CADILLAC SRX 2004 1.G Owners Manual
Manufacturer: CADILLAC, Model Year: 2004, Model line: SRX, Model: CADILLAC SRX 2004 1.GPages: 468, PDF Size: 2.92 MB
Page 391 of 468

{CAUTION:
Someone standing too close during the
procedure could be injured by the jack. If the
spare tire does not slide off the jack
completely, make sure no one is behind you or
on either side of you as you pull the jack out
from the spare.
1. If the cable is not visible, start this procedure
at Step 3.
2. Turn the wrench counterclockwise until
approximately 6 inches (15 cm) of cable is exposed.
3. Attach the wheel wrench to the jack and raise the
jack at least 10 turns.
4. Place the jack under the vehicle, ahead of the rear
bumper. Position the center lift point of the jack
under the center of the spare tire.5. Turn the wheel wrench clockwise to raise the jack
until it lifts the secondary latch spring.
6. Keep raising the jack until the spare tire stops
moving upward and is held �rmly in place, this
lets you know that the secondary latch has
released.
7. Lower the jack by turning the wheel wrench
counterclockwise. Keep lowering the jack until the
spare tire is resting on the wheel wrench.
5-83
Page 392 of 468

8. Grasp the spare tire with both hands and pull it out
from under the vehicle.
9. Reach under the vehicle and remove the wheel
wrench and jack.
10. When the spare tire has been completely lowered,
tilt the retainer and slip it through the wheel
opening.
11. If the cable is hanging, turn the wrench clockwise to
raise the cable back up.
Have the hoist assembly inspected as soon as you can.
You will not be able to store a spare tire using the
hoist assembly until it has been repaired or replaced.
Removing the Flat Tire and Installing
the Spare Tire
1. Using the �at end of the wheel wrench, pry off the
center cap at the notch. Be careful; the edges may
be sharp. Don’t try to remove the cover with
your bare hands.
2. Loosen the wheel nuts - but do not remove
them - using the wheel wrench. (Turn the handle
about 180 degrees, then �ip the handle back to the
starting position. This avoids taking the wrench
off the lug nut for each turn.)
3. Find the jacking
location using the
hoisting notches
located in the plastic
molding. The notches
in the plastic molding
are marked with a
triangle shape to help
you �nd them.
5-84
Page 393 of 468
{CAUTION:
Getting under a vehicle when it is jacked up is
dangerous. If the vehicle slips off the jack you
could be badly injured or killed. Never get
under a vehicle when it is supported only by
a jack.
{CAUTION:
Raising your vehicle with the jack improperly
positioned can damage the vehicle and even
make the vehicle fall. To help avoid personal
injury and vehicle damage, be sure to �t the
jack lift head into the proper location before
raising the vehicle.
{CAUTION:
Lifting a vehicle and getting under it to do
maintenance or repairs is dangerous without
the appropriate safety equipment and training.
The jack provided with your vehicle is
designed only for changing a �at tire. If it is
used for anything else, you or others could be
badly injured or killed if the vehicle slips off
the jack. Use the jack provided with your
vehicle only for changing a �at tire.
4. Attach the wheel wrench to the jack.
5. Turn the wheel wrench clockwise to raise the jack
lift head until the jack just �ts under the vehicle.
5-85
Page 394 of 468
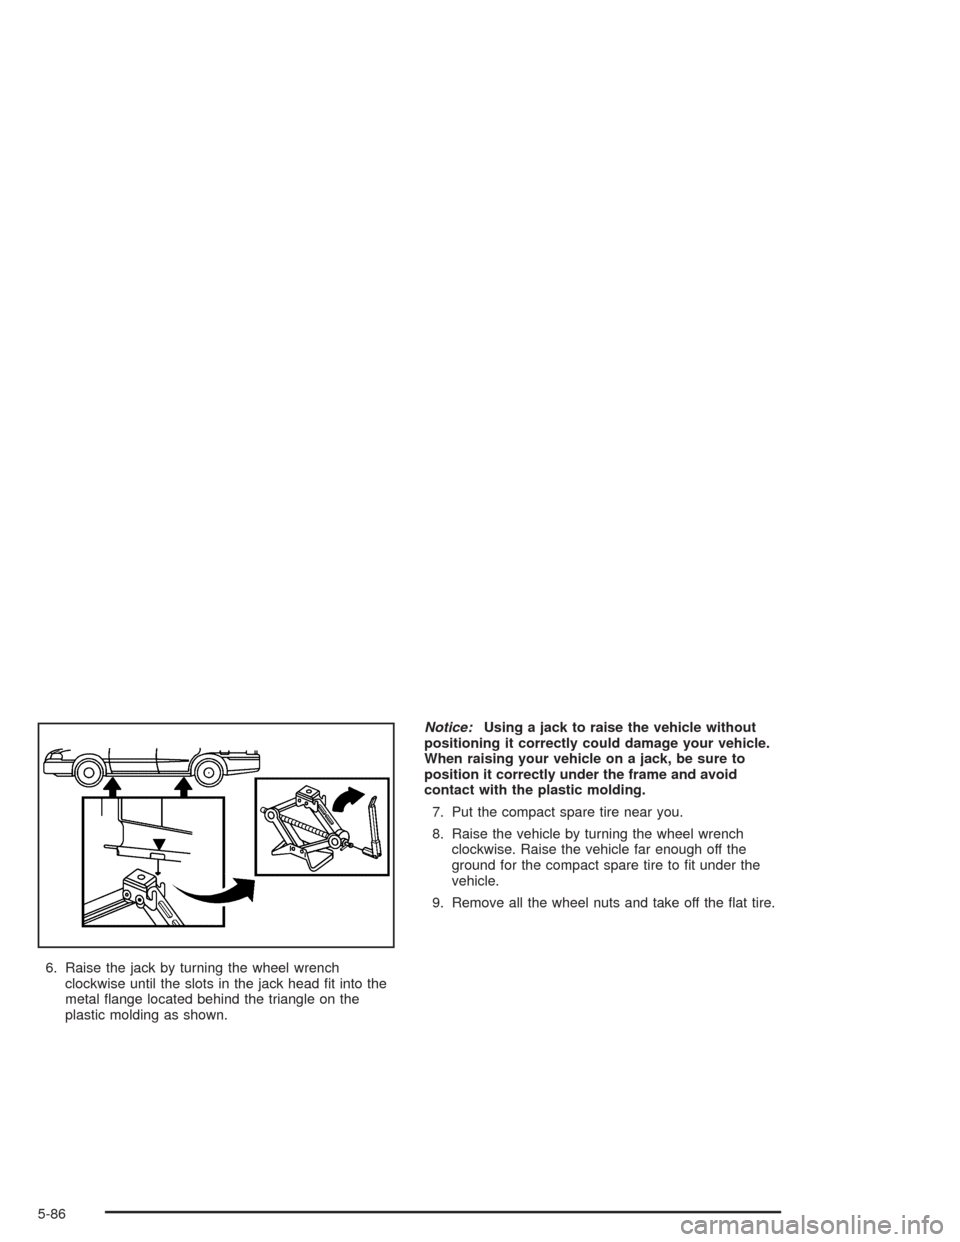
6. Raise the jack by turning the wheel wrench
clockwise until the slots in the jack head �t into the
metal �ange located behind the triangle on the
plastic molding as shown.Notice:Using a jack to raise the vehicle without
positioning it correctly could damage your vehicle.
When raising your vehicle on a jack, be sure to
position it correctly under the frame and avoid
contact with the plastic molding.
7. Put the compact spare tire near you.
8. Raise the vehicle by turning the wheel wrench
clockwise. Raise the vehicle far enough off the
ground for the compact spare tire to �t under the
vehicle.
9. Remove all the wheel nuts and take off the �at tire.
5-86
Page 395 of 468
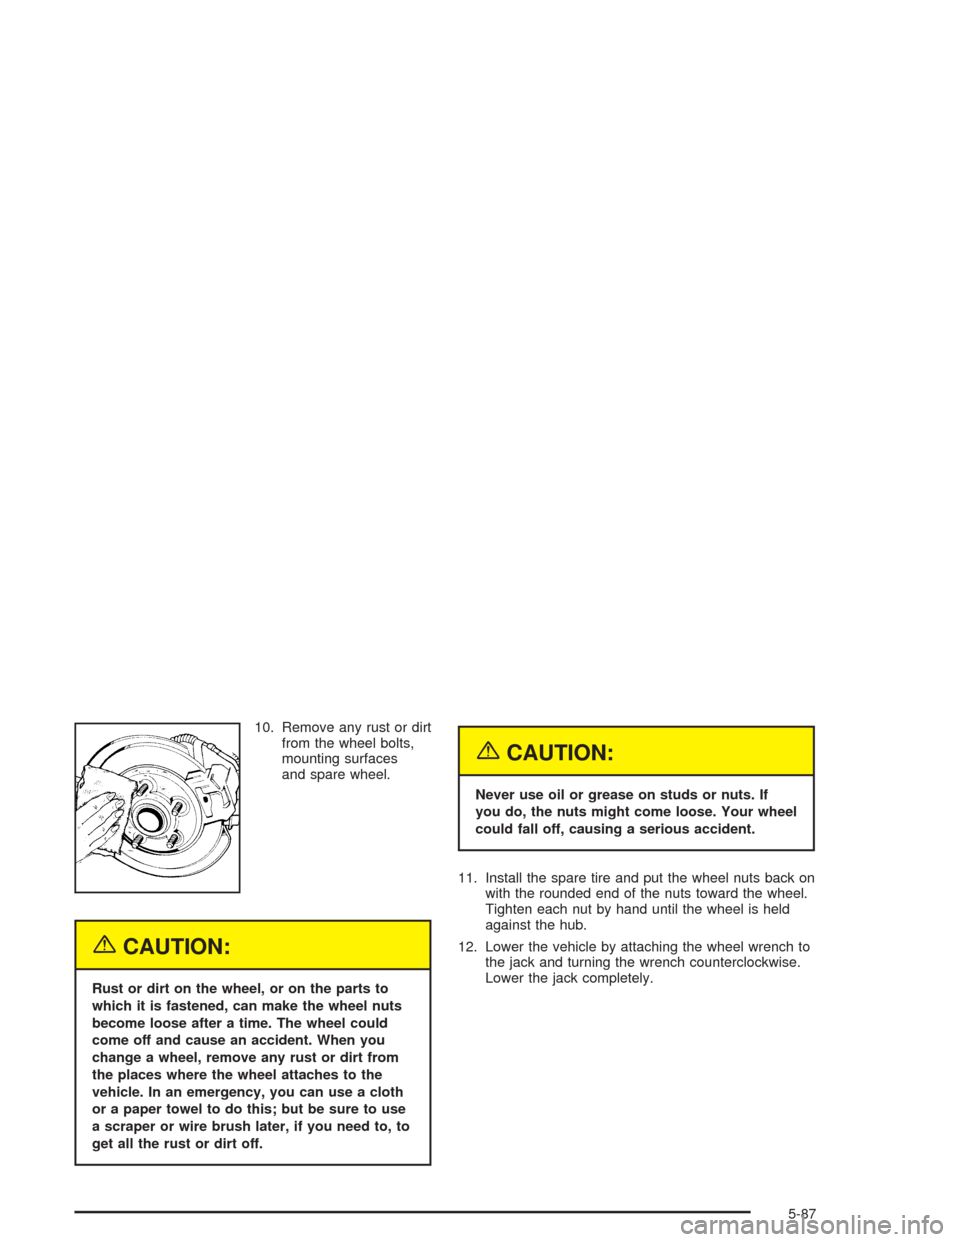
10. Remove any rust or dirt
from the wheel bolts,
mounting surfaces
and spare wheel.
{CAUTION:
Rust or dirt on the wheel, or on the parts to
which it is fastened, can make the wheel nuts
become loose after a time. The wheel could
come off and cause an accident. When you
change a wheel, remove any rust or dirt from
the places where the wheel attaches to the
vehicle. In an emergency, you can use a cloth
or a paper towel to do this; but be sure to use
a scraper or wire brush later, if you need to, to
get all the rust or dirt off.
{CAUTION:
Never use oil or grease on studs or nuts. If
you do, the nuts might come loose. Your wheel
could fall off, causing a serious accident.
11. Install the spare tire and put the wheel nuts back on
with the rounded end of the nuts toward the wheel.
Tighten each nut by hand until the wheel is held
against the hub.
12. Lower the vehicle by attaching the wheel wrench to
the jack and turning the wrench counterclockwise.
Lower the jack completely.
5-87
Page 396 of 468
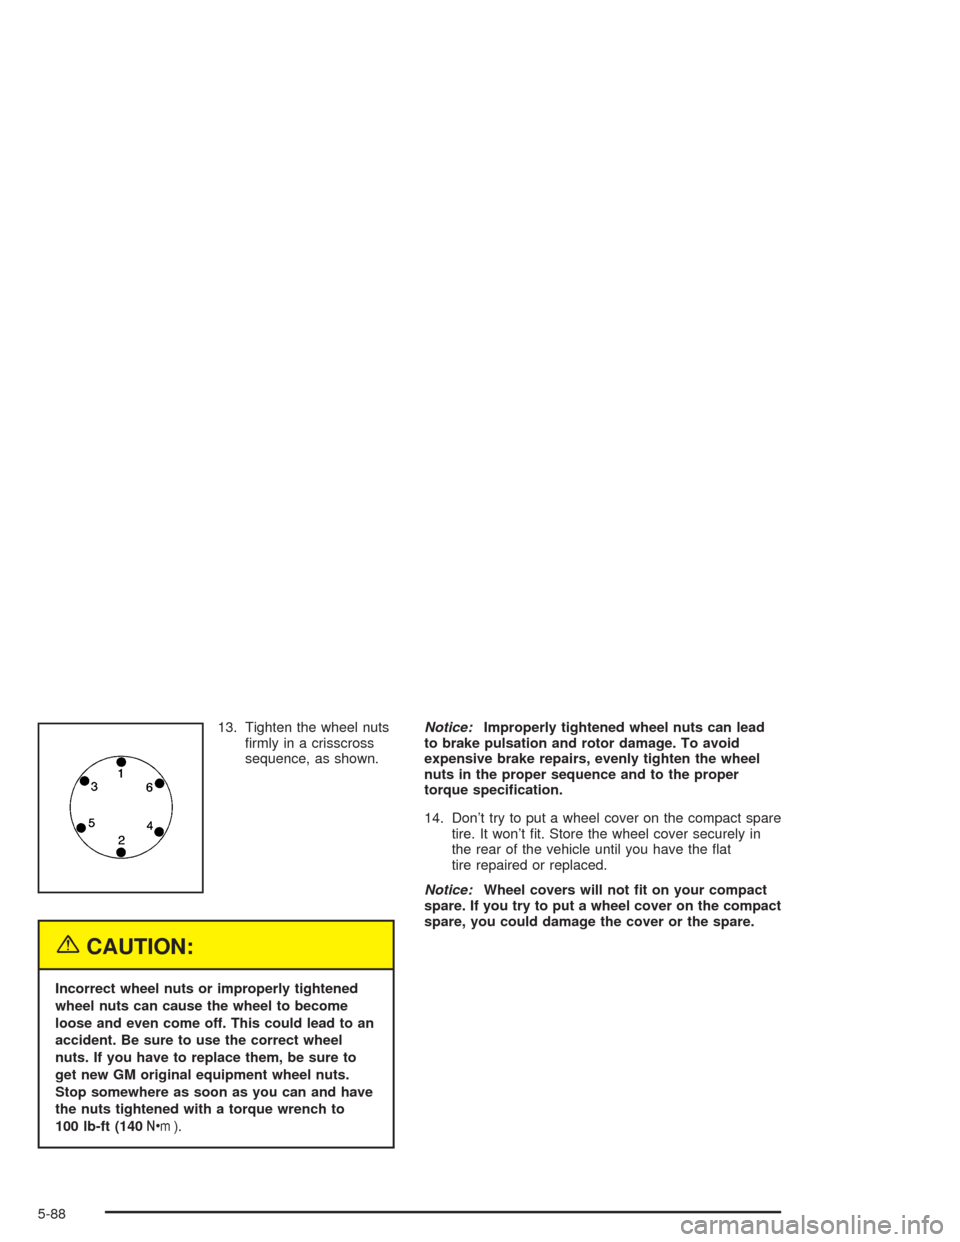
13. Tighten the wheel nuts
�rmly in a crisscross
sequence, as shown.
{CAUTION:
Incorrect wheel nuts or improperly tightened
wheel nuts can cause the wheel to become
loose and even come off. This could lead to an
accident. Be sure to use the correct wheel
nuts. If you have to replace them, be sure to
get new GM original equipment wheel nuts.
Stop somewhere as soon as you can and have
the nuts tightened with a torque wrench to
100 lb-ft (140Y).Notice:Improperly tightened wheel nuts can lead
to brake pulsation and rotor damage. To avoid
expensive brake repairs, evenly tighten the wheel
nuts in the proper sequence and to the proper
torque speci�cation.
14. Don’t try to put a wheel cover on the compact spare
tire. It won’t �t. Store the wheel cover securely in
the rear of the vehicle until you have the �at
tire repaired or replaced.
Notice:Wheel covers will not �t on your compact
spare. If you try to put a wheel cover on the compact
spare, you could damage the cover or the spare.
5-88
Page 397 of 468
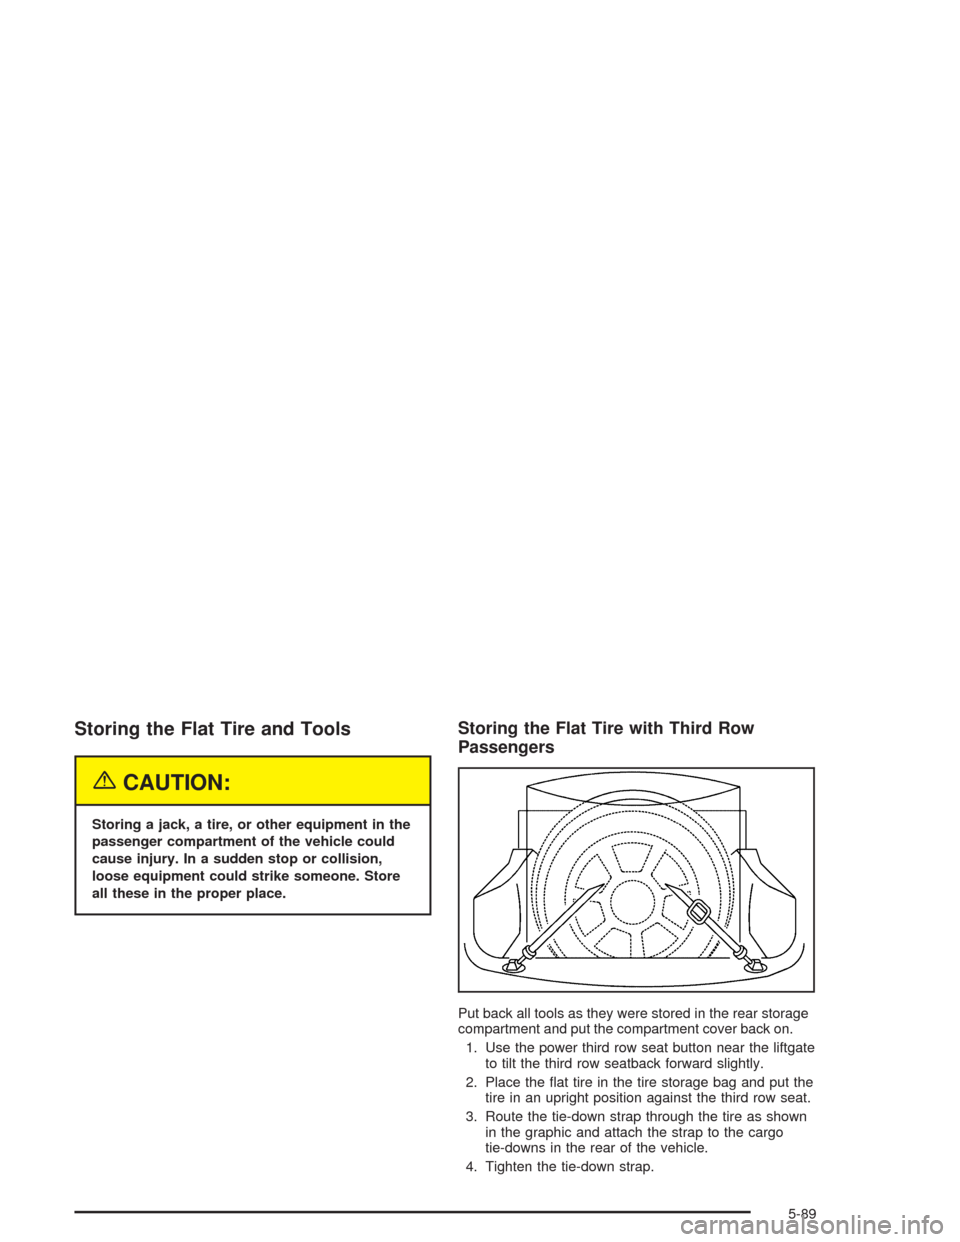
Storing the Flat Tire and Tools
{CAUTION:
Storing a jack, a tire, or other equipment in the
passenger compartment of the vehicle could
cause injury. In a sudden stop or collision,
loose equipment could strike someone. Store
all these in the proper place.
Storing the Flat Tire with Third Row
Passengers
Put back all tools as they were stored in the rear storage
compartment and put the compartment cover back on.
1. Use the power third row seat button near the liftgate
to tilt the third row seatback forward slightly.
2. Place the �at tire in the tire storage bag and put the
tire in an upright position against the third row seat.
3. Route the tie-down strap through the tire as shown
in the graphic and attach the strap to the cargo
tie-downs in the rear of the vehicle.
4. Tighten the tie-down strap.
5-89
Page 398 of 468
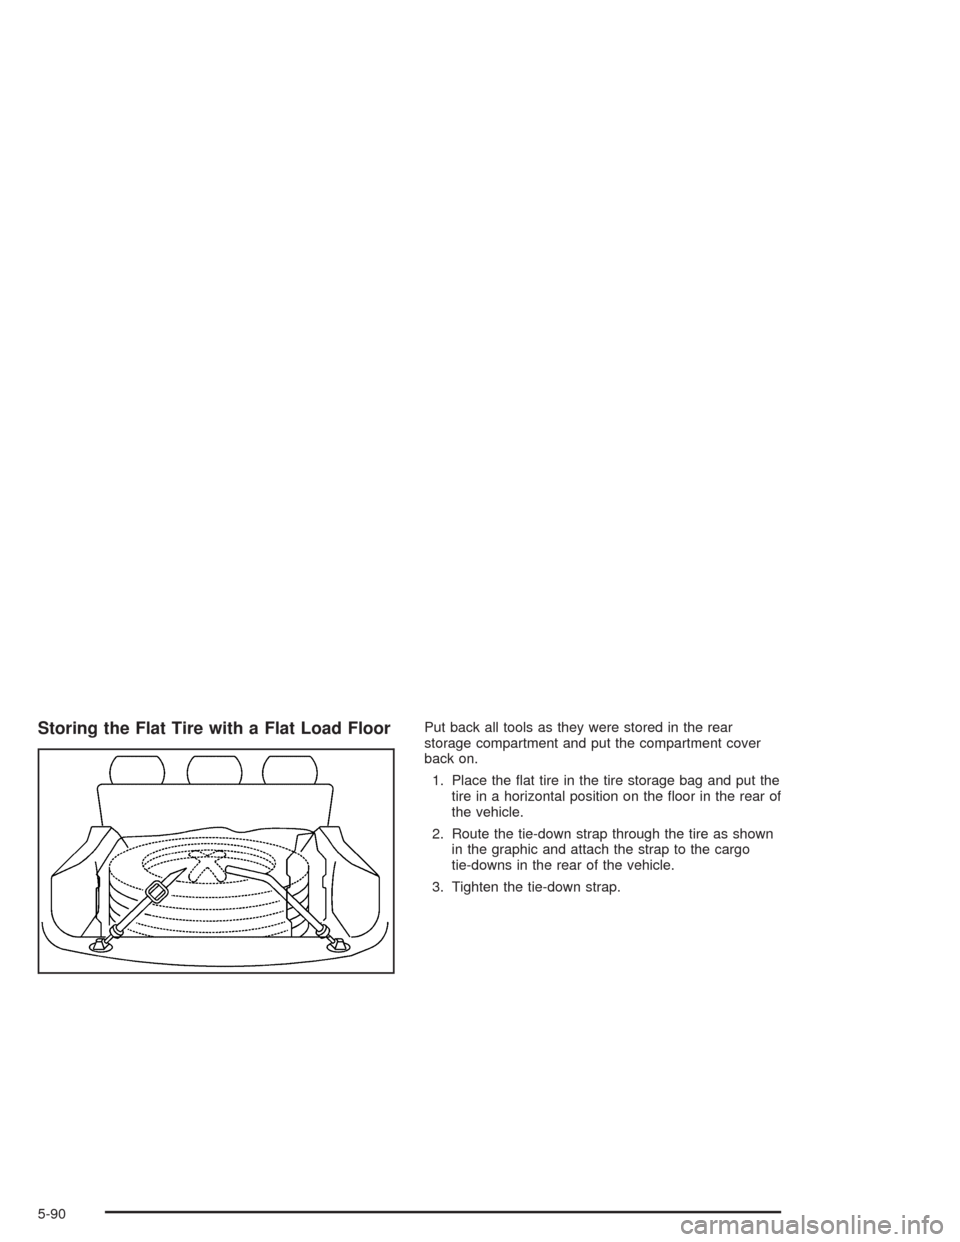
Storing the Flat Tire with a Flat Load FloorPut back all tools as they were stored in the rear
storage compartment and put the compartment cover
back on.
1. Place the �at tire in the tire storage bag and put the
tire in a horizontal position on the �oor in the rear of
the vehicle.
2. Route the tie-down strap through the tire as shown
in the graphic and attach the strap to the cargo
tie-downs in the rear of the vehicle.
3. Tighten the tie-down strap.
5-90
Page 399 of 468
Storing the Spare Tire and Tools
{CAUTION:
Storing a jack, a tire, or other equipment in the
passenger compartment of the vehicle could
cause injury. In a sudden stop or collision,
loose equipment could strike someone. Store
all these in the proper place.
{CAUTION:
The underbody-mounted spare tire needs to be
stored with the valve stem pointing down.
If the spare tire is stored with the valve stem
pointing upwards, its secondary latch won’t
CAUTION: (Continued)
CAUTION: (Continued)
work properly and the spare tire could loosen
and suddenly fall from your vehicle. If this
happened when your vehicle was being
driven, the tire might contact a person or
another vehicle, causing injury and, of course,
damage to itself as well. Be sure the
underbody-mounted spare tire is stored with
its valve stem pointing down.
1. Lay the compact spare tire on the ground at the
rear of the vehicle. Position the compact spare
tire so that the valve stem is pointed down facing
the rear of the vehicle.
2. Lower the cable to the ground. See “Removing the
Spare Tire” earlier in this section.
5-91
Page 400 of 468
3. Tilt the retainer downward and slip it through the
center hole of the spare tire.
Make sure the retainer is fully seated across the
underside of the wheel.
4. Attach the wheel wrench to the hoist shaft.
5. Turn the wheel wrench clockwise to lift the
spare tire.
6. When the tire is almost in the stored position, turn
the tire so that the valve stem is towards the rear of
the vehicle.
This will help when you check and maintain tire
pressure in the spare.
7. Raise the tire fully against the underside of the
vehicle. Continue turning the wheel wrench until
you feel more than two clicks. This indicates that the
compact spare tire is secure and the cable is
tight. The spare tire hoist cannot be overtightened.
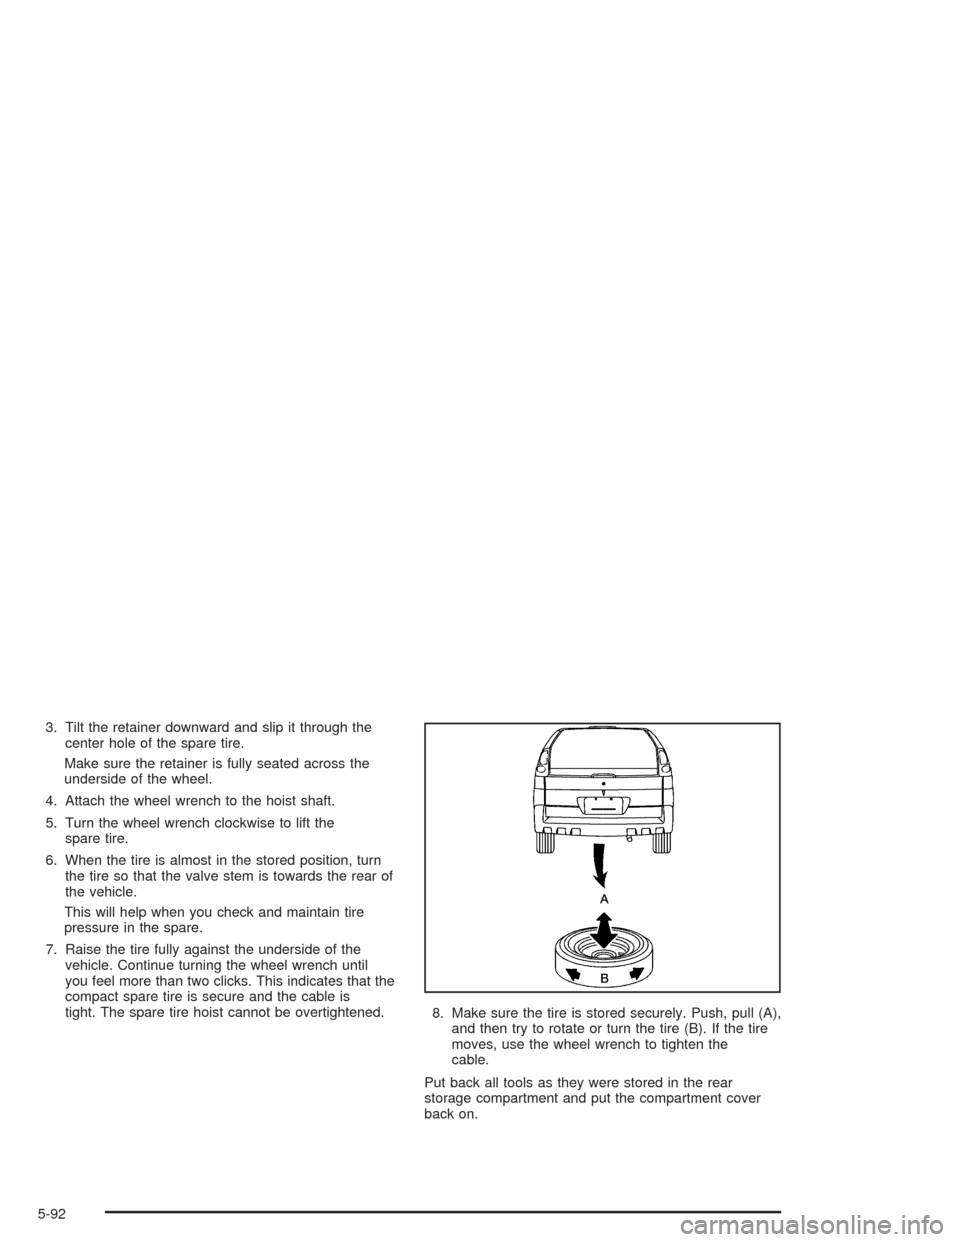
8. Make sure the tire is stored securely. Push, pull (A),
and then try to rotate or turn the tire (B). If the tire
moves, use the wheel wrench to tighten the
cable.
Put back all tools as they were stored in the rear
storage compartment and put the compartment cover
back on.
5-92