load CADILLAC SRX 2013 2.G Owner's Manual
[x] Cancel search | Manufacturer: CADILLAC, Model Year: 2013, Model line: SRX, Model: CADILLAC SRX 2013 2.GPages: 432, PDF Size: 7.13 MB
Page 209 of 432
Black plate (13,1)Cadillac SRX Owner Manual - 2013 - CRC - 11/9/12
Driving and Operating 9-13
seating positions. The combined
weight of the driver, passengers,
and cargo should never exceed
the vehicle's capacity weight.
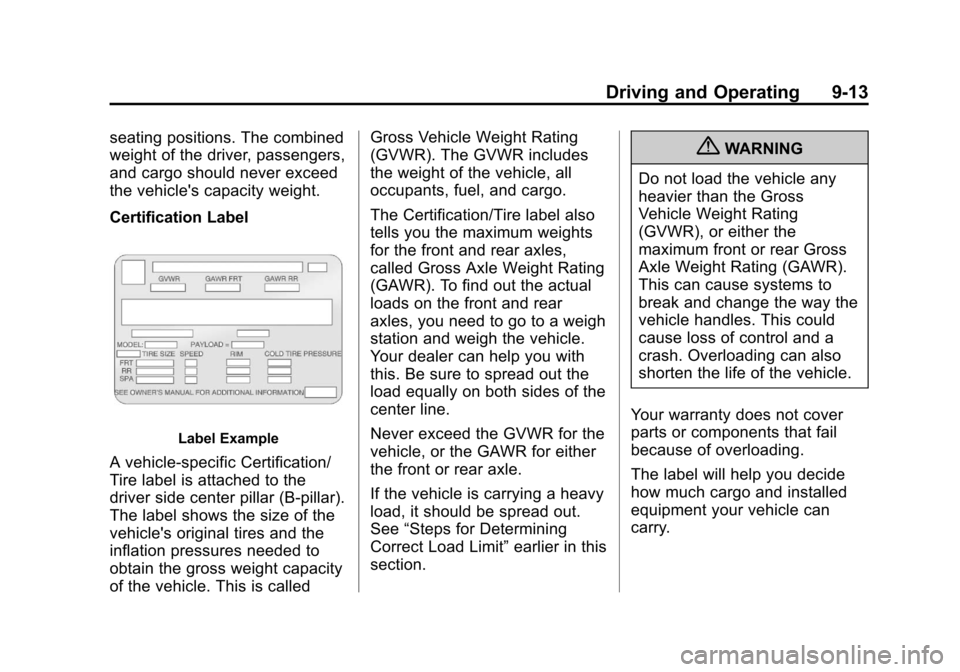
Certification Label
Label Example
A vehicle-specific Certification/
Tire label is attached to the
driver side center pillar (B-pillar).
The label shows the size of the
vehicle's original tires and the
inflation pressures needed to
obtain the gross weight capacity
of the vehicle. This is calledGross Vehicle Weight Rating
(GVWR). The GVWR includes
the weight of the vehicle, all
occupants, fuel, and cargo.
The Certification/Tire label also
tells you the maximum weights
for the front and rear axles,
called Gross Axle Weight Rating
(GAWR). To find out the actual
loads on the front and rear
axles, you need to go to a weigh
station and weigh the vehicle.
Your dealer can help you with
this. Be sure to spread out the
load equally on both sides of the
center line.
Never exceed the GVWR for the
vehicle, or the GAWR for either
the front or rear axle.
If the vehicle is carrying a heavy
load, it should be spread out.
See
“Steps for Determining
Correct Load Limit” earlier in this
section.
{WARNING
Do not load the vehicle any
heavier than the Gross
Vehicle Weight Rating
(GVWR), or either the
maximum front or rear Gross
Axle Weight Rating (GAWR).
This can cause systems to
break and change the way the
vehicle handles. This could
cause loss of control and a
crash. Overloading can also
shorten the life of the vehicle.
Your warranty does not cover
parts or components that fail
because of overloading.
The label will help you decide
how much cargo and installed
equipment your vehicle can
carry.
Page 210 of 432
Black plate (14,1)Cadillac SRX Owner Manual - 2013 - CRC - 11/9/12
9-14 Driving and Operating
Using heavier suspension
components to get added
durability might not change your
weight ratings. Ask your dealer
to help you load your vehicle the
right way.
If you put things inside your
vehicle–like suitcases,
tools, packages, or anything
else –they will go as fast as the
vehicle goes. If you have to stop
or turn quickly, or if there is a
crash, they will keep going.
{WARNING
Things inside the vehicle can
strike and injure people in a
sudden stop or turn, or in a
crash.
.Put things in the cargo
area of the vehicle. In the
cargo area, put them as
(Continued)
WARNING (Continued) far forward as possible.
Try to spread the weight
evenly.
.Never stack heavier
things, like suitcases,
inside the vehicle so that
some of them are above
the tops of the seats.
.Do not leave an
unsecured child restraint
in the vehicle.
.Secure loose items in the
vehicle.
.Do not leave a seat folded
down unless needed.
Starting and
Operating
New Vehicle Break-In
Notice: The vehicle does not
need an elaborate break-in. But it
will perform better in the long run
if you follow these guidelines:
.Do not drive at any one
constant speed, fast or slow,
for the first 805 km (500 mi).
Do not make full-throttle
starts. Avoid downshifting to
brake or slow the vehicle.
.During the first 1 000 km
(600 mi), avoid using more
than moderate acceleration
in lower gears and avoid
vehicle speeds above
110 km/h (68 mph).
Page 211 of 432
Black plate (15,1)Cadillac SRX Owner Manual - 2013 - CRC - 11/9/12
Driving and Operating 9-15
.Between the first 1 000 km
(600 mi) and 5 000 km
(3,000 mi), heavy
acceleration in lower gears
can be used. Vehicle speeds
above 110 km/h (68 mph)
should be limited to
five minutes per use.
.Avoid making hard stops for
the first 322 km (200 mi) or
so. During this time the new
brake linings are not yet
broken in. Hard stops with
new linings can mean
premature wear and earlier
replacement. Follow this
breaking-in guideline every
time you get new brake
linings.
.Do not tow a trailer during
break-in. SeeDriving
Characteristics and Towing
Tips on page 9‑65 for the
trailer towing capabilities of
your vehicle and more
information. Following break‐in, engine speed
and load can be gradually
increased.
Adjustable Throttle and
Brake Pedal
If the vehicle has this feature, the
position of the throttle and brake
pedals can be adjusted.
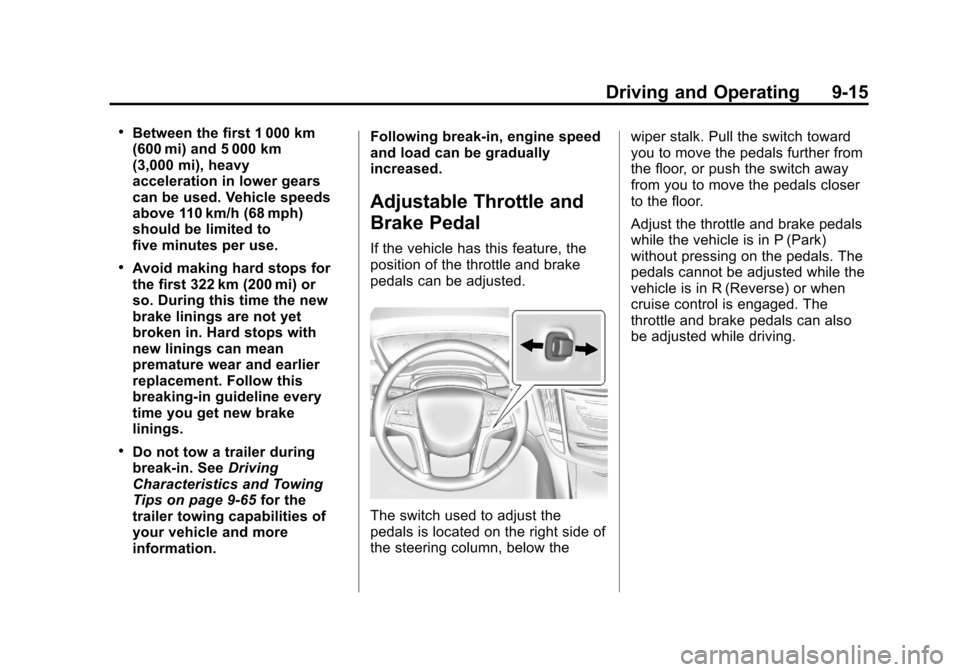
The switch used to adjust the
pedals is located on the right side of
the steering column, below the
wiper stalk. Pull the switch toward
you to move the pedals further from
the floor, or push the switch away
from you to move the pedals closer
to the floor.
Adjust the throttle and brake pedals
while the vehicle is in P (Park)
without pressing on the pedals. The
pedals cannot be adjusted while the
vehicle is in R (Reverse) or when
cruise control is engaged. The
throttle and brake pedals can also
be adjusted while driving.
Page 233 of 432
Black plate (37,1)Cadillac SRX Owner Manual - 2013 - CRC - 11/9/12
Driving and Operating 9-37
Reducing Speed While Cruise
Control is at a Set Speed
If the cruise control system is
already activated:
.Move the control toward
SET−and hold until the desired
lower speed is reached, then
release it.
.To decrease the vehicle speed in
small amounts, move the control
toward SET− briefly. Each time
this is done, the vehicle goes
about 1.6 km/h (1 mph) slower.
The cruise control system may
automatically brake to slow the
vehicle down.
Passing Another Vehicle While
Using Cruise Control
Use the accelerator pedal to
increase the vehicle speed. When
you take your foot off the pedal,
the vehicle will slow down to the
previous set cruise speed. Using Cruise Control on Hills
How well the cruise control will work
on hills depends upon the vehicle
speed, load, and the steepness of
the hills. When going up steep hills,
you might have to step on the
accelerator pedal to maintain the
vehicle speed. When going
downhill, you might have to brake or
shift to a lower gear to keep the
vehicle speed down. If the brake is
applied, the cruise control
disengages.
Ending Cruise Control
There are three ways to end cruise
control:
.Step lightly on the brake pedal.
.Press*.
.PressJ.
Erasing Speed Memory
The cruise control set speed is
erased from memory if
Jis
pressed or if the ignition is
turned off.
Adaptive Cruise Control
For vehicles with Adaptive Cruise
Control (ACC), it allows the driver to
select the cruise control set speed
and following gap. Read this entire
section before using this system.
The following gap is the following
time between your vehicle and a
vehicle detected directly ahead in
your path moving in the same
direction. If no vehicle is detected in
your path, ACC works like regular
cruise control. ACC uses camera
and radar sensors. See Radio
Frequency Statement on
page 13‑21 for information
regarding Part 15 of the Federal
Communications Commission (FCC)
rules and Industry Canada
Standards RSS-GEN/210/220/310.
Page 262 of 432
Black plate (66,1)Cadillac SRX Owner Manual - 2013 - CRC - 11/9/12
9-66 Driving and Operating
Towing a trailer requires a certain
amount of experience. The
combination you are driving is
longer and not as responsive as the
vehicle itself. Get acquainted with
the handling and braking of the rig
before setting out for the open road.
Before starting, check all trailer hitch
parts and attachments, safety
chains, electrical connectors, lamps,
tires and mirrors. If the trailer
has electric brakes, start the
combination moving and then apply
the trailer brake controller by hand
to be sure the brakes work.
During the trip, check occasionally
to be sure that the load is secure
and the lamps and any trailer
brakes still work.Towing with a Stability Control
System
When towing, the sound of the
stability control system might be
heard. The system is reacting to the
vehicle movement caused by the
trailer, which mainly occurs during
cornering. This is normal when
towing heavier trailers.
Following Distance
Stay at least twice as far behind the
vehicle ahead as you would when
driving the vehicle without a trailer.
This can help to avoid situations
that require heavy braking and
sudden turns.
Passing
More passing distance is needed
when towing a trailer. Because the
rig is longer, it is necessary to go
farther beyond the passed vehicle
before returning to the lane.
Backing Up
Hold the bottom of the steering
wheel with one hand. To move the
trailer to the left, move your hand to
the left. To move the trailer to the
right, move your hand to the right.
Always back up slowly and,
if possible, have someone
guide you.
Making Turns
Notice:Making very sharp turns
while trailering could cause the
trailer to come in contact with the
vehicle. The vehicle could be
damaged. Avoid making very
sharp turns while trailering.
When turning with a trailer, make
wider turns than normal so the
trailer will not strike soft shoulders,
curbs, road signs, trees or other
objects. Use the turn signal well in
advance and avoid jerky or sudden
maneuvers.
Page 263 of 432
Black plate (67,1)Cadillac SRX Owner Manual - 2013 - CRC - 11/9/12
Driving and Operating 9-67
Turn Signals When Towing a
Trailer
The turn signal indicators on the
instrument panel flash whenever
signaling a turn or lane change.
Properly hooked up, the trailer
lamps also flash, telling other
drivers the vehicle is turning,
changing lanes or stopping.
When towing a trailer, the arrows on
the instrument panel flash for turns
even if the bulbs on the trailer are
burned out. Check occasionally to
be sure the trailer bulbs are still
working.
Driving on Grades
Reduce speed and shift to a
lower gear before starting down a
long or steep downgrade. If the
transmission is not shifted down, the
brakes might have to be used so
much that they would get hot and no
longer work well.
The vehicle can tow in D (Drive).
Use a lower gear if the transmission
shifts too often.When towing at high altitude on
steep uphill grades, engine coolant
boils at a lower temperature than at
normal altitudes. If the engine is
turned off immediately after towing
at high altitude on steep uphill
grades, the vehicle could show
signs similar to engine overheating.
To avoid this, let the engine run
while parked, preferably on level
ground, with the transmission in
P (Park) for a few minutes before
turning the engine off. If the
overheat warning comes on, see
Engine Overheating on page 10‑18.
Parking on Hills
{WARNING
Parking the vehicle on a hill with
the trailer attached can be
dangerous. If something goes
wrong, the rig could start to move.
People can be injured, and both
the vehicle and the trailer can be
damaged. When possible, always
park the rig on a flat surface.
If parking the rig on a hill:
1. Press the brake pedal, but do
not shift into P (Park) yet. Turn
the wheels into the curb if facing
downhill or into traffic if facing
uphill.
2. Have someone place chocks under the trailer wheels.
3. When the wheel chocks are in place, release the brake pedal
until the chocks absorb the load.
4. Reapply the brake pedal. Then apply the parking brake and shift
into P (Park).
5. Release the brake pedal.
Leaving After Parking on a Hill
1. Apply and hold the brake pedal while you:
.Start the engine.
.Shift into a gear.
.Release the parking brake.
2. Let up on the brake pedal.
Page 265 of 432
Black plate (69,1)Cadillac SRX Owner Manual - 2013 - CRC - 11/9/12
Driving and Operating 9-69
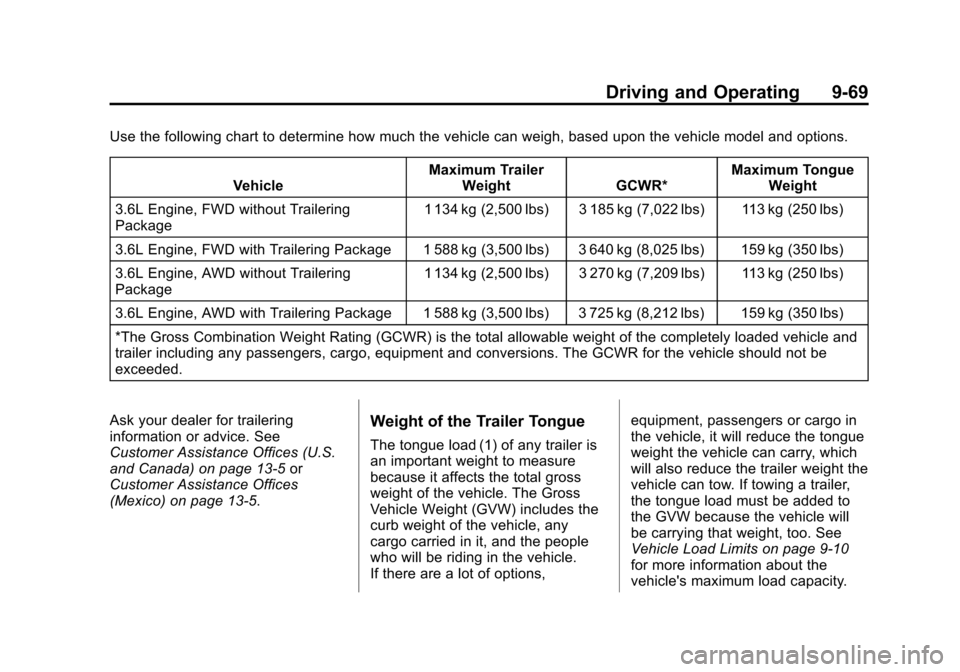
Use the following chart to determine how much the vehicle can weigh, based upon the vehicle model and options.Vehicle Maximum Trailer
Weight GCWR* Maximum Tongue
Weight
3.6L Engine, FWD without Trailering
Package 1 134 kg (2,500 lbs) 3 185 kg (7,022 lbs) 113 kg (250 lbs)
3.6L Engine, FWD with Trailering Package 1 588 kg (3,500 lbs) 3 640 kg (8,025 lbs) 159 kg (350 lbs)
3.6L Engine, AWD without Trailering
Package 1 134 kg (2,500 lbs) 3 270 kg (7,209 lbs) 113 kg (250 lbs)
3.6L Engine, AWD with Trailering Package 1 588 kg (3,500 lbs) 3 725 kg (8,212 lbs) 159 kg (350 lbs)
*The Gross Combination Weight Rating (GCWR) is the total allowable weight of the completely loaded vehicle and
trailer including any passengers, cargo, equipment and conversions. The GCWR for the vehicle should not be
exceeded.
Ask your dealer for trailering
information or advice. See
Customer Assistance Offices (U.S.
and Canada) on page 13‑5 or
Customer Assistance Offices
(Mexico) on page 13‑5.
Weight of the Trailer Tongue
The tongue load (1) of any trailer is
an important weight to measure
because it affects the total gross
weight of the vehicle. The Gross
Vehicle Weight (GVW) includes the
curb weight of the vehicle, any
cargo carried in it, and the people
who will be riding in the vehicle.
If there are a lot of options, equipment, passengers or cargo in
the vehicle, it will reduce the tongue
weight the vehicle can carry, which
will also reduce the trailer weight the
vehicle can tow. If towing a trailer,
the tongue load must be added to
the GVW because the vehicle will
be carrying that weight, too. See
Vehicle Load Limits on page 9‑10
for more information about the
vehicle's maximum load capacity.
Page 266 of 432
Black plate (70,1)Cadillac SRX Owner Manual - 2013 - CRC - 11/9/12
9-70 Driving and Operating
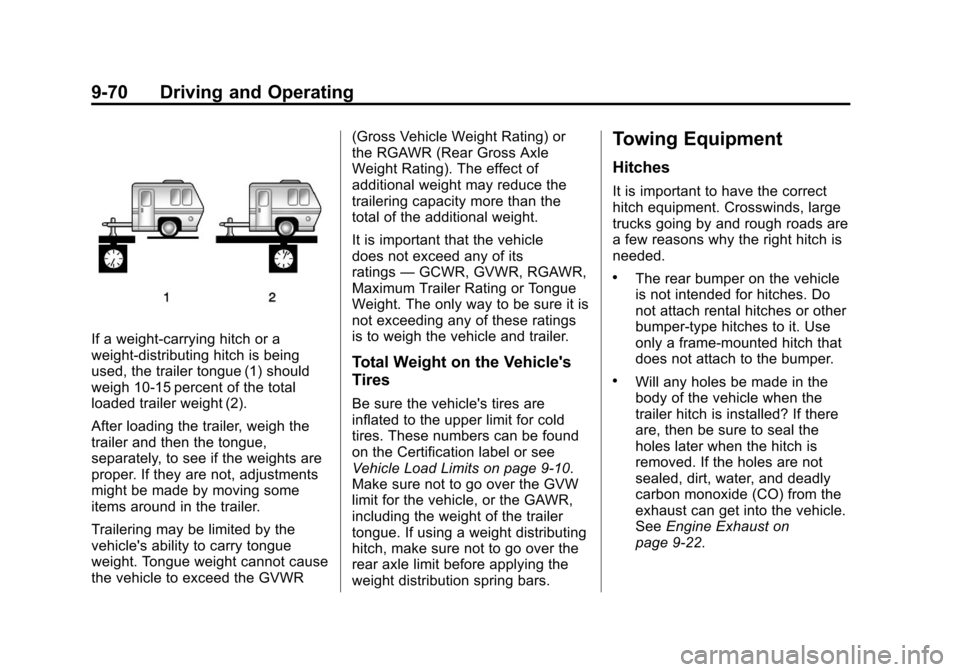
If a weight-carrying hitch or a
weight-distributing hitch is being
used, the trailer tongue (1) should
weigh 10-15 percent of the total
loaded trailer weight (2).
After loading the trailer, weigh the
trailer and then the tongue,
separately, to see if the weights are
proper. If they are not, adjustments
might be made by moving some
items around in the trailer.
Trailering may be limited by the
vehicle's ability to carry tongue
weight. Tongue weight cannot cause
the vehicle to exceed the GVWR(Gross Vehicle Weight Rating) or
the RGAWR (Rear Gross Axle
Weight Rating). The effect of
additional weight may reduce the
trailering capacity more than the
total of the additional weight.
It is important that the vehicle
does not exceed any of its
ratings
—GCWR, GVWR, RGAWR,
Maximum Trailer Rating or Tongue
Weight. The only way to be sure it is
not exceeding any of these ratings
is to weigh the vehicle and trailer.
Total Weight on the Vehicle's
Tires
Be sure the vehicle's tires are
inflated to the upper limit for cold
tires. These numbers can be found
on the Certification label or see
Vehicle Load Limits on page 9‑10.
Make sure not to go over the GVW
limit for the vehicle, or the GAWR,
including the weight of the trailer
tongue. If using a weight distributing
hitch, make sure not to go over the
rear axle limit before applying the
weight distribution spring bars.
Towing Equipment
Hitches
It is important to have the correct
hitch equipment. Crosswinds, large
trucks going by and rough roads are
a few reasons why the right hitch is
needed.
.The rear bumper on the vehicle
is not intended for hitches. Do
not attach rental hitches or other
bumper-type hitches to it. Use
only a frame-mounted hitch that
does not attach to the bumper.
.Will any holes be made in the
body of the vehicle when the
trailer hitch is installed? If there
are, then be sure to seal the
holes later when the hitch is
removed. If the holes are not
sealed, dirt, water, and deadly
carbon monoxide (CO) from the
exhaust can get into the vehicle.
See Engine Exhaust on
page 9‑22.
Page 267 of 432
Black plate (71,1)Cadillac SRX Owner Manual - 2013 - CRC - 11/9/12
Driving and Operating 9-71
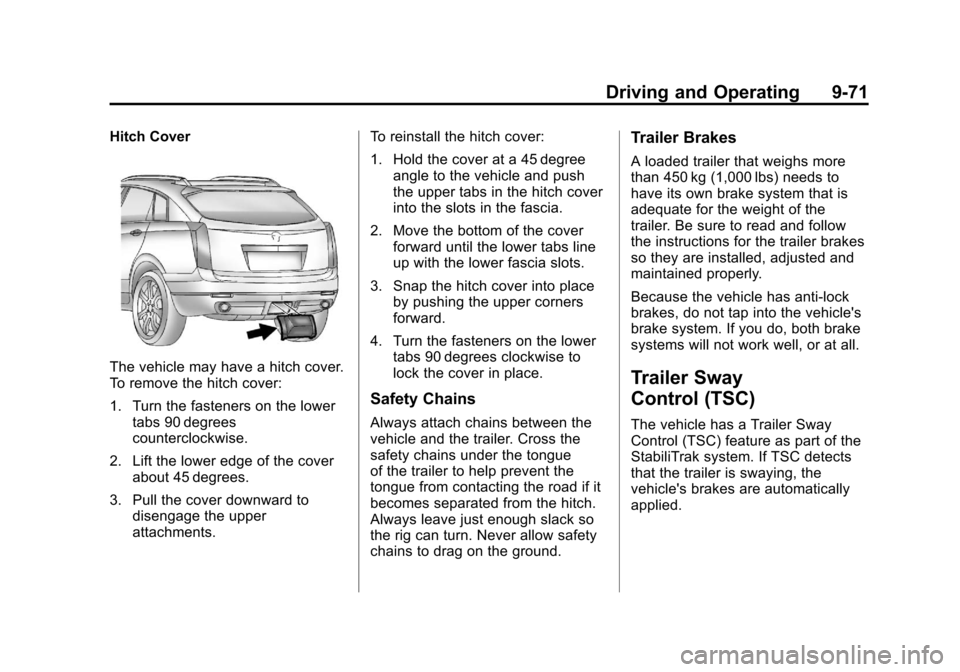
Hitch Cover
The vehicle may have a hitch cover.
To remove the hitch cover:
1. Turn the fasteners on the lowertabs 90 degrees
counterclockwise.
2. Lift the lower edge of the cover about 45 degrees.
3. Pull the cover downward to disengage the upper
attachments. To reinstall the hitch cover:
1. Hold the cover at a 45 degree
angle to the vehicle and push
the upper tabs in the hitch cover
into the slots in the fascia.
2. Move the bottom of the cover forward until the lower tabs line
up with the lower fascia slots.
3. Snap the hitch cover into place by pushing the upper corners
forward.
4. Turn the fasteners on the lower tabs 90 degrees clockwise to
lock the cover in place.
Safety Chains
Always attach chains between the
vehicle and the trailer. Cross the
safety chains under the tongue
of the trailer to help prevent the
tongue from contacting the road if it
becomes separated from the hitch.
Always leave just enough slack so
the rig can turn. Never allow safety
chains to drag on the ground.
Trailer Brakes
A loaded trailer that weighs more
than 450 kg (1,000 lbs) needs to
have its own brake system that is
adequate for the weight of the
trailer. Be sure to read and follow
the instructions for the trailer brakes
so they are installed, adjusted and
maintained properly.
Because the vehicle has anti-lock
brakes, do not tap into the vehicle's
brake system. If you do, both brake
systems will not work well, or at all.
Trailer Sway
Control (TSC)
The vehicle has a Trailer Sway
Control (TSC) feature as part of the
StabiliTrak system. If TSC detects
that the trailer is swaying, the
vehicle's brakes are automatically
applied.
Page 269 of 432
Black plate (1,1)Cadillac SRX Owner Manual - 2013 - CRC - 11/9/12
Vehicle Care 10-1
Vehicle Care
General Information
General Information . . . . . . . . . . 10-2
California Proposition65 Warning . . . . . . . . . . . . . . . . . 10-3
California Perchlorate Materials Requirements . . . . 10-3
Accessories and Modifications . . . . . . . . . . . . . . . 10-3
Vehicle Checks
Doing Your OwnService Work . . . . . . . . . . . . . . . 10-4
Hood . . . . . . . . . . . . . . . . . . . . . . . . 10-5
Engine Compartment Overview . . . . . . . . . . . . . . . . . . . 10-6
Engine Cover . . . . . . . . . . . . . . . . 10-7
Engine Oil . . . . . . . . . . . . . . . . . . . 10-8
Engine Oil Life System . . . . . 10-10
Automatic Transmission Fluid . . . . . . . . . . . . . . . . . . . . . . 10-11
Engine Air Cleaner/Filter . . . . 10-11
Cooling System . . . . . . . . . . . . 10-13
Engine Coolant . . . . . . . . . . . . . 10-14 Engine Overheating . . . . . . . . 10-18
Power Steering Fluid . . . . . . . 10-19
Washer Fluid . . . . . . . . . . . . . . . 10-20
Brakes . . . . . . . . . . . . . . . . . . . . . 10-20
Brake Fluid . . . . . . . . . . . . . . . . . 10-21
Battery . . . . . . . . . . . . . . . . . . . . . 10-23
All-Wheel Drive . . . . . . . . . . . . . 10-23
Starter Switch Check . . . . . . . 10-23
Automatic Transmission Shift
Lock Control Function
Check . . . . . . . . . . . . . . . . . . . . . 10-24
Park Brake and P (Park) Mechanism Check . . . . . . . . 10-24
Wiper Blade Replacement . . . . . . . . . . . . . . 10-25
Headlamp Aiming
Headlamp Aiming . . . . . . . . . . 10-26
Bulb Replacement
Bulb Replacement . . . . . . . . . . 10-27
Halogen Bulbs . . . . . . . . . . . . . . 10-27
High Intensity Discharge(HID) Lighting . . . . . . . . . . . . . 10-27
Headlamps . . . . . . . . . . . . . . . . . 10-27
Turn Signal Lamps . . . . . . . . . 10-31 Back-Up Lamps . . . . . . . . . . . . 10-32
License Plate Lamp . . . . . . . . 10-33
Replacement Bulbs . . . . . . . . . 10-33
Electrical System
Electrical System
Overload . . . . . . . . . . . . . . . . . . 10-34
Fuses and Circuit Breakers . . . . . . . . . . . . . . . . . . 10-34
Engine Compartment Fuse Block . . . . . . . . . . . . . . . . . . . . . 10-35
Instrument Panel Fuse Block . . . . . . . . . . . . . . . . . . . . . 10-37
Rear Compartment Fuse Block . . . . . . . . . . . . . . . . . . . . . 10-39
Wheels and Tires
Tires . . . . . . . . . . . . . . . . . . . . . . . . 10-42
All-Season Tires . . . . . . . . . . . . 10-43
Winter Tires . . . . . . . . . . . . . . . . 10-44
Summer Tires . . . . . . . . . . . . . . 10-44
Tire Sidewall Labeling . . . . . . 10-44
Tire Designations . . . . . . . . . . . 10-47
Tire Terminology andDefinitions . . . . . . . . . . . . . . . . 10-48
Tire Pressure . . . . . . . . . . . . . . . 10-51