clock CADILLAC SRX 2016 2.G User Guide
[x] Cancel search | Manufacturer: CADILLAC, Model Year: 2016, Model line: SRX, Model: CADILLAC SRX 2016 2.GPages: 319, PDF Size: 3.29 MB
Page 249 of 319
Cadillac SRX Owner Manual (GMNA-Localizing-MidEast-9369636) - 2016 -
crc - 6/1/15
248 Vehicle Care
6. Turn the turn signal lamp bulbsocket counterclockwise to
remove it from the taillamp
assembly.
7. Pull the bulb straight out from the socket.
8. Press a new bulb into the socket, insert it into the taillamp
assembly, and turn the bulb
socket clockwise until it clicks.
9. Reinstall the taillamp assembly and tighten the screws.
10. Reinstall the taillamp cover by snapping it into place.
11. Push the push pin to secure the taillamp cover.
Back-Up Lamps
This vehicle has LED back‐up and
rear fog lamps. For replacement of
these lamps, contact your dealer.
License Plate Lamp
To replace one of these bulbs:
1. Open the liftgate. See Liftgate
0 33.
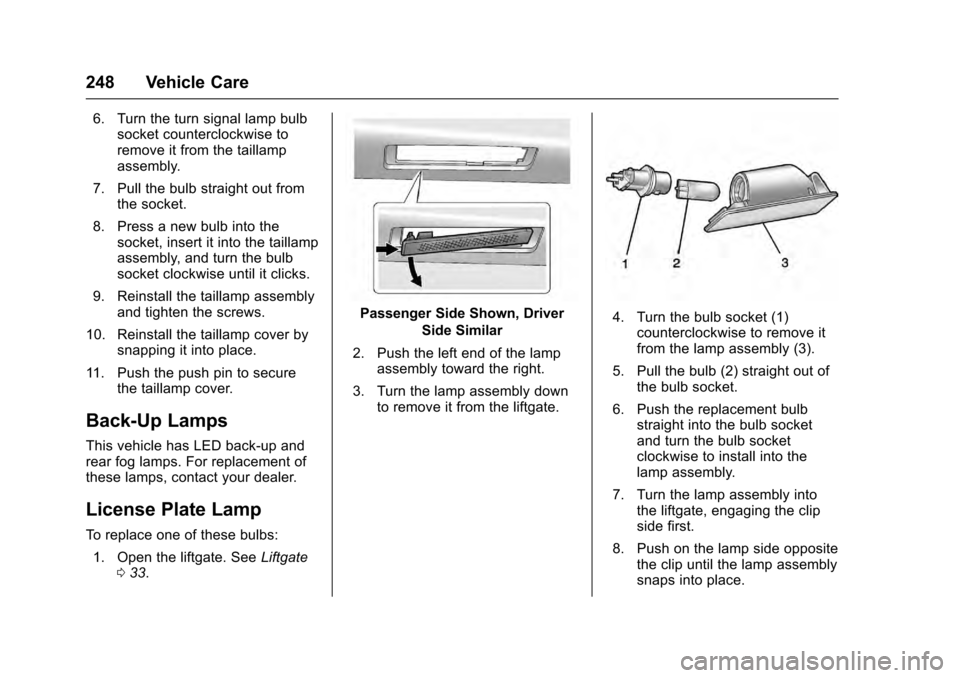
Passenger Side Shown, Driver
Side Similar
2. Push the left end of the lamp assembly toward the right.
3. Turn the lamp assembly down to remove it from the liftgate.4. Turn the bulb socket (1)counterclockwise to remove it
from the lamp assembly (3).
5. Pull the bulb (2) straight out of the bulb socket.
6. Push the replacement bulb straight into the bulb socket
and turn the bulb socket
clockwise to install into the
lamp assembly.
7. Turn the lamp assembly into the liftgate, engaging the clip
side first.
8. Push on the lamp side opposite the clip until the lamp assembly
snaps into place.
Page 275 of 319
Cadillac SRX Owner Manual (GMNA-Localizing-MidEast-9369636) - 2016 -
crc - 6/1/15
274 Vehicle Care
1. Do a safety check beforeproceeding. See If a Tire Goes
Flat 0271 for more information.
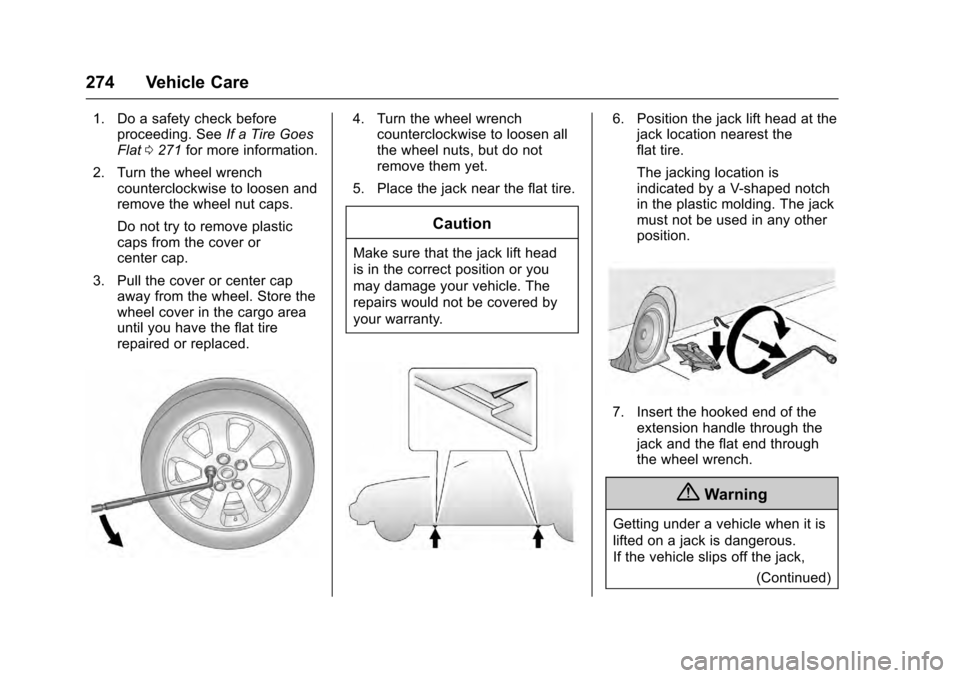
2. Turn the wheel wrench counterclockwise to loosen and
remove the wheel nut caps.
Do not try to remove plastic
caps from the cover or
center cap.
3. Pull the cover or center cap away from the wheel. Store the
wheel cover in the cargo area
until you have the flat tire
repaired or replaced.4. Turn the wheel wrenchcounterclockwise to loosen all
the wheel nuts, but do not
remove them yet.
5. Place the jack near the flat tire.
Caution
Make sure that the jack lift head
is in the correct position or you
may damage your vehicle. The
repairs would not be covered by
your warranty.
6. Position the jack lift head at the jack location nearest the
flat tire.
The jacking location is
indicated by a V-shaped notch
in the plastic molding. The jack
must not be used in any other
position.
7. Insert the hooked end of the
extension handle through the
jack and the flat end through
the wheel wrench.
{Warning
Getting under a vehicle when it is
lifted on a jack is dangerous.
If the vehicle slips off the jack,
(Continued)
Page 276 of 319
Cadillac SRX Owner Manual (GMNA-Localizing-MidEast-9369636) - 2016 -
crc - 6/1/15
Vehicle Care 275
Warning (Continued)
you could be badly injured or
killed. Never get under a vehicle
when it is supported only by
a jack.
{Warning
Raising the vehicle with the jack
improperly positioned can
damage the vehicle and even
make the vehicle fall. To help
avoid personal injury and vehicle
damage, be sure to fit the jack lift
head into the proper location
before raising the vehicle.
{Warning
Lifting a vehicle and getting under
it to do maintenance or repairs is
dangerous without the
appropriate safety equipment and(Continued)
Warning (Continued)
training. If a jack is provided with
the vehicle, it is designed only for
changing a flat tire. If it is used for
anything else, you or others could
be badly injured or killed if the
vehicle slips off the jack. If a jack
is provided with the vehicle, only
use it for changing a flat tire.
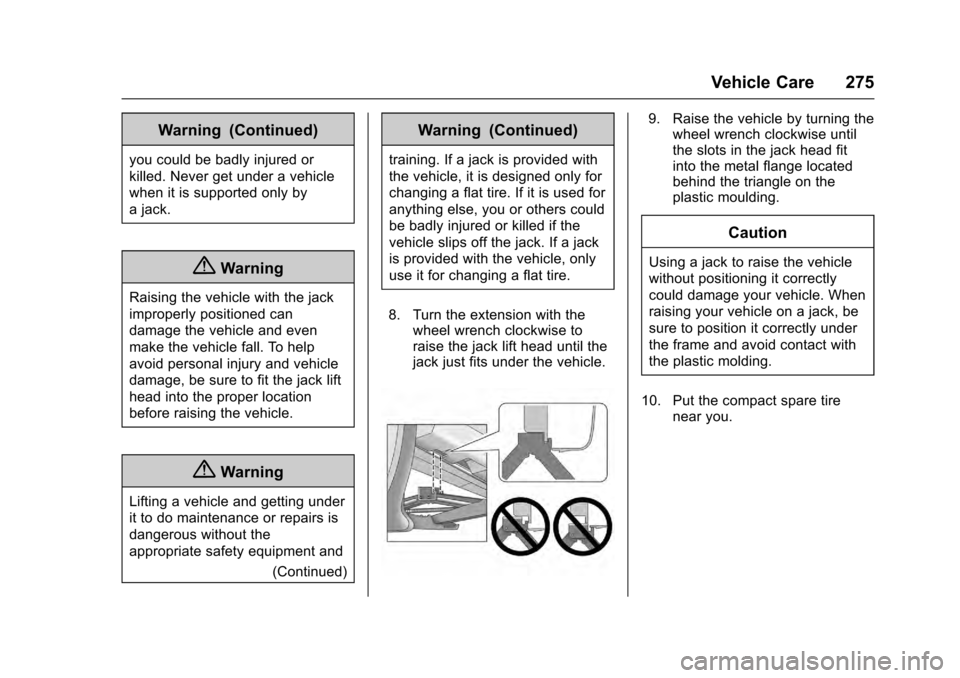
8. Turn the extension with the wheel wrench clockwise to
raise the jack lift head until the
jack just fits under the vehicle.
9. Raise the vehicle by turning thewheel wrench clockwise until
the slots in the jack head fit
into the metal flange located
behind the triangle on the
plastic moulding.
Caution
Using a jack to raise the vehicle
without positioning it correctly
could damage your vehicle. When
raising your vehicle on a jack, be
sure to position it correctly under
the frame and avoid contact with
the plastic molding.
10. Put the compact spare tire near you.
Page 277 of 319
Cadillac SRX Owner Manual (GMNA-Localizing-MidEast-9369636) - 2016 -
crc - 6/1/15
276 Vehicle Care
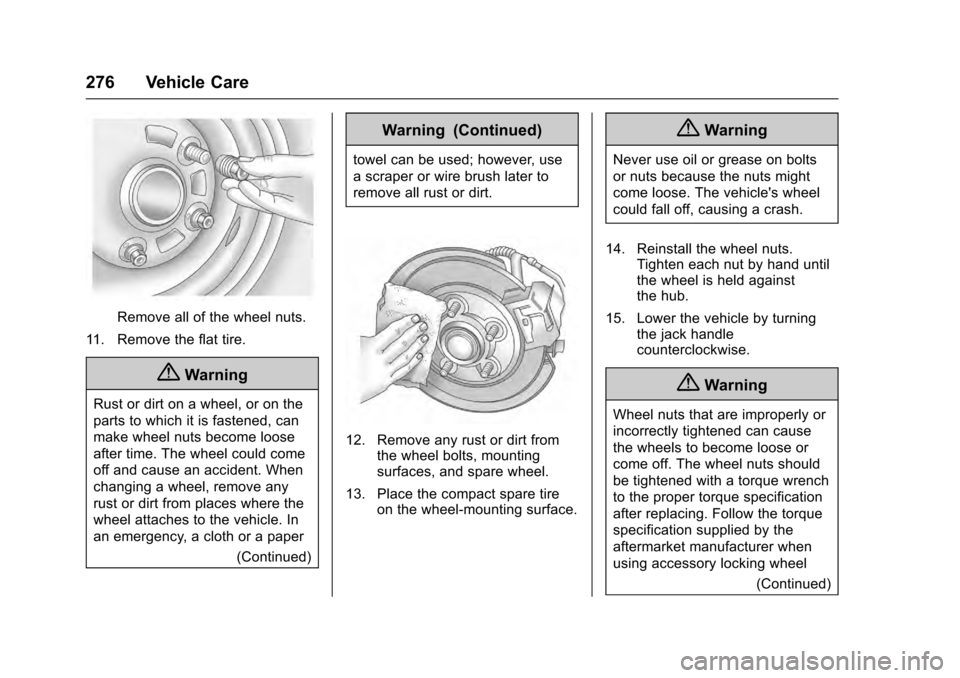
Remove all of the wheel nuts.
11. Remove the flat tire.
{Warning
Rust or dirt on a wheel, or on the
parts to which it is fastened, can
make wheel nuts become loose
after time. The wheel could come
off and cause an accident. When
changing a wheel, remove any
rust or dirt from places where the
wheel attaches to the vehicle. In
an emergency, a cloth or a paper (Continued)
Warning (Continued)
towel can be used; however, use
a scraper or wire brush later to
remove all rust or dirt.
12. Remove any rust or dirt fromthe wheel bolts, mounting
surfaces, and spare wheel.
13. Place the compact spare tire on the wheel-mounting surface.
{Warning
Never use oil or grease on bolts
or nuts because the nuts might
come loose. The vehicle's wheel
could fall off, causing a crash.
14. Reinstall the wheel nuts. Tighten each nut by hand until
the wheel is held against
the hub.
15. Lower the vehicle by turning the jack handle
counterclockwise.
{Warning
Wheel nuts that are improperly or
incorrectly tightened can cause
the wheels to become loose or
come off. The wheel nuts should
be tightened with a torque wrench
to the proper torque specification
after replacing. Follow the torque
specification supplied by the
aftermarket manufacturer when
using accessory locking wheel
(Continued)
Page 284 of 319
Cadillac SRX Owner Manual (GMNA-Localizing-MidEast-9369636) - 2016 -
crc - 6/1/15
Vehicle Care 283
Towing the Vehicle
Caution
Incorrectly towing a disabled
vehicle may cause damage. The
damage would not be covered by
the vehicle warranty.
Do not lash or hook to
suspension components. Use the
proper straps around the tires to
secure the vehicle.
Have the vehicle towed on a flatbed
car carrier. A wheel lift tow truck
could damage the vehicle.
Consult your dealer or a
professional towing service if the
disabled vehicle must be towed.
Caution
Improper use of the tow eye can
cause vehicle damage. Use
caution and low speeds to
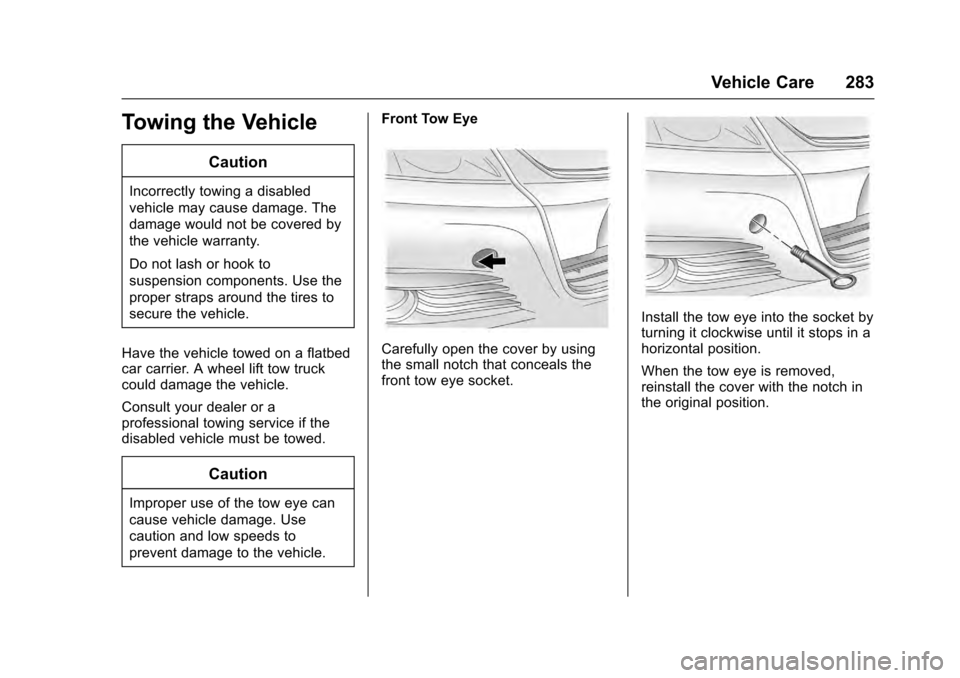
prevent damage to the vehicle. Front Tow Eye
Carefully open the cover by using
the small notch that conceals the
front tow eye socket.
Install the tow eye into the socket by
turning it clockwise until it stops in a
horizontal position.
When the tow eye is removed,
reinstall the cover with the notch in
the original position.
Page 285 of 319
Cadillac SRX Owner Manual (GMNA-Localizing-MidEast-9369636) - 2016 -
crc - 6/1/15
284 Vehicle Care
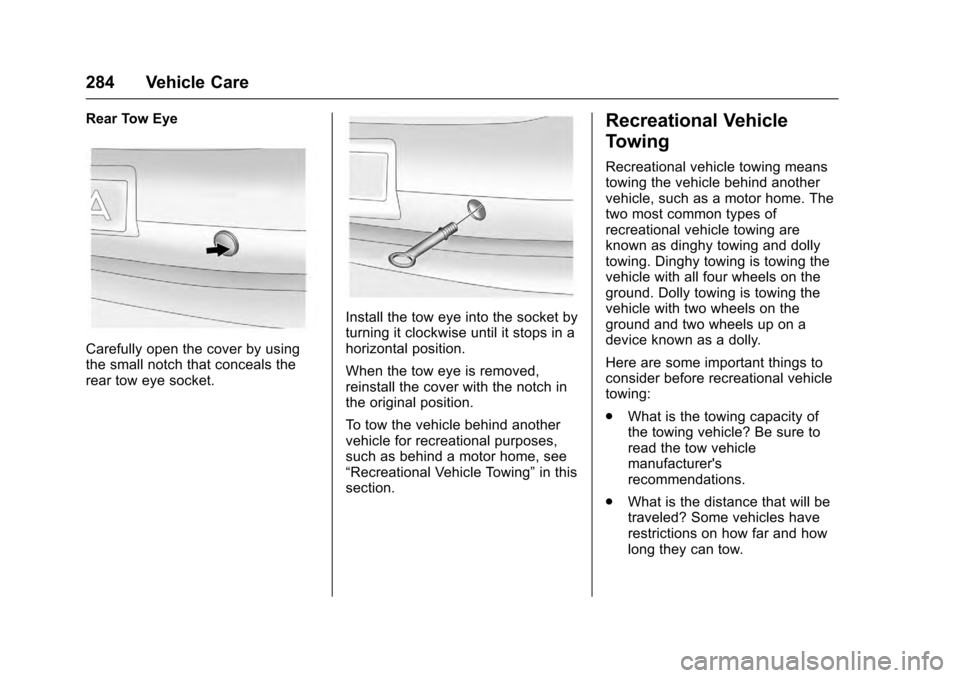
Rear Tow Eye
Carefully open the cover by using
the small notch that conceals the
rear tow eye socket.
Install the tow eye into the socket by
turning it clockwise until it stops in a
horizontal position.
When the tow eye is removed,
reinstall the cover with the notch in
the original position.
To tow the vehicle behind another
vehicle for recreational purposes,
such as behind a motor home, see
“Recreational Vehicle Towing”in this
section.
Recreational Vehicle
Towing
Recreational vehicle towing means
towing the vehicle behind another
vehicle, such as a motor home. The
two most common types of
recreational vehicle towing are
known as dinghy towing and dolly
towing. Dinghy towing is towing the
vehicle with all four wheels on the
ground. Dolly towing is towing the
vehicle with two wheels on the
ground and two wheels up on a
device known as a dolly.
Here are some important things to
consider before recreational vehicle
towing:
. What is the towing capacity of
the towing vehicle? Be sure to
read the tow vehicle
manufacturer's
recommendations.
. What is the distance that will be
traveled? Some vehicles have
restrictions on how far and how
long they can tow.
Page 311 of 319

Cadillac SRX Owner Manual (GMNA-Localizing-MidEast-9369636) - 2016 -
crc - 6/1/15
310 Index
Assistance Systems forDriving . . . . . . . . . . . . . . . . . . . . . . . . 202
Assistance Systems for Parking and Backing . . . . . . . . . . 198
Automatic Dimming Mirrors . . . . . . . . . . . . . . . . 41
Door Locks . . . . . . . . . . . . . . . . . . . . . 32
Transmission . . . . . . . . . . . . . . . . . 178
Transmission Fluid . . . . . . . . . . . 229
Automatic Transmission Manual Mode . . . . . . . . . . . . . . . . . 180
Shift Lock Control Function
Check . . . . . . . . . . . . . . . . . . . . . . . 240
B
Battery . . . . . . . . . . . . . . . . . . . . . . . . . 239Exterior Lighting Battery
Saver . . . . . . . . . . . . . . . . . . . . . . . 151
Jump Starting . . . . . . . . . . . . . . . . . 279
Load Management . . . . . . . . . . . . 150
Power Protection . . . . . . . . . . . . . 151
Voltage and Charging Messages . . . . . . . . . . . . . . . . . . . 126
Blade Replacement, Wiper . . . . . 241
Brake Pedal and Adjustable
Throttle . . . . . . . . . . . . . . . . . . . . . . 172
System Warning Light . . . . . . . . .116
Brakes . . . . . . . . . . . . . . . . . . . . . . . . . . 237 Brakes (cont'd)
Antilock . . . . . . . . . . . . . . . . . . . . . . . 182
Assist . . . . . . . . . . . . . . . . . . . . . . . . . 185
Fluid . . . . . . . . . . . . . . . . . . . . . . . . . . 238
Parking . . . . . . . . . . . . . . . . . . . . . . . 183
System Messages . . . . . . . . . . . . 126
Braking . . . . . . . . . . . . . . . . . . . . . . . . . 163
Break-In, New Vehicle . . . . . . . . . . 172
Bulb Replacement . . . . . . . . . . . . . . 249 Back-up Lamps . . . . . . . . . . . . . . . 248
Halogen Bulbs . . . . . . . . . . . . . . . . 243
Headlamp Aiming . . . . . . . . . . . . . 243
Headlamps . . . . . . . . . . . . . . 243, 244
High Intensity Discharge(HID) Lighting . . . . . . . . . . . . . . . 243
License Plate Lamps . . . . . . . . . 248
Turn Signal Lamps . . . . . . . . . . . 247
Buying New Tires . . . . . . . . . . . . . . . 268
C
Capacities and
Specifications . . . . . . . . . . . . . . . . . 305
Carbon Monoxide Engine Exhaust . . . . . . . . . . . . . . . 177
Liftgate . . . . . . . . . . . . . . . . . . . . . . . . . 33
Winter Driving . . . . . . . . . . . . . . . . 166
Cargo Cover . . . . . . . . . . . . . . . . . . . . . . . . . . . 92
Management System . . . . . . . . . . . 94 Cargo (cont'd)
Tie-Downs . . . . . . . . . . . . . . . . . . . . . . 94
Cargo Lamp . . . . . . . . . . . . . . . . . . . . 149
Cargo Net . . . . . . . . . . . . . . . . . . . . . . . 97
Caution, Danger, and Warning . . . . 2
Center Console Storage . . . . . . . . . 92
Chains, Tire . . . . . . . . . . . . . . . . . . . . 270
Charging System Light . . . . . . . . . 114
Check Malfunction IndicatorEngine Light . . . . . . . . . . . . . . . . .115
Child Restraints Infants and Young Children . . . . . 74
Lower Anchors and Tethersfor Children . . . . . . . . . . . . . . . . . . . 79
Older Children . . . . . . . . . . . . . . . . . . 73
Securing . . . . . . . . . . . . . . . . . . . . 84, 86
Systems . . . . . . . . . . . . . . . . . . . . . . . . 76
Cigarette Lighter . . . . . . . . . . . . . . . . 107
Circuit Breakers . . . . . . . . . . . . . . . . 250
Cleaning Exterior Care . . . . . . . . . . . . . . . . . 287
Interior Care . . . . . . . . . . . . . . . . . . 291
Climate Control Systems Dual Automatic . . . . . . . . . . . . . . . 153
Rear . . . . . . . . . . . . . . . . . . . . . . . . . . 157
Clock . . . . . . . . . . . . . . . . . . . . . . . . . . . 105
Cluster, Instrument . . . . . . . . . . . . . 108