CADILLAC STS 2006 1.G Owners Manual
Manufacturer: CADILLAC, Model Year: 2006, Model line: STS, Model: CADILLAC STS 2006 1.GPages: 480, PDF Size: 2.74 MB
Page 141 of 480
3. Press the tune/select knob to switch back and forth
between the normal and high settings. A check
mark indicates that the chime volume is set
to HIGH.
The mode you selected is now set. You can either exit
the programming mode by following the instructions
later in this section or program the next feature available
on your vehicle.
SUSPENSION MODE
If your vehicle has this feature, you can select between
performance or touring modes. Performance mode is
used where road conditions or personal preference
demand more control. This setting provides more “feel”
or response to road conditions. Touring mode is used for
normal city and highway driving. This setting provides a
smooth, soft ride.
Programmable Modes
Mode 1:PERFORMANCE
Mode 2:TOURING
Before your vehicle was shipped from the factory, it was
programmed to Mode 2. The mode to which the vehicle
was programmed may have been changed since it left
the factory.To program the vehicle to a different mode, use the
following procedure:
1. Enter the PERSONAL SETTINGS MENU by
following the instructions listed previously under
“Entering the Personal Settings Menu.”
2. Turn the tune/select knob until SUSPENSION
MODE is highlighted.
3. Press the tune/select knob to enter the
SUSPENSION MODE submenu.
4. Turn the tune/select knob to highlight TOURING or
PERFORMANCE.
5. Press the tune/select knob to select the setting.
The mode you selected is now set. You can either exit the
programming mode by following the instructions later in
this section or program the next feature available on your
vehicle by pressing the F6 (BACK) button, located on the
radio, to return to the PERSONAL SETTINGS MENU.
Exiting the Personal Settings Menu
Once you have �nished making your selections on the
base audio system, you will automatically return to the
main audio screen after 15 seconds. You can also press
the F6 (BACK) button, located on the radio, to return to
the main audio screen.
2-69
Page 142 of 480
Memory Seat, Mirrors and
Steering Wheel
If your vehicle has the memory feature, you can
program and recall memory settings for the following
features for up to two drivers:
The driver’s seat position
The outside rearview mirrors position
The telescopic steering column position
The following settings and presets are set automatically:
The language, radio and XM™ presets, tone,
volume, playback mode (AM/FM or CD), last
displayed stations, and compact disc position
The last climate control setting
The Head-Up Display (HUD) position, if your
vehicle has this feature
Other personalization settings, for example, remote
start settings
SeeVehicle Personalization on page 2-53.For vehicles with the base audio system, memory
features are programmed and recalled through the radio
from the DRIVER SELECTION and the DRIVER EXIT
SETTINGS submenus. See “Entering the Driver
Selection Submenu” and “Entering the Driver Exit
Settings Submenu” later in this section for more
information on recalling and programming the memory
settings using the base audio system.
For vehicles with the Navigation system, memory
features are programmed and recalled through the
navigation display. See “Personalization” in the Index
of the Navigation System manual for more information
on programming and recalling the memory settings using
the Navigation system.
For vehicles with the Navigation system, you can also
recall the memory features by using voice recognition,
if your vehicle has this feature. See “Voice Recognition”
in the Index of the Navigation System manual for
more information.
2-70
Page 143 of 480
Entering the Driver Selection Submenu
To enter the memory programming mode for your
driver settings, use the following procedure:
1. Be sure the ignition is either on, in ACC position, or
in RAP and place the transmission in PARK (P) or
the vehicle speed is less than 6 mph (9 km/h).
2. Press any button on the appropriate keyless access
transmitter to identify yourself as Driver 1 or
Driver 2.
3. Turn on the radio by pressing the
power/volume knob.
4. Press the CNFG radio button to enter the main
menu of the radio.
5. Turn the tune/select knob and scroll to SETUP.
6. Press the tune/select knob to enter the
SETUP menu.
7. Turn the tune/select knob and scroll to DRIVER
SELECTION.
8. Press the tune/select knob to enter the DRIVER
SELECTION submenu. The following items will
appear:
DRIVER 1
DRIVER 2
RECALL DRIVER SETTINGS
STORE DRIVER SETTINGS
Driver Selection Submenu Items
DRIVER 1/DRIVER 2
The numbers on the back of each keyless access
transmitter correspond to DRIVER 1 and DRIVER 2.
If you would like to recall or store driver settings for the
driver that does not correspond to the number on the
back of the keyless access transmitter that you are using,
use the following procedure:
1. Enter the memory programming mode for your
driver settings by following the instructions listed
previously under “Entering the Driver Selection
Submenu.”
2. From the DRIVER SELECTION submenu, turn the
tune/select knob to highlight the driver number that
you want, either DRIVER 1 or DRIVER 2.
3. Set your choice by pressing in the tune/select knob.
If you would like to recall driver settings for the
selected driver, see “RECALL DRIVER SETTINGS”
later in this section.
If you would like to store driver settings for the selected
driver, see “STORE DRIVER SETTINGS” later in this
section.
If you would like to recall exit settings for the selected
driver, see “RECALL EXIT SETTINGS” later in this
section.
If you would like to store exit settings for the selected
driver, see “STORE EXIT SETTINGS” later in this
section.
2-71
Page 144 of 480
RECALL DRIVER SETTINGS
To recall driver settings, use the following procedure:
1. Enter the memory programming mode for your
driver settings by following the instructions listed
previously under “Entering the Driver Selection
Submenu.”
2. From the DRIVER SELECTION submenu, turn the
tune/select knob to scroll to RECALL DRIVER
SETTINGS and press in the knob.
If the vehicle is in PARK (P), one beep will sound
and your previously saved driving position will
then be recalled.
If the vehicle is not in PARK (P), three beeps will
sound and your previously saved driving position will
not be recalled.
A memory recall can be stopped by pressing any
memory seat or mirror position button.
If you would like the stored driving positions to be
recalled when unlocking your vehicle with the keyless
access transmitter or when starting your vehicle,
see “REMOTE RECALL MEMORY” or “START
BUTTON RECALL” underVehicle Personalization
on page 2-53.
STORE DRIVER SETTINGS
To store driver settings, use the following procedure:
1. Adjust your settings for the driver’s seat, the outside
rearview mirrors, and the steering column to a
comfortable driving position.
2. Enter the memory programming mode for your
driver settings by following the instructions listed
previously under “Entering the Driver Selection
Submenu.”
3. From the DRIVER SELECTION submenu, turn
the tune/select knob to scroll to STORE DRIVER
SETTINGS and press in the knob. Two beeps will
sound to con�rm that your driver settings are saved.
4. Set the HUD position, if your vehicle has this
feature, the climate control temperature, fan
speed and mode settings, the radio presets, tone,
volume, playback mode (AM/FM, XM™, or CD), and
compact disc position.
Your memory settings are now programmed. Any
changes that are made to the HUD, audio system,
and climate controls while driving will be
automatically stored when the ignition is turned off.
5. Repeat the procedure for a second driver by
programming the other driver number.
2-72
Page 145 of 480
Entering the Driver Exit Settings
Submenu
To enter the memory programming mode for your exit
settings, use the following procedure:
1. Be sure the ignition is either on, in ACC position, or
in RAP and place the transmission in PARK (P) or
the vehicle speed is less than 6 mph (9 km/h).
2. Press any button on the appropriate keyless access
transmitter to identify yourself as Driver 1 or
Driver 2.
3. Turn on the radio by pressing the
power/volume knob.
4. Press the CNFG radio button to enter the main
menu of the radio.
5. Turn the tune/select knob and scroll to SETUP.
6. Press the tune/select knob to enter the
SETUP menu.
7. Turn the tune/select knob and scroll to DRIVER
EXIT SETTINGS.
8. Press the tune/select knob to enter the DRIVER
EXIT SETTINGS submenu. The following items
will appear:
RECALL EXIT SETTINGS
STORE EXIT SETTINGS
Driver Exit Settings Submenu Items
RECALL EXIT SETTINGS
To recall exit settings, use the following procedure:
1. Enter the memory programming mode for your
exit settings by following the instructions listed
previously under “Entering the Driver Exit Settings
Submenu.”
2. From the DRIVER EXIT SETTINGS submenu, turn
the tune/select knob to scroll to RECALL EXIT
SETTINGS and press in the knob.
If the vehicle is in PARK (P), one beep will sound
and your previously saved exit position will then be
recalled.
If the vehicle is not in PARK (P), three beeps will
sound and your previously saved exit position
will not be recalled.
A memory recall can be stopped by pressing any
memory seat or mirror position button.
If you would like the stored exit positions to be recalled
when your vehicle is in PARK (P), the vehicle is off,
and the driver’s door is opened, see “AUTO EXIT SEAT”
and “AUTO EXIT COLUMN” underVehicle
Personalization on page 2-53.
2-73
Page 146 of 480
STORE EXIT SETTINGS
To store exit settings, use the following procedure:
1. Adjust your settings for the driver’s seat, the outside
rearview mirrors, and the steering column to a
comfortable exit position.
2. Enter the memory programming mode for your
exit settings by following the instructions listed
previously under “Entering the Driver Exit Settings
Submenu.”3. From the DRIVER EXIT SETTINGS submenu,
turn the tune/select knob to scroll to STORE EXIT
SETTINGS and press in the knob. Two beeps will
sound to con�rm that your new exit settings are
saved.
4. Repeat the procedure for a second driver by
programming the other driver number.
2-74
Page 147 of 480
Instrument Panel Overview...............................3-4
Hazard Warning Flashers................................3-6
Other Warning Devices...................................3-6
Horn .............................................................3-6
Power Tilt Wheel and Telescopic Steering
Column......................................................3-6
Heated Steering Wheel...................................3-7
Turn Signal/Multifunction Lever.........................3-7
Turn and Lane-Change Signals........................3-8
Headlamp High/Low-Beam Changer..................3-8
Forward Collision Alert (FCA) System................3-9
Flash-to-Pass...............................................3-12
Windshield Wipers........................................3-13
Rainsense™ II Wipers...................................3-14
Windshield Washer.......................................3-15
Headlamp Washer........................................3-15
Cruise Control..............................................3-16
Adaptive Cruise Control.................................3-19
Headlamps..................................................3-31
Wiper Activated Headlamps............................3-35
Headlamps on Reminder................................3-35
Daytime Running Lamps (DRL).......................3-35
Fog Lamps ..................................................3-37
Twilight Sentinel
®..........................................3-37
Exterior Lighting Battery Saver........................3-38
Instrument Panel Brightness...........................3-39Entry Lighting...............................................3-39
Parade Dimming...........................................3-39
Reading Lamps............................................3-40
Battery Load Management.............................3-40
Inadvertent Power Battery Saver.....................3-40
Head-Up Display (HUD).................................3-40
Ultrasonic Rear Parking Assist (URPA)............3-44
Accessory Power Outlet(s).............................3-46
Ashtray(s) and Cigarette Lighter......................3-47
Climate Controls............................................3-48
Dual Climate Control System..........................3-48
Outlet Adjustment.........................................3-54
Rear Climate Control System.........................3-54
Passenger Compartment Air Filter...................3-55
Warning Lights, Gages, and Indicators............3-57
Instrument Panel Cluster................................3-58
Speedometer and Odometer...........................3-59
Tachometer.................................................3-59
Safety Belt Reminder Light.............................3-59
Passenger Safety Belt Reminder Light.............3-60
Airbag Readiness Light..................................3-60
Passenger Airbag Status Indicator...................3-61
Charging System Light..................................3-63
Brake System Warning Light..........................3-64
Anti-Lock Brake System Warning Light.............3-65
Section 3 Instrument Panel
3-1
Page 148 of 480
Low Tire Pressure Warning Light....................3-65
Traction Control System (TCS) Warning Light . . .3-66
Engine Coolant Temperature Warning Light......3-66
Engine Coolant Temperature Gage..................3-67
Malfunction Indicator Lamp.............................3-67
Oil Pressure Light.........................................3-70
Security Light...............................................3-71
Fog Lamp Light............................................3-71
Lights On Reminder......................................3-71
Cruise Control Light......................................3-72
Highbeam On Light.......................................3-72
Fuel Gage...................................................3-72
Driver Information Center (DIC).......................3-73
DIC Controls and Displays.............................3-74
DIC Warnings and Messages.........................3-79
Other Messages...........................................3-93Audio System(s).............................................3-94
Setting the Time...........................................3-95
Radio with CD..............................................3-96
Navigation/Radio System..............................3-115
Radio Personalization..................................3-115
Theft-Deterrent Feature................................3-119
Audio Steering Wheel Controls......................3-119
Radio Reception.........................................3-120
Care of Your CDs.......................................3-121
Care of the CD Player.................................3-122
Diversity Antenna System.............................3-122
XM™ Satellite Radio Antenna System............3-122
Section 3 Instrument Panel
3-2
Page 149 of 480
✍NOTES
3-3
Page 150 of 480
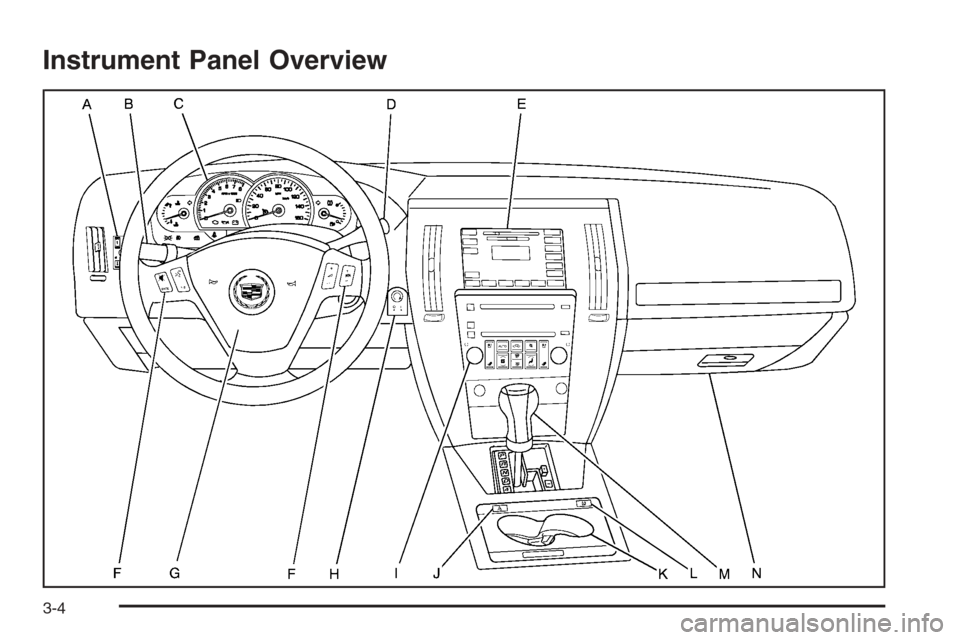
Instrument Panel Overview
3-4