transmission CADILLAC STS 2011 1.G Owners Manual
[x] Cancel search | Manufacturer: CADILLAC, Model Year: 2011, Model line: STS, Model: CADILLAC STS 2011 1.GPages: 528, PDF Size: 4.96 MB
Page 7 of 528
Black plate (1,1)Cadillac STS Owner Manual - 2011
Section 1 In Brief
Instrument Panel. . . . . . . . . . . . . . . . . . . . . . . . . . . . . . . . . . . 1-2
Initial Drive Information . . . . . . . . . . . . . . . . . . . . . . . . . . . 1-4
Remote Keyless Entry (RKE) System . . . . . . . . . . . 1-4
Remote Vehicle Start . . . . . . . . . . . . . . . . . . . . . . . . . . . 1-4
Door Locks . . . . . . . . . . . . . . . . . . . . . . . . . . . . . . . . . . . . . 1-5
Trunk . . . . . . . . . . . . . . . . . . . . . . . . . . . . . . . . . . . . . . . . . . . 1-6
Windows . . . . . . . . . . . . . . . . . . . . . . . . . . . . . . . . . . . . . . . . 1-6
Seat Adjustment . . . . . . . . . . . . . . . . . . . . . . . . . . . . . . . . 1-7
Memory Features . . . . . . . . . . . . . . . . . . . . . . . . . . . . . . . 1-8
Heated Seats (Front) . . . . . . . . . . . . . . . . . . . . . . . . . . . . 1-8
Heated Seats (Rear) . . . . . . . . . . . . . . . . . . . . . . . . . . . . 1-9
Heated and Ventilated Seats . . . . . . . . . . . . . . . . . . . . 1-9
Head Restraint Adjustment . . . . . . . . . . . . . . . . . . . . . . 1-9
Safety Belt . . . . . . . . . . . . . . . . . . . . . . . . . . . . . . . . . . . . . 1-10
Sensing System for Passenger Airbag . . . . . . . . . 1-10
Mirror Adjustment . . . . . . . . . . . . . . . . . . . . . . . . . . . . . . 1-11
Steering Wheel Adjustment . . . . . . . . . . . . . . . . . . . . 1-12
Interior Lighting . . . . . . . . . . . . . . . . . . . . . . . . . . . . . . . . 1-12
Exterior Lighting . . . . . . . . . . . . . . . . . . . . . . . . . . . . . . . 1-13
Windshield Wiper/Washer . . . . . . . . . . . . . . . . . . . . . . 1-14
Climate Controls . . . . . . . . . . . . . . . . . . . . . . . . . . . . . . . 1-15
Transmission . . . . . . . . . . . . . . . . . . . . . . . . . . . . . . . . . . 1-15 Vehicle Features
. . . . . . . . . . . . . . . . . . . . . . . . . . . . . . . . . . 1-16
Radio(s) . . . . . . . . . . . . . . . . . . . . . . . . . . . . . . . . . . . . . . . 1-16
Satellite Radio . . . . . . . . . . . . . . . . . . . . . . . . . . . . . . . . . 1-17
Steering Wheel Controls . . . . . . . . . . . . . . . . . . . . . . . 1-18
Bluetooth
®. . . . . . . . . . . . . . . . . . . . . . . . . . . . . . . . . . . . . 1-18
Navigation System . . . . . . . . . . . . . . . . . . . . . . . . . . . . . 1-18
Driver Information Center (DIC) . . . . . . . . . . . . . . . . 1-19
Vehicle Personalization . . . . . . . . . . . . . . . . . . . . . . . . 1-20
Cruise Control . . . . . . . . . . . . . . . . . . . . . . . . . . . . . . . . . 1-20
Power Outlets . . . . . . . . . . . . . . . . . . . . . . . . . . . . . . . . . 1-21
Performance and Maintenance . . . . . . . . . . . . . . . . . .1-21
Traction Control System (TCS) . . . . . . . . . . . . . . . . 1-21
StabiliTrak
®System . . . . . . . . . . . . . . . . . . . . . . . . . . . 1-21
Tire Pressure Monitor . . . . . . . . . . . . . . . . . . . . . . . . . . 1-22
Tire Sealant and Compressor Kit . . . . . . . . . . . . . . 1-22
Engine Oil Life System . . . . . . . . . . . . . . . . . . . . . . . . 1-22
Driving for Better Fuel Economy . . . . . . . . . . . . . . . 1-23
Roadside Service . . . . . . . . . . . . . . . . . . . . . . . . . . . . . . 1-23
OnStar
®. . . . . . . . . . . . . . . . . . . . . . . . . . . . . . . . . . . . . . . 1-24
1-1
Page 9 of 528

Black plate (3,1)Cadillac STS Owner Manual - 2011
A.Outlet Adjustment on page 4‑48.
B. Instrument Panel Brightness
on page 4‑35.
DIC Operation and Displays on page 4‑70.
Head-Up Display (HUD)
on page 4‑38(If Equipped).
C. Turn Signal/Multifunction Lever on page 4‑4.
Headlamps on page 4‑27.
Cruise Control on page 4‑12.
Adaptive Cruise Control
on page 4‑15(If Equipped).
Forward Collision Alert (FCA) System
on
page 4‑6(If Equipped).
D. Instrument Panel Cluster on page 4‑52.
E. Windshield Wipers on page 4‑10.
F. Audio System(s)
on page 4‑94.
Navigation/Radio System
on page 4‑113(If Equipped). G.
Audio Steering Wheel Controls
on page 4‑124(If Equipped).
Adaptive Cruise Control
on page 4‑15(If Equipped).
Heated Steering Wheel
on page 4‑4(If Equipped).
H. Data Link Connector (DLC). See Malfunction
Indicator Lamp on page 4‑62.
I. Power Tilt Wheel and Telescopic Steering Column
on page 4‑3.
J. Horn on page 4‑3.
K. Ignition Positions on page 3‑26.
L. Dual Climate Control System
on page 4‑43.
M. Hazard Warning Flashers on page 4‑3.
N. Cupholders on page 3‑56.
O. Traction Control System (TCS) on page 5‑9.
P. Shift Lever. See Automatic Transmission Operation
on page 3‑30.
Q. Glove Box on page 3‑56.
1-3
Page 21 of 528
Black plate (15,1)Cadillac STS Owner Manual - 2011
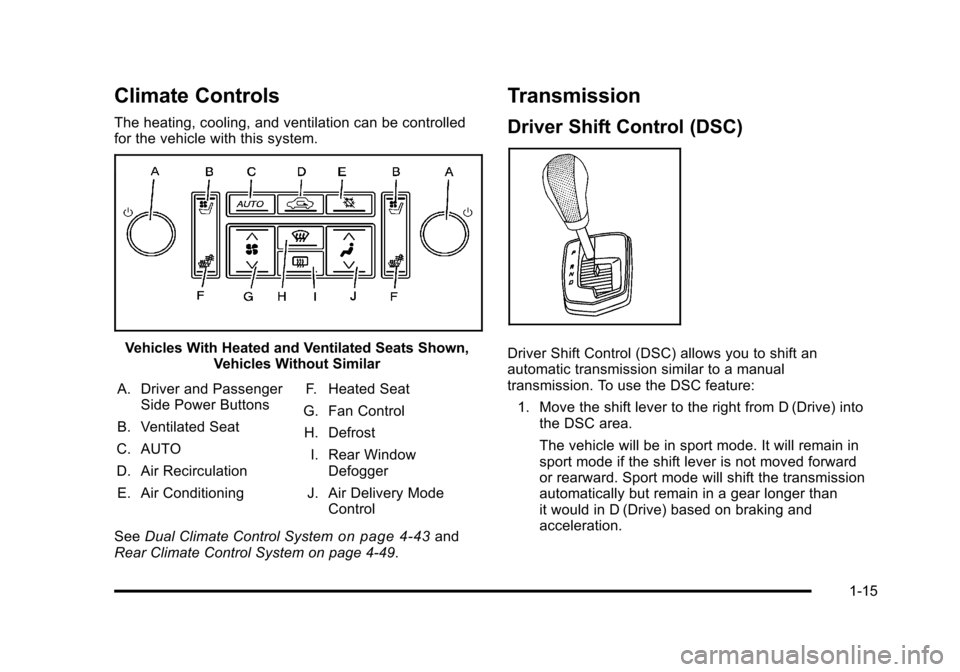
Climate Controls
The heating, cooling, and ventilation can be controlled
for the vehicle with this system.
Vehicles With Heated and Ventilated Seats Shown,Vehicles Without Similar
A. Driver and Passenger Side Power Buttons
B. Ventilated Seat
C. AUTO
D. Air Recirculation E. Air Conditioning F. Heated Seat
G. Fan Control H. Defrost
I. Rear Window Defogger
J. Air Delivery Mode Control
See Dual Climate Control System
on page 4‑43and
Rear Climate Control System on page 4‑49.
Transmission
Driver Shift Control (DSC)
Driver Shift Control (DSC) allows you to shift an
automatic transmission similar to a manual
transmission. To use the DSC feature:
1. Move the shift lever to the right from D (Drive) into the DSC area.
The vehicle will be in sport mode. It will remain in
sport mode if the shift lever is not moved forward
or rearward. Sport mode will shift the transmission
automatically but remain in a gear longer than
it would in D (Drive) based on braking and
acceleration.
1-15
Page 22 of 528
Black plate (16,1)Cadillac STS Owner Manual - 2011
2. Press the shift lever forward to upshift or rearwardto downshift. See Automatic Transmission
Operation on page 3‑30.
Vehicle Features
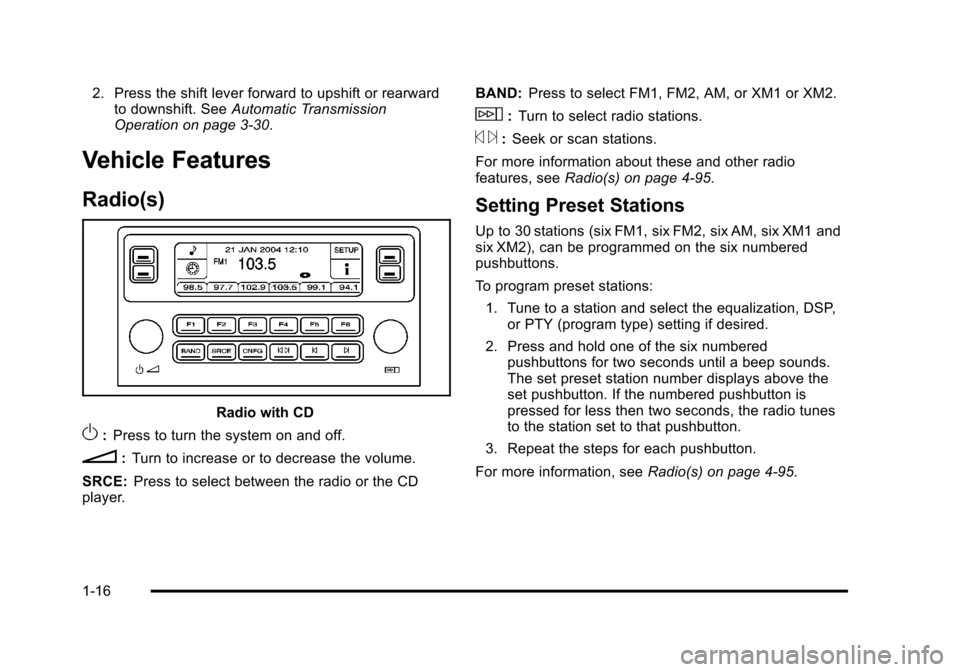
Radio(s)
Radio with CD
O: Press to turn the system on and off.
n: Turn to increase or to decrease the volume.
SRCE: Press to select between the radio or the CD
player. BAND:
Press to select FM1, FM2, AM, or XM1 or XM2.
w:Turn to select radio stations.
© ¨:Seek or scan stations.
For more information about these and other radio
features, see Radio(s) on page 4‑95.
Setting Preset Stations
Up to 30 stations (six FM1, six FM2, six AM, six XM1 and
six XM2), can be programmed on the six numbered
pushbuttons.
To program preset stations:
1. Tune to a station and select the equalization, DSP, or PTY (program type) setting if desired.
2. Press and hold one of the six numbered pushbuttons for two seconds until a beep sounds.
The set preset station number displays above the
set pushbutton. If the numbered pushbutton is
pressed for less then two seconds, the radio tunes
to the station set to that pushbutton.
3. Repeat the steps for each pushbutton.
For more information, see Radio(s) on page 4‑95.
1-16
Page 25 of 528
Black plate (19,1)Cadillac STS Owner Manual - 2011
Driver Information Center (DIC)
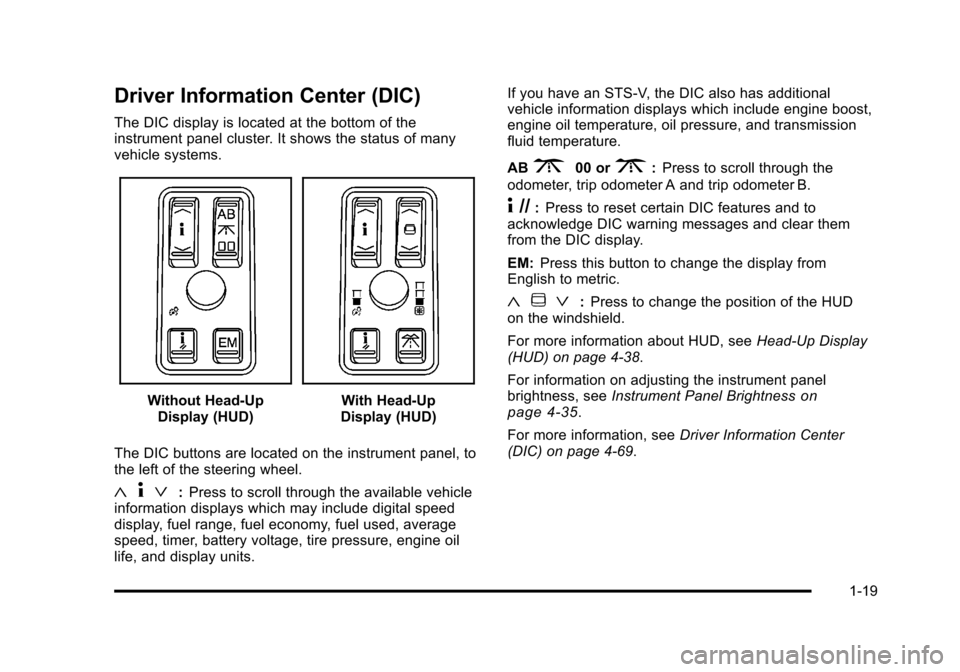
The DIC display is located at the bottom of the
instrument panel cluster. It shows the status of many
vehicle systems.
Without Head-UpDisplay (HUD)With Head-Up
Display (HUD)
The DIC buttons are located on the instrument panel, to
the left of the steering wheel.
« 4ª:Press to scroll through the available vehicle
information displays which may include digital speed
display, fuel range, fuel economy, fuel used, average
speed, timer, battery voltage, tire pressure, engine oil
life, and display units. If you have an STS-V, the DIC also has additional
vehicle information displays which include engine boost,
engine oil temperature, oil pressure, and transmission
fluid temperature.
AB
300 or3:
Press to scroll through the
odometer, trip odometer A and trip odometer B.
4 //: Press to reset certain DIC features and to
acknowledge DIC warning messages and clear them
from the DIC display.
EM: Press this button to change the display from
English to metric.
« ~ ª:Press to change the position of the HUD
on the windshield.
For more information about HUD, see Head-Up Display
(HUD) on page 4‑38.
For information on adjusting the instrument panel
brightness, see Instrument Panel Brightness
on
page 4‑35.
For more information, see Driver Information Center
(DIC) on page 4‑69.
1-19
Page 38 of 528
Black plate (6,1)Cadillac STS Owner Manual - 2011
For vehicles with the base audio system, memory
features are programmed and recalled through the radio
from the DRIVER SELECTION and the DRIVER EXIT
SETTINGS submenus. See“Entering the Driver
Selection Submenu” and“Entering the Driver Exit
Settings Submenu” later in this section for more
information on recalling and programming the memory
settings using the base audio system.
For vehicles with the Navigation system, memory
features are programmed and recalled through the
navigation display. See “Personalization”in the Index of
the Navigation System manual for more information on
programming and recalling the memory settings using
the Navigation system.
For vehicles with the Navigation system, you can also
recall the memory features by using voice recognition,
if your vehicle has this feature. See “Voice Recognition”
in the Index of the Navigation System manual for more
information.Entering the Driver Selection Submenu
To enter the memory programming mode for your driver
settings:
1. The ignition must be either on, in ACCESSORY, or in RAP and the transmission in P (Park) or the
vehicle speed less than 6 mph (9 km/h).
2. Press any button on the appropriate keyless access transmitter to identify yourself as Driver 1 or
Driver 2.
3. Turn on the radio by pressing the power/ volume knob.
4. Press the CNFG radio button to enter the main menu of the radio.
5. Turn the tune/select knob and scroll to SETUP.
6. Press the tune/select knob to enter the SETUP menu.
7. Turn the tune/select knob and scroll to DRIVER SELECTION.
8. Press the tune/select knob to enter the DRIVER SELECTION submenu. The following items will
appear:
.DRIVER 1
.DRIVER 2
.RECALL DRIVER SETTINGS
.STORE DRIVER SETTINGS
2-6
Page 40 of 528
Black plate (8,1)Cadillac STS Owner Manual - 2011
STORE DRIVER SETTINGS
To store driver settings:1. Adjust your settings for the driver seat, the outside rearview mirrors, and the steering column to a
comfortable driving position.
2. Enter the memory programming mode for your driver settings by following the instructions listed
previously under “Entering the Driver Selection
Submenu.”
3. From the DRIVER SELECTION submenu, turn the tune/select knob to scroll to STORE DRIVER
SETTINGS and press in the knob. Two beeps will
sound to confirm that your driver settings are
saved.
4. Set the HUD position, if your vehicle has this feature, the climate control temperature, fan speed
and mode settings, the radio presets, tone,
volume, playback mode (AM/FM, XM™, or CD),
and compact disc position.
Your memory settings are now programmed.
Any changes that are made to the HUD, audio
system, and climate controls while driving will be
automatically stored when the ignition is turned off.
5. Repeat the procedure for a second driver by programming the other driver number.
Entering the Driver Exit Settings
Submenu
To enter the memory programming mode for your exit
settings:
1. The ignition must be either on, in ACCESSORY, or in RAP and the transmission in P (Park) or
the vehicle speed less than 6 mph (9 km/h).
2. Press any button on the appropriate keyless access transmitter to identify yourself as
Driver 1 or Driver 2.
3. Turn on the radio by pressing the power/ volume knob.
4. Press the CNFG radio button to enter the main menu of the radio.
5. Turn the tune/select knob and scroll to SETUP.
6. Press the tune/select knob to enter the SETUP menu.
7. Turn the tune/select knob and scroll to DRIVER EXIT SETTINGS.
8. Press the tune/select knob to enter the DRIVER EXIT SETTINGS submenu. The following items
will appear:
.RECALL EXIT SETTINGS
.STORE EXIT SETTINGS
2-8
Page 107 of 528
Black plate (1,1)Cadillac STS Owner Manual - 2011
Section 3 Features and Controls
Keys. . . . . . . . . . . . . . . . . . . . . . . . . . . . . . . . . . . . . . . . . . . . . . . . 3-3
Keyless Access System . . . . . . . . . . . . . . . . . . . . . . . . . 3-4
Keyless Access System Operation . . . . . . . . . . . . . . 3-5
Remote Vehicle Start . . . . . . . . . . . . . . . . . . . . . . . . . . 3-10
Doors and Locks . . . . . . . . . . . . . . . . . . . . . . . . . . . . . . . . . 3-12
Door Locks . . . . . . . . . . . . . . . . . . . . . . . . . . . . . . . . . . . . 3-12
Power Door Locks . . . . . . . . . . . . . . . . . . . . . . . . . . . . . 3-13
Programmable Automatic Door Locks . . . . . . . . . . 3-14
Rear Door Security Locks . . . . . . . . . . . . . . . . . . . . . 3-14
Lockout Protection . . . . . . . . . . . . . . . . . . . . . . . . . . . . . 3-15
Trunk . . . . . . . . . . . . . . . . . . . . . . . . . . . . . . . . . . . . . . . . . . 3-15
Windows . . . . . . . . . . . . . . . . . . . . . . . . . . . . . . . . . . . . . . . . . . 3-18
Power Windows . . . . . . . . . . . . . . . . . . . . . . . . . . . . . . . 3-19
Sun Visors . . . . . . . . . . . . . . . . . . . . . . . . . . . . . . . . . . . . . 3-21
Theft-Deterrent Systems . . . . . . . . . . . . . . . . . . . . . . . . .3-22
Theft-Deterrent System . . . . . . . . . . . . . . . . . . . . . . . . 3-22
Valet Lockout Switch . . . . . . . . . . . . . . . . . . . . . . . . . . . 3-24
Immobilizer . . . . . . . . . . . . . . . . . . . . . . . . . . . . . . . . . . . . 3-24
Immobilizer Operation . . . . . . . . . . . . . . . . . . . . . . . . . 3-24 Starting and Operating Your Vehicle
. . . . . . . . . . . .3-25
New Vehicle Break-In . . . . . . . . . . . . . . . . . . . . . . . . . . 3-25
Ignition Positions . . . . . . . . . . . . . . . . . . . . . . . . . . . . . . 3-26
Retained Accessory Power (RAP) . . . . . . . . . . . . . 3-27
Starting the Engine . . . . . . . . . . . . . . . . . . . . . . . . . . . . 3-27
Engine Coolant Heater . . . . . . . . . . . . . . . . . . . . . . . . . 3-29
Automatic Transmission Operation . . . . . . . . . . . . . 3-30
Parking Brake . . . . . . . . . . . . . . . . . . . . . . . . . . . . . . . . . 3-33
Shifting Into Park . . . . . . . . . . . . . . . . . . . . . . . . . . . . . . 3-34
Shifting Out of Park . . . . . . . . . . . . . . . . . . . . . . . . . . . . 3-35
Parking Over Things That Burn . . . . . . . . . . . . . . . . 3-35
Engine Exhaust . . . . . . . . . . . . . . . . . . . . . . . . . . . . . . . . 3-36
Running the Vehicle While Parked . . . . . . . . . . . . . 3-36
Mirrors . . . . . . . . . . . . . . . . . . . . . . . . . . . . . . . . . . . . . . . . . . . . 3-37
Automatic Dimming Rearview Mirror . . . . . . . . . . . 3-37
Compass . . . . . . . . . . . . . . . . . . . . . . . . . . . . . . . . . . . . . . 3-38
Outside Power Mirrors . . . . . . . . . . . . . . . . . . . . . . . . . 3-39
Outside Automatic Dimming Mirror . . . . . . . . . . . . . 3-39
Park Tilt Mirrors . . . . . . . . . . . . . . . . . . . . . . . . . . . . . . . . 3-40
Outside Convex Mirror . . . . . . . . . . . . . . . . . . . . . . . . . 3-40
Outside Heated Mirrors . . . . . . . . . . . . . . . . . . . . . . . . 3-40
3-1
Page 132 of 528
Black plate (26,1)Cadillac STS Owner Manual - 2011
Ignition Positions
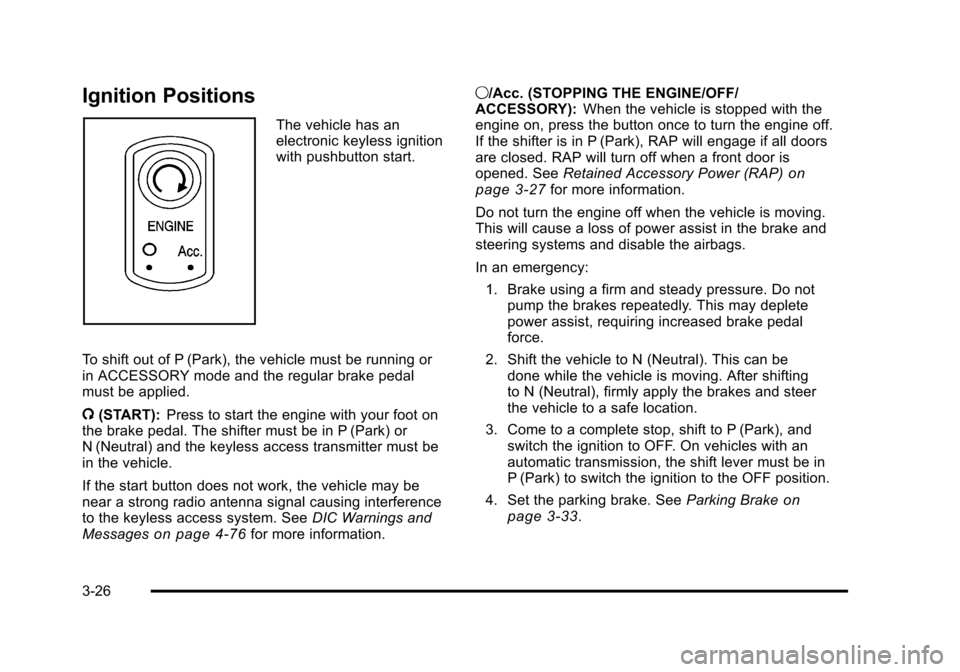
The vehicle has an
electronic keyless ignition
with pushbutton start.
To shift out of P (Park), the vehicle must be running or
in ACCESSORY mode and the regular brake pedal
must be applied.
/ (START): Press to start the engine with your foot on
the brake pedal. The shifter must be in P (Park) or
N (Neutral) and the keyless access transmitter must be
in the vehicle.
If the start button does not work, the vehicle may be
near a strong radio antenna signal causing interference
to the keyless access system. See DIC Warnings and
Messages
on page 4‑76for more information. 9/Acc. (STOPPING THE ENGINE/OFF/
ACCESSORY):
When the vehicle is stopped with the
engine on, press the button once to turn the engine off.
If the shifter is in P (Park), RAP will engage if all doors
are closed. RAP will turn off when a front door is
opened. See Retained Accessory Power (RAP)
on
page 3‑27for more information.
Do not turn the engine off when the vehicle is moving.
This will cause a loss of power assist in the brake and
steering systems and disable the airbags.
In an emergency: 1. Brake using a firm and steady pressure. Do not pump the brakes repeatedly. This may deplete
power assist, requiring increased brake pedal
force.
2. Shift the vehicle to N (Neutral). This can be done while the vehicle is moving. After shifting
to N (Neutral), firmly apply the brakes and steer
the vehicle to a safe location.
3. Come to a complete stop, shift to P (Park), and switch the ignition to OFF. On vehicles with an
automatic transmission, the shift lever must be in
P (Park) to switch the ignition to the OFF position.
4. Set the parking brake. See Parking Brake
on
page 3‑33.
3-26
Page 133 of 528
Black plate (27,1)Cadillac STS Owner Manual - 2011
If the engine is off, press this button to turn on the
accessory mode. ACCESSORY ACTIVE will display on
the Driver Information Center (DIC). Accessory mode
allows use of the audio system and windshield wipers.
Accessory mode must be used if the vehicle must be
towed or in motion when the engine is not running.
After the vehicle has been in accessory mode for more
than 20 minutes, the vehicle will enter RAP or turn off,
depending on if the doors are opened or closed.
Retained Accessory Power (RAP)
These vehicle accessories can be used for up to
20 minutes after the engine is turned off:
.Audio System
.Audio Steering Wheel Controls
.Power Windows
Power to these accessories will work up to 20 minutes
or until one of the front doors is opened. For an
additional 20 minutes of operation, close all the doors
and press Acc. to place the vehicle in accessory mode.
Press the button again to return to RAP.
Starting the Engine
To place the transmission in the proper gear:
Move the shift lever to P (Park) or N (Neutral). To restart
the engine when the vehicle is already moving, use
N (Neutral).
Notice: Do not try to shift to P (Park) if the
vehicle is moving. If you do, you could damage
the transmission. Shift to P (Park) only when the
vehicle is stopped.
The keyless access transmitter must be inside the
vehicle for the ignition to work.
Cell phone chargers can interfere with the operation of
the Keyless Access System. Battery chargers should
not be plugged in when starting or turning off the
engine.
To start the vehicle, do the following:
Starting Procedure
1. With your foot on the brake pedal, press the START button located on the instrument panel.
If there is not a keyless access transmitter
in the vehicle or if there is something causing
interference with it, the DIC will display NO FOBS
DETECTED. See DIC Warnings and Messages
on
page 4‑76for more information.
3-27