ECO mode CADILLAC XLR 2008 1.G Owners Manual
[x] Cancel search | Manufacturer: CADILLAC, Model Year: 2008, Model line: XLR, Model: CADILLAC XLR 2008 1.GPages: 470, PDF Size: 8.39 MB
Page 69 of 470

If you have additional transmitters to program, take
transmitter 1 out of the transmitter pocket and place
transmitter 2 in the pocket. This can be done repeatedly
until up to four transmitters have been programmed.
The DIC will then display MAX # FOBS LEARNED and
will exit the programming mode.
When you are done programming transmitters, press
the Acc. button.
Battery Replacement
Under normal use, the battery in your keyless access
transmitter should last about three years.
You can tell the battery is weak if the transmitter will not
work at the normal range in any location. If you have
to get close to your vehicle before the transmitter works,
it is probably time to change the battery.
A weak battery may also cause the DIC to display
NO FOB DETECTED when you try to start the vehicle.
If this happens, place the transmitter in the glove box
transmitter pocket with the buttons facing to the right.
Then, with the vehicle in PARK (P) or NEUTRAL (N),
press the brake pedal and the START button. Although
this will start the vehicle, it is recommended that you
replace the transmitter battery as soon as possible.
The DIC may display FOB BATTERY LOW.
Notice:When replacing the battery, use care not to
touch any of the circuitry. Static from your body
transferred to these surfaces may damage the
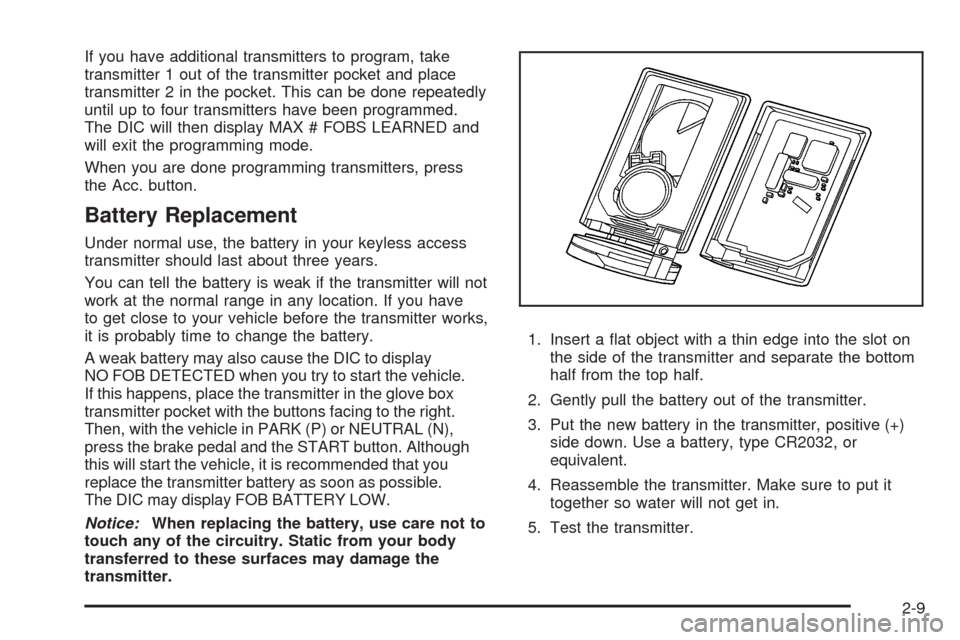
transmitter.1. Insert a �at object with a thin edge into the slot on
the side of the transmitter and separate the bottom
half from the top half.
2. Gently pull the battery out of the transmitter.
3. Put the new battery in the transmitter, positive (+)
side down. Use a battery, type CR2032, or
equivalent.
4. Reassemble the transmitter. Make sure to put it
together so water will not get in.
5. Test the transmitter.
2-9
Page 78 of 470

Power Window Initialize
After a power reconnect such as battery replacement,
the express-up and index-up features will not function
until the system is initialized. Once power is restored,
do the following:
1. Close the door.
2. Raise the window by holding the up arrow on
the power window switch.
3. Hold the up arrow for three seconds after
the window is closed. Release the switch.
Then hold the up arrow again for three seconds.
The express-up system must be initialized to operate
the windows with the door open.
Express-Down Window
This feature is on both power windows. Press the
down arrow on the switch to the second position to
activate the express-down feature. If you want to stop
the window as it is lowering, press the switch again.
Express-Up Window
This feature is on both power windows. Press the up
arrow on the switch to the second position to activate
the express-up feature. If you want to stop the window
as it is raising, press the switch again.
Express Window Anti-Pinch Feature
If any object is in the path of the window when
the express-up is active, the window will stop at the
obstruction and auto-reverse to a preset factory position.
Weather conditions such as severe icing may also
cause the window to auto-reverse. The window
will return to normal operation once the obstruction or
condition is removed.
{CAUTION:
If express override is activated, the window will
not reverse automatically. You or others could
be injured and the window could be damaged.
Before you use express override, make sure
that all people and obstructions are clear of the
window path.
Express Window Anti-Pinch Override
In an emergency, the anti-pinch feature can be
overridden in a supervised mode. Hold the window switch
all the way down in the express position. The window will
rise for as long as the switch is held. Once the switch is
released, the express mode is re-activated.
In this mode, the window can still close on an object in
its path. Use care when using the override mode.
2-18
Page 86 of 470

Your vehicle has a Computer-Controlled Cranking
System. This feature assists in starting the engine and
protects components. Once cranking has been initiated,
the engine continues cranking for a few seconds or until
the vehicle starts. If the engine does not start, cranking
automatically stops after 15 seconds to prevent cranking
motor damage. To prevent gear damage, this system
also prevents cranking if the engine is already running.
Notice:The engine is designed to work with the
electronics in your vehicle. If you add electrical parts
or accessories, you could change the way the engine
operates. Before adding electrical equipment, check
with your dealer/retailer. If you do not, your engine
might not perform properly. Any resulting damage
would not be covered by your vehicle’s warranty.
Stopping Your Engine
Move the shift lever to PARK (P) and press the Acc.
button located on the instrument panel. If the shifter is
not in PARK (P), the engine shuts off and the vehicle
goes into the Accessory Mode. The DIC displays SHIFT
TO PARK. Once the shifter is moved to PARK (P),
the vehicle turns off.
The DIC displays NO FOB, OFF OR RUN?, if the
keyless access transmitter is not detected inside the
vehicle when it is turned off.
SeeDIC Warnings and Messages on page 3-63for
more information.
Automatic Transmission Operation
There are several different positions for the shift lever.
PARK (P):This position locks the rear wheels. It is
the best position to use when you starting the engine
because your vehicle cannot move easily.
2-26
Page 105 of 470

Universal Home Remote System
Operation (With Three Round LED)
Your vehicle may have the Universal Home Remote
System. If there are three round Light Emitting
Diode (LED) indicator lights above the Universal
Home Remote buttons, follow the instructions below.
This system provides a way to replace up to
three remote control transmitters used to activate
devices such as garage door openers, security
systems, and home automation devices.Do not use this system with any garage door opener
that does not have the stop and reverse feature.
This includes any garage door opener model
manufactured before April 1, 1982.
Read the instructions completely before attempting to
program the transmitter. Because of the steps involved,
it may be helpful to have another person available to
assist you in programming the transmitter.
Be sure to keep the original remote control transmitter
for use in other vehicles, as well as, for future
programming. You only need the original remote control
transmitter for Fixed Code programming. It is also
recommended that upon the sale or lease termination
of the vehicle, the programmed buttons should be
erased for security purposes. See “Erasing Universal
Home Remote Buttons” later in this section.
When programming a garage door, it is advised to
park outside of the garage. Be sure that people
and objects are clear of the garage door or security
device you are programming.
2-45
Page 110 of 470

2. Write down the eight to 12 switch settings from
left to right as follows:
When a switch is in the up position,
write “Left.”
When a switch is in the down position,
write “Right.”
If a switch is set between the up and down
position, write “Middle.”
The switch settings that you wrote down in
Step 2 will now become the button strokes
you enter into the Universal Home Remote in
Step 4. Be sure to enter the switch settings
that you wrote down in Step 2, in order from
left to right, into the Universal Home Remote,
when completing Step 4.
3. From inside your vehicle, �rst �rmly press all
three buttons at the same time for about
three seconds. Release the buttons to put the
Universal Home Remote into programming mode.4. The indicator lights will blink slowly. Enter each
switch setting from Step 2 into your vehicle’s
Universal Home Remote. You will have two and
one-half minutes to complete Step 4. Now press
one button on the Universal Home Remote for each
switch setting as follows:
If you wrote “Left,” press the left button in
the vehicle.
If you wrote “Right,” press the right button in
the vehicle.
If you wrote “Middle,” press the middle button
in the vehicle.
2-50
Page 162 of 470

A/C OFF (Air Conditioning):Press this button to turn
off the air conditioning compressor. Press AUTO to
return to automatic operation. The compressor cannot
be turned off in either the defrost or �oor/defog mode.
((Heated/Cooled Seat):Press this button to turn the
feature on. The button on the left controls the driver’s
seat and the button on the right controls the passenger’s
seat. Each press of the button will take you to a different
setting. The settings available in order are HI HEAT,
LO HEAT, OFF, HI COOL, LO COOL and OFF. You will
be able to feel the temperature change in a few minutes.
The feature will automatically turn off when the vehicle
is turned off.
?(Recirculation):Press this button to turn the
recirculation mode on or off. The air conditioning
compressor also comes on. This mode keeps outside
air from coming in the vehicle. It can be used to prevent
outside air and odors from entering your vehicle or to
help cool the air inside your vehicle more quickly.
Recirculation is not available in defrost or �oor/defog
modes.
Using recirculation for long periods of time may cause
the air inside your vehicle to become too dry. To prevent
this from happening, after the air in your vehicle has
cooled, turn the recirculation mode off.
Sensors
There are sensors to measure the temperature and
sun’s effect on passenger comfort.
The solar sensor on your vehicle monitors the solar
radiation then uses the information to maintain the
selected temperature when operating in AUTO mode by
initiating needed adjustments to the temperature, the
fan speed and the air delivery system. The system may
also supply cooler air to the side of the vehicle facing
the sun. The recirculation mode will also be activated, as
necessary. Do not cover the solar sensor located on
the top of the instrument panel near the windshield
or the system will not work properly.
There is also a sensor located behind the front bumper.
This sensor reads the outside air temperature and helps
maintain the temperature inside the vehicle. The outside
temperature will be displayed in the navigation system
only when the engine is running. Any cover on the front of
the vehicle could give a false reading of the temperature.
If the outside temperature goes up, the display
temperature will not change until:
The vehicle’s speed is above 15 mph (24 km/h)
for �ve minutes.
The vehicle’s speed is above 32 mph (51 km/h)
for two and one-half minutes.
3-40
Page 178 of 470

Emissions Inspection and
Maintenance Programs
Some state/provincial and local governments have
or might begin programs to inspect the emission
control equipment on your vehicle. Failure to pass
this inspection could prevent you from getting a
vehicle registration.
Here are some things you need to know to help
your vehicle pass an inspection:
Your vehicle will not pass this inspection if the check
engine light is on or not working properly.
To perform a check engine light bulb check with the
keyless ignition, make sure the transmitter fob is
in the passenger compartment. SeeIgnition Positions
on page 2-23. Press the bottom of the Acc. button
on the instrument panel and hold the button down for
�ve seconds. The instrument panel, including the check
engine light, will light up and the ignition will be on,but the engine will not start — if you press the bottom
of the Acc. button only brie�y, less than �ve seconds,
the accessory power mode will be turned on, but not
the ignition. After the bulb check, be sure to press and
release the Acc. button again to turn the ignition off
and avoid draining the vehicle’s battery.
Your vehicle will not pass this inspection if the
OBD (on-board diagnostic) system determines that
critical emission control systems have not been
completely diagnosed by the system. The vehicle would
be considered not ready for inspection. This can
happen if you have recently replaced the battery or
if the battery has run down. The diagnostic system is
designed to evaluate critical emission control systems
during normal driving. This may take several days
of routine driving. If you have done this and your
vehicle still does not pass the inspection for lack of
OBD system readiness, your dealer/retailer can prepare
the vehicle for inspection.
3-56
Page 183 of 470

+(Interior Lamps):Press this button to turn the
interior lamps on and off.
OPTIONS:Press this button to choose personal
options that are available on your vehicle.
RESET:Press this button to reset a feature. It is also
used to switch between English and Metric options.
Use the information button to scroll through the
following options:
ODOMETER:This feature shows how far the vehicle
has been driven in either miles (mi) or kilometers (km).
Use the ENG/METRIC feature to switch between
English and Metric units.
TRIP A:This feature will record the distance traveled
since the last time it was reset. Press and hold the
RESET button to return to zero. If your vehicle is �rst
sold in the United States, the trip odometer will return
to zero after 999.9 miles (1 609 km). If your vehicle
is �rst sold in Canada, the trip odometer will return to
zero after 1,242 miles (1 999 km).
TRIP B:This feature allows you to record the distance
traveled during a second trip and functions the same
as TRIP A.RANGE xxx MI:This feature shows about how many
miles (mi) or kilometers (km) you can drive without
re�lling your fuel tank. Once the range drops below
40 miles (64 km) remaining, the display will show LOW.
If the vehicle has been idling for a long time, the
range displayed on the DIC could be abnormally low.
The vehicle must be driven 5-10 miles (8-16 km) to
get an accurate reading.
AVERAGE xx.x MPG (Average Miles Per Gallon):
This feature shows the approximate fuel economy the
vehicle has averaged since the last time the value
was reset. To reset the average miles per gallon, press
the information button to display AVERAGE xx.x MPG,
then press and hold the RESET button until AVERAGE
00.0 MPG is displayed.
INST xx.x MPG (Instantaneous Miles Per Gallon):
This feature shows the instantaneous fuel economy
which varies with your driving conditions, such as
acceleration, braking, and the grade of the road being
traveled. The RESET button does not function in
this mode.
3-61
Page 196 of 470

TRAC (Traction)/STABILITRAK ON
This message displays when both the Traction Control
System (TCS) and the StabiliTrak®System are on.
TRACTION SYSTEM OFF
This message displays when the Traction Control
System (TCS) is off, but the StabiliTrak®System
remains on.
TRACTION SYSTEM ON
This message displays when the Traction Control
System (TCS) is on.
TRUNK AJAR
This message displays when the trunk is open while
the vehicle is running and is not in PARK (P).
WAIT FOR STABILITRAK
This message displays after driving 19 mph (30 km/h)
for 10 seconds if the steering is not centered.
The StabiliTrak
®System is not available until the
steering centers itself and the STABILITRAK READY
message is displayed in the DIC.
Other Messages
Here are more messages that you can receive on the
Driver Information Center (DIC). To acknowledge a
message and read another message that may have
come on at the same time, press the RESET button.
ACCESSORY MODE ON
SeeIgnition Positions on page 2-23.
CHANGE OIL SOON
SeeEngine Oil on page 6-16andEngine Oil
Life System on page 6-20.
FOB BATTERY LOW
See “Battery Replacement” underKeyless
Access System Operation on page 2-6.
HIGH TIRE PRESS LF
SeeInflation - Tire Pressure on page 6-60.
HIGH TIRE PRESS RF
SeeInflation - Tire Pressure on page 6-60.
HIGH TIRE PRESS LR
SeeInflation - Tire Pressure on page 6-60.
HIGH TIRE PRESS RR
SeeInflation - Tire Pressure on page 6-60.
3-74
Page 199 of 470

Auto Recall
This feature allows the steering column, outside mirrors
and the driver’s seat to automatically move to the current
driver’s set position when the engine starts. The DIC will
display AUTO RECALL OFF or AUTO RECALL ON.
Press the OPTIONS button to change the setting.
Auto Exit Recall
This feature allows the steering column and driver’s
seat to automatically move to the current driver’s
exit position when one of the following occurs:
The vehicle is turned off or in RAP or accessory
mode and the driver’s door is opened.
The vehicle is turned off or in RAP and the
unlock button on the keyless access transmitter
is pressed.
The DIC will display AUTO EXIT RECALL OFF or
AUTO EXIT RECALL ON. Press the OPTIONS
button to change the setting.
Approach Lights
This feature activates the parking lamps, front fog lamps
and back-up lamps during low light periods when the
unlock button on the keyless access transmitter is
pressed, both doors are closed and the vehicle is off or
in RAP. The lamps remain on for 20 seconds or until
a door is opened, the lock button on the keyless access
transmitter is pressed or the vehicle is no longer off
or in RAP.
The DIC will display APPROACH LIGHTS OFF or
APPROACH LIGHTS ON. Press the OPTIONS button
to change the setting.
Exit Lights
This feature activates the parking lamps and front fog
lamps for 15, 30 or 90 seconds. This will occur when
the vehicle is off or in RAP and the headlamps are on
due to the automatic headlamp system. The parking
lamps and front fog lamps will remain on until the driver
selected time period expires, the exterior lamp control
is activated or the vehicle is no longer off or in RAP.
The DIC will display EXIT LIGHTS OFF, EXIT
LIGHTS - 15 SEC, EXIT LIGHTS - 30 SEC, or
EXIT LIGHTS - 90 SEC. Press the OPTIONS button
to change the setting.
3-77