set clock CADILLAC XLR 2009 1.G Owners Manual
[x] Cancel search | Manufacturer: CADILLAC, Model Year: 2009, Model line: XLR, Model: CADILLAC XLR 2009 1.GPages: 462, PDF Size: 3.72 MB
Page 181 of 462
AVERAGE SPEED:This feature shows the average
speed the vehicle has traveled since the last time
the value was reset. To reset the value, press the
information button to display AVERAGE SPEED, then
press and hold the RESET button until AVERAGE
SPEED 00.0 is displayed.
ELAPSED TIME:This feature is like a stopwatch, in
that you can clock the time it takes to get from one point
to another.
To operate, press the information button to display
ELAPSED TIME. Each of the �elds for the hours,
minutes, and seconds are two numeric digits.
Once ELAPSED TIME 00:00:00 is displayed, press the
RESET button to start the timing feature. Press the
RESET button again to stop it. If you will be starting and
stopping the vehicle, during a trip for instance, the
ELAPSED TIME feature will automatically start timing
where it left off when you last stopped. To reset it, press
and hold the RESET button until the display reads
ELAPSED TIME 00:00:00. Press the information button
to exit from the ELAPSED TIME display.FRONT Lxx Rxx PSI:This feature shows the tire
pressure for the front left and right tires.
REAR Lxx Rxx PSI:This feature shows the tire
pressure for the rear left and right tires.
OIL LIFE:This feature shows the estimated oil life
remaining. SeeOil Life Indicator on page 3-76for more
information. To reset the engine oil life system, see
Engine Oil Life System on page 6-18. This only needs
to be reset after you have had the oil changed.
In addition to the engine oil life system monitoring oil
life, additional maintenance is recommended in the
Maintenance Schedule in this manual. SeeScheduled
Maintenance on page 7-4andEngine Oil on page 6-15
for more information.
ENG/METRIC (English/Metric):This feature allows
you to switch the DIC displays between English
and Metric. Press the RESET button to switch the
display between English and Metric. There will be an
arrow next to the option that is selected.
3-59
Page 220 of 462
Setting the Clock
To set the time:
1. Press the PWR/VOL knob to turn the system on.
2. Press the
e/z(Audio/Adjust) hard key.
3. Press the
8clock symbol screen button.
4. Select the 12H or 24H screen button to display the
time in standard or military time.
5. Press and hold the HOUR and MIN. (minute) arrow
buttons to increase or to decrease the time.
6. Select the appropriate time zone screen button.
7. Select the Daylight Saving Time screen button,
if necessary.
The radio uses the GPS satellite to set the time.
The vehicle needs to be in an open area to receive the
signal. See “Clock Adjust Menu” underNavigation
Audio System on page 4-52for more information.
Setting the Search Area, Entering an
Address and Point of Interest, Storing a
Home Destination, and Using The
Home or Previous Destinations
Before entering an Address, Point of Interest, Home, or
Preset Destination, select the appropriate region that
contains the �nal destination. The vehicle must be
stopped to perform this operation.
Setting the Search Area
To set the search area:
1. If the radio is already on with a map disc inserted,
skip to Step 5.
2. Press the PWR/VOL knob to turn the system on.
3. Insert the DVD map disc. See “Regional Maps”
underMaps on page 4-38for more information.
4. A notice may appear. Touch the I AGREE screen
button to proceed.
5. Press the ROUTE hard key.
6. Press the Enter Destination screen button.
7. Press the Change screen button.
8. Select the appropriate region numbered screen
button that contains your �nal destination.
The system returns to the Destination menu. SeeEnter
Destination on page 4-27for more information.
4-6
Page 268 of 462
8(Clock):Touch this screen button to get to the
CLOCK ADJUST menu. See “Clock Adjust Menu” later
in this section for more information.
SCREEN ADJUST:To adjust the brightness or contrast
of the screen, touch SCREEN ADJUST to display the
screen adjust menu. See “Screen Adjust Menu” later in
this section for more information.
SOUND:Touch this screen button to access the Sound
menu. See “Sound Menu” later in this section for more
information.
DSP (Digital Signal Processing):Touch this screen
button to access the DSP menu. See “Adjusting
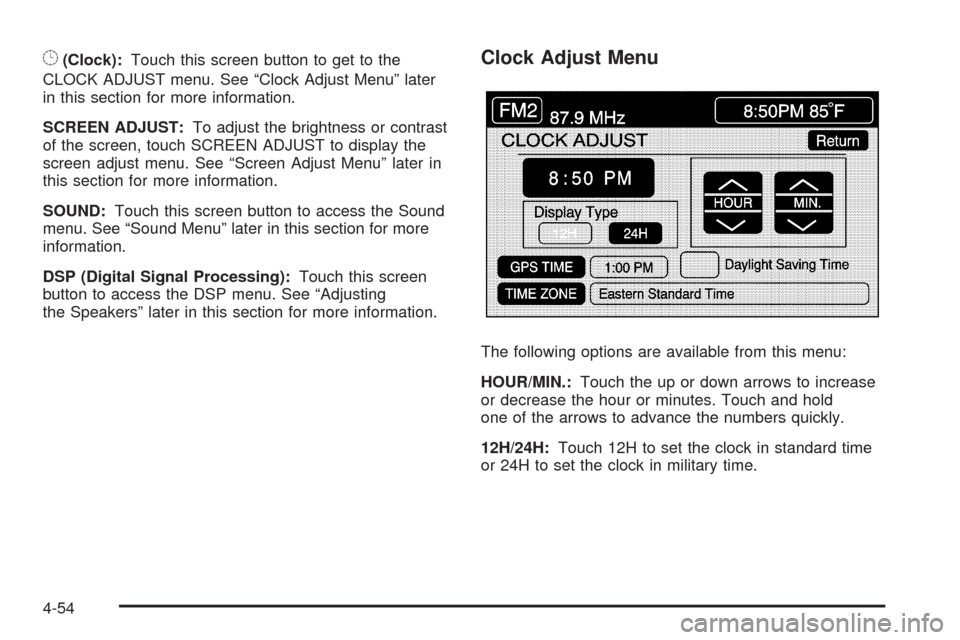
the Speakers” later in this section for more information.Clock Adjust Menu
The following options are available from this menu:
HOUR/MIN.:Touch the up or down arrows to increase
or decrease the hour or minutes. Touch and hold
one of the arrows to advance the numbers quickly.
12H/24H:Touch 12H to set the clock in standard time
or 24H to set the clock in military time.
4-54
Page 269 of 462
GPS TIME:The current GPS time displays to the right of
this screen button. Touch GPS TIME to set the navigation
system time to match current GPS time. If the seconds for
the present minute are greater than thirty when GPS
TIME is selected, the clock rounds up to the next minute.
Daylight Saving Time:Touch this screen button to
increase the time setting by one hour. Then touch GPS
TIME to save the new setting. If the screen button is light
blue, the daylight savings time feature is on. If the button
is dark blue, the daylight savings time feature is off.
TIME ZONE:The selected time zone appears to the
right of this screen button. Touch this screen button to
toggle between time zones and select the desired
one. The time of the selected zone displays to the right
of the GPS TIME screen button. To set the clock to
the new setting, touch GPS TIME.
If the system is not receiving GPS information, the time
can still be set manually as described above but the
GPS time and Daylight Saving Time features will not
be available.
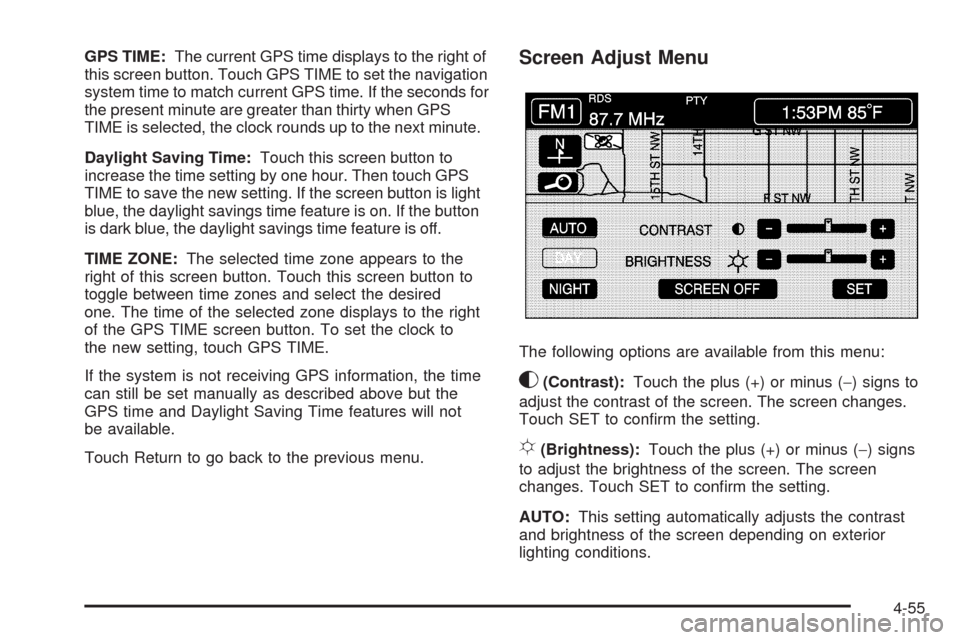
Touch Return to go back to the previous menu.Screen Adjust Menu
The following options are available from this menu:
K(Contrast):Touch the plus (+) or minus (−) signs to
adjust the contrast of the screen. The screen changes.
Touch SET to con�rm the setting.
!(Brightness):Touch the plus (+) or minus (−) signs
to adjust the brightness of the screen. The screen
changes. Touch SET to con�rm the setting.
AUTO:This setting automatically adjusts the contrast
and brightness of the screen depending on exterior
lighting conditions.
4-55
Page 270 of 462
DAY:This setting leaves the screen in day mode.
Day mode is best suited for daylight conditions.
NIGHT:This setting leaves the screen in night mode.
Night mode is best suited for nighttime conditions.
SCREEN OFF:Touch SCREEN OFF to turn off the
screen. Press any hard key to turn the screen back on.
SET:Touch SET to save the choices and exit the
CLOCK ADJUST menu.
Language
The vehicle has been set for the English language.
Change the language, through the Driver Information
Center (DIC). SeeDriver Information Center (DIC)
on page 3-57for more information.
If the language is changed from English, a majority of the
voice guidance prompts and screen text changes to the
selected language. Remember, the menu screens will not
match word-for-word as they appear in this manual.
Playing the Radio
PWR-VOL (Power-Volume):Press to turn the audio
and navigation systems on and off. Turn the knob
to increase or decrease the volume to the audio system.
«TUNE/SEEKª:Press the up or down arrow to
go to the next or previous station and stay there.BAND:Press this key to switch between AM, FM1,
FM2, XM1, XM 2, or WX, if equipped. While on a map
screen and this key is pressed, the screen will not
change but the audio source will.
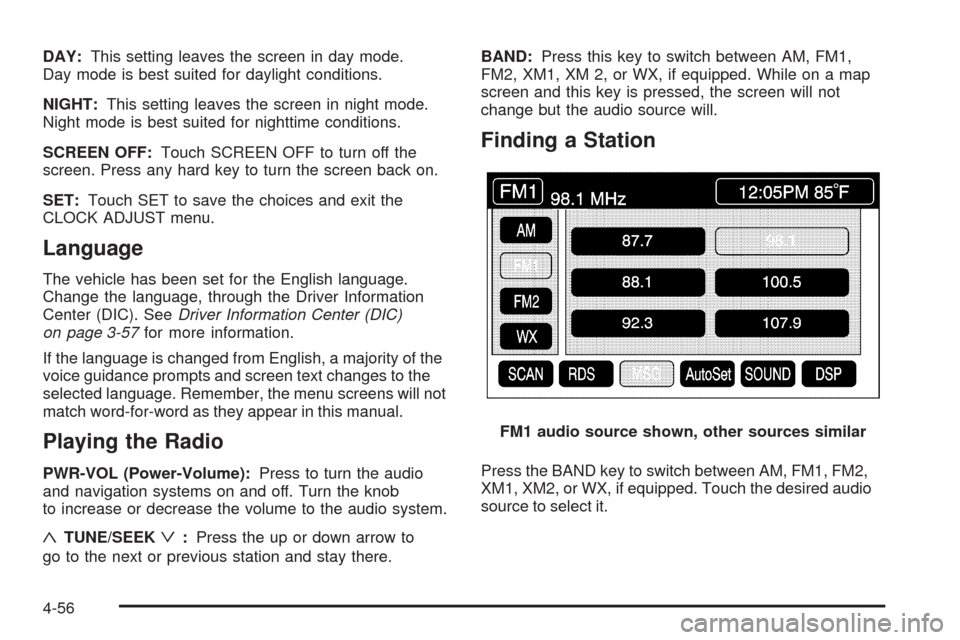
Finding a Station
Press the BAND key to switch between AM, FM1, FM2,
XM1, XM2, or WX, if equipped. Touch the desired audio
source to select it.FM1 audio source shown, other sources similar
4-56