Remove CADILLAC XT4 2021 Manual PDF
[x] Cancel search | Manufacturer: CADILLAC, Model Year: 2021, Model line: XT4, Model: CADILLAC XT4 2021Pages: 408, PDF Size: 8.33 MB
Page 337 of 408
Cadillac XT4 Owner Manual (GMNA-Localizing-U.S./Canada/Mexico-
14584367) - 2021 - CRC - 10/14/20
336 VEHICLE CARE
9. Inflate the tire to therecommended inflation pressure
using the pressure gauge (8). The
recommended inflation pressure
can be found on the Tire and
Loading Information label. See Tire
Pressure 0316.
The pressure gauge (8) may read
higher than the actual tire pressure
while the compressor is on. Turn
the compressor off to get an
accurate pressure reading. The
compressor may be turned on/off
until the correct pressure is
reached.
Caution
If the recommended pressure
cannot be reached after
approximately 25 minutes, the
vehicle should not be driven farther.
The tire is too severely damaged
and the tire sealant and compressor
kit cannot inflate the tire. Remove
the power plug from the accessory
power outlet and unscrew the
inflating hose from the tire valve. 10. Press the on/off button (5) to turn
the tire sealant and compressor
kit off.
Be careful while handling the
compressor as it could be warm
after usage.
11. Unplug the power plug (9) from the accessory power outlet in the
vehicle.
12. Turn the air only hose (10) counterclockwise to remove it from
the tire valve stem.
13. Replace the tire valve stem cap.
14. Return the air only hose (10) and power plug (9) back to their
original storage location.
15. Return the equipment to its original storage location in the
vehicle.
The tire sealant and compressor kit
has accessory adapters located in a
compartment on the bottom of its
housing that can be used to inflate air
mattresses, balls, etc.
Storing the Tire Sealant
and Compressor Kit
The tire sealant and compressor kit is
in a bag in the rear compartment
storage area. 1. Open the liftgate.
2. Remove the cargo cover, if equipped.
3. Lift the load floor. Use the hook to hold the load floor open. See Rear
Storage 085.
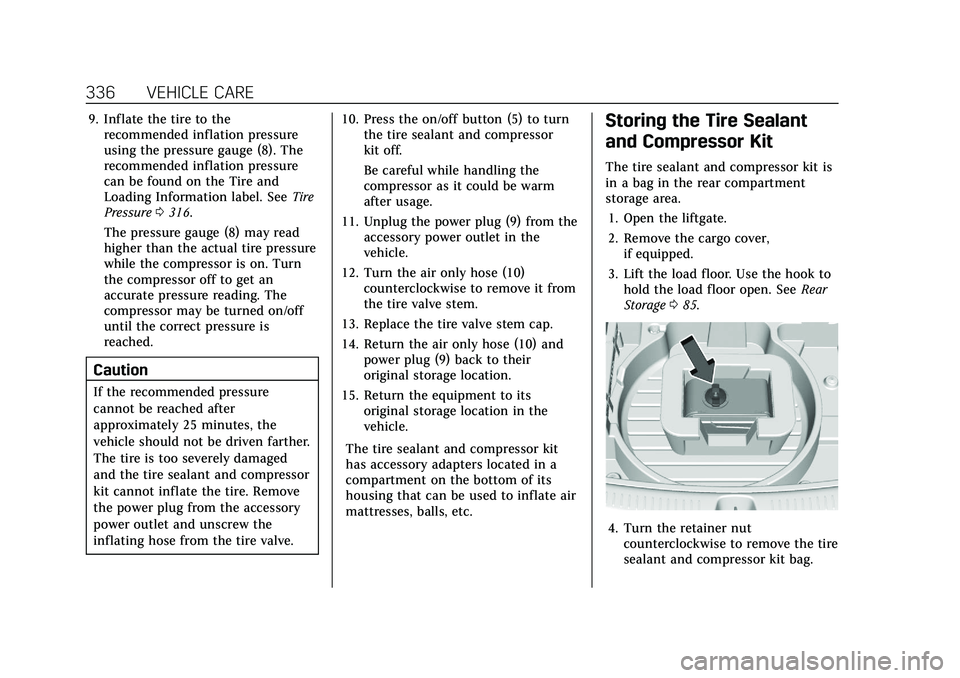
4. Turn the retainer nut
counterclockwise to remove the tire
sealant and compressor kit bag.
Page 338 of 408

Cadillac XT4 Owner Manual (GMNA-Localizing-U.S./Canada/Mexico-
14584367) - 2021 - CRC - 10/14/20
VEHICLE CARE 337
5. Remove the tire sealant andcompressor kit from the bag.
To store the tire sealant and
compressor kit, reverse the steps.
Tire Changing
Removing the Spare Tire and
Tools
1. Wrench
2. Jack
3. Strap
4. Tow Hook (If Equipped)
To access the spare tire and tools: 1. Open the liftgate. See Liftgate019.
2. Remove the cargo cover, if equipped.
3. Lift the load floor. Use the hook to hold the load floor open. See Rear
Storage 085.
Insert the hook (2) into the
opening on the liftgate (1) to hold
it open.
4. Turn the retainer nut
counterclockwise and remove the
spare tire.
Place the spare tire next to the tire
being changed.
5. The jack and tools are stored below the spare tire.
Remove them from their container
and place them near the tire being
changed.
Removing the Flat Tire and
Installing the Spare Tire
1. Do a safety check beforeproceeding. See If a Tire Goes Flat
0 329.
Page 339 of 408

Cadillac XT4 Owner Manual (GMNA-Localizing-U.S./Canada/Mexico-
14584367) - 2021 - CRC - 10/14/20
338 VEHICLE CARE
2. For vehicles equipped with a wheelcover or center cap, pull the cover
or center cap away from the wheel
to remove it.
Store the wheel cover in the cargo
area until the flat tire is repaired or
replaced.
If the vehicle has a center cap with
wheel nut caps, the wheel nut caps
are designed to stay with the
center cap after they are loosened.
Remove the entire center cap if the
wheel has a smooth center cap.
Place the chisel end of the wheel
wrench in the slot on the wheel,
and gently pry it off.3. Turn the wheel wrenchcounterclockwise to loosen all the
wheel nuts, but do not remove
them yet.
Caution
Make sure that the jack lift head is
in the correct position or you may
damage your vehicle. The repairs
would not be covered by your
warranty.
4. Position the jack lift head at the jack location nearest the flat tire.
Locate the notch on the sheet
metal weld flange. Place the center
of the jack lift head on the center
of the sheet metal notch.
The jack must not be used in any
other position.
{Warning
Getting under a vehicle when it is
lifted on a jack is dangerous. If the
vehicle slips off the jack, you could
be badly injured or killed. Never get
under a vehicle when it is
supported only by a jack.
{Warning
Raising the vehicle with the jack
improperly positioned can damage
the vehicle and even make the
vehicle fall. To help avoid personal
injury and vehicle damage, be sure
to fit the jack lift head into the
proper location before raising the
vehicle.
Page 340 of 408

Cadillac XT4 Owner Manual (GMNA-Localizing-U.S./Canada/Mexico-
14584367) - 2021 - CRC - 10/14/20
VEHICLE CARE 339
{Warning
Lifting a vehicle and getting under
it to do maintenance or repairs is
dangerous without the appropriate
safety equipment and training. If a
jack is provided with the vehicle, it
is designed only for changing a flat
tire. If it is used for anything else,
you or others could be badly injured
or killed if the vehicle slips off the
jack. If a jack is provided with the
vehicle, only use it for changing a
flat tire.
Caution
Using a jack to raise the vehicle
without positioning it correctly
could damage your vehicle. When
raising your vehicle on a jack, be
sure to position it correctly under
the frame and avoid contact with
the plastic molding.
5. Turn the wheel wrench clockwiseto raise the jack until the slot in
the jack lift head fits into the metal
flange located behind the cut out
on the plastic molding.
Do not raise the vehicle yet.
6. Put the compact spare tire near you.
7. Raise the vehicle by turning the jack handle clockwise. Raise the
vehicle far enough off the ground
so there is enough room for the
road tire to clear the ground.8. Remove all of the wheel nuts.
9. Remove the flat tire.
{Warning
Rust or dirt on a wheel, or on
the parts to which it is fastened,
can cause wheel nuts to become
loose over time. The wheel
could come off and cause a
crash. When changing a wheel,
remove any rust or dirt from
places where the wheel attaches
to the vehicle. In an emergency,
a cloth or paper towel can be
(Continued)
Page 341 of 408
Cadillac XT4 Owner Manual (GMNA-Localizing-U.S./Canada/Mexico-
14584367) - 2021 - CRC - 10/14/20
340 VEHICLE CARE
Warning (Continued)
used; however, use a scraper or
wire brush later to remove all
rust or dirt.
10. Remove any rust or dirt from thewheel bolts, mounting surfaces,
and spare wheel.
11. Place the compact spare tire on the wheel-mounting surface.
{Warning
Never use oil or grease on bolts or
nuts because the nuts might come
loose. The vehicle's wheel could fall
off, causing a crash.
12. Reinstall the wheel nuts. Tighten each nut by hand until the wheel is
held against the hub.
13. Lower the vehicle by turning the jack handle counterclockwise.
{Warning
Wheel nuts that are improperly or
incorrectly tightened can cause the
wheels to become loose or come off.
The wheel nuts should be tightened
with a torque wrench to the proper
torque specification after replacing.
Follow the torque specification
supplied by the aftermarket
manufacturer when using accessory
locking wheel nuts. See Capacities
and Specifications 0371 for original
equipment wheel nut torque
specifications.
Caution
Improperly tightened wheel nuts
can lead to brake pulsation and
rotor damage. To avoid expensive
brake repairs, evenly tighten the
wheel nuts in the proper sequence
and to the proper torque
specification. See Capacities and
Specifications 0371 for the wheel
nut torque specification.
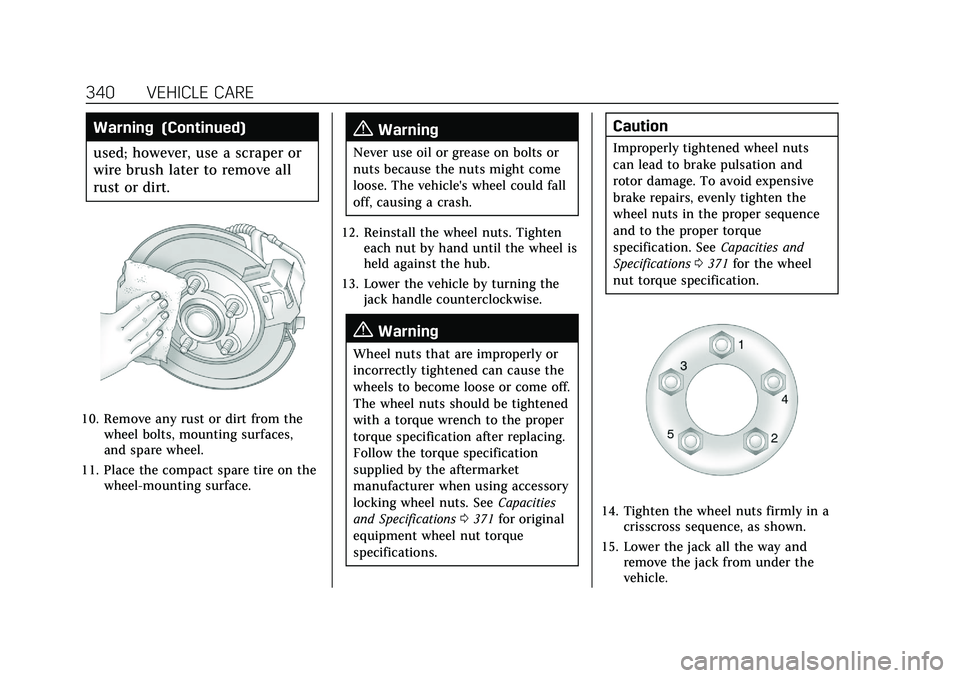
14. Tighten the wheel nuts firmly in a crisscross sequence, as shown.
15. Lower the jack all the way and remove the jack from under the
vehicle.
Page 344 of 408
Cadillac XT4 Owner Manual (GMNA-Localizing-U.S./Canada/Mexico-
14584367) - 2021 - CRC - 10/14/20
VEHICLE CARE 343
Warning (Continued)
If you do not follow these steps
exactly, some or all of these things
can hurt you.
Caution
Ignoring these steps could result in
costly damage to the vehicle that
would not be covered by the vehicle
warranty. Trying to start the vehicle
by pushing or pulling it will not
work, and it could damage the
vehicle.
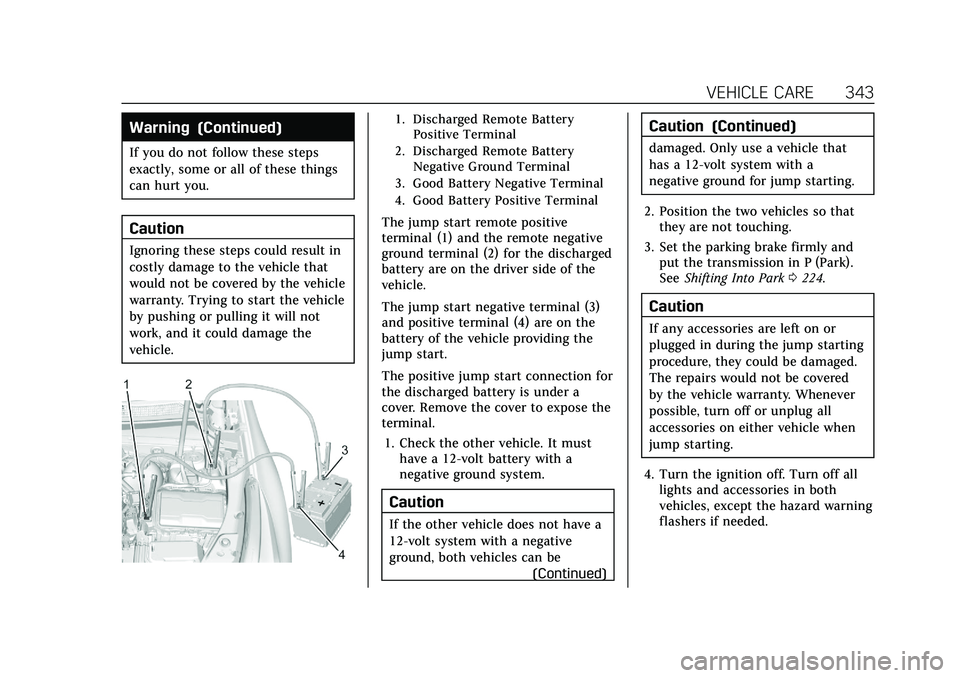
1. Discharged Remote BatteryPositive Terminal
2. Discharged Remote Battery Negative Ground Terminal
3. Good Battery Negative Terminal
4. Good Battery Positive Terminal
The jump start remote positive
terminal (1) and the remote negative
ground terminal (2) for the discharged
battery are on the driver side of the
vehicle.
The jump start negative terminal (3)
and positive terminal (4) are on the
battery of the vehicle providing the
jump start.
The positive jump start connection for
the discharged battery is under a
cover. Remove the cover to expose the
terminal.
1. Check the other vehicle. It must have a 12-volt battery with a
negative ground system.
Caution
If the other vehicle does not have a
12-volt system with a negative
ground, both vehicles can be
(Continued)
Caution (Continued)
damaged. Only use a vehicle that
has a 12-volt system with a
negative ground for jump starting.
2. Position the two vehicles so that they are not touching.
3. Set the parking brake firmly and put the transmission in P (Park).
See Shifting Into Park 0224.
Caution
If any accessories are left on or
plugged in during the jump starting
procedure, they could be damaged.
The repairs would not be covered
by the vehicle warranty. Whenever
possible, turn off or unplug all
accessories on either vehicle when
jump starting.
4. Turn the ignition off. Turn off all lights and accessories in both
vehicles, except the hazard warning
flashers if needed.
Page 345 of 408

Cadillac XT4 Owner Manual (GMNA-Localizing-U.S./Canada/Mexico-
14584367) - 2021 - CRC - 10/14/20
344 VEHICLE CARE
{Warning
An electric fan can start up even
when the engine is not running and
can injure you. Keep hands,
clothing, and tools away from any
underhood electric fan.
{Warning
Using a match near a battery can
cause battery gas to explode. People
have been hurt doing this, and
some have been blinded. Use a
flashlight if you need more light.
Battery fluid contains acid that can
burn you. Do not get it on you.
If you accidentally get it in your
eyes or on your skin, flush the place
with water and get medical help
immediately.
{Warning
Fans or other moving engine parts
can injure you badly. Keep your
hands away from moving parts
once the engine is running.
5. Connect one end of the red positive (+) cable to the remote
positive (+) terminal on the
discharged battery.
6. Connect the other end of the red positive (+) cable to the positive (+)
terminal of the good battery.
7. Connect one end of the black negative (–) cable to the
negative (–) terminal of the good
battery.
8. Connect the other end of the black negative (–) cable to the remote
negative (–) ground terminal on the
driver side shock tower for the
discharged battery.
9. Start the engine in the vehicle with the good battery and run the
engine at idle speed for at least
four minutes. 10. Try to start the vehicle that had
the dead battery. If it will not start
after a few tries, it probably needs
service.
Caution
If the jumper cables are connected
or removed in the wrong order,
electrical shorting may occur and
damage the vehicle. The repairs
would not be covered by the vehicle
warranty. Always connect and
remove the jumper cables in the
correct order, making sure that the
cables do not touch each other or
other metal.
Jumper Cable Removal
Reverse the sequence exactly when
removing the jumper cables.
After starting the disabled vehicle and
removing the jumper cables, allow it
to idle for several minutes.
Page 349 of 408

Cadillac XT4 Owner Manual (GMNA-Localizing-U.S./Canada/Mexico-
14584367) - 2021 - CRC - 10/14/20
348 VEHICLE CARE
Appearance Care
Exterior Care
Locks
Locks are lubricated at the factory.
Use a de-icing agent only when
absolutely necessary, and have the
locks greased after using. See
Recommended Fluids and Lubricants
0367.
Washing the Vehicle
To preserve the vehicle's finish, wash
it often and out of direct sunlight.
Caution
Do not use petroleum-based, acidic,
or abrasive cleaning agents as they
can damage the vehicle's paint,
metal, or plastic parts. If damage
occurs, it would not be covered by
the vehicle warranty. Approved
cleaning products can be obtained
from your dealer. Follow all
manufacturer directions regarding
correct product usage, necessary
(Continued)
Caution (Continued)
safety precautions, and appropriate
disposal of any vehicle care
product.
Caution
Avoid using high-pressure washes
closer than 30 cm (12 in) to the
surface of the vehicle. Use of power
washers exceeding 8 274 kPa
(1,200 psi) can result in damage or
removal of paint and decals.
If using an automatic car wash, follow
the car wash instructions. The
windshield wiper and rear window
wiper, if equipped, must be off.
Remove any accessories that may be
damaged or interfere with the car
wash equipment.
Rinse the vehicle well, before washing
and after, to remove all cleaning
agents completely. If they are allowed
to dry on the surface, they could stain. Dry the finish with a soft, clean
chamois or an all-cotton towel to
avoid surface scratches and water
spotting.
Cleaning Underhood Components
Caution
Do not power wash any component
under the hood that has this
e
symbol.
This could cause damage that
would not be covered by the vehicle
warranty.
Solvents or aggressive cleaners may
harm underhood components. The
usages of these chemicals should be
avoided.
Recommend water only.
A pressure washer may be used, but
care must be utilized. The following
criteria must be followed:
.Water pressure must be kept below
14 000 KPa (2,000 PSI).
.Water temperature must be below
80 °C (180 °F).
Page 350 of 408

Cadillac XT4 Owner Manual (GMNA-Localizing-U.S./Canada/Mexico-
14584367) - 2021 - CRC - 10/14/20
VEHICLE CARE 349
.Spray nozzle with a 40 degree wide
angle spray pattern or wider must
be used.
.Nozzle must be kept at least 30 cm
(1 ft) away from all surfaces.
Finish Care
Application of aftermarket clearcoat
sealant/wax is not recommended.
If painted surfaces are damaged, see
your dealer to have the damage
assessed and repaired. Foreign
materials such as calcium chloride
and other salts, ice melting agents,
road oil and tar, tree sap, bird
droppings, chemicals from industrial
chimneys, etc., can damage the
vehicle's finish if they remain on
painted surfaces. Wash the vehicle as
soon as possible. If necessary, use
non-abrasive cleaners that are marked
safe for painted surfaces to remove
foreign matter.
Occasional hand waxing or mild
polishing should be done to remove
residue from the paint finish. See your
dealer for approved cleaning products.Do not apply waxes or polishes to
uncoated plastic, vinyl, rubber, decals,
simulated wood, or flat paint as
damage can occur.
Caution
Machine compounding or
aggressive polishing on a basecoat/
clearcoat paint finish may damage
it. Use only non-abrasive waxes and
polishes that are made for a
basecoat/clearcoat paint finish on
the vehicle.
To keep the paint finish looking new,
keep the vehicle garaged or covered
whenever possible.
Protecting Exterior Bright Metal
Moldings
Caution
Failure to clean and protect the
bright metal moldings can result in
a hazy white finish or pitting. This
damage would not be covered by
the vehicle warranty. The bright metal moldings on the
vehicle are aluminum, chrome,
or stainless steel. To prevent damage
always follow these cleaning
instructions:
.Be sure the molding is cool to the
touch before applying any cleaning
solution.
.Use only approved cleaning
solutions for aluminum, chrome,
or stainless steel. Some cleaners are
highly acidic or contain alkaline
substances and can damage the
moldings.
.Always dilute a concentrated
cleaner according to the
manufacturer’s instructions.
.Do not use cleaners that are not
intended for automotive use.
.Use a nonabrasive wax on the
vehicle after washing to protect and
extend the molding finish.
Cleaning Exterior Lamps/Lenses,
Emblems, Decals, and Stripes
Use only lukewarm or cold water, a
soft cloth, and a car washing soap to
clean exterior lamps, lenses, emblems,
Page 352 of 408
Cadillac XT4 Owner Manual (GMNA-Localizing-U.S./Canada/Mexico-
14584367) - 2021 - CRC - 10/14/20
VEHICLE CARE 351
material on painted surfaces can be
removed by rubbing with a clean
cloth. SeeRecommended Fluids and
Lubricants 0367.
Tires
Use a stiff brush with tire cleaner to
clean the tires.
Caution
Using petroleum-based tire dressing
products on the vehicle may
damage the paint finish and/or
tires. When applying a tire dressing,
always wipe off any overspray from
all painted surfaces on the vehicle.
Wheels and Wheel Trim
Use a soft, clean cloth with mild soap
and water to clean the wheels. After
rinsing thoroughly with clean water,
dry with a soft, clean towel. A wax
may then be applied.
Caution
Chrome wheels and chrome wheel
trim may be damaged if the vehicle
is not washed after driving on roads
(Continued)
Caution (Continued)
that have been sprayed with
magnesium chloride or calcium
chloride. These are used on roads
for conditions such as dust and ice.
Always wash the chrome with soap
and water after exposure.
Caution
To avoid surface damage on wheels
and wheel trim, do not use strong
soaps, chemicals, abrasive polishes,
cleaners, or brushes. Use only GM
approved cleaners. Do not drive the
vehicle through an automatic car
wash that uses silicon carbide tire/
wheel cleaning brushes. Damage
could occur and the repairs would
not be covered by the vehicle
warranty.
Brake System
Visually inspect brake lines and hoses
for proper hook-up, binding, leaks,
cracks, chafing, etc. Inspect disc brake
pads for wear and rotors for surface condition. Inspect drum brake linings/
shoes for wear or cracks. Inspect all
other brake parts.
Steering, Suspension, and
Chassis Components
Visually inspect steering, suspension,
and chassis components for damaged,
loose, or missing parts or signs of
wear at least once a year.
Inspect power steering for proper
attachment, connections, binding,
leaks, cracks, chafing, etc.
Visually check constant velocity joint
boots and axle seals for leaks.
Body Component Lubrication
Lubricate all key lock cylinders, hood
hinges, liftgate hinges, and the steel
fuel door hinges, unless the
components are plastic. Applying
silicone grease on weatherstrips with a
clean cloth will make them last
longer, seal better, and not stick or
squeak.