length CADILLAC XT4 2021 Owner's Manual
[x] Cancel search | Manufacturer: CADILLAC, Model Year: 2021, Model line: XT4, Model: CADILLAC XT4 2021Pages: 408, PDF Size: 8.33 MB
Page 23 of 408

Cadillac XT4 Owner Manual (GMNA-Localizing-U.S./Canada/Mexico-
14584367) - 2021 - CRC - 10/14/20
22 KEYS, DOORS, AND WINDOWS
manually close the liftgate. This will
allow normal power operation
functions to resume.
If the vehicle is locked while the
liftgate is closing, and an obstacle is
encountered that prevents the liftgate
from completely closing, the horn will
sound as an alert that the liftgate did
not close.
Setting the 3/4 Mode
To change the position the liftgate
stops at when opening:1. Select MAX or 3/4 mode and power open the liftgate.
2. Stop the liftgate movement at the desired height by pressing any
liftgate button. Manually adjust the
liftgate position if needed.
3. Press and hold
lnext to the pull
cup on the bottom of the liftgate
until the turn signals flash and a
beep sounds. This indicates the
setting has been recorded. The liftgate cannot be set below a
minimum programmable height.
If there is no light flash or sound,
then the height adjustment may be
too low.
Manual Operation
Select OFF to manually operate the
liftgate.
Caution
Attempting to move the liftgate too
quickly and with excessive force
may result in damage to the
vehicle.
Operate the liftgate manually with a
smooth motion and moderate speed.
The system includes a feature which
limits the manual closing speed to
protect the components.
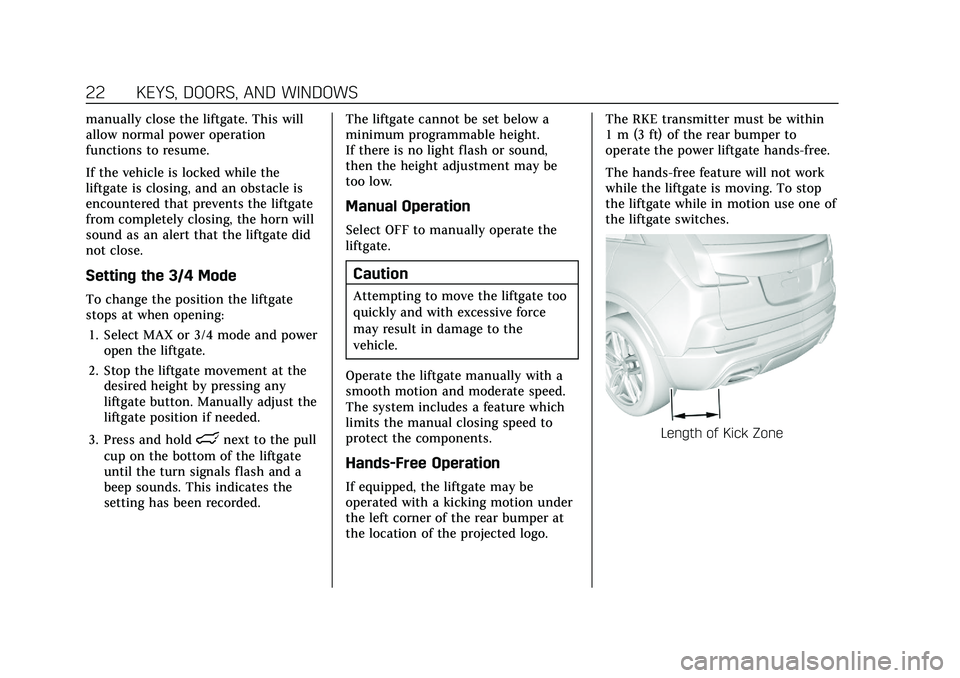
Hands-Free Operation
If equipped, the liftgate may be
operated with a kicking motion under
the left corner of the rear bumper at
the location of the projected logo. The RKE transmitter must be within
1 m (3 ft) of the rear bumper to
operate the power liftgate hands-free.
The hands-free feature will not work
while the liftgate is moving. To stop
the liftgate while in motion use one of
the liftgate switches.
Length of Kick Zone
Page 67 of 408

Cadillac XT4 Owner Manual (GMNA-Localizing-U.S./Canada/Mexico-
14584367) - 2021 - CRC - 10/14/20
66 SEATS AND RESTRAINTS
.Buckle the lap-shoulder belt. Does
the shoulder belt rest on the
shoulder? If yes, continue. If no, try
using the rear seat belt comfort
guide, if available. See“Rear Seat
Belt Comfort Guides” under
Lap-Shoulder Belt 050. If a comfort
guide is not available, or if the
shoulder belt still does not rest on
the shoulder, then return to the
booster seat.
.Does the lap belt fit low and snug
on the hips, touching the thighs? If
yes, continue. If no, return to the
booster seat.
.Can proper seat belt fit be
maintained for the length of the
trip? If yes, continue. If no, return
to the booster seat.
Q: What is the proper way to wear seat belts?
A: An older child should wear a
lap-shoulder belt and get the
additional restraint a shoulder belt
can provide. The shoulder belt
should not cross the face or neck.
The lap belt should fit snugly
below the hips, just touching the
top of the thighs. This applies belt force to the child's pelvic bones in
a crash. It should never be worn
over the abdomen, which could
cause severe or even fatal internal
injuries in a crash.
Also see “Rear Seat Belt Comfort
Guides” underLap-Shoulder Belt 050.
According to accident statistics,
children are safer when properly
restrained in a rear seating position.
In a crash, children who are not
buckled up can strike other people
who are buckled up, or can be thrown
out of the vehicle. Older children need
to use seat belts properly.
{Warning
Never allow more than one child to
wear the same seat belt. The seat
belt cannot properly spread the
impact forces. In a crash, they can
be crushed together and seriously
injured. A seat belt must be used by
only one person at a time.
{Warning
Never allow a child to wear the seat
belt shoulder belt under both arms
or behind their back. A child can be
seriously injured by not wearing the
lap-shoulder belt properly. In a
crash, the child would not be
restrained by the shoulder belt. The
child could move too far forward
increasing the chance of head and
neck injury. The child might also
slide under the lap belt. The belt
force would then be applied right
on the abdomen. That could cause (Continued)
Page 180 of 408

Cadillac XT4 Owner Manual (GMNA-Localizing-U.S./Canada/Mexico-
14584367) - 2021 - CRC - 10/14/20
INFOTAINMENT SYSTEM 179
Display
Touch and the following may display:
.Mode: This adjusts the appearance
of the navigation map view and any
downloaded apps optimized for day
or night time conditions. Set to
Auto for the display to
automatically adjust based on
bright/dark conditions.
Touch Auto, Day, or Night to adjust
the display.
.Calibrate Touchscreen: Touch to
calibrate the infotainment display
and follow the prompts.
.Turn Display Off: Touch to turn the
display off. Touch anywhere on the
infotainment display or press any
infotainment control on the center
stack again to turn the display on.
Sounds
Touch and the following may display:
.Maximum Startup Volume: This
feature adjusts the maximum
volume of the infotainment system
when you start the vehicle. To set
the maximum startup volume, touch the controls on the
infotainment display to increase or
decrease.
.Audio Cues: This feature determines
if sounds play when the
infotainment system starts up and
shuts down. This feature can be
turned off or on.
.Set Audio Cue Volume: This setting
controls the volume of Audio Cues
played on startup and shutdown.
Touch the controls on the
infotainment display to increase or
decrease.
.Audible Touch Feedback: This
setting determines if a sound plays
when touching the infotainment
display or radio controls. This
feature can be turned off or on.
Voice
Touch and the following may display:
.Confirm More/Less: This setting
specifies how often the voice
recognition system confirms
commands. Touch Confirm More to
have the system check with you
more often before acting on your
commands.
.Prompt Length: This setting
specifies the amount of detail the
voice recognition system provides
when giving you feedback. Touch
Auto to have the system
automatically adjust to your speech
habits. Touch Informative, Short,
or Auto.
.Audio Feedback Speed: Touch Slow,
Medium, or Fast to adjust how
quickly the voice recognition system
speaks.
.Friendly Prompts: This setting
adjusts the formality of voice
prompts. Touch Off for shorter
prompts. Touch On to hear prompts
with more personality. Touch Auto
to have the prompt match your
command style.
.Tutorial Mode: Touch Off or On to
provide tutorial feedback on the
display.
.Allow Prompt Interruptions: This
setting controls whether voice
commands can be spoken before
voice prompts finish. Turn this on
to speak commands without hearing
the full prompt. Speaking while the
prompt is still playing will
immediately stop playing the
Page 225 of 408

Cadillac XT4 Owner Manual (GMNA-Localizing-U.S./Canada/Mexico-
14584367) - 2021 - CRC - 10/14/20
224 DRIVING AND OPERATING
The length of time the heater should
remain plugged in depends on several
factors. Ask a dealer in the area where
you will be parking the vehicle for the
best advice on this.
Retained Accessory
Power (RAP)
When the ignition is turned from on
to off, the following features (if
equipped) will continue to function
for up to 10 minutes, or until the
driver door is opened. These features
will also work when the ignition is in
RUN or ACC/ACCESSORY:
.Infotainment System
.Power Windows (during RAP this
functionality will be lost when any
door is opened)
.Sunroof (during RAP this
functionality will be lost when any
door is opened)
.Auxiliary Power Outlet
.Audio System
.OnStar System
Shifting Into Park
To shift into P (Park):1. Hold the brake pedal down and set the parking brake. See Electric
Parking Brake 0233.
2. Press the button on top of the shift lever to shift into P (Park). See
Automatic Transmission 0226.
3. The P indicator on the shift lever will turn red when the vehicle is in
P (Park).
Leaving the Vehicle with the
Engine Running
{Warning
It can be dangerous to leave the
vehicle with the engine running.
It could overheat and catch fire.
It is dangerous to get out of the
vehicle if the vehicle is not in
P (Park) with the parking brake set.
The vehicle can roll.
Do not leave the vehicle when the
engine is running. If you have left
the engine running, the vehicle can
(Continued)
Warning (Continued)
move suddenly. You or others could
be injured. To be sure the vehicle
will not move, even when you are
on fairly level ground, always set
the parking brake and shift to
P (Park). SeeShifting Into Park 0224
. If you are towing a trailer, see
Driving Characteristics and Towing
Tips 0271.
If you have to leave the vehicle with
the engine running, be sure the
vehicle is in P (Park) and the parking
brake is set before you leave it. See
Electric Parking Brake 0233.
If you are towing a trailer and parking
on a hill, see Driving Characteristics
and Towing Tips 0271.
Shifting out of Park
This vehicle is equipped with an
electronic transmission. The shift lock
release button is designed to prevent
inadvertent shifting out of P (Park).
To shift out of P (Park):
1. Ensure the engine is running.
Page 300 of 408

Cadillac XT4 Owner Manual (GMNA-Localizing-U.S./Canada/Mexico-
14584367) - 2021 - CRC - 10/14/20
VEHICLE CARE 299
.To check the parking brake's
holding ability: With the engine
running and the transmission in
N (Neutral), slowly remove foot
pressure from the regular brake
pedal. Do this until the vehicle is
held by the parking brake only.
.To check the P (Park) mechanism's
holding ability: With the engine
running, shift to P (Park). Then
release the parking brake followed
by the regular brake.
Contact your dealer if service is
required.
Wiper Blade Replacement
Windshield wiper blades should be
inspected for wear or cracking.
It is a good idea to clean or replace
the wiper blade assembly on a regular
basis or when worn. For proper
windshield wiper blade length and
type, see Maintenance Replacement
Parts 0368.
Caution
Allowing the wiper arm to touch
the windshield when no wiper blade
is installed could damage the
windshield. Any damage that occurs
would not be covered by the vehicle
warranty. Do not allow the wiper
arm to touch the windshield.
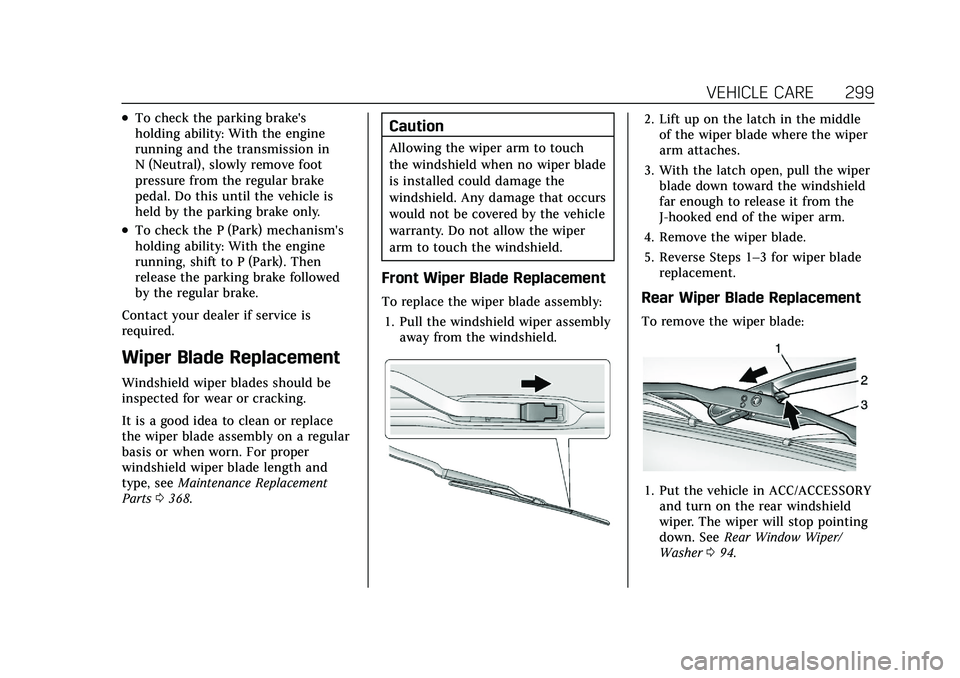
Front Wiper Blade Replacement
To replace the wiper blade assembly:
1. Pull the windshield wiper assembly away from the windshield.
2. Lift up on the latch in the middleof the wiper blade where the wiper
arm attaches.
3. With the latch open, pull the wiper blade down toward the windshield
far enough to release it from the
J-hooked end of the wiper arm.
4. Remove the wiper blade.
5. Reverse Steps 1–3 for wiper blade replacement.
Rear Wiper Blade Replacement
To remove the wiper blade:
1. Put the vehicle in ACC/ACCESSORYand turn on the rear windshield
wiper. The wiper will stop pointing
down. See Rear Window Wiper/
Washer 094.