window CADILLAC XT5 2018 Workshop Manual
[x] Cancel search | Manufacturer: CADILLAC, Model Year: 2018, Model line: XT5, Model: CADILLAC XT5 2018Pages: 380, PDF Size: 6.21 MB
Page 263 of 380
Cadillac XT5 Owner Manual (GMNA-Localizing-U.S./Canada/Mexico-
11349110) - 2018 - CRC - 9/28/17
262 VEHICLE CARE
If the engine is overheating, the fan
should be running. If it is not, do not
continue to run the engine. Have the
vehicle serviced.
Caution
Do not run the engine if there is a
leak in the engine cooling system.
This can cause a loss of all coolant
and can damage the system and
vehicle. Have any leaks fixed
right away.
If Steam Is Coming from the
Engine Compartment
{Warning
Steam and scalding liquids from a
hot cooling system are under
pressure. Turning the pressure cap,
even a little, can cause them to
come out at high speed and you
could be burned. Never turn the cap
when the cooling system, including(Continued)
Warning (Continued)
the pressure cap, is hot. Wait for
the cooling system and pressure
cap to cool.
If No Steam Is Coming from the
Engine Compartment
If an engine overheat warning is
displayed but no steam can be seen or
heard, the problem may not be too
serious. Sometimes the engine can get
a little too hot when the vehicle:
.Climbs a long hill on a hot day.
. Stops after high-speed driving.
. Idles for long periods in traffic.
If the overheat warning is displayed
with no sign of steam: 1. Turn the air conditioning off.
2. Turn the heater on to the highest temperature and to the highest
fan speed. Open the windows as
necessary. 3. When it is safe to do so, pull off
the road, shift to P (Park) or
N (Neutral), and let the
engine idle.
If the engine coolant temperature
gauge is no longer in the overheated
area or the engine coolant
temperature warning light no longer
displays, the vehicle can be driven.
Continue to drive the vehicle slowly
for about 10 minutes. Keep a safe
distance from the vehicle in front.
If the warning does not come back on,
continue to drive normally and have
the cooling system checked for proper
fill and function.
If the warning continues, pull over,
stop, and park the vehicle right away.
If there is no sign of steam, idle the
engine for three minutes while parked.
If the warning is still displayed, turn
off the engine until it cools down.
Page 269 of 380
Cadillac XT5 Owner Manual (GMNA-Localizing-U.S./Canada/Mexico-
11349110) - 2018 - CRC - 9/28/17
268 VEHICLE CARE
Rear Wiper Blade Replacement
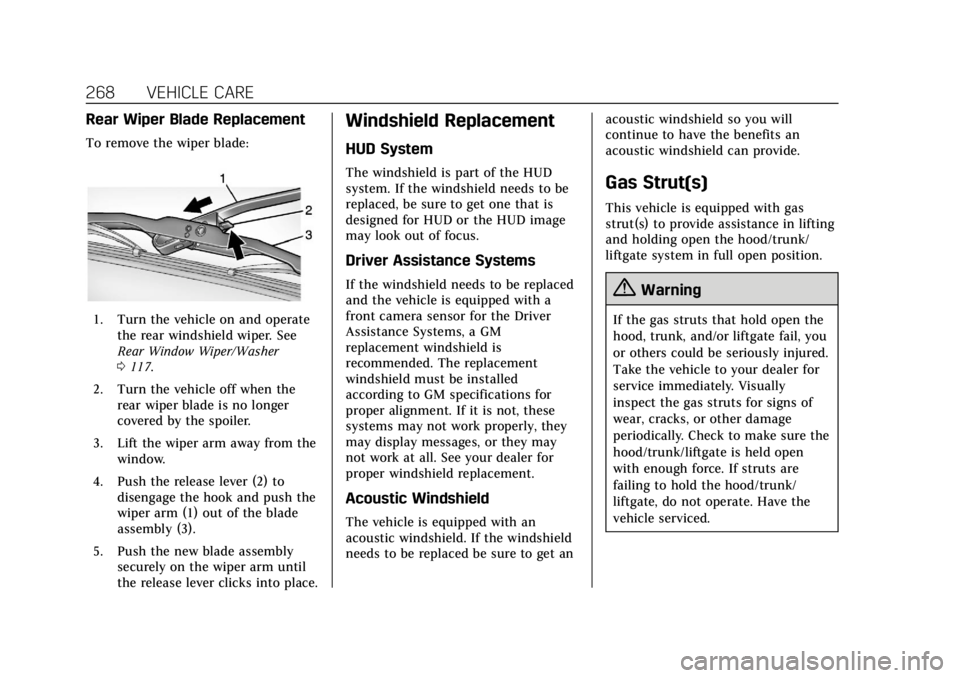
To remove the wiper blade:
1. Turn the vehicle on and operatethe rear windshield wiper. See
Rear Window Wiper/Washer
0117.
2. Turn the vehicle off when the rear wiper blade is no longer
covered by the spoiler.
3. Lift the wiper arm away from the window.
4. Push the release lever (2) to disengage the hook and push the
wiper arm (1) out of the blade
assembly (3).
5. Push the new blade assembly securely on the wiper arm until
the release lever clicks into place.
Windshield Replacement
HUD System
The windshield is part of the HUD
system. If the windshield needs to be
replaced, be sure to get one that is
designed for HUD or the HUD image
may look out of focus.
Driver Assistance Systems
If the windshield needs to be replaced
and the vehicle is equipped with a
front camera sensor for the Driver
Assistance Systems, a GM
replacement windshield is
recommended. The replacement
windshield must be installed
according to GM specifications for
proper alignment. If it is not, these
systems may not work properly, they
may display messages, or they may
not work at all. See your dealer for
proper windshield replacement.
Acoustic Windshield
The vehicle is equipped with an
acoustic windshield. If the windshield
needs to be replaced be sure to get an acoustic windshield so you will
continue to have the benefits an
acoustic windshield can provide.
Gas Strut(s)
This vehicle is equipped with gas
strut(s) to provide assistance in lifting
and holding open the hood/trunk/
liftgate system in full open position.
{Warning
If the gas struts that hold open the
hood, trunk, and/or liftgate fail, you
or others could be seriously injured.
Take the vehicle to your dealer for
service immediately. Visually
inspect the gas struts for signs of
wear, cracks, or other damage
periodically. Check to make sure the
hood/trunk/liftgate is held open
with enough force. If struts are
failing to hold the hood/trunk/
liftgate, do not operate. Have the
vehicle serviced.
Page 279 of 380

Cadillac XT5 Owner Manual (GMNA-Localizing-U.S./Canada/Mexico-
11349110) - 2018 - CRC - 9/28/17
278 VEHICLE CARE
FusesUsage
F1 –
F2 Trailer battery 1 Fuses
Usage
F3 Driver seat belt motor
F4 Rear blower
F5 Rear drive control
F6 Passenger seat belt motor
F7 Right window
F8 Rear defogger
F9 Left window
F10 –
F11 Trailer reverse
F12 –
F13 –
F14 –
F15 –
F16 –
F17 Camera
F18 Trailer module
F19 Ventilated seats
F20 –
F21 Trailer connector Fuses
Usage
F22 –
F23 –
F24 Passenger window switch
F25 –
F26 Trailer brake
F27 Driver ventilated seat/ Lumbar
F28 Passive entry/Passive start
F29 –
F30 Canister vent
F31 –
F32 Heated mirror
F33 –
F34 Liftgate module
F35 Fuel system control module
F36 Passenger ventilated seat/Lumbar
F37 –
Page 280 of 380
Cadillac XT5 Owner Manual (GMNA-Localizing-U.S./Canada/Mexico-
11349110) - 2018 - CRC - 9/28/17
VEHICLE CARE 279
FusesUsage
F38 Window module
F39 Rear closure
F40 Memory seat module
F41 Automatic occupancy sensor
F42 Trailer battery 2
F43 –
F44 –
F45 Liftgate motor
F46 Rear heated seats
F47 –
F48 Glass break sensor
F49 –
F50 –
F51 –
F52 Active dampening system module
F53 Rear parking aid module/Video/USB Fuses
Usage
F54 External object calculating/Side blind
zone alert
F55 –
F56 Universal remote system/Rain sensor
F57 Theft deterrent
Circuit
Breakers Usage
CB1 –
CB2 –
CB3 Rear auxiliary power outlet
Relays Usage
K1 –
K2 –Wheels and Tires
Tires
Every new GM vehicle has
high-quality tires made by a
leading tire manufacturer. See the
warranty manual for information
regarding the tire warranty and
where to get service. For
additional information refer to the
tire manufacturer.
{Warning
.Poorly maintained and
improperly used tires are
dangerous.
.Overloading the tires can
cause overheating as a
result of too much flexing.
There could be a blowout
and a serious crash. See
Vehicle Load Limits 0184.
(Continued)
Page 285 of 380
Cadillac XT5 Owner Manual (GMNA-Localizing-U.S./Canada/Mexico-
11349110) - 2018 - CRC - 9/28/17
284 VEHICLE CARE
(1) Passenger (P-Metric) Tire:
The United States version of a
metric tire sizing system. The
letter P as the first character in
the tire size means a passenger
vehicle tire engineered to
standards set by the U.S. Tire and
Rim Association.
(2) Tire Width
:The three-digit
number indicates the tire section
width in millimeters from sidewall
to sidewall.
(3) Aspect Ratio
:A two-digit
number that indicates the tire
height-to-width measurements.
For example, if the tire size aspect
ratio is 60, as shown in item 3 of
the illustration, it would mean
that the tire's sidewall is
60 percent as high as it is wide.
(4) Construction Code
:A letter
code is used to indicate the type
of ply construction in the tire. The
letter R means radial ply
construction; the letter D means diagonal or bias ply construction;
and the letter B means belted-bias
ply construction.
(5) Rim Diameter
:Diameter of
the wheel in inches.
(6) Service Description
:These
characters represent the load
index and speed rating of the tire.
The load index represents the load
carrying capacity a tire is certified
to carry. The speed rating is the
maximum speed a tire is certified
to carry a load.
Tire Terminology and
Definitions
Air Pressure:The amount of air
inside the tire pressing outward
on each square inch of the tire.
Air pressure is expressed in kPa
(kilopascal) or psi (pounds per
square inch).
Accessory Weight
:The combined
weight of optional accessories.
Some examples of optional accessories are automatic
transmission, power windows,
power seats, and air conditioning.
Aspect Ratio
:The relationship of
a tire's height to its width.
Belt
:A rubber coated layer of
cords between the plies and the
tread. Cords may be made from
steel or other reinforcing
materials.
Bead
:The tire bead contains steel
wires wrapped by steel cords that
hold the tire onto the rim.
Bias Ply Tire
:A pneumatic tire in
which the plies are laid at
alternate angles less than
90 degrees to the centerline of the
tread.
Cold Tire Pressure
:The amount
of air pressure in a tire, measured
in kPa (kilopascal) or psi (pounds
per square inch) before a tire has
built up heat from driving. See
Tire Pressure 0286.
Page 305 of 380
Cadillac XT5 Owner Manual (GMNA-Localizing-U.S./Canada/Mexico-
11349110) - 2018 - CRC - 9/28/17
304 VEHICLE CARE
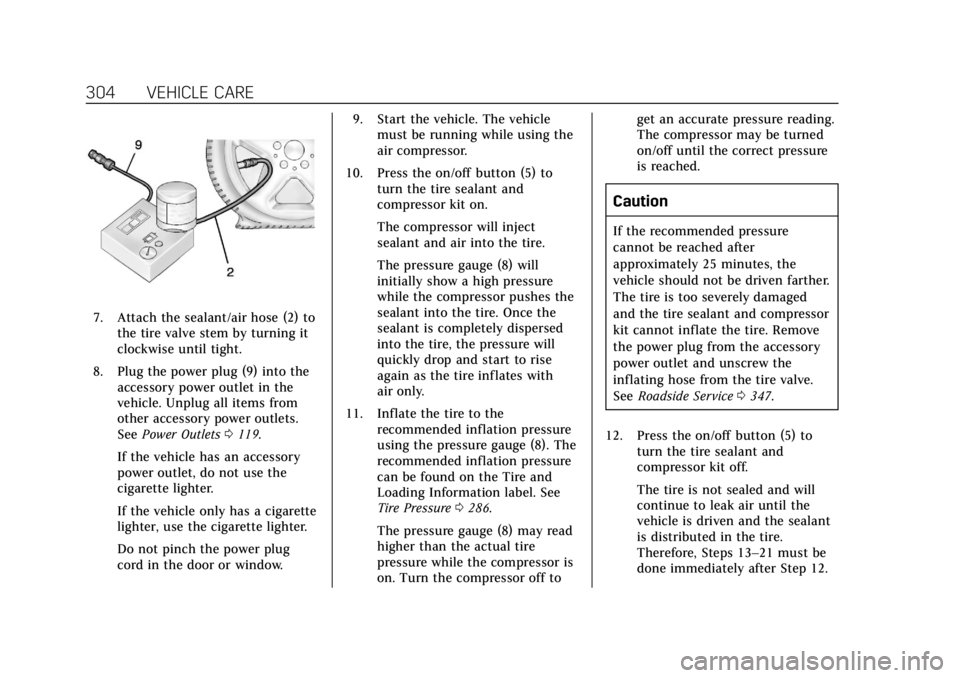
7. Attach the sealant/air hose (2) tothe tire valve stem by turning it
clockwise until tight.
8. Plug the power plug (9) into the accessory power outlet in the
vehicle. Unplug all items from
other accessory power outlets.
See Power Outlets 0119.
If the vehicle has an accessory
power outlet, do not use the
cigarette lighter.
If the vehicle only has a cigarette
lighter, use the cigarette lighter.
Do not pinch the power plug
cord in the door or window. 9. Start the vehicle. The vehicle
must be running while using the
air compressor.
10. Press the on/off button (5) to turn the tire sealant and
compressor kit on.
The compressor will inject
sealant and air into the tire.
The pressure gauge (8) will
initially show a high pressure
while the compressor pushes the
sealant into the tire. Once the
sealant is completely dispersed
into the tire, the pressure will
quickly drop and start to rise
again as the tire inflates with
air only.
11. Inflate the tire to the recommended inflation pressure
using the pressure gauge (8). The
recommended inflation pressure
can be found on the Tire and
Loading Information label. See
Tire Pressure 0286.
The pressure gauge (8) may read
higher than the actual tire
pressure while the compressor is
on. Turn the compressor off to get an accurate pressure reading.
The compressor may be turned
on/off until the correct pressure
is reached.
Caution
If the recommended pressure
cannot be reached after
approximately 25 minutes, the
vehicle should not be driven farther.
The tire is too severely damaged
and the tire sealant and compressor
kit cannot inflate the tire. Remove
the power plug from the accessory
power outlet and unscrew the
inflating hose from the tire valve.
See
Roadside Service 0347.
12. Press the on/off button (5) to turn the tire sealant and
compressor kit off.
The tire is not sealed and will
continue to leak air until the
vehicle is driven and the sealant
is distributed in the tire.
Therefore, Steps 13–21 must be
done immediately after Step 12.
Page 307 of 380

Cadillac XT5 Owner Manual (GMNA-Localizing-U.S./Canada/Mexico-
11349110) - 2018 - CRC - 9/28/17
306 VEHICLE CARE
161 km (100 mi) of driving to
have the tire repaired or
replaced.
Using the Tire Sealant and
Compressor Kit without Sealant
to Inflate a Tire (Not Punctured)
The kit includes:
1. Sealant Canister Inlet Valve
2. Sealant/Air Hose
3. Base of Sealant Canister
4. Tire Sealant Canister
5. On/Off Button
6. Slot on Top of Compressor
7. Pressure Deflation Button8. Pressure Gauge
9. Power Plug
10. Air Only Hose
If a tire goes flat, avoid further tire
and wheel damage by driving slowly
to a level place. Turn on the hazard
warning flashers. See
Hazard Warning
Flashers 0163.
See If a Tire Goes Flat 0300 for other
important safety warnings.
1. Remove the compressor from its storage location. See Storing the
Tire Sealant and Compressor Kit
0 307. 2. Remove the air only hose (10)
and the power plug (9) from the
bottom of the compressor.
3. Place the compressor on the ground near the flat tire.
Make sure the tire valve stem is
positioned close to the ground so
the hose will reach it.
4. Remove the valve stem cap from the flat tire by turning it
counterclockwise.
5. Attach the air only hose (10) to the tire valve stem by turning it
clockwise until tight.
6. Plug the power plug (9) into the accessory power outlet in the
vehicle. Unplug all items from
other accessory power outlets.
See Power Outlets 0119.
If the vehicle has an accessory
power outlet, do not use the
cigarette lighter.
If the vehicle only has a cigarette
lighter, use the cigarette lighter.
Do not pinch the power plug
cord in the door or window.
Page 321 of 380
Cadillac XT5 Owner Manual (GMNA-Localizing-U.S./Canada/Mexico-
11349110) - 2018 - CRC - 9/28/17
320 VEHICLE CARE
If using an automatic car wash, follow
the car wash instructions. The
windshield wiper and rear window
wiper, if equipped, must be off.
Remove any accessories that may be
damaged or interfere with the car
wash equipment.
Rinse the vehicle well, before washing
and after, to remove all cleaning
agents completely. If they are allowed
to dry on the surface, they could stain.
Dry the finish with a soft, clean
chamois or an all-cotton towel to
avoid surface scratches and water
spotting.
Finish Care
Application of aftermarket clearcoat
sealant/wax materials is not
recommended. If painted surfaces are
damaged, see your dealer to have the
damage assessed and repaired. Foreign
materials such as calcium chloride
and other salts, ice melting agents,
road oil and tar, tree sap, bird
droppings, chemicals from industrial
chimneys, etc., can damage the
vehicle's finish if they remain on
painted surfaces. Wash the vehicle assoon as possible. If necessary, use
non-abrasive cleaners that are marked
safe for painted surfaces to remove
foreign matter.
Occasional hand waxing or mild
polishing should be done to remove
residue from the paint finish. See your
dealer for approved cleaning products.
Do not apply waxes or polishes to
uncoated plastic, vinyl, rubber, decals,
simulated wood, or flat paint as
damage can occur.
Caution
Machine compounding or
aggressive polishing on a basecoat/
clearcoat paint finish may damage
it. Use only non-abrasive waxes and
polishes that are made for a
basecoat/clearcoat paint finish on
the vehicle.
To keep the paint finish looking new,
keep the vehicle garaged or covered
whenever possible. Protecting Exterior Bright Metal
Moldings
Caution
Failure to clean and protect the
bright metal moldings can result in
a hazy white finish or pitting. This
damage would not be covered by
the vehicle warranty.
The bright metal moldings on the
vehicle are aluminum, chrome,
or stainless steel. To prevent damage
always follow these cleaning
instructions:
. Be sure the molding is cool to the
touch before applying any cleaning
solution.
. Use only approved cleaning
solutions for aluminum, chrome,
or stainless steel. Some cleaners
are highly acidic or contain
alkaline substances and can
damage the moldings.
. Always dilute a concentrated
cleaner according to the
manufacturer’s instructions.
Page 325 of 380
Cadillac XT5 Owner Manual (GMNA-Localizing-U.S./Canada/Mexico-
11349110) - 2018 - CRC - 9/28/17
324 VEHICLE CARE
lotions, sunscreen, and insect
repellent from all interior surfaces or
permanent damage may result.
Use cleaners specifically designed for
the surfaces being cleaned to prevent
permanent damage. Apply all cleaners
directly to the cleaning cloth. Do not
spray cleaners on any switches or
controls. Remove cleaners quickly.
Before using cleaners, read and follow
all safety instructions on the label.
While cleaning the interior, open the
doors and windows to get proper
ventilation.
To prevent damage, do not clean the
interior using the following cleaners
or techniques:
.Never use a razor or any other
sharp object to remove soil from
any interior surface.
. Never use a brush with stiff
bristles.
. Never rub any surface aggressively
or with too much pressure.
. Do not use laundry detergents or
dishwashing soaps with
degreasers. For liquid cleaners, use approximately 20 drops per 3.8 L
(1 gal) of water. A concentrated
soap solution will create streaks
and attract dirt. Do not use
solutions that contain strong or
caustic soap.
. Do not heavily saturate the
upholstery when cleaning.
. Do not use solvents or cleaners
containing solvents.
Interior Glass
To clean, use a terry cloth fabric
dampened with water. Wipe droplets
left behind with a clean dry cloth.
If necessary, use a commercial glass
cleaner after cleaning with plain water.
Caution
To prevent scratching, never use
abrasive cleaners on automotive
glass. Abrasive cleaners or
aggressive cleaning may damage
the rear window defogger. Cleaning the windshield with water
during the first three to six months of
ownership will reduce tendency to fog.
Speaker Covers
Vacuum around a speaker cover
gently, so that the speaker will not be
damaged. Clean spots with water and
mild soap.
Coated Moldings
Coated moldings should be cleaned.
.
When lightly soiled, wipe with a
sponge or soft, lint-free cloth
dampened with water.
. When heavily soiled, use warm
soapy water.
Fabric/Carpet/Suede
Start by vacuuming the surface using
a soft brush attachment. If a rotating
vacuum brush attachment is being
used, only use it on the floor carpet.
Before cleaning, gently remove as
much of the soil as possible:
.Gently blot liquids with a paper
towel. Continue blotting until no
more soil can be removed.
Page 326 of 380
Cadillac XT5 Owner Manual (GMNA-Localizing-U.S./Canada/Mexico-
11349110) - 2018 - CRC - 9/28/17
VEHICLE CARE 325
.For solid soils, remove as much as
possible prior to vacuuming.
To clean: 1. Saturate a clean, lint-free colorfast cloth with water.
Microfiber cloth is recommended
to prevent lint transfer to the
fabric or carpet.
2. Remove excess moisture by gently wringing until water does
not drip from the cleaning cloth.
3. Start on the outside edge of the soil and gently rub toward the
center. Fold the cleaning cloth to
a clean area frequently to
prevent forcing the soil in to the
fabric.
4. Continue gently rubbing the soiled area until there is no
longer any color transfer from
the soil to the cleaning cloth.
5. If the soil is not completely removed, use a mild soap
solution followed only by plain
water. If the soil is not completely removed,
it may be necessary to use a
commercial upholstery cleaner or spot
lifter. Test a small hidden area for
colorfastness before using a
commercial upholstery cleaner or spot
lifter. If ring formation occurs, clean
the entire fabric or carpet.
After cleaning, use a paper towel to
blot excess moisture.
Cleaning High Gloss Surfaces
and Vehicle Information and
Radio Displays
Use a microfiber cloth on high gloss
surfaces or vehicle displays. First, use
a soft bristle brush to remove dirt that
can scratch the surface. Then gently
clean by rubbing with a microfiber
cloth. Never use window cleaners or
solvents. Periodically hand wash the
microfiber cloth separately, using mild
soap. Do not use bleach or fabric
softener. Rinse thoroughly and air dry
before next use.
Caution
Do not attach a device with a
suction cup to the display. This may
cause damage and would not be
covered by the vehicle warranty.
Instrument Panel, Leather, Vinyl,
Other Plastic Surfaces, Low
Gloss Paint Surfaces, and
Natural Open Pore Wood
Surfaces
Use a soft microfiber cloth dampened
with water to remove dust and loose
dirt. For a more thorough cleaning,
use a soft microfiber cloth dampened
with a mild soap solution.
Caution
Soaking or saturating leather,
especially perforated leather, as well
as other interior surfaces, may
cause permanent damage. Wipe
excess moisture from these surfaces
after cleaning and allow them to
(Continued)