light CADILLAC XT5 2020 Owners Manual
[x] Cancel search | Manufacturer: CADILLAC, Model Year: 2020, Model line: XT5, Model: CADILLAC XT5 2020Pages: 384, PDF Size: 6.52 MB
Page 269 of 384
268 VEHICLE CARE
new brake linings are installed. Add or
remove fluid, as necessary, only when
work is done on the brake hydraulic
system.
{Warning
If too much brake fluid is added, it
can spill on the engine and burn,
if the engine is hot enough. You or
others could be burned, and the
vehicle could be damaged. Add
brake fluid only when work is done
on the brake hydraulic system.
When the brake fluid falls to a low
level, the brake warning light comes
on. See Brake System Warning Light
0 117.
Brake fluid absorbs water over time
which degrades the effectiveness of
the brake fluid. Replace brake fluid at
the specified intervals to prevent
increased stopping distance. See
Maintenance Schedule 0332. What to Add
Use only GM approved DOT 3 brake
fluid from a clean, sealed container.
See
Recommended Fluids and
Lubricants 0342.{Warning
The wrong or contaminated brake
fluid could result in damage to the
brake system. This could result in
the loss of braking leading to a
possible injury. Always use the
proper GM approved brake fluid.
Caution
If brake fluid is spilled on the
vehicle's painted surfaces, the paint
finish can be damaged. Immediately
wash off any painted surface.
Battery - North America
The original equipment battery is
maintenance free. Do not remove the
cap and do not add fluid. Refer to the replacement number on
the original battery label when a new
battery is needed. For replacement of
the battery, see your dealer.
The vehicle has an Absorbed Glass
Mat (AGM) 12-volt battery.
Installation of a standard 12-volt
battery will result in reduced 12-volt
battery life.
When using a 12-volt battery charger
on the 12-volt AGM battery, some
chargers have an AGM battery setting
on the charger. If available, use the
AGM setting on the charger, to limit
charge voltage to 14.8 volts.
Stop/Start System
This vehicle has a Stop/Start system
to shut off the engine to help
conserve fuel. See
Stop/Start System
0 177.
{Warning
WARNING: Battery posts,
terminals, and related accessories
contain lead and lead compounds,
(Continued)
Page 274 of 384
VEHICLE CARE 273
Bulb Replacement
For the proper type of replacement
bulbs, or any bulb changing procedure
not listed in this section, contact your
dealer.
Caution
Do not replace incandescent bulbs
with aftermarket LED replacement
bulbs. This can cause damage to
the vehicle electrical system.
Halogen Bulbs
{Warning
Halogen bulbs have pressurized gas
inside and can burst if you drop or
scratch the bulb. You or others
could be injured. Be sure to read
and follow the instructions on the
bulb package.
LED Lighting
This vehicle has several LED lamps.
For replacement of any LED lighting
assembly, contact your dealer.
Electrical System
Electrical System Overload
The vehicle has fuses and circuit
breakers to protect against an
electrical system overload.
When the current electrical load is too
heavy, the circuit breaker opens and
closes, protecting the circuit until the
current load returns to normal or the
problem is fixed. This greatly reduces
the chance of circuit overload and fire
caused by electrical problems.
Fuses and circuit breakers protect
power devices in the vehicle.
Replace a bad fuse with a new one of
the identical size and rating.
If there is a problem on the road and
a fuse needs to be replaced, the
same amperage fuse can be borrowed.
Choose some feature of the vehicle
that is not needed to use and replace
it as soon as possible.
Page 280 of 384
VEHICLE CARE 279
FusesUsage
F16 Sunroof
F17 Body control module 1
F18 Instrument cluster
F19 –
F20 Rear seat entertainment
F21 Body control module 4
F22 Infotainment/USB data/Aux jack
F23 Body control module 2
F24 USB charger/ Wireless charging
F25 Park aid/electronic transmission range
system
F26 Communications integration module
F27 Video Fuses
Usage
F28 Heating, ventilation, and air conditioning
display
F29 Radio
F30 Steering wheel adjustment controls
F31 Electronic brake control module
electric brake
booster
F32 DC AC inverter
F33 Driver power seat
F34 Passenger power seat
F35 Battery IEC 1 feed
F36 Electric power steering
F37 Rear seat entertainment/USB
charge/Wireless
charging module
F38 Body control module 8
F39 – Circuit
Breakers Usage
F40 –
F41 –
F42 Auxiliary power outlet/Lighter
Rear Compartment Fuse
Block
The rear compartment fuse block is in
the cargo area, on the driver side of
the vehicle behind the lower trim
Page 288 of 384
VEHICLE CARE 287
Aspect Ratio:The relationship of
a tire's height to its width.
Belt
:A rubber coated layer of
cords between the plies and the
tread. Cords may be made from
steel or other reinforcing
materials.
Bead
:The tire bead contains steel
wires wrapped by steel cords that
hold the tire onto the rim.
Bias Ply Tire
:A pneumatic tire in
which the plies are laid at
alternate angles less than
90 degrees to the centerline of the
tread.
Cold Tire Pressure
:The amount
of air pressure in a tire, measured
in kPa (kilopascal) or psi (pounds
per square inch) before a tire has
built up heat from driving. See
Tire Pressure 0289.
Curb Weight
:The weight of a
motor vehicle with standard and
optional equipment including the maximum capacity of fuel, oil, and
coolant, but without passengers
and cargo.
DOT Markings
:A code molded
into the sidewall of a tire
signifying that the tire is in
compliance with the U.S.
Department of Transportation
(DOT) Motor Vehicle Safety
Standards. The DOT code includes
the Tire Identification Number
(TIN), an alphanumeric designator
which can also identify the tire
manufacturer, production plant,
brand, and date of production.
GVWR
:Gross Vehicle Weight
Rating. See Vehicle Load Limits
0 170.
GAWR FRT
:Gross Axle Weight
Rating for the front axle. See
Vehicle Load Limits 0170.
GAWR RR
:Gross Axle Weight
Rating for the rear axle. See
Vehicle Load Limits 0170. Intended Outboard Sidewall
:
The side of an asymmetrical tire
that must always face outward
when mounted on a vehicle.
Kilopascal (kPa)
:The metric unit
for air pressure.
Light Truck (LT-Metric) Tire
:A
tire used on light duty trucks and
some multipurpose passenger
vehicles.
Load Index
:An assigned number
ranging from 1 to 279 that
corresponds to the load carrying
capacity of a tire.
Maximum Inf lation Pressure
:
The maximum air pressure to
which a cold tire can be inflated.
The maximum air pressure is
molded onto the sidewall.
Maximum Load Rating
:The load
rating for a tire at the maximum
permissible inflation pressure for
that tire.
Page 289 of 384

288 VEHICLE CARE
Maximum Loaded Vehicle
Weight
:The sum of curb weight,
accessory weight, vehicle capacity
weight, and production options
weight.
Normal Occupant Weight
:The
number of occupants a vehicle is
designed to seat multiplied by
68 kg (150 lb). See Vehicle Load
Limits 0170.
Occupant Distribution
:
Designated seating positions.
Outward Facing Sidewall
:The
side of an asymmetrical tire that
has a particular side that faces
outward when mounted on a
vehicle. The side of the tire that
contains a whitewall, bears white
lettering, or bears manufacturer,
brand, and/or model name
molding that is higher or deeper
than the same moldings on the
other sidewall of the tire. Passenger (P-Metric) Tire
:A tire
used on passenger cars and some
light duty trucks and
multipurpose vehicles.
Recommended Inf lation
Pressure
:Vehicle manufacturer's
recommended tire inflation
pressure as shown on the tire
placard. See Tire Pressure 0289
and
Vehicle Load Limits 0170.
Radial Ply Tire
:A pneumatic tire
in which the ply cords that extend
to the beads are laid at 90 degrees
to the centerline of the tread.
Rim
:A metal support for a tire
and upon which the tire beads are
seated.
Sidewall
:The portion of a tire
between the tread and the bead.
Speed Rating
:An alphanumeric
code assigned to a tire indicating
the maximum speed at which a
tire can operate. Traction
:The friction between
the tire and the road surface. The
amount of grip provided.
Tread
:The portion of a tire that
comes into contact with the road.
Treadwear Indicators
:Narrow
bands, sometimes called wear
bars, that show across the tread of
a tire when only 1.6 mm (1/16 in)
of tread remains. See When It Is
Time for New Tires 0297.
UTQGS (Uniform Tire Quality
Grading Standards)
:A tire
information system that provides
consumers with ratings for a tire's
traction, temperature, and
treadwear. Ratings are determined
by tire manufacturers using
government testing procedures.
The ratings are molded into the
sidewall of the tire. See Uniform
Tire Quality Grading 0299.
Page 293 of 384

292 VEHICLE CARE
Tire Pressure Monitor
Operation
This vehicle may have a Tire Pressure
Monitor System (TPMS). The TPMS is
designed to warn the driver when a
low tire pressure condition exists.
TPMS sensors are mounted onto each
tire and wheel assembly, excluding the
spare tire and wheel assembly. The
TPMS sensors monitor the air
pressure in the tires and transmit the
tire pressure readings to a receiver
located in the vehicle.
When a low tire pressure condition is
detected, the TPMS illuminates the
low tire pressure warning light on the
instrument cluster. If the warning
light comes on, stop as soon as
possible and inflate the tires to the
recommended pressure shown on the
Tire and Loading Information label.
SeeVehicle Load Limits 0170. A message to check the pressure in a
specific tire displays in the Driver
Information Center (DIC). The low tire
pressure warning light and the DIC
warning message come on at each
ignition cycle until the tires are
inflated to the correct inflation
pressure. Using the DIC, tire pressure
levels can be viewed. For additional
information and details about the DIC
operation and displays see
Driver
Information Center (DIC) 0124.
The low tire pressure warning light
may come on in cool weather when
the vehicle is first started, and then
turn off as the vehicle is driven. This
could be an early indicator that the air
pressure is getting low and needs to
be inflated to the proper pressure.
A Tire and Loading Information label,
attached to your vehicle, shows the
size of the original equipment tires
and the correct inflation pressure for
the tires when they are cold. See
Vehicle Load Limits 0170, for an
example of the Tire and Loading
Information label and its location.
Also see Tire Pressure 0289. The TPMS can warn about a low tire
pressure condition but it does not
replace normal tire maintenance. See
Tire Inspection
0295, Tire Rotation
0 296 and
Tires 0282.
Caution
Tire sealant materials are not all
the same. A non-approved tire
sealant could damage the TPMS
sensors. TPMS sensor damage
caused by using an incorrect tire
sealant is not covered by the
vehicle warranty. Always use only
the GM approved tire sealant
available through your dealer or
included in the vehicle.
Factory-installed Tire Inflator Kits use
a GM approved liquid tire sealant.
Using non-approved tire sealants
could damage the TPMS sensors. See
Tire Sealant and Compressor Kit 0304
for information regarding the inflator
kit materials and instructions.
Page 294 of 384

VEHICLE CARE 293
TPMS Malfunction Light and
Message
The TPMS will not function properly if
one or more of the TPMS sensors are
missing or inoperable. When the
system detects a malfunction, the low
tire pressure warning light flashes for
about one minute and then stays on
for the remainder of the ignition cycle.
A DIC warning message also displays.
The malfunction light and DIC
warning message come on at each
ignition cycle until the problem is
corrected. Some of the conditions that
can cause these to come on are:
.One of the road tires has been
replaced with the spare tire. The
spare tire does not have a TPMS
sensor. The malfunction light and
DIC message should go off after
the road tire is replaced and the
sensor matching process is
performed successfully. See “TPMS
Sensor Matching Process ”later in
this section.
. The TPMS sensor matching
process was not done or not
completed successfully after
rotating the tires. The malfunction light and the DIC message should
go off after successfully
completing the sensor matching
process. See "TPMS Sensor
Matching Process" later in this
section.
. One or more TPMS sensors are
missing or damaged. The
malfunction light and the DIC
message should go off when the
TPMS sensors are installed and
the sensor matching process is
performed successfully. See your
dealer for service.
. Replacement tires or wheels do
not match the original equipment
tires or wheels. Tires and wheels
other than those recommended
could prevent the TPMS from
functioning properly. See Buying
New Tires 0297.
. Operating electronic devices or
being near facilities using radio
wave frequencies similar to the
TPMS could cause the TPMS
sensors to malfunction.
If the TPMS is not functioning
properly it cannot detect or signal a
low tire pressure condition. See your dealer for service if the TPMS
malfunction light and DIC message
come on and stay on.Tire Fill Alert (If Equipped)
This feature provides visual and
audible alerts outside the vehicle to
help when inflating an underinflated
tire to the recommended cold tire
pressure.
When the low tire pressure warning
light comes on:
1. Park the vehicle in a safe, level place.
2. Set the parking brake firmly.
3. Place the vehicle in P (Park).
4. Add air to the tire that is underinflated. The turn signal
lamp will flash.
When the recommended
pressure is reached, the horn
sounds once and the turn signal
lamp will stop flashing and
briefly turn solid.
Page 295 of 384

294 VEHICLE CARE
Repeat these steps for all
underinflated tires that have
illuminated the low tire pressure
warning light.
{Warning
Overinflating a tire could cause the
tire to rupture and you or others
could be injured. Do not exceed the
maximum pressure listed on the
tire sidewall. SeeTire Sidewall
Labeling 0284 and
Vehicle Load Limits 0170.
If the tire is overinflated by more than
35 kPa (5 psi), the horn will sound
multiple times and the turn signal
lamp will continue to flash for several
seconds after filling stops. To release
and correct the pressure, while the
turn signal lamp is still flashing,
briefly press the center of the valve
stem. When the recommended
pressure is reached, the horn
sounds once. If the turn signal lamp does not flash
within 15 seconds after starting to
inflate the tire, the tire fill alert has
not been activated or is not working.
If the hazard warning flashers are on,
the tire fill alert visual feedback will
not work properly.
The TPMS will not activate the tire fill
alert properly under the following
conditions:
.
There is interference from an
external device or transmitter.
. The air pressure from the inflation
device is not sufficient to inflate
the tire.
. There is a malfunction in
the TPMS.
. There is a malfunction in the horn
or turn signal lamps.
. The identification code of the
TPMS sensor is not registered to
the system.
. The battery of the TPMS sensor
is low. If the tire fill alert does not operate
due to TPMS interference, move the
vehicle about 1 m (3 ft) back or
forward and try again. If the tire fill
alert feature is not working, use a tire
pressure gauge.TPMS Sensor Matching Process
Each TPMS sensor has a unique
identification code. The identification
code needs to be matched to a new
tire/wheel position after rotating the
vehicle’s tires or replacing one or more
of the TPMS sensors. The TPMS
sensor matching process should also
be performed after replacing a spare
tire with a road tire containing the
TPMS sensor. The malfunction light
and the DIC message should go off at
the next ignition cycle. The sensors
are matched to the tire/wheel
positions, using a TPMS relearn tool,
in the following order: driver side
front tire, passenger side front tire,
passenger side rear tire, and driver
side rear. See your dealer for service or
to purchase a relearn tool. A TPMS
relearn tool can also be purchased.
See Tire Pressure Monitor Sensor
Activation Tool at
Page 297 of 384
296 VEHICLE CARE
.The tire has a bump, bulge,
or split.
.The tire has a puncture, cut,
or other damage that cannot
be repaired well because of the
size or location of the damage.
Tire Rotation
Tires should be rotated every
12 000 km (7,500 mi). See
Maintenance Schedule0332.
Tires are rotated to achieve a
more uniform wear for all tires.
The first rotation is the most
important.
Anytime unusual wear is noticed,
rotate the tires as soon as
possible, check for proper tire
inflation pressure, and check for
damaged tires or wheels. If the
unusual wear continues after the
rotation, check the wheel
alignment. See When It Is Time for
New Tires 0297 and
Wheel Replacement 0301.
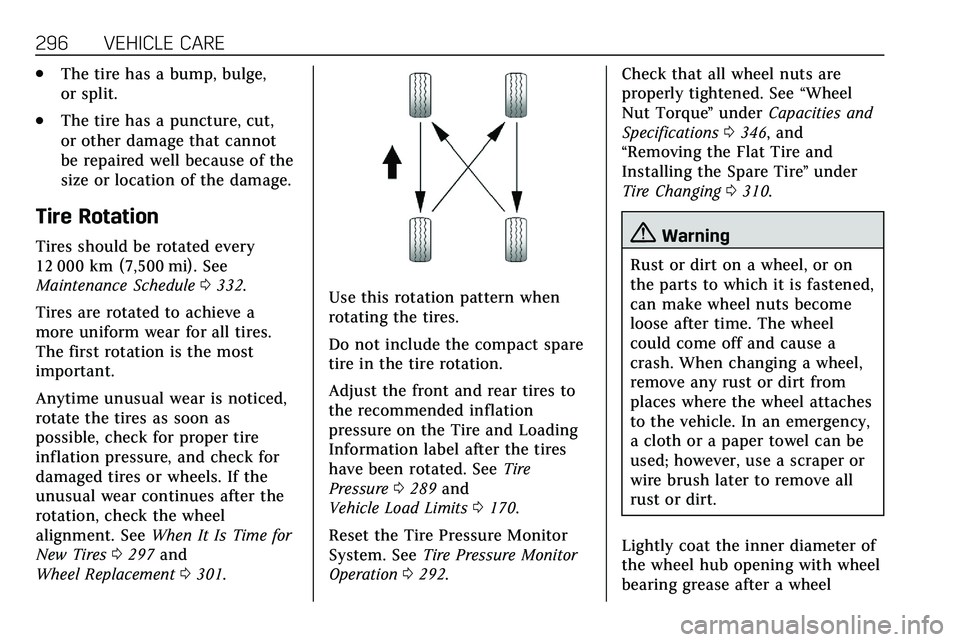
Use this rotation pattern when
rotating the tires.
Do not include the compact spare
tire in the tire rotation.
Adjust the front and rear tires to
the recommended inflation
pressure on the Tire and Loading
Information label after the tires
have been rotated. See Tire
Pressure 0289 and
Vehicle Load Limits 0170.
Reset the Tire Pressure Monitor
System. See Tire Pressure Monitor
Operation 0292. Check that all wheel nuts are
properly tightened. See
“Wheel
Nut Torque ”under Capacities and
Specifications 0346, and
“Removing the Flat Tire and
Installing the Spare Tire ”under
Tire Changing 0310.
{Warning
Rust or dirt on a wheel, or on
the parts to which it is fastened,
can make wheel nuts become
loose after time. The wheel
could come off and cause a
crash. When changing a wheel,
remove any rust or dirt from
places where the wheel attaches
to the vehicle. In an emergency,
a cloth or a paper towel can be
used; however, use a scraper or
wire brush later to remove all
rust or dirt.
Lightly coat the inner diameter of
the wheel hub opening with wheel
bearing grease after a wheel
Page 298 of 384
VEHICLE CARE 297
change or tire rotation to prevent
corrosion or rust buildup. Do not
get grease on the wheel mounting
surface or on the wheel nuts or
bolts.
When It Is Time for New
Tires
Factors such as maintenance,
temperatures, driving speeds, vehicle
loading, and road conditions affect the
wear rate of the tires.
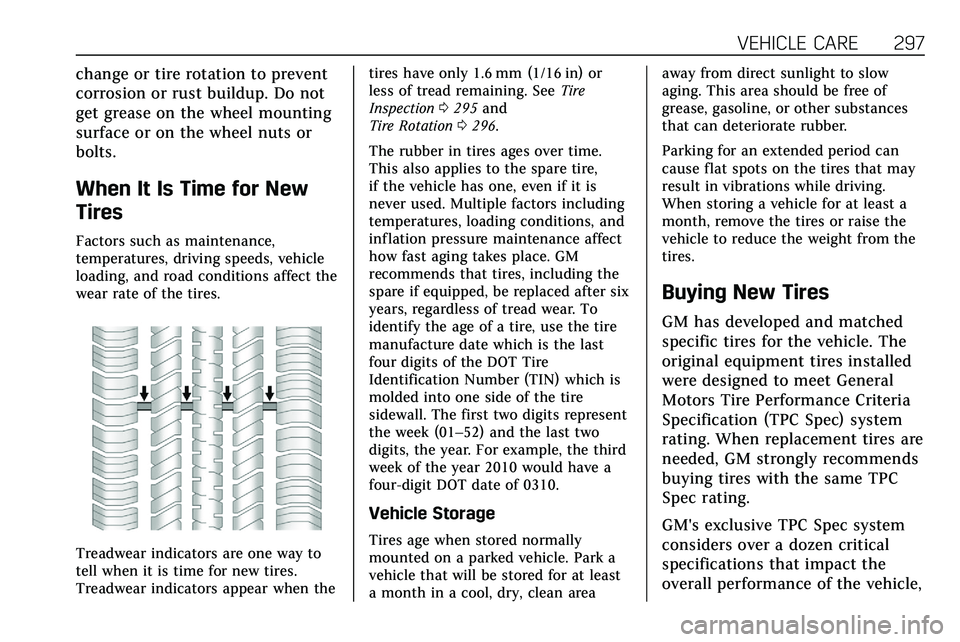
Treadwear indicators are one way to
tell when it is time for new tires.
Treadwear indicators appear when thetires have only 1.6 mm (1/16 in) or
less of tread remaining. See
Tire
Inspection 0295 and
Tire Rotation 0296.
The rubber in tires ages over time.
This also applies to the spare tire,
if the vehicle has one, even if it is
never used. Multiple factors including
temperatures, loading conditions, and
inflation pressure maintenance affect
how fast aging takes place. GM
recommends that tires, including the
spare if equipped, be replaced after six
years, regardless of tread wear. To
identify the age of a tire, use the tire
manufacture date which is the last
four digits of the DOT Tire
Identification Number (TIN) which is
molded into one side of the tire
sidewall. The first two digits represent
the week (01–52) and the last two
digits, the year. For example, the third
week of the year 2010 would have a
four-digit DOT date of 0310.
Vehicle Storage
Tires age when stored normally
mounted on a parked vehicle. Park a
vehicle that will be stored for at least
a month in a cool, dry, clean area away from direct sunlight to slow
aging. This area should be free of
grease, gasoline, or other substances
that can deteriorate rubber.
Parking for an extended period can
cause flat spots on the tires that may
result in vibrations while driving.
When storing a vehicle for at least a
month, remove the tires or raise the
vehicle to reduce the weight from the
tires.
Buying New Tires
GM has developed and matched
specific tires for the vehicle. The
original equipment tires installed
were designed to meet General
Motors Tire Performance Criteria
Specification (TPC Spec) system
rating. When replacement tires are
needed, GM strongly recommends
buying tires with the same TPC
Spec rating.
GM's exclusive TPC Spec system
considers over a dozen critical
specifications that impact the
overall performance of the vehicle,