warning CADILLAC XT5 2020 Repair Manual
[x] Cancel search | Manufacturer: CADILLAC, Model Year: 2020, Model line: XT5, Model: CADILLAC XT5 2020Pages: 384, PDF Size: 6.52 MB
Page 124 of 384
INSTRUMENTS AND CONTROLS 123
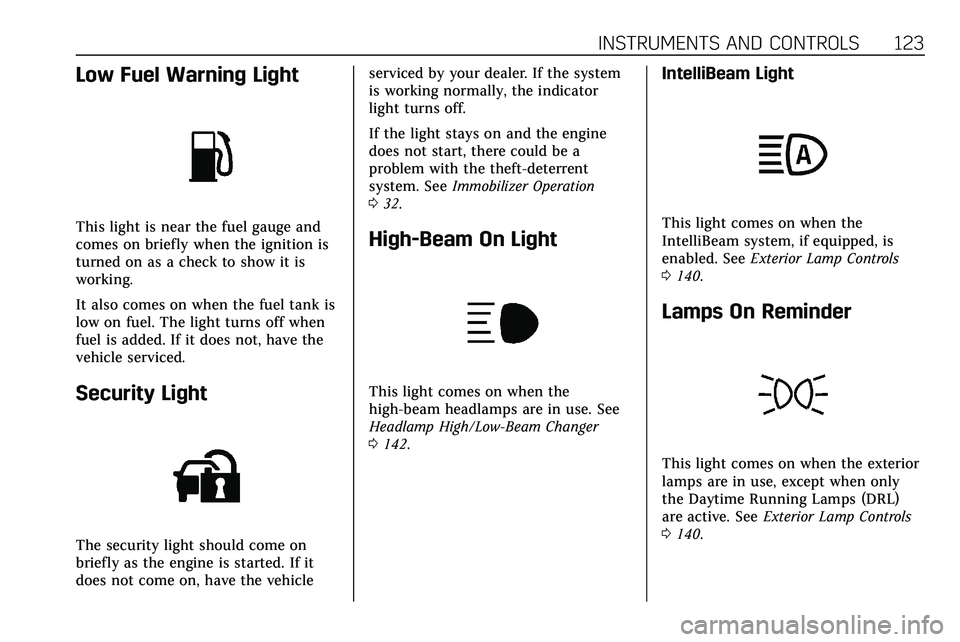
Low Fuel Warning Light
This light is near the fuel gauge and
comes on briefly when the ignition is
turned on as a check to show it is
working.
It also comes on when the fuel tank is
low on fuel. The light turns off when
fuel is added. If it does not, have the
vehicle serviced.
Security Light
The security light should come on
briefly as the engine is started. If it
does not come on, have the vehicleserviced by your dealer. If the system
is working normally, the indicator
light turns off.
If the light stays on and the engine
does not start, there could be a
problem with the theft-deterrent
system. See
Immobilizer Operation
0 32.
High-Beam On Light
This light comes on when the
high-beam headlamps are in use. See
Headlamp High/Low-Beam Changer
0142.
IntelliBeam Light
This light comes on when the
IntelliBeam system, if equipped, is
enabled. See Exterior Lamp Controls
0 140.
Lamps On Reminder
This light comes on when the exterior
lamps are in use, except when only
the Daytime Running Lamps (DRL)
are active. See Exterior Lamp Controls
0 140.
Page 128 of 384
INSTRUMENTS AND CONTROLS 127
Transmission Fluid Temperature :
Shows the temperature of the
automatic transmission fluid in either
degrees Celsius (°C) or degrees
Fahrenheit (°F).
Off Road :Displays vehicle pitch and
roll information, road wheel angle,
and four-wheel drive (4WD) status.
Engine Boost : Displays engine
manifold pressure relative to ambient
air pressure. It will display boost
pressure generated by the
turbocharging system.
Info Page Options : Scroll to choose
which info pages appear on the DIC.
Press SEL to select or deselect.
Blank Page : Allows for no
information to be displayed in the
cluster info display areas.Head-Up Display (HUD)
{Warning
If the HUD image is too bright or
too high in your field of view, it
may take you more time to see
things you need to see when it is
dark outside. Be sure to keep the
HUD image dim and placed low in
your field of view.
If equipped with HUD, some
information concerning the operation
of the vehicle is projected onto the
windshield. The image is projected
through the HUD lens on top of the
instrument panel. The information
appears as an image focused out
toward the front of the vehicle.
Caution
If you try to use the HUD image as
a parking aid, you may misjudge
the distance and damage your
vehicle. Do not use the HUD image
as a parking aid. The HUD information can be
displayed in various languages. The
speedometer reading and other
numerical values can be displayed in
either English or metric units.
The language selection is changed
through the radio and the units of
measurement is changed through the
instrument cluster. See
Vehicle
Personalization 0131 and "Options"
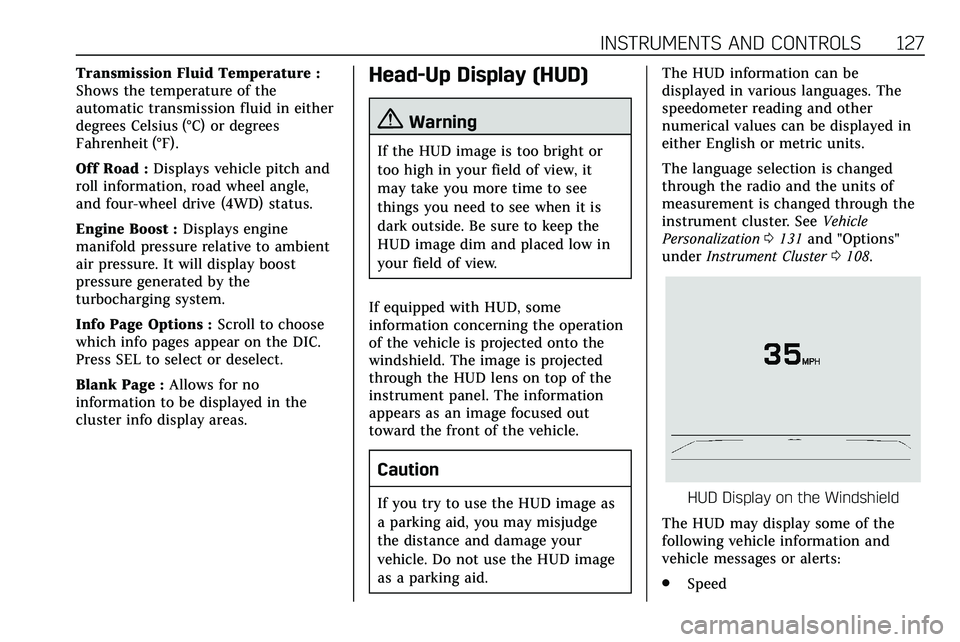
under Instrument Cluster 0108.HUD Display on the Windshield
The HUD may display some of the
following vehicle information and
vehicle messages or alerts:
. Speed
Page 130 of 384
INSTRUMENTS AND CONTROLS 129
Metric
English
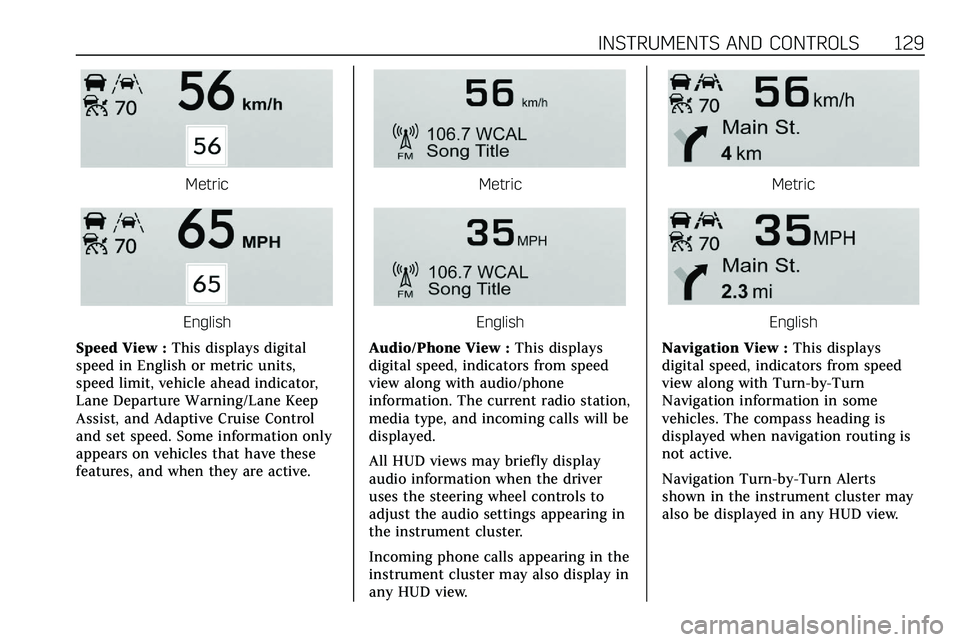
Speed View : This displays digital
speed in English or metric units,
speed limit, vehicle ahead indicator,
Lane Departure Warning/Lane Keep
Assist, and Adaptive Cruise Control
and set speed. Some information only
appears on vehicles that have these
features, and when they are active.
Metric
English
Audio/Phone View : This displays
digital speed, indicators from speed
view along with audio/phone
information. The current radio station,
media type, and incoming calls will be
displayed.
All HUD views may briefly display
audio information when the driver
uses the steering wheel controls to
adjust the audio settings appearing in
the instrument cluster.
Incoming phone calls appearing in the
instrument cluster may also display in
any HUD view.
Metric
English
Navigation View : This displays
digital speed, indicators from speed
view along with Turn-by-Turn
Navigation information in some
vehicles. The compass heading is
displayed when navigation routing is
not active.
Navigation Turn-by-Turn Alerts
shown in the instrument cluster may
also be displayed in any HUD view.
Page 141 of 384
140 LIGHTING
Lighting
Exterior Lighting
Exterior Lamp Controls . . . . . . . . . . 140
Exterior Lamps Off Reminder . . . 142
Headlamp High/Low-BeamChanger . . . . . . . . . . . . . . . . . . . . . . . . . . 142
Flash-to-Pass . . . . . . . . . . . . . . . . . . . . . 142
Daytime Running Lamps (DRL) . . . . . . . . . . . . . . . . . . . . 142
Automatic Headlamp System . . . 142
Hazard Warning Flashers . . . . . . . . 143
Turn and Lane-Change Signals . . . . . . . . . . . . . . . . . . . . . . . . . . . 143
Cornering Lamps . . . . . . . . . . . . . . . . . 144
Interior Lighting
Instrument Panel Illumination Control . . . . . . . . . . . . . . . . . . . . . . . . . . 144
Courtesy Lamps . . . . . . . . . . . . . . . . . . 144
Dome Lamps . . . . . . . . . . . . . . . . . . . . . 144
Reading Lamps . . . . . . . . . . . . . . . . . . . 145
Lighting Features
Entry Lighting . . . . . . . . . . . . . . . . . . . . 145
Exit Lighting . . . . . . . . . . . . . . . . . . . . . . 145
Battery Power Protection . . . . . . . . 146
Exterior Lighting Battery Saver . . . . . . . . . . . . . . . . . . . . . . . . . . . . . 146
Exterior Lighting
Exterior Lamp Controls
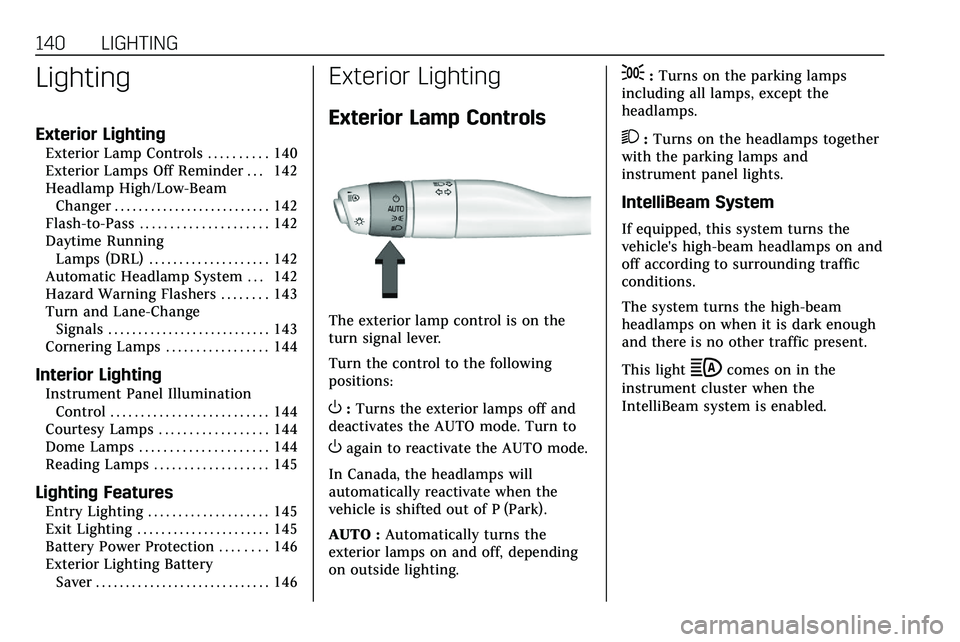
The exterior lamp control is on the
turn signal lever.
Turn the control to the following
positions:
O:Turns the exterior lamps off and
deactivates the AUTO mode. Turn to
Oagain to reactivate the AUTO mode.
In Canada, the headlamps will
automatically reactivate when the
vehicle is shifted out of P (Park).
AUTO : Automatically turns the
exterior lamps on and off, depending
on outside lighting.
;: Turns on the parking lamps
including all lamps, except the
headlamps.
2: Turns on the headlamps together
with the parking lamps and
instrument panel lights.
IntelliBeam System
If equipped, this system turns the
vehicle's high-beam headlamps on and
off according to surrounding traffic
conditions.
The system turns the high-beam
headlamps on when it is dark enough
and there is no other traffic present.
This light
bcomes on in the
instrument cluster when the
IntelliBeam system is enabled.
Page 143 of 384
142 LIGHTING
Exterior Lamps Off
Reminder
A warning chime sounds if the driver
door is opened while the ignition is off
and the exterior lamps are on.
Headlamp High/Low-Beam
Changer
3:Push the turn signal lever away
from you and release, to turn the high
beams on. To return to low beams,
push the lever again or pull it toward
you and release.
This indicator light turns on in the
instrument cluster when the
high-beam headlamps are on.
Flash-to-Pass
To flash the high beams, pull the turn
signal lever toward you, and release.
Daytime Running
Lamps (DRL)
DRL can make it easier for others to
see the front of your vehicle during
the day. Fully functional DRL are
required on all vehicles first sold in
Canada.
The dedicated DRL will come on when
all of the following conditions are met:
. The ignition is on.
. The exterior lamp control is
in AUTO.
. The light sensor determines it is
daytime.
. The parking brake is released or
the vehicle is not in P (Park).
When the DRL are on, the taillamps,
sidemarker lamps, and other lamps
will not be on.
The DRL turn off when the headlamps
are turned to
Oor the ignition is off.
For vehicles first sold in Canada, the
DRL can only be turned off when the
vehicle is parked.
Automatic Headlamp
System
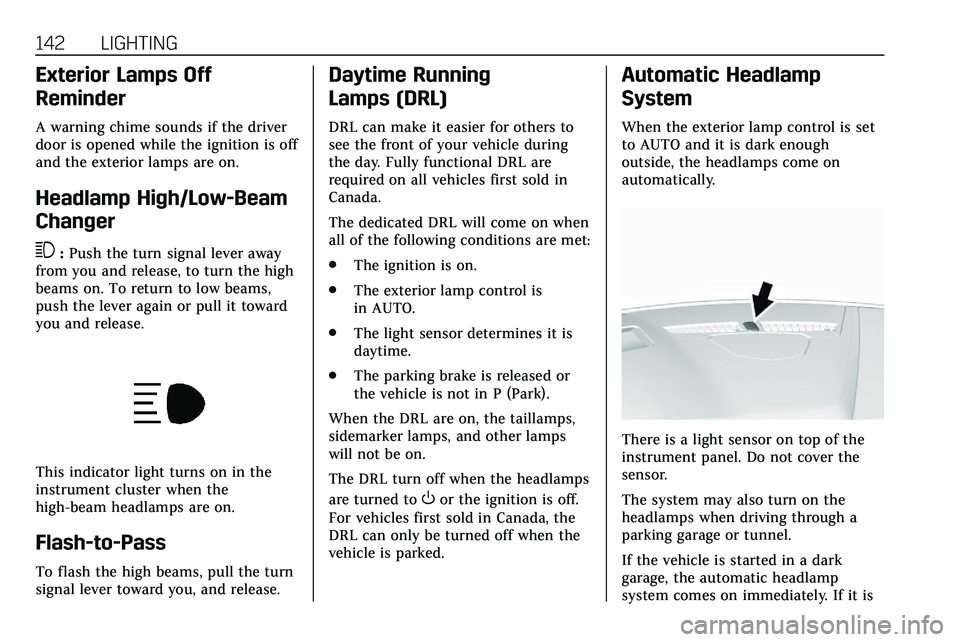
When the exterior lamp control is set
to AUTO and it is dark enough
outside, the headlamps come on
automatically.
There is a light sensor on top of the
instrument panel. Do not cover the
sensor.
The system may also turn on the
headlamps when driving through a
parking garage or tunnel.
If the vehicle is started in a dark
garage, the automatic headlamp
system comes on immediately. If it is
Page 144 of 384

LIGHTING 143
light outside when the vehicle leaves
the garage, there is a slight delay
before the automatic headlamp
system changes to the Daytime
Running Lamps (DRL). During that
delay, the instrument cluster may not
be as bright as usual. Make sure the
instrument panel brightness control is
in the full bright position. See
Instrument Panel Illumination Control
0144.
When it is bright enough outside, the
headlamps will turn off or may change
to DRL.
The automatic headlamp system turns
off when the exterior lamp control is
turned to
Oor the ignition is off.
For vehicles sold in Canada, this
control only works when the
transmission is in P (Park).
Lights On with Wipers
If the windshield wipers are activated
in daylight with the engine on, and
the exterior lamp control is in AUTO,
the headlamps, parking lamps, and
other exterior lamps come on. The
transition time for the lamps coming
on varies based on wiper speed. When the wipers are not operating, these
lamps turn off. Move the exterior
lamp control to
Oor;to disable
this feature.
Hazard Warning Flashers
|: Touch|on the center stack to
make the front and rear turn signal
lamps flash on and off. Touch again to
turn the flashers off.
The hazard warning flashers turn on
automatically if the airbags deploy.
Turn and Lane-Change
Signals
Move the lever all the way up or down
to signal a turn.
An arrow on the instrument cluster
flashes in the direction of the turn or
lane change.
Raise or lower the lever until the
arrow starts to flash to signal a lane
change. Hold it there until the lane
change is completed. If the lever is
briefly pressed and released, the turn
signal flashes three times.
The turn and lane-change signal can
be turned off manually by moving the
lever back to its original position.
Page 161 of 384
160 DRIVING AND OPERATING
.Do not use a phone in demanding
driving situations. Use a
hands-free method to place or
receive necessary phone calls.
. Watch the road. Do not read, take
notes, or look up information on
phones or other electronic devices.
. Designate a front seat passenger
to handle potential distractions.
. Become familiar with vehicle
features before driving, such as
programming favorite radio
stations and adjusting climate
control and seat settings. Program
all trip information into any
navigation device prior to driving.
. Wait until the vehicle is parked to
retrieve items that have fallen to
the floor.
. Stop or park the vehicle to tend to
children.
. Keep pets in an appropriate carrier
or restraint.
. Avoid stressful conversations
while driving, whether with a
passenger or on a cell phone.
{Warning
Taking your eyes off the road too
long or too often could cause a
crash resulting in injury or death.
Focus your attention on driving.
Refer to the infotainment manual for
more information on using that
system and the navigation system,
if equipped, including pairing and
using a cell phone.
Defensive Driving
Defensive driving means “always
expect the unexpected.” The first step
in driving defensively is to wear the
seat belt. See Seat Belts053.
. Assume that other road users
(pedestrians, bicyclists, and other
drivers) are going to be careless
and make mistakes. Anticipate
what they may do and be ready.
. Allow enough following distance
between you and the driver in
front of you.
. Focus on the task of driving.
Drunk Driving
Death and injury associated with
drinking and driving is a global
tragedy.
{Warning
Drinking and then driving is very
dangerous. Your reflexes,
perceptions, attentiveness, and
judgment can be affected by even a
small amount of alcohol. You can
have a serious —or even fatal —
collision if you drive after drinking.
Do not drink and drive or ride with
a driver who has been drinking.
Ride home in a cab; or if you are
with a group, designate a driver
who will not drink.
Control of a Vehicle
Braking, steering, and accelerating are
important factors in helping to control
a vehicle while driving.
Page 164 of 384
DRIVING AND OPERATING 163
Defensive drivers avoid most skids by
taking reasonable care suited to
existing conditions, and by not
overdriving those conditions. But
skids are always possible.
If the vehicle starts to slide, follow
these suggestions:
.Ease your foot off the accelerator
pedal and steer the way you want
the vehicle to go. The vehicle may
straighten out. Be ready for a
second skid if it occurs.
. Slow down and adjust your driving
according to weather conditions.
Stopping distance can be longer
and vehicle control can be affected
when traction is reduced by water,
snow, ice, gravel, or other material
on the road. Learn to recognize
warning clues —such as enough
water, ice, or packed snow on the
road to make a mirrored surface
— and slow down when you have
any doubt.
. Try to avoid sudden steering,
acceleration, or braking, including
reducing vehicle speed by shifting to a lower gear. Any sudden
changes could cause the tires to
slide.
Remember: Antilock brakes help avoid
only the braking skid.
Off-Road Driving
All-Wheel Drive vehicles can be used
for off-road driving. Vehicles without
All-Wheel Drive and vehicles not
equipped with All Terrain (AT) or
On-Off Road (OOR) tires must not be
driven off-road except on a level, solid
surface. To contact the tire
manufacturer for more information
about the original equipment tires, see
the Limited Warranty and Owner
Assistance Information manual.
Controlling the vehicle is the key to
successful off-road driving. One of the
best ways to control the vehicle is to
control the speed.
{Warning
When driving off-road, bouncing
and quick changes in direction can
easily throw you out of position.
This could cause you to lose control
and crash. You and your passengers
should always wear seat belts.
Before Driving Off-Road
. Have all necessary maintenance
and service work completed.
. Fuel the vehicle, fill fluid levels,
and check inflation pressure in all
tires, including the spare,
if equipped.
. Read all the information about
All-Wheel Drive vehicles in this
manual.
. Make sure all underbody shields,
if equipped, are properly attached.
. Know the local laws that apply to
off-road driving.
Page 165 of 384
164 DRIVING AND OPERATING
To gain more ground clearance if
needed, it may be necessary to remove
the front fascia lower air dam.
However, driving without the air dam
reduces fuel economy.
Caution
Operating the vehicle for extended
periods without the front fascia
lower air dam installed can cause
improper airf low to the engine.
Reattach the front fascia air dam
after off-road driving.
Loading the Vehicle for Off-Road
Driving
{Warning
.Unsecured cargo on the load
floor can be tossed about
when driving over rough
terrain. You or your
passengers can be struck by
flying objects. Secure the
cargo properly.
(Continued)
Warning (Continued)
.Keep cargo in the cargo area
as far forward and as low as
possible. The heaviest things
should be on the floor,
forward of the rear axle.
. Heavy loads on the roof raise
the vehicle's center of gravity,
making it more likely to roll
over. You can be seriously or
fatally injured if the vehicle
rolls over. Put heavy loads
inside the cargo area, not on
the roof.
For more information about loading
the vehicle, see Vehicle Load Limits
0 170.
Environmental Concerns
.
Always use established trails,
roads, and areas that have been
set aside for public off-road
recreational driving and obey all
posted regulations.
. Do not damage shrubs, flowers,
trees, or grasses or disturb wildlife. .
Do not park over things that burn.
See Parking over Things That Burn
0 182.
Driving on Hills
Driving safely on hills requires good
judgment and an understanding of
what the vehicle can and cannot do.
{Warning
Many hills are simply too steep for
any vehicle. Driving up hills can
cause the vehicle to stall. Driving
down hills can cause loss of control.
Driving across hills can cause a
rollover. You could be injured or
killed. Do not drive on steep hills.
Before driving on a hill, assess the
steepness, traction, and obstructions.
If the terrain ahead cannot be seen,
get out of the vehicle and walk the hill
before driving further.
When driving on hills:
. Use a low gear and keep a firm
grip on the steering wheel.
. Maintain a slow speed.
Page 166 of 384
DRIVING AND OPERATING 165
.When possible, drive straight up
or down the hill.
. Slow down when approaching the
top of the hill.
. Use headlamps even during the
day to make the vehicle more
visible.
{Warning
Driving to the top of a hill at high
speed can cause a crash. There
could be a drop-off, embankment,
cliff, or even another vehicle. You
could be seriously injured or killed.
As you near the top of a hill, slow
down and stay alert.
. Never go downhill forward or
backward with the transmission in
N (Neutral). The brakes could
overheat and you could lose
control.
. When driving down a hill, keep
the vehicle headed straight down.
Use a low gear because the engine will work with the brakes to slow
the vehicle and help keep the
vehicle under control.
{Warning
Heavy braking when going down a
hill can cause your brakes to
overheat and fade. This could cause
loss of control and you or others
could be injured or killed. Apply the
brakes lightly when descending a
hill and use a low gear to keep
vehicle speed under control.
If the vehicle stalls on a hill: 1. Apply the brakes to stop the vehicle, and then apply the
parking brake.
2. Shift into P (Park) and then restart the engine.
.If driving uphill when the
vehicle stalls, shift to
R (Reverse), release the
parking brake, and back
straight down. .
Never try to turn the vehicle
around. If the hill is steep
enough to stall the vehicle, it
is steep enough to cause it to
roll over.
. If you cannot make it up the
hill, back straight down
the hill.
. Never back down a hill in
N (Neutral) using only the
brake.
. The vehicle can roll backward
quickly and you could lose
control.
. If driving downhill when the
vehicle stalls, shift to a lower
gear, release the parking
brake, and drive straight
down the hill.
3. If the vehicle cannot be restarted after stalling, set the parking
brake, shift into P (Park), and
turn the vehicle off.
3.1. Leave the vehicle and seek help.