car with line CADILLAC XT5 2020 Owner's Manual
[x] Cancel search | Manufacturer: CADILLAC, Model Year: 2020, Model line: XT5, Model: CADILLAC XT5 2020Pages: 384, PDF Size: 6.52 MB
Page 52 of 384
SEATS AND RESTRAINTS 51
vehicle through the rear door and left
the vehicle without the vehicle being
shut off.
The feature can be turned on or off.
SeeVehicle Personalization 0131.
Rear Seat Adjustment
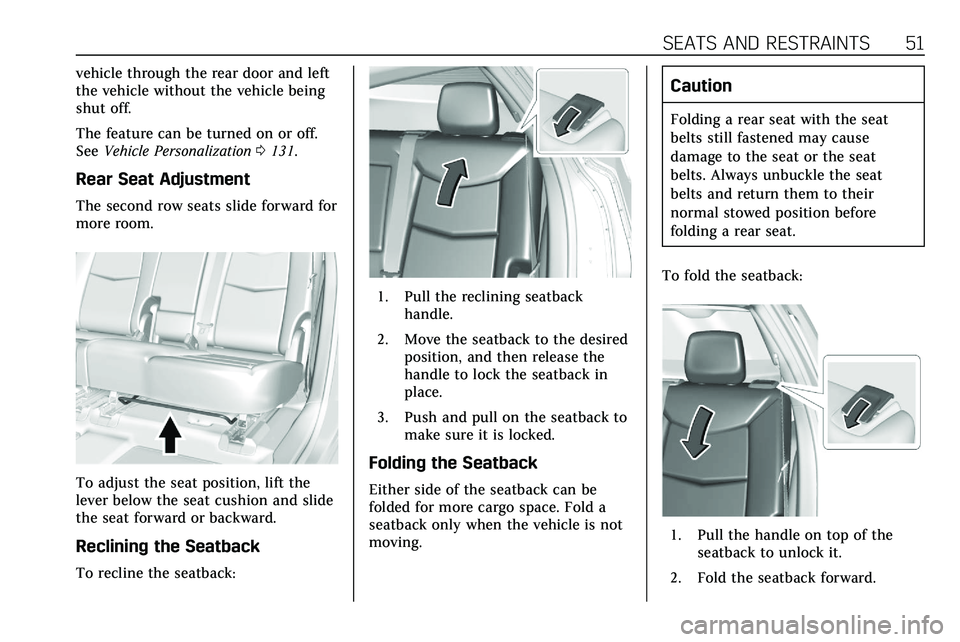
The second row seats slide forward for
more room.
To adjust the seat position, lift the
lever below the seat cushion and slide
the seat forward or backward.
Reclining the Seatback
To recline the seatback:
1. Pull the reclining seatback
handle.
2. Move the seatback to the desired position, and then release the
handle to lock the seatback in
place.
3. Push and pull on the seatback to make sure it is locked.
Folding the Seatback
Either side of the seatback can be
folded for more cargo space. Fold a
seatback only when the vehicle is not
moving.
Caution
Folding a rear seat with the seat
belts still fastened may cause
damage to the seat or the seat
belts. Always unbuckle the seat
belts and return them to their
normal stowed position before
folding a rear seat.
To fold the seatback:
1. Pull the handle on top of the seatback to unlock it.
2. Fold the seatback forward.
Page 94 of 384

STORAGE 93
To close, push the button and the
cover will close automatically.
Sunglasses Storage
If equipped, sunglasses storage is on
the overhead console. Press the fixed
button on the cover and release to
access.
Armrest Storage
For vehicles with a rear seat armrest,
pull the rear seat armrest forward to
access the cupholders with removable
liner.
Rear Storage
There is storage in the floor of the
rear cargo area. Lift the handle to
access.
Remove the load floor hook from the
holder and hook to the weatherstrip
above.
When done, return the load floor hook
to the holder.
Page 117 of 384
116 INSTRUMENTS AND CONTROLS
Malfunctions are often indicated by
the system before any problem is
noticeable. Being aware of the light
and seeking service promptly when it
comes on may prevent damage.
Caution
If the vehicle is driven continually
with this light on, the emission
control system may not work as
well, the fuel economy may be
lower, and the vehicle may not run
smoothly. This could lead to costly
repairs that might not be covered
by the vehicle warranty.
Caution
Modifications to the engine,
transmission, exhaust, intake,
or fuel system, or the use of
replacement tires that do not meet
the original tire specifications, can
cause this light to come on. This
could lead to costly repairs not(Continued)
Caution (Continued)
covered by the vehicle warranty.
This could also affect the vehicle’s
ability to pass an Emissions
Inspection/Maintenance test. See
Accessories and Modifications 0249.
If the light is f lashing : A
malfunction has been detected that
could damage the emission control
system and increase vehicle
emissions. Diagnosis and service may
be required.
To help prevent damage, reduce
vehicle speed and avoid hard
accelerations and uphill grades.
If towing a trailer, reduce the amount
of cargo being hauled as soon as
possible.
If the light continues to flash, find a
safe place to park. Turn the vehicle off
and wait at least 10 seconds before
restarting the engine. If the light is
still flashing, follow the previous
guidelines and see your dealer for
service as soon as possible. If the light is on steady :
A
malfunction has been detected.
Diagnosis and service may be
required.
Check the following:
. If fuel has been added to the
vehicle using the capless fuel
funnel adapter, make sure that it
has been removed. See “Filling the
Tank with a Portable Gas Can ”
under Filling the Tank 0231. The
diagnostic system can detect if the
adapter has been left installed in
the vehicle, allowing fuel to
evaporate into the atmosphere.
A few driving trips with the
adapter removed may turn off the
light.
. Poor fuel quality can cause
inefficient engine operation and
poor driveability, which may go
away once the engine is warmed
up. If this occurs, change the fuel
brand. It may require at least one
full tank of the proper fuel to turn
the light off. See Recommended
Fuel (3.6L V6 Engine) 0230 or
Recommended Fuel (2.0L L4 Engine)
0 230.
Page 169 of 384
168 DRIVING AND OPERATING
and you are going fast enough. When
the vehicle is hydroplaning, it has
little or no contact with the road.
There is no hard and fast rule about
hydroplaning. The best advice is to
slow down when the road is wet.
Other Rainy Weather Tips
Besides slowing down, other wet
weather driving tips include:
.Allow extra following distance.
. Pass with caution.
. Keep windshield wiping equipment
in good shape.
. Keep the windshield washer fluid
reservoir filled.
. Have good tires with proper tread
depth. See Tires0282.
. Turn off cruise control.
Hill and Mountain Roads
Driving on steep hills or through
mountains is different than driving on
flat or rolling terrain. Tips include:
.
Keep the vehicle serviced and in
good shape. .
Check all fluid levels, brakes, tires,
cooling system, and transmission.
. Shift to a lower gear when going
down steep or long hills.
{Warning
Using the brakes to slow the vehicle
on a long downhill slope can cause
brake overheating, can reduce brake
performance, and could result in a
loss of braking. Shift the
transmission to a lower gear to let
the engine assist the brakes on a
steep downhill slope.
{Warning
Coasting downhill in N (Neutral) or
with the ignition off is dangerous.
This can cause overheating of the
brakes and loss of steering assist.
Always have the engine running
and the vehicle in gear. .
Drive at speeds that keep the
vehicle in its own lane. Do not
swing wide or cross the
center line.
. Be alert on top of hills; something
could be in your lane (e.g., stalled
car, crash).
. Pay attention to special road signs
(e.g., falling rocks area, winding
roads, long grades, passing or
no-passing zones) and take
appropriate action.
Winter Driving
Driving on Snow or Ice
Snow or ice between the tires and the
road creates less traction or grip, so
drive carefully. Wet ice can occur at
about 0 °C (32 °F) when freezing rain
begins to fall. Avoid driving on wet ice
or in freezing rain until roads can be
treated.
For Slippery Road Driving:
.
Accelerate gently. Accelerating too
quickly causes the wheels to spin
and makes the surface under the
tires slick.
Page 174 of 384
DRIVING AND OPERATING 173
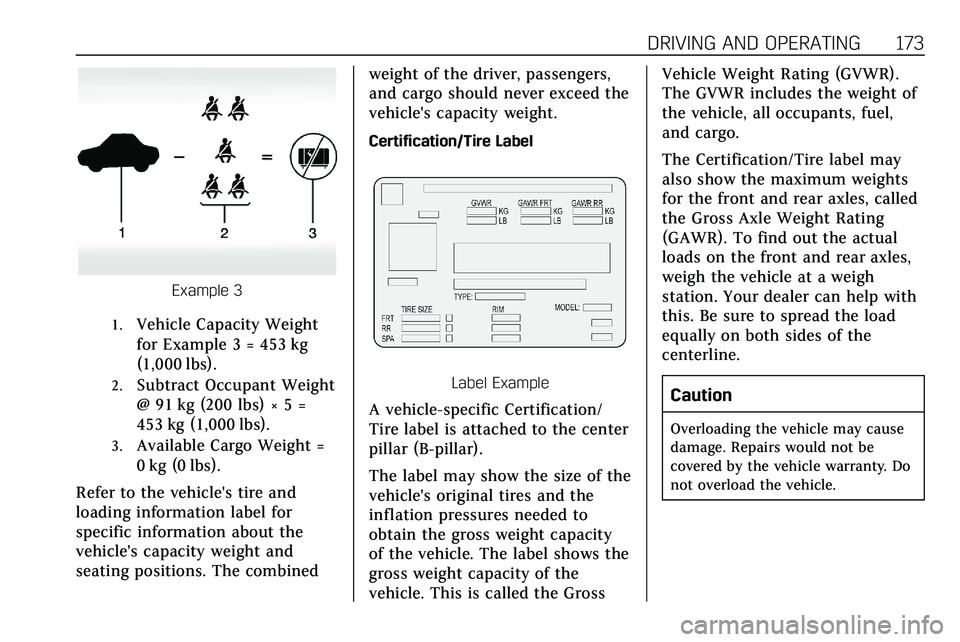
Example 3
1.Vehicle Capacity Weight
for Example 3 = 453 kg
(1,000 lbs).
2.Subtract Occupant Weight
@ 91 kg (200 lbs) × 5 =
453 kg (1,000 lbs).
3.Available Cargo Weight =
0 kg (0 lbs).
Refer to the vehicle's tire and
loading information label for
specific information about the
vehicle's capacity weight and
seating positions. The combined weight of the driver, passengers,
and cargo should never exceed the
vehicle's capacity weight.
Certification/Tire Label
Label Example
A vehicle-specific Certification/
Tire label is attached to the center
pillar (B-pillar).
The label may show the size of the
vehicle's original tires and the
inflation pressures needed to
obtain the gross weight capacity
of the vehicle. The label shows the
gross weight capacity of the
vehicle. This is called the GrossVehicle Weight Rating (GVWR).
The GVWR includes the weight of
the vehicle, all occupants, fuel,
and cargo.
The Certification/Tire label may
also show the maximum weights
for the front and rear axles, called
the Gross Axle Weight Rating
(GAWR). To find out the actual
loads on the front and rear axles,
weigh the vehicle at a weigh
station. Your dealer can help with
this. Be sure to spread the load
equally on both sides of the
centerline.
Caution
Overloading the vehicle may cause
damage. Repairs would not be
covered by the vehicle warranty. Do
not overload the vehicle.
Page 175 of 384
174 DRIVING AND OPERATING
{Warning
Things inside the vehicle can
strike and injure people in a
sudden stop or turn, or in a
crash.
.Put things in the cargo
area of the vehicle. In the
cargo area, put them as far
forward as possible. Try to
spread the weight evenly.
.Never stack heavier things,
like suitcases, inside the
vehicle so that some of
them are above the tops of
the seats.
.Do not leave an unsecured
child restraint in the
vehicle.
.Secure loose items in the
vehicle.
.Do not leave a seat folded
down unless needed.
Starting and Operating
New Vehicle Break-In
Caution
The vehicle does not need an
elaborate break-in. But it will
perform better in the long run if
you follow these guidelines: . Do not drive at any one
constant speed, fast or slow,
for the first 800 km (500 mi).
Do not make full-throttle
starts. Avoid downshifting to
brake or slow the vehicle.
. Avoid making hard stops for
the first 300 km (200 mi) or
so. During this time the new
brake linings are not yet
broken in. Hard stops with
new linings can mean
premature wear and earlier
replacement. Follow this
breaking-in guideline every
time you get new brake
linings.
(Continued)
Caution (Continued)
Following break-in, engine speed
and load can be gradually
increased.
Ignition Positions
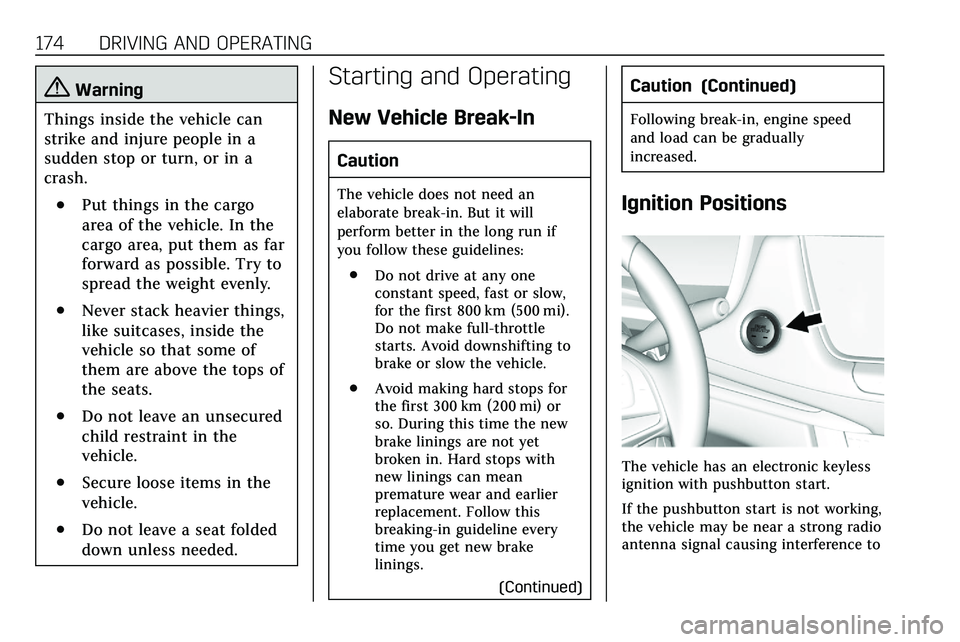
The vehicle has an electronic keyless
ignition with pushbutton start.
If the pushbutton start is not working,
the vehicle may be near a strong radio
antenna signal causing interference to
Page 232 of 384
DRIVING AND OPERATING 231
Prohibited Fuels
Caution
Do not use fuels with any of the
following conditions; doing so may
damage the vehicle and void its
warranty:. For vehicles that are not
FlexFuel, fuel labeled greater
than 15% ethanol by volume,
such as mid-level ethanol
blends (16–50% ethanol), E85,
or FlexFuel.
. Fuel with any amount of
methanol, methylal, ferrocene,
and aniline. These fuels can
corrode metal fuel system
parts or damage plastic and
rubber parts.
. Fuel containing metals such
as methylcyclopentadienyl
manganese tricarbonyl
(MMT), which can damage
the emissions control system
and spark plugs.
(Continued)
Caution (Continued)
.Fuel with a posted octane
rating of less than the
recommended fuel. Using this
fuel will lower fuel economy
and performance, and may
decrease the life of the
emissions catalyst.
Fuels in Foreign Countries
The U.S., Canada, and Mexico post
fuel octane ratings in anti-knock index
(AKI). For fuel not to use in a foreign
country, see Prohibited Fuels 0231.
Fuel Additives
TOP TIER Detergent Gasoline is highly
recommended for use with your
vehicle. If your country does not have
TOP TIER Detergent Gasoline, add
ACDelco Fuel System Treatment Plus
−Gasoline to the vehicle’s gasoline fuel
tank at every oil change or 15 000 km
(9,000 mi), whichever occurs first. TOP
TIER Detergent Gasoline and ACDelco
Fuel System Treatment Plus−Gasoline will help keep your vehicle’s engine
fuel deposit free and performing
optimally.
Filling the Tank
An arrow on the fuel gauge indicates
which side of the vehicle the fuel door
is on. See
Fuel Gauge 0112.
{Warning
Fuel vapors and fuel fires burn
violently and can cause injury or
death.
Follow these guidelines to help
avoid injuries to you and others:
. Read and follow all the
instructions on the fuel pump
island.
. Turn off the engine when
refueling.
. Keep sparks, flames, and
smoking materials away
from fuel.
(Continued)
Page 256 of 384
VEHICLE CARE 255
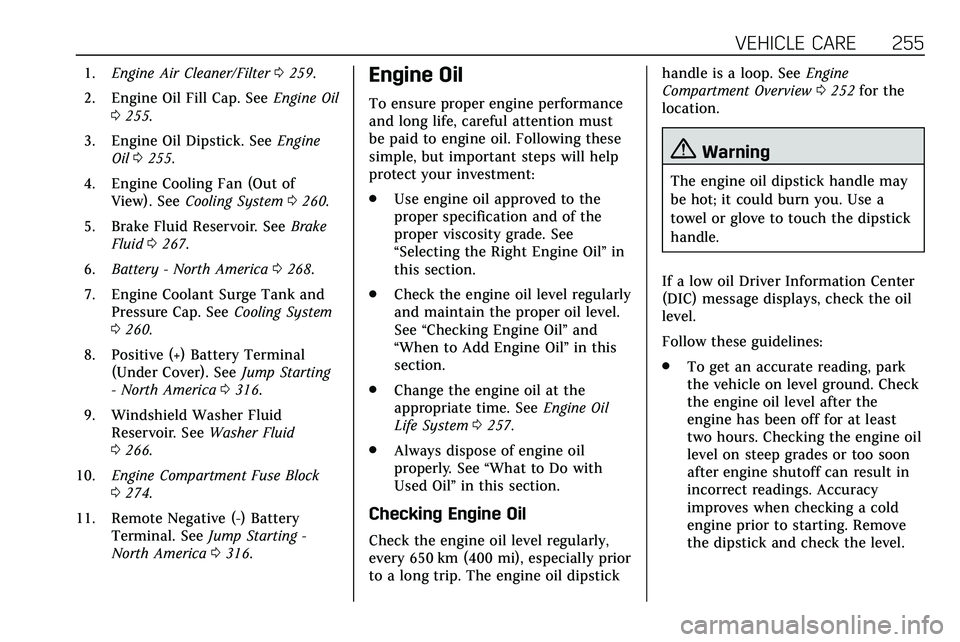
1.Engine Air Cleaner/Filter 0259.
2. Engine Oil Fill Cap. See Engine Oil
0 255.
3. Engine Oil Dipstick. See Engine
Oil 0255.
4. Engine Cooling Fan (Out of View). See Cooling System 0260.
5. Brake Fluid Reservoir. See Brake
Fluid 0267.
6. Battery - North America 0268.
7. Engine Coolant Surge Tank and Pressure Cap. See Cooling System
0 260.
8. Positive (+) Battery Terminal (Under Cover). See Jump Starting
- North America 0316.
9. Windshield Washer Fluid Reservoir. See Washer Fluid
0 266.
10. Engine Compartment Fuse Block
0274.
11. Remote Negative (-) Battery Terminal. See Jump Starting -
North America 0316.Engine Oil
To ensure proper engine performance
and long life, careful attention must
be paid to engine oil. Following these
simple, but important steps will help
protect your investment:
.
Use engine oil approved to the
proper specification and of the
proper viscosity grade. See
“Selecting the Right Engine Oil” in
this section.
. Check the engine oil level regularly
and maintain the proper oil level.
See “Checking Engine Oil” and
“When to Add Engine Oil” in this
section.
. Change the engine oil at the
appropriate time. See Engine Oil
Life System 0257.
. Always dispose of engine oil
properly. See “What to Do with
Used Oil” in this section.
Checking Engine Oil
Check the engine oil level regularly,
every 650 km (400 mi), especially prior
to a long trip. The engine oil dipstick handle is a loop. See
Engine
Compartment Overview 0252 for the
location.
{Warning
The engine oil dipstick handle may
be hot; it could burn you. Use a
towel or glove to touch the dipstick
handle.
If a low oil Driver Information Center
(DIC) message displays, check the oil
level.
Follow these guidelines:
. To get an accurate reading, park
the vehicle on level ground. Check
the engine oil level after the
engine has been off for at least
two hours. Checking the engine oil
level on steep grades or too soon
after engine shutoff can result in
incorrect readings. Accuracy
improves when checking a cold
engine prior to starting. Remove
the dipstick and check the level.
Page 265 of 384
264 VEHICLE CARE
surge tank until the level reaches
the mark pointed to on the front
of the coolant surge tank.
5. Replace the pressure cap tightly.
6. Verify coolant level after the engine is shut off and the
coolant is cold. If necessary,
repeat coolant fill procedure
Step 1–6.
Caution
If the pressure cap is not tightly
installed, coolant loss and engine
damage may occur. Be sure the cap
is properly and tightly secured.
Automatic Coolant Service Fill
Instructions (2.0L Engine Only)
If equipped, this feature assists in
filling and removing air from the
cooling system after service of
components or when coolant is added
after being too low.
To activate the fill and air removal
process:
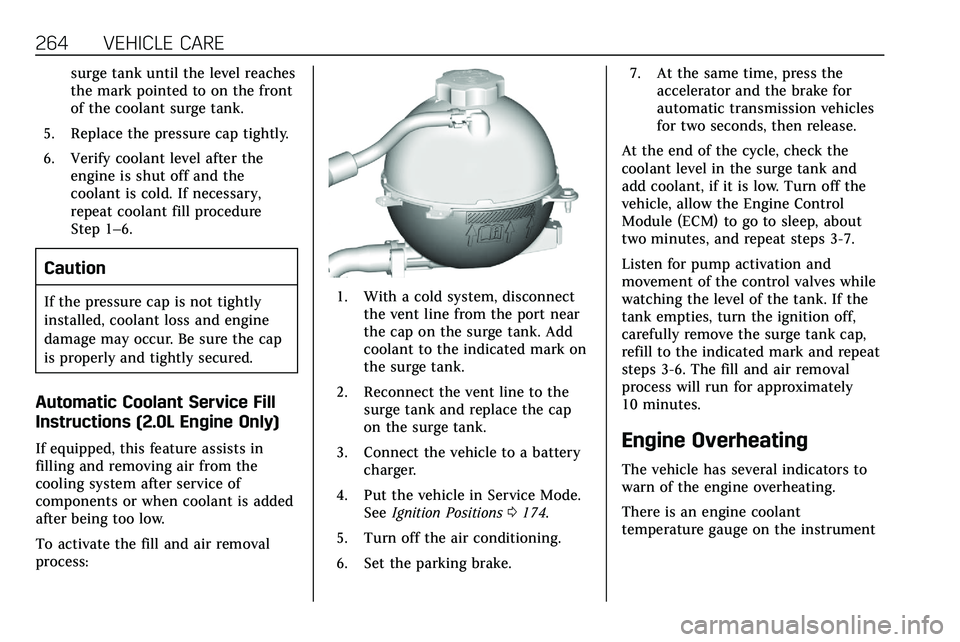
1. With a cold system, disconnectthe vent line from the port near
the cap on the surge tank. Add
coolant to the indicated mark on
the surge tank.
2. Reconnect the vent line to the surge tank and replace the cap
on the surge tank.
3. Connect the vehicle to a battery charger.
4. Put the vehicle in Service Mode. See Ignition Positions 0174.
5. Turn off the air conditioning.
6. Set the parking brake. 7. At the same time, press the
accelerator and the brake for
automatic transmission vehicles
for two seconds, then release.
At the end of the cycle, check the
coolant level in the surge tank and
add coolant, if it is low. Turn off the
vehicle, allow the Engine Control
Module (ECM) to go to sleep, about
two minutes, and repeat steps 3-7.
Listen for pump activation and
movement of the control valves while
watching the level of the tank. If the
tank empties, turn the ignition off,
carefully remove the surge tank cap,
refill to the indicated mark and repeat
steps 3-6. The fill and air removal
process will run for approximately
10 minutes.
Engine Overheating
The vehicle has several indicators to
warn of the engine overheating.
There is an engine coolant
temperature gauge on the instrument
Page 285 of 384
284 VEHICLE CARE
Caution (Continued)
been subjected to−7 °C (20 °F) or
less, let them warm up in a heated
space to at least 5 °C (40 °F) for
24 hours or more before being
installed or driving a vehicle on
which they are installed. Do not
apply heat or blow heated air
directly on the tires. Always inspect
tires before use. See Tire Inspection
0 295.
Tire Sidewall Labeling
Useful information about a tire is
molded into its sidewall. The
examples show a typical passenger
vehicle tire and a compact spare
tire sidewall.
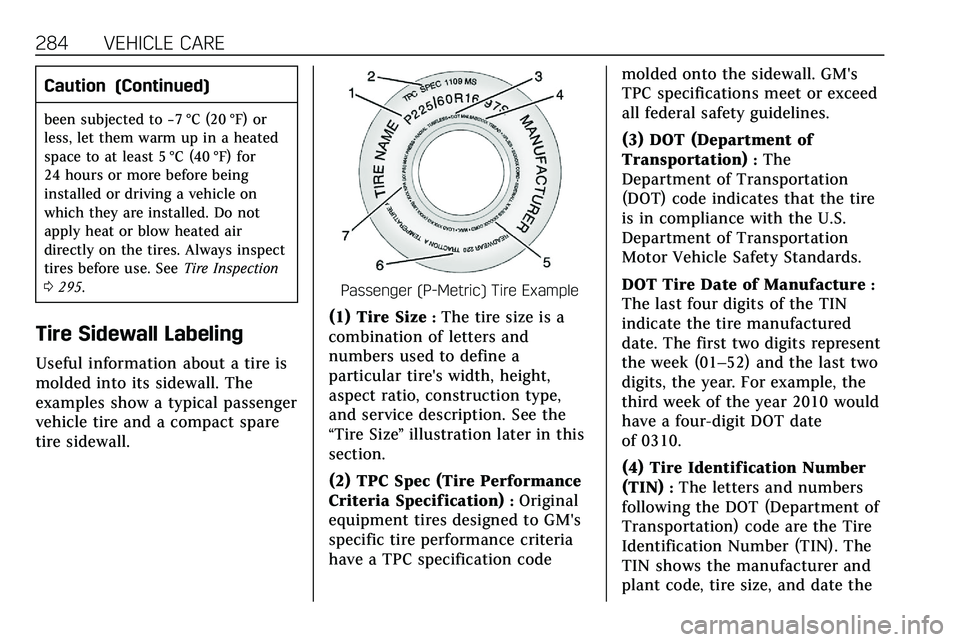
Passenger (P-Metric) Tire Example
(1) Tire Size:The tire size is a
combination of letters and
numbers used to define a
particular tire's width, height,
aspect ratio, construction type,
and service description. See the
“Tire Size ”illustration later in this
section.
(2) TPC Spec (Tire Performance
Criteria Specification)
:Original
equipment tires designed to GM's
specific tire performance criteria
have a TPC specification code molded onto the sidewall. GM's
TPC specifications meet or exceed
all federal safety guidelines.
(3) DOT (Department of
Transportation)
:The
Department of Transportation
(DOT) code indicates that the tire
is in compliance with the U.S.
Department of Transportation
Motor Vehicle Safety Standards.
DOT Tire Date of Manufacture
:
The last four digits of the TIN
indicate the tire manufactured
date. The first two digits represent
the week (01–52) and the last two
digits, the year. For example, the
third week of the year 2010 would
have a four-digit DOT date
of 0310.
(4) Tire Identification Number
(TIN)
:The letters and numbers
following the DOT (Department of
Transportation) code are the Tire
Identification Number (TIN). The
TIN shows the manufacturer and
plant code, tire size, and date the