towing CADILLAC XT5 2020 Owner's Manual
[x] Cancel search | Manufacturer: CADILLAC, Model Year: 2020, Model line: XT5, Model: CADILLAC XT5 2020Pages: 384, PDF Size: 6.52 MB
Page 72 of 384
SEATS AND RESTRAINTS 71
A thick layer of additional material,
such as a blanket or cushion,
or aftermarket equipment such as seat
covers, seat heaters, and seat
massagers can affect how well the
passenger sensing system operates.
We recommend that you not use seat
covers or other aftermarket equipment
except when approved by GM for your
specific vehicle. SeeAdding Equipment
to the Airbag-Equipped Vehicle 071 for
more information about modifications
that can affect how the system
operates.
The ON indicator may be lit if an
object, such as a briefcase, handbag,
grocery bag, laptop, or other electronic
device, is put on an unoccupied seat.
If this is not desired, remove the
object from the seat.
{Warning
Stowing articles under the
passenger seat or between the
passenger seat cushion and
seatback may interfere with the
proper operation of the passenger
sensing system.
Servicing the
Airbag-Equipped Vehicle
Airbags affect how the vehicle should
be serviced. There are parts of the
airbag system in several places around
the vehicle. Your dealer and the
service manual have information
about servicing the vehicle and the
airbag system. To purchase a service
manual, see Publication Ordering
Information 0358.
{Warning
For up to 10 seconds after the
vehicle is turned off and the battery
is disconnected, an airbag can still
inflate during improper service. You
can be injured if you are close to an
airbag when it inflates. Avoid
yellow connectors. They are
probably part of the airbag system.
Be sure to follow proper service
procedures, and make sure the
person performing work for you is
qualified to do so.
Adding Equipment to the
Airbag-Equipped Vehicle
Adding accessories that change the
vehicle's frame, bumper system,
height, front end, or side sheet metal
may keep the airbag system from
working properly.
The operation of the airbag system
can also be affected by changing,
including improperly repairing or
replacing, any parts of the following:
.
Airbag system, including airbag
modules, front or side impact
sensors, sensing and diagnostic
module, or airbag wiring
. Front seats, including stitching,
seams or zippers
. Seat belts
. Steering wheel, instrument panel,
overhead console, ceiling trim,
or pillar garnish trim
. Inner door seals, including
speakers
Your dealer and the service manual
have information about the location of
the airbag modules and sensors,
Page 117 of 384
116 INSTRUMENTS AND CONTROLS
Malfunctions are often indicated by
the system before any problem is
noticeable. Being aware of the light
and seeking service promptly when it
comes on may prevent damage.
Caution
If the vehicle is driven continually
with this light on, the emission
control system may not work as
well, the fuel economy may be
lower, and the vehicle may not run
smoothly. This could lead to costly
repairs that might not be covered
by the vehicle warranty.
Caution
Modifications to the engine,
transmission, exhaust, intake,
or fuel system, or the use of
replacement tires that do not meet
the original tire specifications, can
cause this light to come on. This
could lead to costly repairs not(Continued)
Caution (Continued)
covered by the vehicle warranty.
This could also affect the vehicle’s
ability to pass an Emissions
Inspection/Maintenance test. See
Accessories and Modifications 0249.
If the light is f lashing : A
malfunction has been detected that
could damage the emission control
system and increase vehicle
emissions. Diagnosis and service may
be required.
To help prevent damage, reduce
vehicle speed and avoid hard
accelerations and uphill grades.
If towing a trailer, reduce the amount
of cargo being hauled as soon as
possible.
If the light continues to flash, find a
safe place to park. Turn the vehicle off
and wait at least 10 seconds before
restarting the engine. If the light is
still flashing, follow the previous
guidelines and see your dealer for
service as soon as possible. If the light is on steady :
A
malfunction has been detected.
Diagnosis and service may be
required.
Check the following:
. If fuel has been added to the
vehicle using the capless fuel
funnel adapter, make sure that it
has been removed. See “Filling the
Tank with a Portable Gas Can ”
under Filling the Tank 0231. The
diagnostic system can detect if the
adapter has been left installed in
the vehicle, allowing fuel to
evaporate into the atmosphere.
A few driving trips with the
adapter removed may turn off the
light.
. Poor fuel quality can cause
inefficient engine operation and
poor driveability, which may go
away once the engine is warmed
up. If this occurs, change the fuel
brand. It may require at least one
full tank of the proper fuel to turn
the light off. See Recommended
Fuel (3.6L V6 Engine) 0230 or
Recommended Fuel (2.0L L4 Engine)
0 230.
Page 118 of 384

INSTRUMENTS AND CONTROLS 117
If the light remains on, see your
dealer.
Emissions Inspection and
Maintenance Programs
If the vehicle requires an Emissions
Inspection/Maintenance test, the test
equipment will likely connect to the
vehicle's Data Link Connector (DLC).
The DLC is under the instrument
panel to the left of the steering wheel.
Connecting devices that are not used
to perform an Emissions Inspection/
Maintenance test or to service the
vehicle may affect vehicle operation.
SeeAdd-On Electrical Equipment 0246.
See your dealer if assistance is needed.
The vehicle may not pass
inspection if:
. The light is on when the engine is
running. .
The light does not come on when
the ignition is in Service Mode.
. Critical emission control systems
have not been completely
diagnosed. If this happens, the
vehicle would not be ready for
inspection and might require
several days of routine driving
before the system is ready for
inspection. This can happen if the
12-volt battery has recently been
replaced or run down, or if the
vehicle has been recently serviced.
See your dealer if the vehicle will not
pass or cannot be made ready for
the test.
Brake System Warning
Light
MetricEnglish This light should come on briefly
when the vehicle is turned on. If it
does not come on then, have it fixed
so it will be ready to warn you if there
is a problem.
If the light comes on and stays on at
start up, there is a brake problem.
Have the brake system inspected
right away.
If the light comes on while driving,
pull off the road and stop carefully.
The brake pedal might be harder to
push, or the brake pedal may go closer
to the floor. It could take longer to
stop. If the light is still on, have the
vehicle towed for service. See
Towing
the Vehicle 0319.
{Warning
The brake system might not be
working properly if the brake
system warning light is on. Driving
with the brake system warning light
on can lead to a crash. If the light is
still on after the vehicle has been
(Continued)
Page 160 of 384
DRIVING AND OPERATING 159
Filling the Tank . . . . . . . . . . . . . . . . . . 231
Filling a Portable FuelContainer . . . . . . . . . . . . . . . . . . . . . . . . 233
Trailer Towing
General Towing Information . . . . 234
Driving Characteristics andTowing Tips . . . . . . . . . . . . . . . . . . . . . 234
Trailer Towing . . . . . . . . . . . . . . . . . . . . 237
Towing Equipment . . . . . . . . . . . . . . . 241
Trailer Sway Control (TSC) . . . . . . 244
Conversions and Add-Ons
Add-On Electrical Equipment . . . 246
Driving Information
Driving for Better Fuel
Economy
Driving habits can affect fuel mileage.
Here are some driving tips to get the
best fuel economy possible.
. Set the climate controls to the
desired temperature after the
engine is started, or turn them off
when not required.
. On AWD vehicles, use Tour Mode
when conditions permit.
. Avoid fast starts and accelerate
smoothly.
. Brake gradually and avoid abrupt
stops.
. Avoid idling the engine for long
periods of time.
. When road and weather
conditions are appropriate, use
cruise control.
. Always follow posted speed limits
or drive more slowly when
conditions require. .
Keep vehicle tires properly
inflated.
. Combine several trips into a
single trip.
. Replace the vehicle's tires with the
same TPC Spec number molded
into the tire's sidewall near
the size.
. Follow recommended scheduled
maintenance.
Distracted Driving
Distraction comes in many forms and
can take your focus from the task of
driving. Exercise good judgment and
do not let other activities divert your
attention away from the road. Many
local governments have enacted laws
regarding driver distraction. Become
familiar with the local laws in
your area.
To avoid distracted driving, keep your
eyes on the road, keep your hands on
the steering wheel, and focus your
attention on driving.
Page 171 of 384

170 DRIVING AND OPERATING
This keeps the battery charged to
restart the vehicle and to signal for
help with the headlamps. Do this as
little as possible, to save fuel.
If the Vehicle Is Stuck
Slowly and cautiously spin the wheels
to free the vehicle when stuck in sand,
mud, ice, or snow.
If stuck too severely for the traction
system to free the vehicle, turn the
traction system off and use the
rocking method. SeeTraction Control/
Electronic Stability Control 0193.
{Warning
If the vehicle's tires spin at high
speed, they can explode, and you or
others could be injured. The vehicle
can overheat, causing an engine
compartment fire or other damage.
Spin the wheels as little as possible
and avoid going above 56 km/h
(35 mph). For All-Wheel Drive (AWD), select
Off-Road or AWD mode. See
Driver
Mode Control 0195 and
All-Wheel Drive 0190.
Rocking the Vehicle to Get it Out
Turn the steering wheel left and right
to clear the area around the front
wheels. Turn off any traction system.
Shift back and forth between
R (Reverse) and a low forward gear,
spinning the wheels as little as
possible. To prevent transmission
wear, wait until the wheels stop
spinning before shifting gears. Release
the accelerator pedal while shifting,
and press lightly on the accelerator
pedal when the transmission is in
gear. Slowly spinning the wheels in
the forward and reverse directions
causes a rocking motion that could
free the vehicle. If that does not get
the vehicle out after a few tries, it
might need to be towed out. If the
vehicle does need to be towed out, see
Towing the Vehicle 0319.
Vehicle Load Limits
It is very important to know how
much weight the vehicle can carry.
This weight is called the vehicle
capacity weight and includes the
weight of all occupants, cargo, and
all nonfactory-installed options.
Two labels on the vehicle may
show how much weight it may
properly carry, the Tire and
Loading Information label and the
Certification/Tire label.
{Warning
Do not load the vehicle any
heavier than the Gross Vehicle
Weight Rating (GVWR),
or either the maximum front or
rear Gross Axle Weight Rating
(GAWR). This can cause
systems to break and change
the way the vehicle handles.
This could cause loss of control
and a crash. Overloading can
(Continued)
Page 173 of 384
172 DRIVING AND OPERATING
exceed the available cargo
and luggage load capacity
calculated in Step 4.
6.If your vehicle will be towing
a trailer, load from your
trailer will be transferred to
your vehicle. Consult this
manual to determine how
this reduces the available
cargo and luggage load
capacity of your vehicle.”
See Trailer Towing 0237 for
important information on towing
a trailer, towing safety rules and
trailering tips.
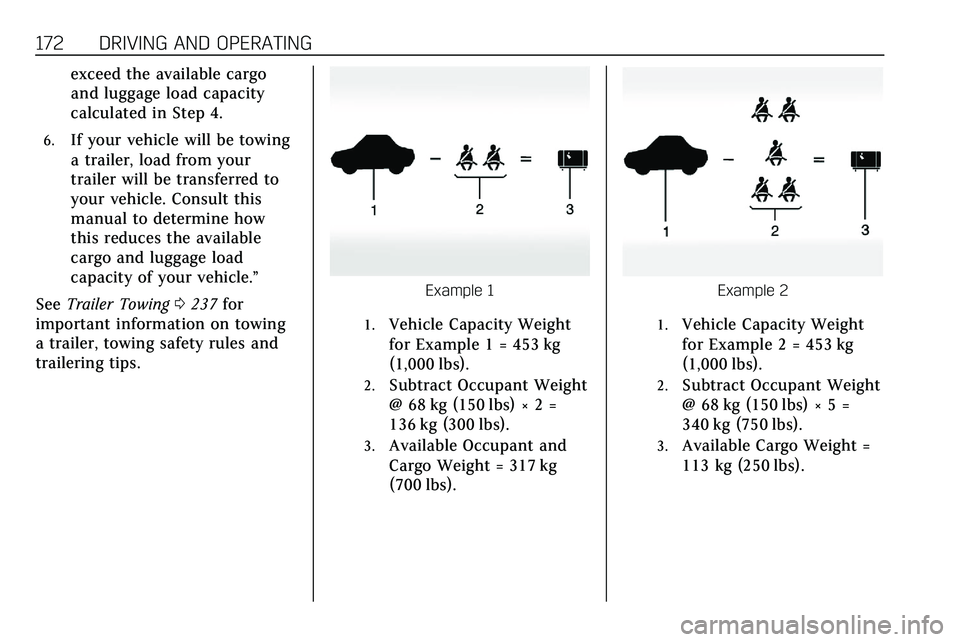
Example 1
1.Vehicle Capacity Weight
for Example 1 = 453 kg
(1,000 lbs).
2.Subtract Occupant Weight
@ 68 kg (150 lbs) × 2 =
136 kg (300 lbs).
3.Available Occupant and
Cargo Weight = 317 kg
(700 lbs).
Example 2
1.Vehicle Capacity Weight
for Example 2 = 453 kg
(1,000 lbs).
2.Subtract Occupant Weight
@ 68 kg (150 lbs) × 5 =
340 kg (750 lbs).
3.Available Cargo Weight =
113 kg (250 lbs).
Page 181 of 384
180 DRIVING AND OPERATING
The length of time the heater should
remain plugged in depends on several
factors. Ask a dealer in the area where
you will be parking the vehicle for the
best advice on this.
Retained Accessory
Power (RAP)
When the ignition is turned from on
to off, the following features (if
equipped) will continue to function
for up to 10 minutes, or until the
driver door is opened. These features
will also work when the ignition is in
RUN or ACC/ACCESSORY:
.Infotainment System
. Power Windows (during RAP this
functionality will be lost when any
door is opened)
. Sunroof (during RAP this
functionality will be lost when any
door is opened)
. Auxiliary Power Outlet
. Audio System
. OnStar System
Shifting Into Park
To shift into P (Park):
1. Hold the brake pedal down and set the parking brake. See Electric
Parking Brake 0191.
2. Press the button on top of the shift lever to shift into P (Park).
See Automatic Transmission
0 184.
3. The P indicator on the shift lever will turn red when the vehicle is
in P (Park).
Leaving the Vehicle with the
Engine Running
{Warning
It can be dangerous to leave the
vehicle with the engine running.
It could overheat and catch fire.
It is dangerous to get out of the
vehicle if the vehicle is not in
P (Park) with the parking brake set.
The vehicle can roll.
(Continued)
Warning (Continued)
Do not leave the vehicle when the
engine is running. If you have left
the engine running, the vehicle can
move suddenly. You or others could
be injured. To be sure the vehicle
will not move, even when you are
on fairly level ground, always set
the parking brake and shift to
P (Park). SeeShifting Into Park 0180
. If you are towing a trailer, see
Driving Characteristics and Towing
Tips 0234.
If you have to leave the vehicle with
the engine running, be sure the
vehicle is in P (Park) and the parking
brake is set before you leave it.
If you are towing a trailer and parking
on a hill, see Driving Characteristics
and Towing Tips 0234.
Shifting out of Park
This vehicle is equipped with an
electronic transmission. The shift lock
release button is designed to prevent
Page 182 of 384

DRIVING AND OPERATING 181
inadvertent shifting out of P (Park)
unless the ignition is on, the brake
pedal is applied, and the shift lock
release button is pressed.
The shift lock control is always
functional except in the case of an
uncharged or low voltage (less than
9-volt) battery.
If the vehicle has an uncharged
battery or a battery with low voltage,
try charging or jump starting the
battery. SeeJump Starting - North
America 0316.
To shift out of P (Park): 1. Ensure the engine is running.
2. Apply the brake pedal.
3. Press the shift lock release button.
4. Move the shift lever to the desired position.
5. The P indicator will turn white and the gear indicator on the
shift lever will turn red when the
vehicle is no longer in P (Park).
6. After releasing the shift lever, it will return to the center position. If the vehicle cannot shift from
P (Park), a Driver Information
Center (DIC) message will be
displayed. See your dealer for service.
Manual Park Release
{Warning
The transmission will be placed in
N (Neutral) when the manual park
release is pulled. The vehicle can
roll and you or others could be
injured. Ensure the vehicle is on
level ground.
Caution
The manual park release is not
intended to be used for towing.
Damage may result from using the
manual park release in this way.
The repairs would not be covered
by the vehicle warranty.
This vehicle includes a manual park
release that can be used to shift the
vehicle into N (Neutral) when the
engine is not running.
Pulling the manual park release while
the vehicle is on or turning the
ignition on while the manual park
release is pulled, will cause a DIC
message to display.
To place the vehicle in N (Neutral)
using the manual park release:
1. Ensure the vehicle is on level ground and set the parking
brake. Release the brake pedal.
2. Turn the vehicle off.
Page 185 of 384
184 DRIVING AND OPERATING
If the vehicle is left with the engine
running, follow the proper steps to be
sure the vehicle will not move. See
Shifting Into Park0180 and
Engine Exhaust 0183.
If parking on a hill and pulling a
trailer, see Driving Characteristics and
Towing Tips 0234.Automatic Transmission
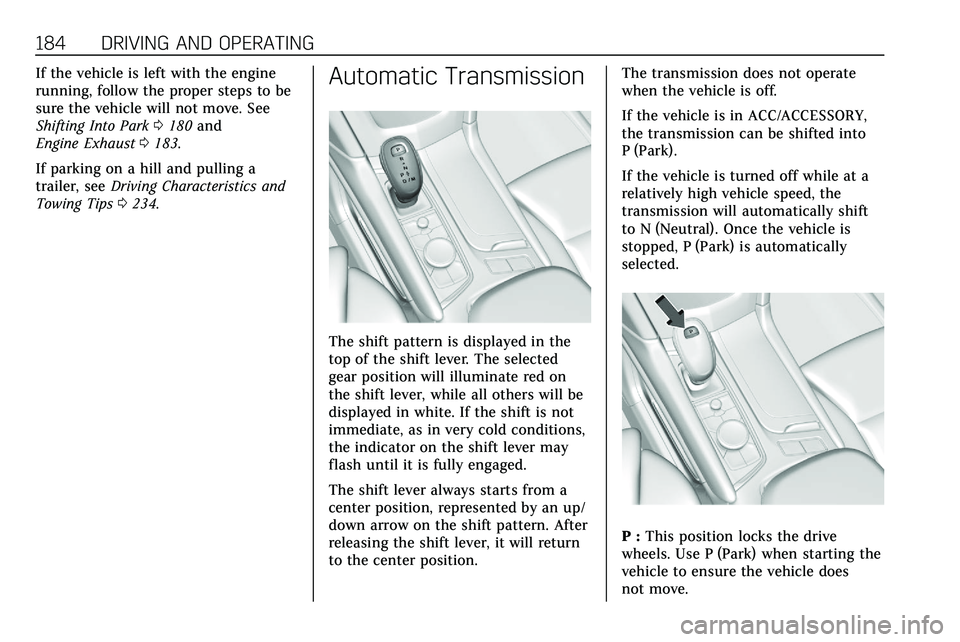
The shift pattern is displayed in the
top of the shift lever. The selected
gear position will illuminate red on
the shift lever, while all others will be
displayed in white. If the shift is not
immediate, as in very cold conditions,
the indicator on the shift lever may
flash until it is fully engaged.
The shift lever always starts from a
center position, represented by an up/
down arrow on the shift pattern. After
releasing the shift lever, it will return
to the center position. The transmission does not operate
when the vehicle is off.
If the vehicle is in ACC/ACCESSORY,
the transmission can be shifted into
P (Park).
If the vehicle is turned off while at a
relatively high vehicle speed, the
transmission will automatically shift
to N (Neutral). Once the vehicle is
stopped, P (Park) is automatically
selected.
P :
This position locks the drive
wheels. Use P (Park) when starting the
vehicle to ensure the vehicle does
not move.
Page 187 of 384

186 DRIVING AND OPERATING
2. Press and hold the shift lockrelease button on the side of the
shift lever.
3. From the center position, move the shift lever forward through
the first detent to the end of
travel. R is illuminated in red.
4. After releasing the shift lever, it will return to the center position.
To shift out of R (Reverse): 1. Bring the vehicle to a complete stop.
2. Shift to the desired gear.
3. After releasing the shift lever, it will return to the center position.
At low vehicle speeds, R (Reverse) can
be used to rock the vehicle back and
forth to get out of snow, ice, or sand
without damaging the transmission.
See If the Vehicle Is Stuck 0170.
N : In this position, the engine does
not connect with the wheels. To
restart the engine when the vehicle is
already moving, use N (Neutral) only.
{Warning
Shifting into a drive gear while the
engine is running at high speed is
dangerous. Unless your foot is
firmly on the brake pedal, the
vehicle could move very rapidly.
You could lose control and hit
people or objects. Do not shift into
a drive gear while the engine is
running at high speed.
Caution
Shifting out of P (Park) or
N (Neutral) with the engine running
at high speed may damage the
transmission. The repairs would not
be covered by the vehicle warranty.
Be sure the engine is not running at
high speed when shifting the
vehicle.
The vehicle is not designed to stay in
N (Neutral) for more than
five minutes. It may automatically
shift into P (Park). N (Neutral) is not intended for towing. If the vehicle
needs to be towed, see
Towing the
Vehicle 0319.
To shift into N (Neutral): 1. Move the shift lever forward to the first detent from the center
position.
.If the vehicle is in P (Park),
apply the brake pedal and
press the shift lock release
button while moving the shift
lever forward.
. N will illuminate in red.
2. After releasing the shift lever, it will return to the center position.
To shift out of N (Neutral): 1. Bring the vehicle to a complete stop.
2. Shift to the desired gear. If shifting from N (Neutral) to
R (Reverse), press the shift lock
release button.
3. After releasing the shift lever, it will return to the center position.