ECU CADILLAC XT5 2021 Service Manual
[x] Cancel search | Manufacturer: CADILLAC, Model Year: 2021, Model line: XT5, Model: CADILLAC XT5 2021Pages: 426, PDF Size: 8.73 MB
Page 185 of 426
Cadillac XT5 Owner Manual (GMNA-Localizing-U.S./Canada/Mexico-
14590481) - 2021 - CRC - 10/22/20
184 INFOTAINMENT SYSTEM
current prompt and recognize your
command. Background noise may
cause accidental interruptions.
Touch Off or On.
Favorites
Touch and the following may display:
.Manage Favorites: Touch to display
a list of Audio, Phone, and
Navigation favorites.
Favorites can be moved, renamed,
or deleted.
To move, touch and hold the
favorite, and then drag up or down
to rearrange the position.
.Set Number of Audio Favorites:
Touch to select how many favorites
pages can be viewed from the audio
application. The Auto setting will
automatically adjust this number
based on the number of favorites
you have saved. Touch Auto, 5, 10,
15, 20, 25, 30, 35, or 40.
Updates
If equipped, the vehicle can download
and install select software updates
over a wireless connection. The
system will prompt for certain updates to be downloaded and
installed. There is also an option to
check for updates manually.
To manually check for updates, touch
Settings on the Home Page and select
the System tab. Go to the Vehicle
Software section and touch Updates.
Follow the on-screen prompts. The
steps to check for, download, and
install updates may vary by vehicle.
The vehicle can be used normally
during the software download. Once
the download is complete, there may
be a prompt to accept the installation
of the update upon the next ignition
cycle or the next time the vehicle is
shifted into P (Park). For most
updates, the vehicle will be disabled
and cannot be driven during the
installation. The system will deliver
messages indicating success or error
during and after the download and
installation processes.
Downloading Over-the-Air vehicle
software updates requires Internet
connectivity, which can be accessed
through the vehicle’s built-in 4G LTE
connection, if equipped and active.
If required, data plans are provided bya third party. Optionally, a secure
Wi-Fi hotspot such as a compatible
mobile device hotspot, home hotspot,
or public hotspot can be used.
Applicable data rates may apply.
To connect the infotainment system
to a secured mobile device hotspot,
home hotspot, or public hotspot,
touch Settings on the Home Page,
select the System tab, followed by
Wi-Fi Networks. Select the appropriate
Wi-Fi network, and follow the
on-screen prompts. Download speeds
may vary.
On most compatible mobile devices,
activation of the Wi-Fi hotspot is in
the Settings menu under Mobile
Network Sharing, Personal Hotspot,
Mobile Hotspot, or similar.
Availability of Over-the-Air software
updates varies by vehicle and country.
Features are subject to change. For
more information on this feature, see
my.cadillac.com/learn.
Page 189 of 426
Cadillac XT5 Owner Manual (GMNA-Localizing-U.S./Canada/Mexico-
14590481) - 2021 - CRC - 10/22/20
188 INFOTAINMENT SYSTEM
Vehicle
This menu allows adjustment of
different vehicle features. SeeVehicle
Personalization 0123.
Personal
If equipped, this menu allows
adjustment of different user profile
settings. See “Users”in Using the
System 0143 for information on
setting up user profiles.
The menu may contain the following:
Name
Touch to edit your user name that will
be displayed in the vehicle.
Vehicle Account Information
Touch to view the vehicle account
information and to change the
account password.
An “unverified user account ”pop-up
will display until the account
information verification process has
been completed on the Internet.
Check your registered e-mail account
for an activation e-mail to complete
the verification process. Profile Picture
Touch to choose or change your
profile picture.
Profile Identifiers
Touch to have the vehicle recognize
the identifier you choose.
Touch Vehicle Key 1 and/or
Vehicle Key 2.
If the remote key is lost or stolen, see
your dealer.
Security
Touch to have your profile secured
with a Personal Identification
Number (PIN).
Touch No or Yes.
Vehicle Name
Touch to edit your vehicle name.
Vehicle Account
Touch to view the vehicle account
information and to change the
account password.
Delete Profile
Touch to remove the profile from the
vehicle.Touch Remove or Cancel.
Teen Driver
If equipped, this allows multiple keys
to be registered for beginner drivers to
encourage safe driving habits. When
the vehicle is started with a Teen
Driver key, it will automatically
activate certain safety systems, allow
setting of some features, and limit the
use of others. The Report Card will
record vehicle data about driving
behavior that can be viewed later.
When the vehicle is started with a
registered key, the Driver Information
Center (DIC) displays a message that
Teen Driver is active.
To access:
1. Touch Settings on the Home Page, then touch Vehicle, and then Teen
Driver.
2. Create a Personal Identification Number (PIN) by choosing a
four-digit PIN. Re-enter the PIN to
confirm. To change the PIN, touch
Change PIN.
The PIN is required to:
.Register or unregister keys.
Page 191 of 426
Cadillac XT5 Owner Manual (GMNA-Localizing-U.S./Canada/Mexico-
14590481) - 2021 - CRC - 10/22/20
190 INFOTAINMENT SYSTEM
Teen Driver Speed Limiter :Limits
the maximum speed of the vehicle.
When the speed limiter is turned on
and the vehicle is started with a Teen
Driver key, the DIC displays a message
that the top speed is limited.
On certain vehicles, when the Speed
Limiter is turned ON, the vehicle’s
maximum acceleration will be limited.
The DIC will display a message that
the acceleration is limited.
Teen Driver Speed Warning : Allows
the speed warning to be turned on or
off. Touch Set Teen Driver Speed
Warning to set the warning speed.
Set Teen Driver Speed Warning :
Displays a warning in the DIC when
exceeding a selectable speed. Choose
the desired speed warning level. The
speed warning does not limit the
speed of the vehicle.
SiriusXM Explicit Content Filter (if
equipped) : Allows the SiriusXM
Explicit Content Filter to be turned
ON or OFF. When ON, the teen driver
will not be able to listen to SiriusXM
stations that contain explicit content, and the Explicit Content Filter
selection in the Audio Settings will be
unavailable for change.
When Teen Driver is Active:
.If equipped with Buckle to Drive,
shifting out of P (Park) will be
prevented if the driver seat belt, and
in some vehicles the front passenger
seat belt, is not buckled.
.The radio will mute when the driver
seat belt, and in some vehicles the
front passenger seat belt, is not
buckled. The audio from any device
paired to the vehicle will also be
muted.
.An object placed on the front
passenger seat, such as a briefcase,
handbag, grocery bag, laptop,
or other electronic device, could
cause the passenger sensing system
to falsely sense an unbuckled front
passenger and mute the radio.
If this happens, remove the object
from the seat. See
Passenger Sensing
System 061.
.Some safety systems, such as
Forward Collision Alert, if equipped,
cannot be turned off.
.The gap setting for the Forward
Collision Alert and Adaptive Cruise
Control, if equipped, cannot be
changed.
.When trying to change a safety
feature that is not configurable in
Teen Driver, the DIC displays a
message indicating that Teen Driver
is active and the action is not
available.
.Super Cruise, if equipped, is not
available.
.Enhanced Low Fuel Warning (if
equipped) –When the vehicle is low
on fuel, the low fuel light on the
instrument cluster flashes and the
DIC low fuel warning cannot be
dismissed.
.Do not tow a trailer.
Report Card
The vehicle owner must secure the
driver’s consent to record certain
vehicle data when the vehicle is driven
with a registered Teen Driver key.
There is one Report Card per vehicle.
Data is only recorded when a
registered Teen Driver key is used to
operate the vehicle.
Page 215 of 426
Cadillac XT5 Owner Manual (GMNA-Localizing-U.S./Canada/Mexico-
14590481) - 2021 - CRC - 10/22/20
214 DRIVING AND OPERATING
Off-Road Driving
All-Wheel Drive vehicles can be used
for off-road driving. Vehicles without
All-Wheel Drive and vehicles not
equipped with All Terrain (AT) or
On-Off Road (OOR) tires must not be
driven off-road except on a level, solid
surface. To contact the tire
manufacturer for more information
about the original equipment tires, see
the Limited Warranty and Owner
Assistance Information manual.
Controlling the vehicle is the key to
successful off-road driving. One of the
best ways to control the vehicle is to
control the speed.
{Warning
When driving off-road, bouncing
and quick changes in direction can
easily throw you out of position.
This could cause you to lose control
and crash. You and your passengers
should always wear seat belts.
Before Driving Off-Road
.Have all necessary maintenance and
service work completed.
.Fuel the vehicle, fill fluid levels, and
check inflation pressure in all tires,
including the spare, if equipped.
.Read all the information about
All-Wheel Drive vehicles in this
manual.
.Make sure all underbody shields,
if equipped, are properly attached.
.Know the local laws that apply to
off-road driving.
To gain more ground clearance if
needed, it may be necessary to remove
the front fascia lower air dam.
However, driving without the air dam
reduces fuel economy.
Caution
Operating the vehicle for extended
periods without the front fascia
lower air dam installed can cause
improper airf low to the engine.
Reattach the front fascia air dam
after off-road driving.
Loading the Vehicle for Off-Road
Driving
{Warning
.Unsecured cargo on the load
floor can be tossed about when
driving over rough terrain. You or
your passengers can be struck by
flying objects. Secure the cargo
properly.
.Keep cargo in the cargo area as
far forward and as low as
possible. The heaviest things
should be on the floor, forward
of the rear axle.
.Heavy loads on the roof raise the
vehicle's center of gravity,
making it more likely to roll over.
You can be seriously or fatally
injured if the vehicle rolls over.
Put heavy loads inside the cargo
area, not on the roof.
For more information about loading
the vehicle, see Vehicle Load Limits
0 220.
Page 224 of 426
Cadillac XT5 Owner Manual (GMNA-Localizing-U.S./Canada/Mexico-
14590481) - 2021 - CRC - 10/22/20
DRIVING AND OPERATING 223
weight of the driver, passengers,
and cargo should never exceed the
vehicle's capacity weight.
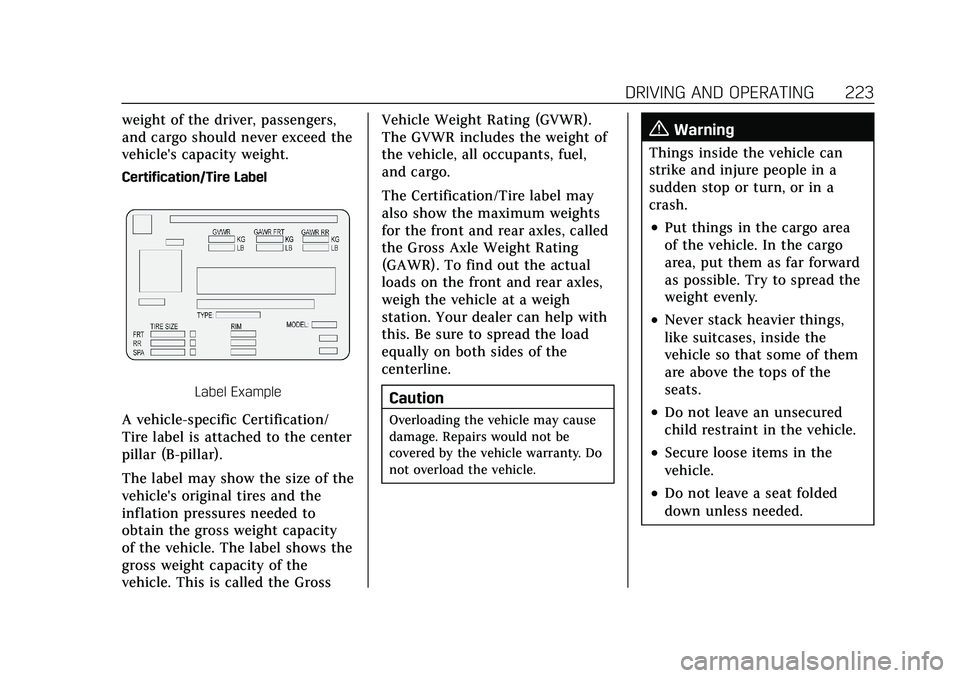
Certification/Tire Label
Label Example
A vehicle-specific Certification/
Tire label is attached to the center
pillar (B-pillar).
The label may show the size of the
vehicle's original tires and the
inflation pressures needed to
obtain the gross weight capacity
of the vehicle. The label shows the
gross weight capacity of the
vehicle. This is called the GrossVehicle Weight Rating (GVWR).
The GVWR includes the weight of
the vehicle, all occupants, fuel,
and cargo.
The Certification/Tire label may
also show the maximum weights
for the front and rear axles, called
the Gross Axle Weight Rating
(GAWR). To find out the actual
loads on the front and rear axles,
weigh the vehicle at a weigh
station. Your dealer can help with
this. Be sure to spread the load
equally on both sides of the
centerline.
CautionOverloading the vehicle may cause
damage. Repairs would not be
covered by the vehicle warranty. Do
not overload the vehicle.
{Warning
Things inside the vehicle can
strike and injure people in a
sudden stop or turn, or in a
crash.
.Put things in the cargo area
of the vehicle. In the cargo
area, put them as far forward
as possible. Try to spread the
weight evenly.
.Never stack heavier things,
like suitcases, inside the
vehicle so that some of them
are above the tops of the
seats.
.Do not leave an unsecured
child restraint in the vehicle.
.Secure loose items in the
vehicle.
.Do not leave a seat folded
down unless needed.
Page 282 of 426

Cadillac XT5 Owner Manual (GMNA-Localizing-U.S./Canada/Mexico-
14590481) - 2021 - CRC - 10/22/20
DRIVING AND OPERATING 281
Warning (Continued)
.Adjust the climate control
system to a setting that brings in
only outside air. See“Climate
Control Systems” in the Index.
For more information about carbon
monoxide, see Engine Exhaust
0 231.
Towing a trailer requires experience.
The combination of the vehicle and
trailer is longer and not as responsive
as the vehicle itself. Get used to the
handling and braking of the
combination by driving on a level road
surface before driving on public roads.
The trailer structure, the tires, and the
brakes must be all be rated to carry
the intended cargo. Inadequate trailer
equipment can cause the combination
to operate in an unexpected or unsafe
manner. Before driving, inspect all
trailer hitch parts and attachments,
safety chains, electrical connectors,
lamps, tires, and mirrors. See Towing
Equipment 0286. If the trailer has
electric brakes, start the combination
moving and then manually apply the trailer brake controller to check the
trailer brakes work. During the trip,
occasionally check that the cargo and
trailer are secure and that the lamps
and any trailer brakes are working.
Towing with a Stability Control
System
When towing, the stability control
system might be heard. The system
reacts to vehicle movement caused by
the trailer, which mainly occurs
during cornering. This is normal when
towing heavier trailers.
Following Distance
Stay at least twice as far behind the
vehicle ahead as you would when
driving without a trailer. This can help
to avoid heavy braking and sudden
turns.
Passing
More passing distance is needed when
towing a trailer. The combination will
not accelerate as quickly and is much
longer so it is necessary to go much
farther beyond the passed vehicle
before returning to the lane. Pass on
level roadways. Avoid passing on hills
if possible.
Backing Up
Hold the bottom of the steering wheel
with one hand. To move the trailer to
the left, move that hand to the left. To
move the trailer to the right, move
that hand to the right. Always back up
slowly and, if possible, have someone
guide you.
Making Turns
Caution
Turn more slowly and make wider
arcs when towing a trailer to
prevent damage to your vehicle.
Making very sharp turns could
cause the trailer to contact the
vehicle.
Make wider turns than normal when
towing, so trailer will not go over soft
shoulders, over curbs, or strike road
signs, trees, or other objects. Always
signal turns well in advance. Do not
steer or brake suddenly.
Page 308 of 426
Cadillac XT5 Owner Manual (GMNA-Localizing-U.S./Canada/Mexico-
14590481) - 2021 - CRC - 10/22/20
VEHICLE CARE 307
Caution (Continued)
cause system damage. If coolant is
not visible in the surge tank,
contact your dealer.
The coolant surge tank pressure cap
can be removed when the cooling
system, including the surge tank
pressure cap and upper radiator hose,
is no longer hot.
Coolant Fill Instructions (3.6L
Engine Only)
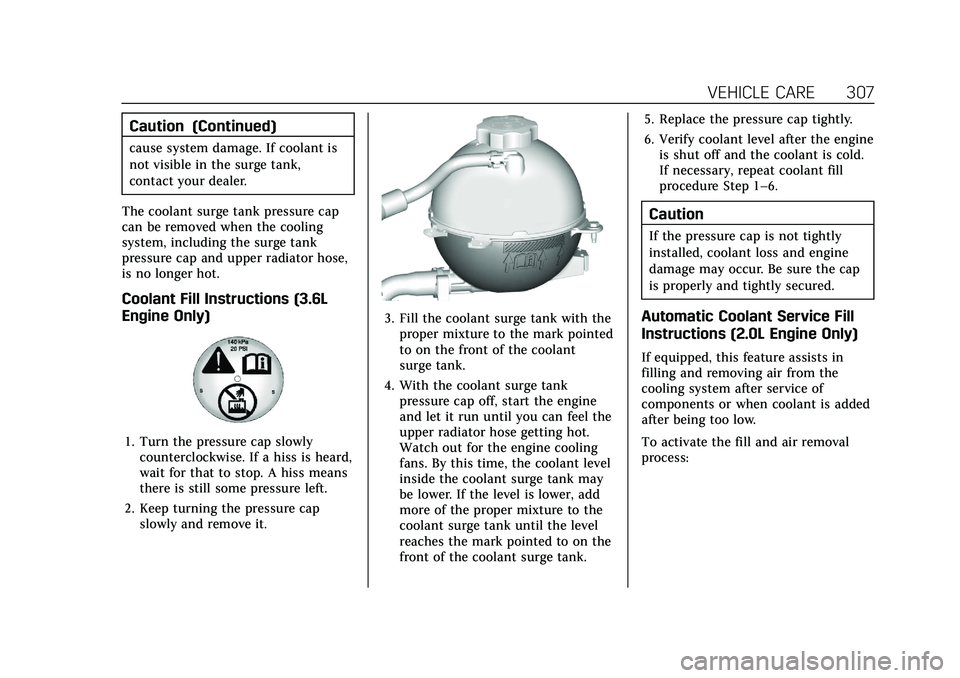
1. Turn the pressure cap slowly counterclockwise. If a hiss is heard,
wait for that to stop. A hiss means
there is still some pressure left.
2. Keep turning the pressure cap slowly and remove it.
3. Fill the coolant surge tank with theproper mixture to the mark pointed
to on the front of the coolant
surge tank.
4. With the coolant surge tank pressure cap off, start the engine
and let it run until you can feel the
upper radiator hose getting hot.
Watch out for the engine cooling
fans. By this time, the coolant level
inside the coolant surge tank may
be lower. If the level is lower, add
more of the proper mixture to the
coolant surge tank until the level
reaches the mark pointed to on the
front of the coolant surge tank. 5. Replace the pressure cap tightly.
6. Verify coolant level after the engine
is shut off and the coolant is cold.
If necessary, repeat coolant fill
procedure Step 1–6.
Caution
If the pressure cap is not tightly
installed, coolant loss and engine
damage may occur. Be sure the cap
is properly and tightly secured.
Automatic Coolant Service Fill
Instructions (2.0L Engine Only)
If equipped, this feature assists in
filling and removing air from the
cooling system after service of
components or when coolant is added
after being too low.
To activate the fill and air removal
process:
Page 315 of 426

Cadillac XT5 Owner Manual (GMNA-Localizing-U.S./Canada/Mexico-
14590481) - 2021 - CRC - 10/22/20
314 VEHICLE CARE
Rear Wiper Blade Replacement
To remove the wiper blade:
1. Put the vehicle in ACC/ACCESSORYand turn on the rear windshield
wiper. The wiper will stop pointing
down. See Rear Window Wiper/
Washer 097.
2. Push ENGINE START/STOP to turn the vehicle off.
3. Lift the wiper arm away from the window.
4. Push the release lever (2) to disengage the hook and push the
wiper arm (1) out of the blade
assembly (3).
5. Push the new blade assembly securely on the wiper arm until the
release lever clicks into place. 6. Start the engine and the rear wiper
will return to its normal position.
Windshield Replacement
HUD System
The windshield is part of the HUD
system. If the windshield needs to be
replaced, be sure to get one that is
designed for HUD or the HUD image
may look out of focus.
Driver Assistance Systems
If the windshield needs to be replaced
and the vehicle is equipped with a
front camera sensor for the Driver
Assistance Systems, a GM
replacement windshield is
recommended. The replacement
windshield must be installed
according to GM specifications for
proper alignment. If it is not, these
systems may not work properly, they
may display messages, or they may
not work at all. See your dealer for
proper windshield replacement.
Acoustic Windshield
The vehicle is equipped with an
acoustic windshield. If the windshield
needs to be replaced be sure to get an
acoustic windshield so you will
continue to have the benefits an
acoustic windshield can provide.
Gas Strut(s)
This vehicle is equipped with gas
strut(s) to provide assistance in lifting
and holding open the hood/trunk/
liftgate system in full open position.
{Warning
If the gas struts that hold open the
hood, trunk, and/or liftgate fail, you
or others could be seriously injured.
Take the vehicle to your dealer for
service immediately. Visually
inspect the gas struts for signs of
wear, cracks, or other damage
periodically. Check to make sure the
hood/trunk/liftgate is held open
with enough force. If struts are
failing to hold the hood/trunk/
liftgate, do not operate. Have the
vehicle serviced.
Page 346 of 426
Cadillac XT5 Owner Manual (GMNA-Localizing-U.S./Canada/Mexico-
14590481) - 2021 - CRC - 10/22/20
VEHICLE CARE 345
Warning (Continued)
used on a vehicle without the
proper amount of clearance can
cause damage to the brakes,
suspension, or other vehicle parts.
The area damaged by the tire
chains could cause loss of control
and a crash. Use another type of
traction device only if its
manufacturer recommends it for
the vehicle's tire size combination
and road conditions. Follow that
manufacturer's instructions. To
avoid vehicle damage, drive slow
and readjust or remove the traction
device if it contacts the vehicle. Do
not spin the wheels. If traction
devices are used, install them on
the front tires.
Caution
If the vehicle is equipped with a tire
size other than 235/55R20, use tire
chains only where legal and only
when necessary. Use low profile
chains that add no more than(Continued)
Caution (Continued)
12 mm thickness to the tire tread
and inner sidewall. Use chains that
are the proper size for the tires.
Install them on the tires of the
front axle. Do not use chains on the
tires of the rear axle. Tighten them
as tightly as possible with the ends
securely fastened. Drive slowly and
follow the chain manufacturer's
instructions. If the chains contact
the vehicle, stop and retighten
them. If the contact continues, slow
down until it stops. Driving too fast
or spinning the wheels with chains
on will damage the vehicle.
If a Tire Goes Flat
It is unusual for a tire to blow out
while driving, especially if the tires are
maintained properly. See Tires0325.
If air goes out of a tire, it is much
more likely to leak out slowly. But if
there is ever a blowout, here are a few
tips about what to expect and what
to do: If a front tire fails, the flat tire creates
a drag that pulls the vehicle toward
that side. Take your foot off the
accelerator pedal and grip the steering
wheel firmly. Steer to maintain lane
position, and then gently brake to a
stop, well off the road, if possible.
A rear blowout, particularly on a
curve, acts much like a skid and may
require the same correction as used in
a skid. Stop pressing the accelerator
pedal and steer to straighten the
vehicle. It may be very bumpy and
noisy. Gently brake to a stop, well off
the road, if possible.
{Warning
Driving on a flat tire will cause
permanent damage to the tire.
Re-inflating a tire after it has been
driven on while severely
underinflated or flat may cause a
blowout and a serious crash. Never
attempt to re-inflate a tire that has
been driven on while severely
underinflated or flat. Have your
(Continued)
Page 358 of 426
Cadillac XT5 Owner Manual (GMNA-Localizing-U.S./Canada/Mexico-
14590481) - 2021 - CRC - 10/22/20
VEHICLE CARE 357
Caution
Improperly tightened wheel nuts
can lead to brake pulsation and
rotor damage. To avoid expensive
brake repairs, evenly tighten the
wheel nuts in the proper sequence
and to the proper torque
specification. SeeCapacities and
Specifications 0388 for the wheel
nut torque specification.
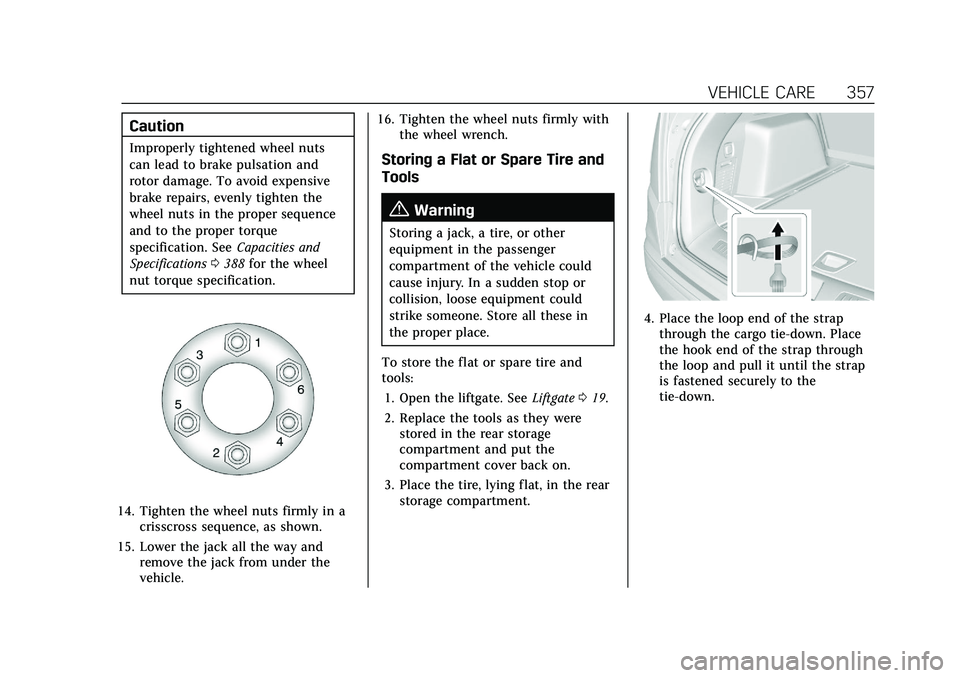
14. Tighten the wheel nuts firmly in a crisscross sequence, as shown.
15. Lower the jack all the way and remove the jack from under the
vehicle. 16. Tighten the wheel nuts firmly with
the wheel wrench.
Storing a Flat or Spare Tire and
Tools
{Warning
Storing a jack, a tire, or other
equipment in the passenger
compartment of the vehicle could
cause injury. In a sudden stop or
collision, loose equipment could
strike someone. Store all these in
the proper place.
To store the flat or spare tire and
tools: 1. Open the liftgate. See Liftgate019.
2. Replace the tools as they were stored in the rear storage
compartment and put the
compartment cover back on.
3. Place the tire, lying flat, in the rear storage compartment.
4. Place the loop end of the strapthrough the cargo tie-down. Place
the hook end of the strap through
the loop and pull it until the strap
is fastened securely to the
tie-down.