wheel size CHEVROLET ASTRO 2004 Owners Manual
[x] Cancel search | Manufacturer: CHEVROLET, Model Year: 2004, Model line: ASTRO, Model: CHEVROLET ASTRO 2004Pages: 382, PDF Size: 2.73 MB
Page 276 of 382
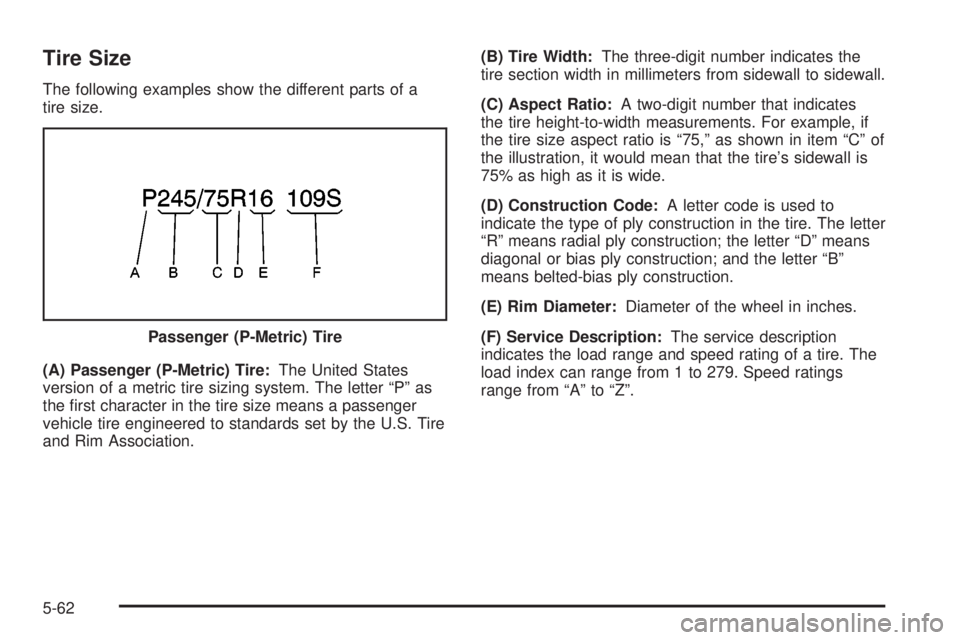
Tire Size
The following examples show the different parts of a
tire size.
(A) Passenger (P-Metric) Tire:The United States
version of a metric tire sizing system. The letter ªPº as
the ®rst character in the tire size means a passenger
vehicle tire engineered to standards set by the U.S. Tire
and Rim Association.(B) Tire Width:The three-digit number indicates the
tire section width in millimeters from sidewall to sidewall.
(C) Aspect Ratio:A two-digit number that indicates
the tire height-to-width measurements. For example, if
the tire size aspect ratio is ª75,º as shown in item ªCº of
the illustration, it would mean that the tire's sidewall is
75% as high as it is wide.
(D) Construction Code:A letter code is used to
indicate the type of ply construction in the tire. The letter
ªRº means radial ply construction; the letter ªDº means
diagonal or bias ply construction; and the letter ªBº
means belted-bias ply construction.
(E) Rim Diameter:Diameter of the wheel in inches.
(F) Service Description:The service description
indicates the load range and speed rating of a tire. The
load index can range from 1 to 279. Speed ratings
range from ªAº to ªZº. Passenger (P-Metric) Tire
5-62
Page 277 of 382
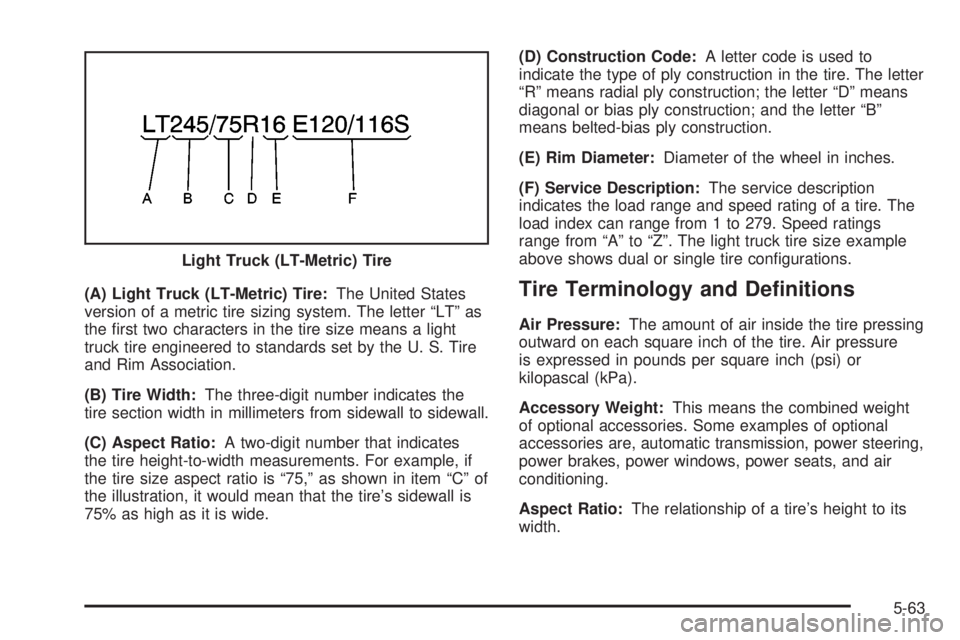
(A) Light Truck (LT-Metric) Tire:The United States
version of a metric tire sizing system. The letter ªLTº as
the ®rst two characters in the tire size means a light
truck tire engineered to standards set by the U. S. Tire
and Rim Association.
(B) Tire Width:The three-digit number indicates the
tire section width in millimeters from sidewall to sidewall.
(C) Aspect Ratio:A two-digit number that indicates
the tire height-to-width measurements. For example, if
the tire size aspect ratio is ª75,º as shown in item ªCº of
the illustration, it would mean that the tire's sidewall is
75% as high as it is wide.(D) Construction Code:A letter code is used to
indicate the type of ply construction in the tire. The letter
ªRº means radial ply construction; the letter ªDº means
diagonal or bias ply construction; and the letter ªBº
means belted-bias ply construction.
(E) Rim Diameter:Diameter of the wheel in inches.
(F) Service Description:The service description
indicates the load range and speed rating of a tire. The
load index can range from 1 to 279. Speed ratings
range from ªAº to ªZº. The light truck tire size example
above shows dual or single tire con®gurations.Tire Terminology and De®nitions
Air Pressure:The amount of air inside the tire pressing
outward on each square inch of the tire. Air pressure
is expressed in pounds per square inch (psi) or
kilopascal (kPa).
Accessory Weight:This means the combined weight
of optional accessories. Some examples of optional
accessories are, automatic transmission, power steering,
power brakes, power windows, power seats, and air
conditioning.
Aspect Ratio:The relationship of a tire's height to its
width. Light Truck (LT-Metric) Tire
5-63
Page 283 of 382
{CAUTION:
Rust or dirt on a wheel, or on the parts to
which it is fastened, can make wheel nuts
become loose after a time. The wheel could
come off and cause an accident. When you
change a wheel, remove any rust or dirt from
places where the wheel attaches to the vehicle.
In an emergency, you can use a cloth or a
paper towel to do this; but be sure to use a
scraper or wire brush later, if you need to, to
get all the rust or dirt off. See ªChanging a Flat
Tireº in the Index.
When It Is Time for New Tires
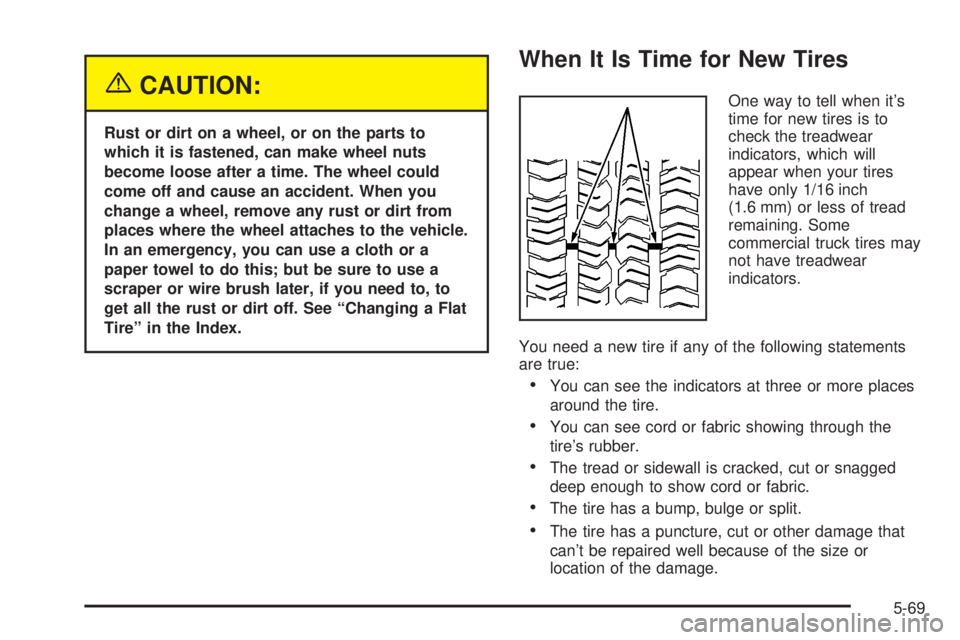
One way to tell when it's
time for new tires is to
check the treadwear
indicators, which will
appear when your tires
have only 1/16 inch
(1.6 mm) or less of tread
remaining. Some
commercial truck tires may
not have treadwear
indicators.
You need a new tire if any of the following statements
are true:
·You can see the indicators at three or more places
around the tire.
·You can see cord or fabric showing through the
tire's rubber.
·The tread or sidewall is cracked, cut or snagged
deep enough to show cord or fabric.
·The tire has a bump, bulge or split.
·The tire has a puncture, cut or other damage that
can't be repaired well because of the size or
location of the damage.
5-69
Page 284 of 382
Buying New Tires
To ®nd out what kind and size of tires you need, look at
the Certi®cation/Tire label or the Tire and Loading
Information label. See
Loading Your Vehicle on
page 4-30, for examples of the labels and where they
can be found on your vehicle.
The tires installed on your vehicle when it was new had
a Tire Performance Criteria Speci®cation (TPC Spec)
number on each tire's sidewall. When you get new tires,
GM recommends that you get tires with that same
TPC Spec number. That way your vehicle will continue
to have tires that are designed to give proper
endurance, handling, speed rating, traction, ride and
other things during normal service on your vehicle.
If your tires have an all-season tread design, the TPC
number will be followed by an ªMSº (for mud and snow).
If you ever replace your tires with those not having a
TPC Spec number, make sure they are the same size,
load range, speed rating and construction type (bias,
bias-belted or radial) as your original tires.
{CAUTION:
Mixing tires could cause you to lose control
while driving. If you mix tires of different sizes
or types (radial and bias-belted tires), the
vehicle may not handle properly, and you
could have a crash. Using tires of different
sizes may also cause damage to your vehicle.
Be sure to use the same size and type tires on
all wheels. It's all right to drive with your
compact spare temporarily, it was developed
for use on your vehicle. See ªCompact Spare
Tireº in the index.
{CAUTION:
If you use bias-ply tires on your vehicle, the
wheel rim ¯anges could develop cracks after
many miles of driving. A tire and/or wheel
could fail suddenly, causing a crash. Use only
radial-ply tires with the wheels on your vehicle.
5-70
Page 288 of 382
Tire Chains
Notice:Use tire chains only where legal and only
when you must. Use only SAE Class²S²type chains
that are the proper size for your tires. Install them
on the rear axle tires and tighten them as tightly as
possible with the ends securely fastened. Drive
slowly and follow the chain manufacturer's
instructions. If you can hear the chains contacting
your vehicle, stop and retighten them. If the contact
continues, slow down until it stops. Driving too
fast or spinning the wheels with chains on will
damage your vehicle.
If a Tire Goes Flat
It's unusual for a tire to ªblowoutº while you're driving,
especially if you maintain your tires properly. If air goes
out of a tire, it's much more likely to leak out slowly.
But if you should ever have a ªblowout,º here are a few
tips about what to expect and what to do:
If a front tire fails, the ¯at tire will create a drag that
pulls the vehicle toward that side. Take your foot off the
accelerator pedal and grip the steering wheel ®rmly.
Steer to maintain lane position, and then gently brake to
a stop well out of the traffic lane.A rear blowout, particularly on a curve, acts much like a
skid and may require the same correction you'd use
in a skid. In any rear blowout, remove your foot from the
accelerator pedal. Get the vehicle under control by
steering the way you want the vehicle to go. It may be
very bumpy and noisy, but you can still steer. Gently
brake to a stop, well off the road if possible.
{CAUTION:
Lifting a vehicle and getting under it to do
maintenance or repairs is dangerous without
the appropriate safety equipment and training.
The jack provided with your vehicle is
designed only for changing a ¯at tire. If it is
used for anything else, you or others could be
badly injured or killed if the vehicle slips off
the jack. Use the jack provided with your
vehicle only for changing a ¯at tire.
If a tire goes ¯at, the next part shows how to use your
jacking equipment to change a ¯at tire safely.
5-74
Page 299 of 382
Storing a Flat or Spare Tire and Tools
{CAUTION:
Storing a jack, a tire, or other equipment in the
passenger compartment of the vehicle could
cause injury. In a sudden stop or collision,
loose equipment could strike someone. Store
all these in the proper place.
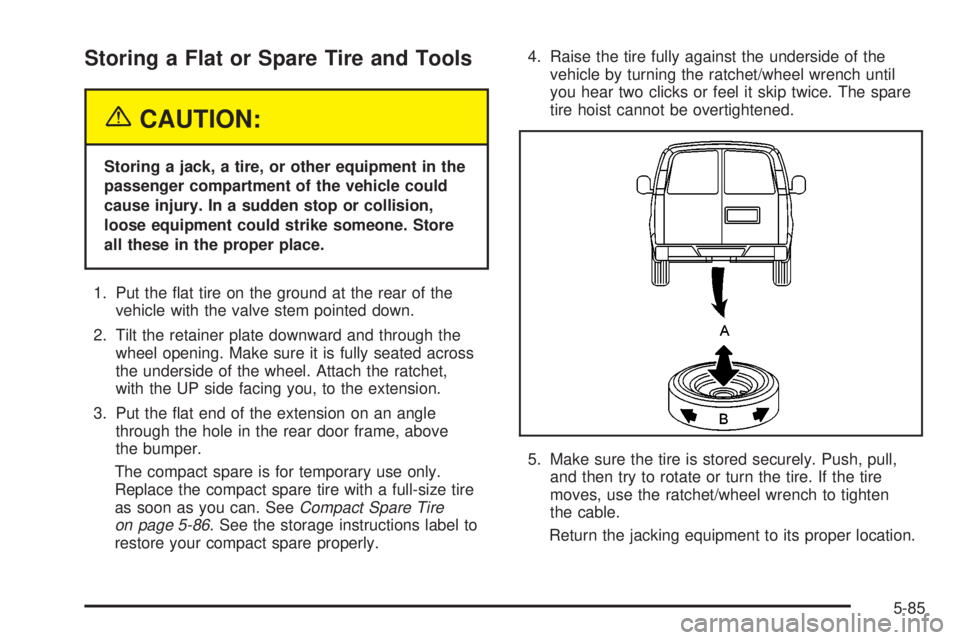
1. Put the ¯at tire on the ground at the rear of the
vehicle with the valve stem pointed down.
2. Tilt the retainer plate downward and through the
wheel opening. Make sure it is fully seated across
the underside of the wheel. Attach the ratchet,
with the UP side facing you, to the extension.
3. Put the ¯at end of the extension on an angle
through the hole in the rear door frame, above
the bumper.
The compact spare is for temporary use only.
Replace the compact spare tire with a full-size tire
as soon as you can. See
Compact Spare Tire
on page 5-86. See the storage instructions label to
restore your compact spare properly.4. Raise the tire fully against the underside of the
vehicle by turning the ratchet/wheel wrench until
you hear two clicks or feel it skip twice. The spare
tire hoist cannot be overtightened.
5. Make sure the tire is stored securely. Push, pull,
and then try to rotate or turn the tire. If the tire
moves, use the ratchet/wheel wrench to tighten
the cable.
Return the jacking equipment to its proper location.
5-85
Page 300 of 382
Compact Spare Tire
Although the compact spare tire was fully in¯ated when
your vehicle was new, it can lose air after a time.
Check the in¯ation pressure regularly. It should be
60 psi (420 kPa).
After installing the compact spare on your vehicle, you
should stop as soon as possible and make sure
your spare tire is correctly in¯ated. The compact spare
is made to perform well at speeds up to 65 mph
(105 km/h) for distances up to 3,000 miles (5 000 km),
so you can ®nish your trip and have your full-size
tire repaired or replaced where you want. Of course, it's
best to replace your spare with a full-size tire as
soon as you can. Your spare will last longer and be in
good shape in case you need it again.
Notice:When the compact spare is installed, don't
take your vehicle through an automatic car wash
with guide rails. The compact spare can get caught
on the rails. That can damage the tire and wheel,
and maybe other parts of your vehicle.
Don't use your compact spare on other vehicles.
And don't mix your compact spare tire or wheel with
other wheels or tires. They won't ®t. Keep your spare tire
and its wheel together.
Notice:Tire chains won't ®t your compact spare.
Using them can damage your vehicle and can
damage the chains too. Don't use tire chains on
your compact spare.
Appearance Care
Remember, cleaning products can be hazardous. Some
are toxic. Others can burst into ¯ames if you strike a
match or get them on a hot part of the vehicle. Some are
dangerous if you breathe their fumes in a closed
space. When you use anything from a container to clean
your vehicle, be sure to follow the manufacturer's
warnings and instructions. And always open your doors
or windows when you are cleaning the inside.
Never use these to clean your vehicle:
·Gasoline
·Benzene
·Naphtha
·Carbon Tetrachloride
·Acetone
·Paint Thinner
·Turpentine
·Lacquer Thinner
·Nail Polish Remover
They can all be hazardous Ð some more than
others Ð and they can all damage your vehicle, too.
5-86
Page 380 of 382
Starting Your Engine.......................................2-19
Steering.......................................................... 4-9
Steering in Emergencies..................................4-10
Steering, Suspension and Front Drive Axle
Boot and Seal Inspection..............................6-28
Steering Tips................................................... 4-9
Storage Areas................................................2-34
Convenience Net.........................................2-41
Luggage Carrier..........................................2-41
Overhead Console.......................................2-36
Storing a Flat or Spare Tire and Tools...............5-85
Stuck in Sand, Mud, Ice or Snow......................4-28
Sun Visors.....................................................2-15
Sunglasses Storage Compartment.....................2-40
T
Taillamps.......................................................5-54
Theft-Deterrent, Radio.....................................3-47
Theft-Deterrent Systems...................................2-16
Passlock
ž...................................................2-16
Throttle System Inspection...............................6-29
Tilt Wheel........................................................ 3-5
Tire In¯ation Check.........................................6-24
Tire Sidewall Labeling......................................5-57
Tire Size.......................................................5-62
Tire Terminology and De®nitions........................5-63Tires.............................................................5-56
Buying New Tires........................................5-70
Chains.......................................................5-74
Changing a Flat Tire....................................5-75
Compact Spare Tire.....................................5-86
If a Tire Goes Flat.......................................5-74
In¯ation - Tire Pressure................................5-66
Inspection and Rotation................................5-68
Uniform Tire Quality Grading.........................5-71
Wheel Alignment and Tire Balance.................5-72
Wheel Replacement.....................................5-72
When It Is Time for New Tires......................5-69
To Use the Engine Coolant Heater....................2-20
Top Strap......................................................1-48
Top Strap Anchor Location...............................1-50
Torque Lock...................................................2-27
Total Weight on Your Vehicle's Tires..................4-39
Tow/Haul Mode...............................................4-36
Tow/Haul Mode Button.....................................2-23
Tow/Haul Mode Light.......................................3-36
Towing
Recreational Vehicle.....................................4-29
Towing a Trailer..........................................4-35
Your Vehicle...............................................4-29
Trailer Brakes.................................................4-40
Trailer Wiring Harness.....................................4-44
Trailering Package..........................................4-35
14