turn signal CHEVROLET AVALANCHE 2011 2.G Owner's Manual
[x] Cancel search | Manufacturer: CHEVROLET, Model Year: 2011, Model line: AVALANCHE, Model: CHEVROLET AVALANCHE 2011 2.GPages: 528, PDF Size: 7.65 MB
Page 300 of 528
Black plate (22,1)Chevrolet Avalanche Owner Manual - 2011
9-22 Driving and Operating
Repeat this until help arrives
but only when you feel really
uncomfortable from the cold.
Moving about to keep warm
also helps.
If it takes some time for help to
arrive, now and then when you run
the engine, push the accelerator
pedal slightly so the engine runs
faster than the idle speed. This
keeps the battery charged to restart
the vehicle and to signal for help
with the headlamps. Do this as little
as possible to save fuel.
If the Vehicle is Stuck
Slowly and cautiously spin the
wheels to free the vehicle when
stuck in sand, mud, ice, or snow.
See“Rocking Your Vehicle to
Get It Out” later in this section.
If the vehicle has a traction system,
it can often help to free a stuck
vehicle. Refer to the vehicle's
traction system in the Index. If stuck too severely for the traction
system to free the vehicle, turn the
traction system off and use the
rocking method.
{WARNING
If the vehicle's tires spin at high
speed, they can explode, and you
or others could be injured. The
vehicle can overheat, causing an
engine compartment fire or other
damage. Spin the wheels as little
as possible and avoid going
above 55 km/h (35 mph).
For information about using tire
chains on the vehicle, see Tire
Chains on page 10‑72.
Rocking the Vehicle to Get
it Out
Turn the steering wheel left and
right to clear the area around the
front wheels. For four-wheel-drive
vehicles with a two‐speed automatic
transfer case, shift into Four‐Wheel
High. For vehicles with StabiliTrak,
turn the traction control part of the
system off. Shift back and forth
between R (Reverse) and a forward
gear, spinning the wheels as little as
possible. To prevent transmission
wear, wait until the wheels stop
spinning before shifting gears.
Page 335 of 528
Black plate (57,1)Chevrolet Avalanche Owner Manual - 2011
Driving and Operating 9-57
Continuous Damping
Control (CDC)
This vehicle may have a continuous
damping control system called
Autoride
®. With this feature,
improved vehicle ride and handling
is provided under a variety of
passenger and loading conditions.
Autoride is fully automatic
and uses a computer controller to
continuously monitor vehicle speed,
wheel to body position, lift/dive,
and steering position of the
vehicle. The controller then sends
signals to each shock absorber
to independently adjust the damping
level to provide the optimum
vehicle ride. Autoride also interact with the tow/
haul mode that, when activated, will
provide additional control of the
shock absorbers. This additional
control results in better ride and
handling characteristics when the
vehicle is loaded or towing a trailer.
See
“Tow/Haul Mode” underTrailer
Towing on page 9‑79 for more
information.
Automatic Level Control
The automatic level control rear
suspension is available on light‐duty
vehicles and comes as a part of the
Continuous Damping Control (CDC)
suspension, if equipped.
This type of level control is fully
automatic and will provide a better
leveled riding position as well as
better handling under a variety of
passenger and loading conditions. An air compressor connected to the
rear shocks will raise or lower the
rear of the vehicle to maintain
proper vehicle height. The system is
activated when the ignition key is
turned to ON/RUN and will
automatically adjust vehicle height
thereafter. The system may exhaust
(lower vehicle height) for up to
ten minutes after the ignition key
has been turned off. You may hear
the air compressor operating when
the height is being adjusted.
If a weight‐distributing hitch is being
used, it is recommended to allow
the shocks to inflate, thereby
leveling the vehicle prior to adjusting
the hitch.
Page 345 of 528
Black plate (67,1)Chevrolet Avalanche Owner Manual - 2011
Driving and Operating 9-67
When the System Does Not
Seem To Work Properly
The rear vision camera system
might not work properly or display a
clear image if:
.The RVC is turned off.
See“Turning the Rear Camera
System On or Off” earlier in
this section.
.It is dark.
.The sun or the beam of
headlights is shining directly into
the camera lens.
.Ice, snow, mud, or anything else
builds up on the camera lens.
Clean the lens, rinse it with
water, and wipe it with a
soft cloth.
.The back of the vehicle is in
an accident, the position and
mounting angle of the camera
can change or the camera can
be affected. Be sure to have the
camera and its position and
mounting angle checked at
your dealer. The rear vision camera system
display in the rearview mirror may
turn off or not appear as expected
due to one of the following
conditions. If this occurs the
left indicator light on the mirror
will flash.
.A slow flash may indicate a loss
of video signal, or no video
signal present during the reverse
cycle.
.A fast flash may indicate that the
display has been on for the
maximum allowable time during
a reverse cycle, or the display
has reached an Over
Temperature limit.
The fast flash conditions are
used to protect the video device
from high temperature
conditions. Once conditions
return to normal the device will
reset and the green indicator will
stop flashing.
During any of these fault conditions,
the display will be blank and the
indicator will continue to flash as
long as the vehicle is in R (Reverse)
or until the conditions return to
normal.
Pressing and holding
zwhen the
left indicator light is flashing will turn
off the video display along with the
left indicator light.
Page 355 of 528
Black plate (77,1)Chevrolet Avalanche Owner Manual - 2011
Driving and Operating 9-77
Passing
More passing distance is
needed when towing a trailer.
The combination will not accelerate
as quickly and is longer so it is
necessary to go much farther
beyond the passed vehicle before
returning to the lane.
Backing Up
Hold the bottom of the steering
wheel with one hand. Then, to move
the trailer to the left, move that hand
to the left. To move the trailer to the
right, move your hand to the right.
Always back up slowly and,
if possible, have someone
guide you.
Making Turns
Notice:Making very sharp turns
while trailering could cause the
trailer to come in contact with the
vehicle. The vehicle could be
damaged. Avoid making very
sharp turns while trailering.
When turning with a trailer, make
wider turns than normal. Do this
so the trailer will not strike soft
shoulders, curbs, road signs, trees
or other objects. Avoid jerky or
sudden maneuvers. Signal well in
advance.
If the trailer turn signal bulbs burn
out, the arrows on the instrument
panel will still flash for turns. It is
important to check occasionally to
be sure the trailer bulbs are
still working.
Driving on Grades
Reduce speed and shift to a
lower gear beforestarting down a
long or steep downgrade. If the
transmission is not shifted down, the
brakes might get hot and no longer
work well.
Vehicles can tow in D (Drive). Shift
the transmission to a lower gear if
the transmission shifts too often
under heavy loads and/or hilly
conditions.
The tow/haul mode may be used if
the transmission shifts too often.
See Tow/Haul Mode Light on
page 5‑24.
When towing at high altitude on
steep uphill grades, consider the
following: Engine coolant will boil at
a lower temperature than at normal
altitudes. If the engine is turned off
immediately after towing at high
altitude on steep uphill grades,
the vehicle may show signs
similar to engine overheating.
Page 363 of 528
Black plate (85,1)Chevrolet Avalanche Owner Manual - 2011
Driving and Operating 9-85
Trailer Brakes
A loaded trailer that weighs more
than 900 kg (2,000 lbs) needs to
have its own brake system that is
adequate for the weight of the
trailer. Be sure to read and follow
the instructions for the trailer brakes
so they are installed, adjusted and
maintained properly.
Since the vehicle is equipped with
StabiliTrak, the trailer brakes cannot
tap into the vehicle's hydraulic
system.
Trailer Wiring Harness
Heavy-Duty Trailer Wiring Harness
Package
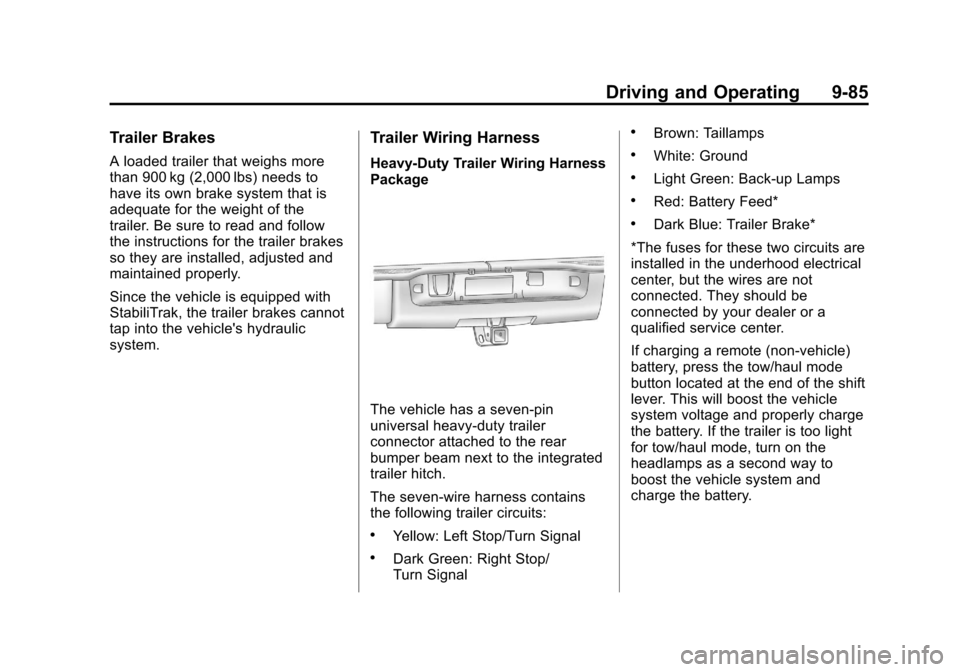
The vehicle has a seven-pin
universal heavy-duty trailer
connector attached to the rear
bumper beam next to the integrated
trailer hitch.
The seven-wire harness contains
the following trailer circuits:
.Yellow: Left Stop/Turn Signal
.Dark Green: Right Stop/
Turn Signal
.Brown: Taillamps
.White: Ground
.Light Green: Back-up Lamps
.Red: Battery Feed*
.Dark Blue: Trailer Brake*
*The fuses for these two circuits are
installed in the underhood electrical
center, but the wires are not
connected. They should be
connected by your dealer or a
qualified service center.
If charging a remote (non-vehicle)
battery, press the tow/haul mode
button located at the end of the shift
lever. This will boost the vehicle
system voltage and properly charge
the battery. If the trailer is too light
for tow/haul mode, turn on the
headlamps as a second way to
boost the vehicle system and
charge the battery.
Page 364 of 528
Black plate (86,1)Chevrolet Avalanche Owner Manual - 2011
9-86 Driving and Operating
Electric Brake Control Wiring
Provisions
These wiring provisions are
included with the vehicle as part of
the trailer wiring package. These
provisions are for an electric brake
controller. The instrument panel
contains blunt cut wires near the
data link connector for the trailer
brake controller. The harness
contains the following wires:
.Dark Blue: Brake Signal to
Trailer Connector
.Red/Black: Battery
.Light Blue/White: Brake Switch
.White: Ground
It should be installed by your dealer
or a qualified service center.
If the vehicle is equipped with an
ITBC, the blunt cuts exist, but are
not connected further in the
harness. If an aftermarket trailer
brake controller is installed, the
ITBC must be disconnected. Do not power both ITBC and
aftermarket controllers to control the
trailer brakes at the same time.
Tow/Haul Mode
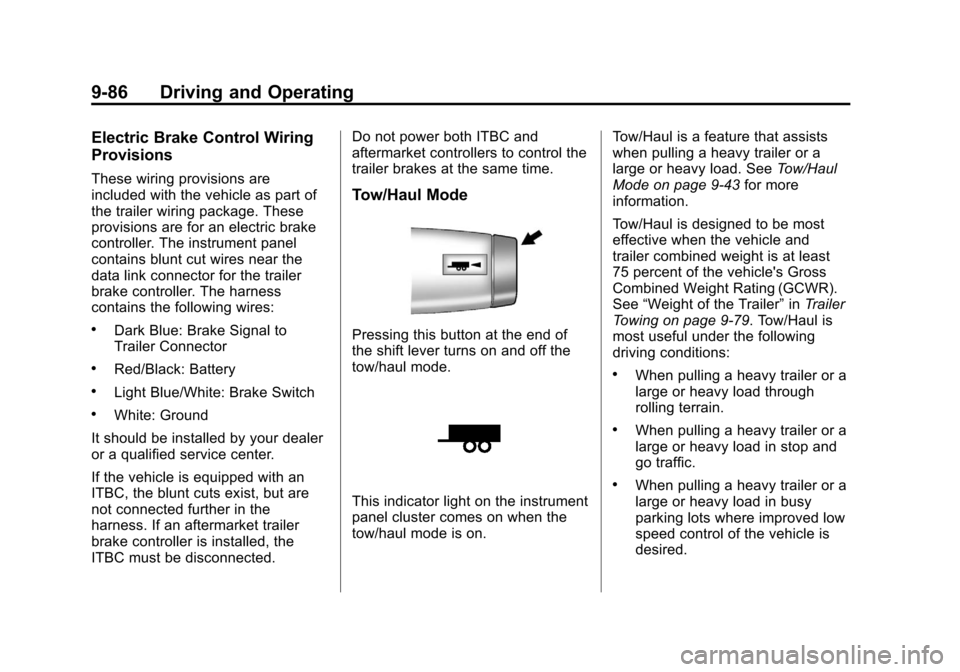
Pressing this button at the end of
the shift lever turns on and off the
tow/haul mode.
This indicator light on the instrument
panel cluster comes on when the
tow/haul mode is on.
Tow/Haul is a feature that assists
when pulling a heavy trailer or a
large or heavy load. See
Tow/Haul
Mode on page 9‑43 for more
information.
Tow/Haul is designed to be most
effective when the vehicle and
trailer combined weight is at least
75 percent of the vehicle's Gross
Combined Weight Rating (GCWR).
See “Weight of the Trailer” inTrailer
Towing on page 9‑79. Tow/Haul is
most useful under the following
driving conditions:
.When pulling a heavy trailer or a
large or heavy load through
rolling terrain.
.When pulling a heavy trailer or a
large or heavy load in stop and
go traffic.
.When pulling a heavy trailer or a
large or heavy load in busy
parking lots where improved low
speed control of the vehicle is
desired.
Page 373 of 528
Black plate (1,1)Chevrolet Avalanche Owner Manual - 2011
Vehicle Care 10-1
Vehicle Care
General Information
General Information . . . . . . . . . . 10-2
California Proposition65 Warning . . . . . . . . . . . . . . . . . 10-3
California Perchlorate Materials Requirements . . . . 10-3
Accessories and Modifications . . . . . . . . . . . . . . . 10-3
Vehicle Checks
Doing Your OwnService Work . . . . . . . . . . . . . . . 10-4
Hood . . . . . . . . . . . . . . . . . . . . . . . . 10-5
Engine Compartment Overview . . . . . . . . . . . . . . . . . . . 10-6
Engine Oil . . . . . . . . . . . . . . . . . . . 10-8
Engine Oil Life System . . . . . 10-11
Automatic Transmission Fluid . . . . . . . . . . . . . . . . . . . . . . 10-12
Engine Air Cleaner/Filter . . . . 10-16
Cooling System . . . . . . . . . . . . 10-18
Engine Coolant . . . . . . . . . . . . . 10-19
Engine Overheating . . . . . . . . 10-22 Overheated Engine
Protection
Operating Mode . . . . . . . . . . . 10-24
Engine Fan . . . . . . . . . . . . . . . . . 10-25
Power Steering Fluid . . . . . . . 10-25
Washer Fluid . . . . . . . . . . . . . . . 10-26
Brakes . . . . . . . . . . . . . . . . . . . . . 10-27
Brake Fluid . . . . . . . . . . . . . . . . . 10-28
Battery . . . . . . . . . . . . . . . . . . . . . 10-29
Four-Wheel Drive . . . . . . . . . . . 10-30
Front Axle . . . . . . . . . . . . . . . . . . 10-31
Rear Axle . . . . . . . . . . . . . . . . . . 10-32
Starter Switch Check . . . . . . . 10-33
Automatic Transmission Shift Lock Control Function
Check . . . . . . . . . . . . . . . . . . . . . 10-33
Ignition Transmission Lock Check . . . . . . . . . . . . . . . . . . . . . 10-33
Park Brake and P (Park) Mechanism Check . . . . . . . . 10-34
Wiper Blade Replacement . . . . . . . . . . . . . . 10-34
Glass Replacement . . . . . . . . 10-35
Headlamp Aiming
Headlamp Aiming . . . . . . . . . . 10-35
Bulb Replacement
Bulb Replacement . . . . . . . . . . 10-37
Halogen Bulbs . . . . . . . . . . . . . . 10-37
Taillamps, Turn Signal, Sidemarker, Stoplamps,
and Back-Up Lamps . . . . . . 10-38
License Plate Lamp . . . . . . . . 10-39
Replacement Bulbs . . . . . . . . . 10-39
Electrical System
Electrical System Overload . . . . . . . . . . . . . . . . . . 10-40
Fuses and Circuit Breakers . . . . . . . . . . . . . . . . . . 10-41
Engine Compartment Fuse Block . . . . . . . . . . . . . . . . . . . . . 10-41
Instrument Panel Fuse Block . . . . . . . . . . . . . . . . . . . . . 10-46
Wheels and Tires
Tires . . . . . . . . . . . . . . . . . . . . . . . . 10-49
Tire Sidewall Labeling . . . . . . 10-50
Tire Designations . . . . . . . . . . . 10-53
Tire Terminology and
Definitions . . . . . . . . . . . . . . . . 10-55
Tire Pressure . . . . . . . . . . . . . . . 10-58
Tire Pressure Monitor System . . . . . . . . . . . . . . . . . . . 10-59
Page 410 of 528
Black plate (38,1)Chevrolet Avalanche Owner Manual - 2011
10-38 Vehicle Care
Taillamps, Turn Signal,
Sidemarker, Stoplamps,
and Back-Up Lamps
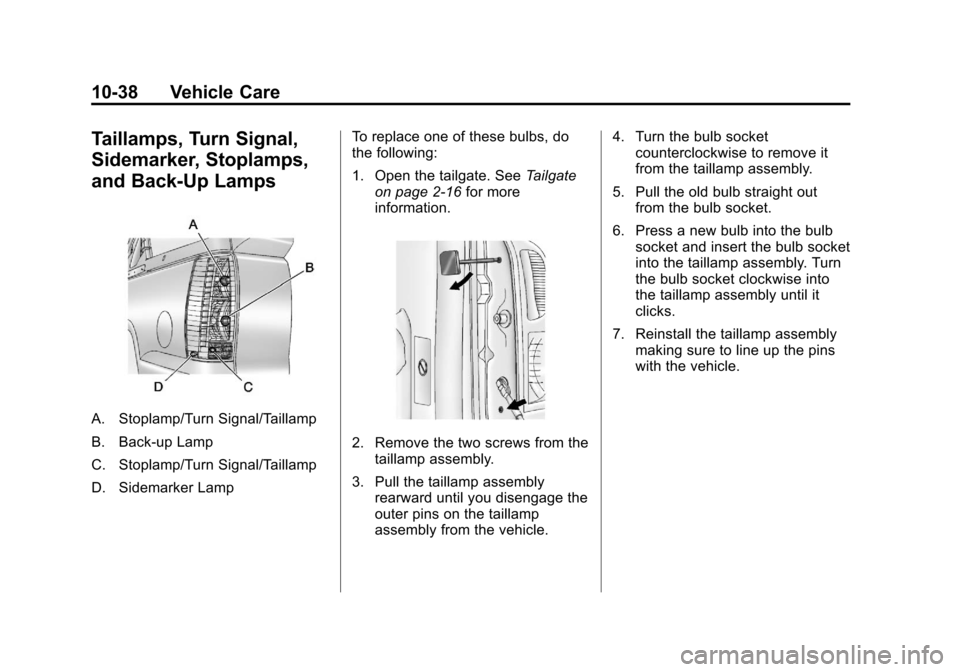
A. Stoplamp/Turn Signal/Taillamp
B. Back-up Lamp
C. Stoplamp/Turn Signal/Taillamp
D. Sidemarker LampTo replace one of these bulbs, do
the following:
1. Open the tailgate. See
Tailgate
on page 2‑16 for more
information.
2. Remove the two screws from the taillamp assembly.
3. Pull the taillamp assembly rearward until you disengage the
outer pins on the taillamp
assembly from the vehicle. 4. Turn the bulb socket
counterclockwise to remove it
from the taillamp assembly.
5. Pull the old bulb straight out from the bulb socket.
6. Press a new bulb into the bulb socket and insert the bulb socket
into the taillamp assembly. Turn
the bulb socket clockwise into
the taillamp assembly until it
clicks.
7. Reinstall the taillamp assembly making sure to line up the pins
with the vehicle.
Page 411 of 528
Black plate (39,1)Chevrolet Avalanche Owner Manual - 2011
Vehicle Care 10-39
License Plate Lamp
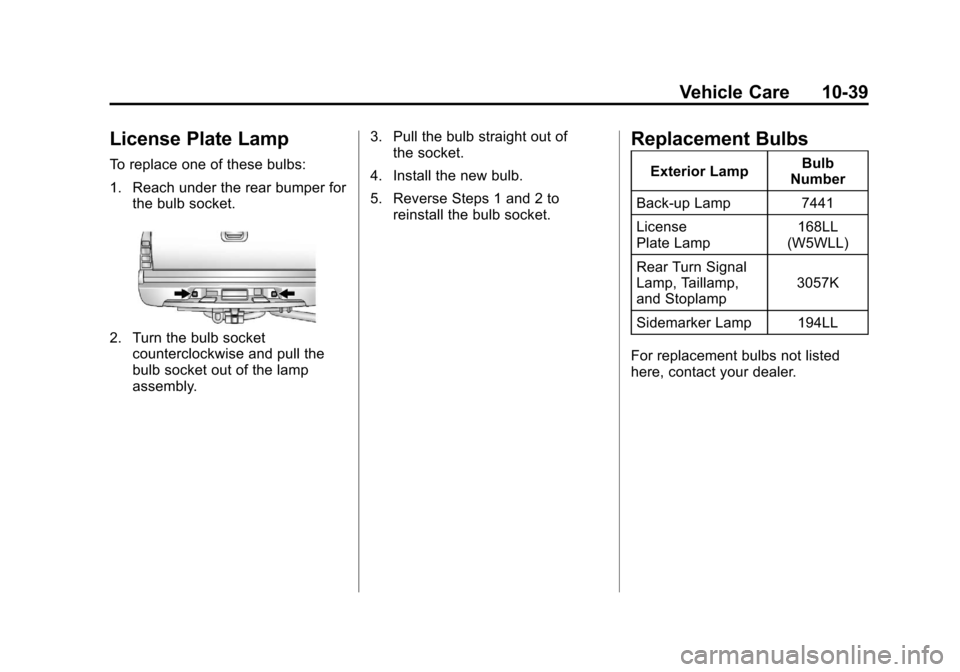
To replace one of these bulbs:
1. Reach under the rear bumper forthe bulb socket.
2. Turn the bulb socketcounterclockwise and pull the
bulb socket out of the lamp
assembly. 3. Pull the bulb straight out of
the socket.
4. Install the new bulb.
5. Reverse Steps 1 and 2 to reinstall the bulb socket.
Replacement Bulbs
Exterior Lamp Bulb
Number
Back-up Lamp 7441
License
Plate Lamp 168LL
(W5WLL)
Rear Turn Signal
Lamp, Taillamp,
and Stoplamp 3057K
Sidemarker Lamp 194LL
For replacement bulbs not listed
here, contact your dealer.
Page 418 of 528
Black plate (46,1)Chevrolet Avalanche Owner Manual - 2011
10-46 Vehicle Care
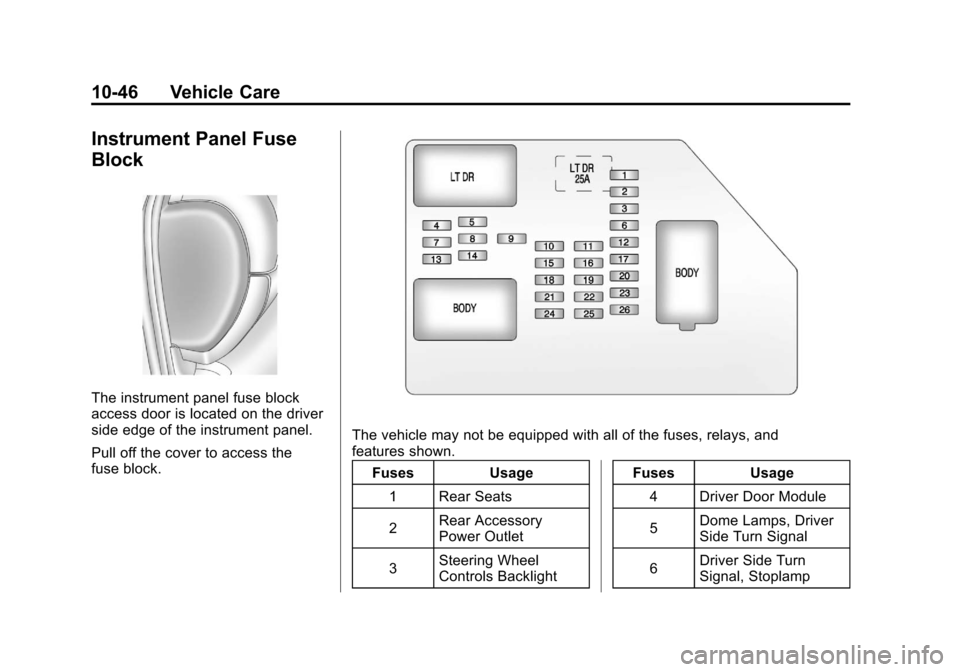
Instrument Panel Fuse
Block
The instrument panel fuse block
access door is located on the driver
side edge of the instrument panel.
Pull off the cover to access the
fuse block.
The vehicle may not be equipped with all of the fuses, relays, and
features shown.Fuses Usage
1 Rear Seats
2 Rear Accessory
Power Outlet
3 Steering Wheel
Controls Backlight Fuses Usage
4 Driver Door Module
5 Dome Lamps, Driver
Side Turn Signal
6 Driver Side Turn
Signal, Stoplamp