CHEVROLET AVALANCHE 2012 2.G Owners Manual
Manufacturer: CHEVROLET, Model Year: 2012, Model line: AVALANCHE, Model: CHEVROLET AVALANCHE 2012 2.GPages: 508, PDF Size: 7.78 MB
Page 121 of 508
Black plate (5,1)Chevrolet Avalanche Owner Manual - 2012
Storage 4-5
Midgate Drain Grate Removal
and Cleaning
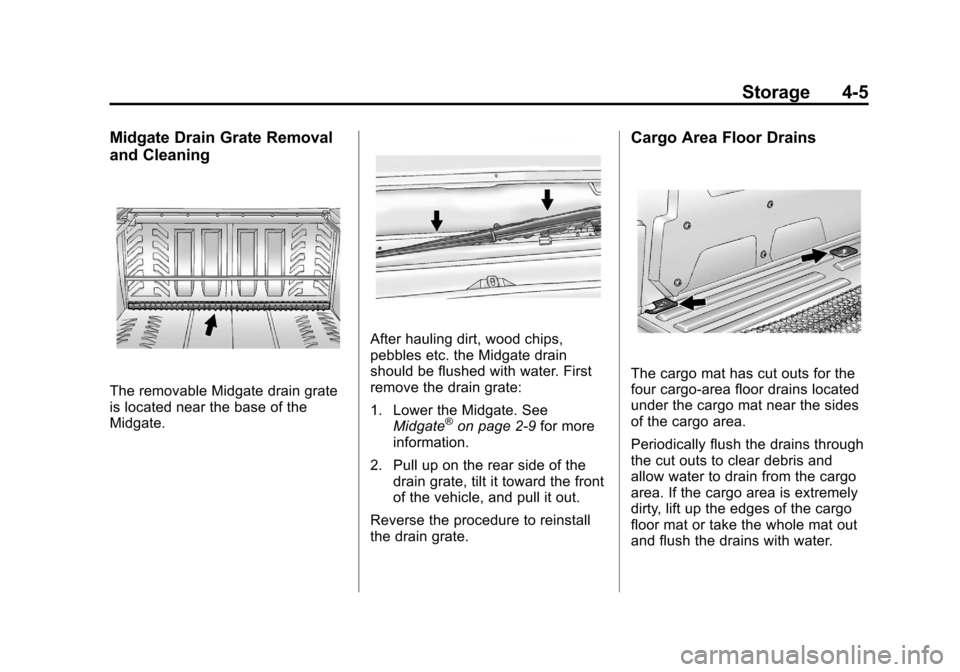
The removable Midgate drain grate
is located near the base of the
Midgate.
After hauling dirt, wood chips,
pebbles etc. the Midgate drain
should be flushed with water. First
remove the drain grate:
1. Lower the Midgate. SeeMidgate
®on page 2‑9 for more
information.
2. Pull up on the rear side of the drain grate, tilt it toward the front
of the vehicle, and pull it out.
Reverse the procedure to reinstall
the drain grate.
Cargo Area Floor Drains
The cargo mat has cut outs for the
four cargo-area floor drains located
under the cargo mat near the sides
of the cargo area.
Periodically flush the drains through
the cut outs to clear debris and
allow water to drain from the cargo
area. If the cargo area is extremely
dirty, lift up the edges of the cargo
floor mat or take the whole mat out
and flush the drains with water.
Page 122 of 508
Black plate (6,1)Chevrolet Avalanche Owner Manual - 2012
4-6 Storage
Additional Storage
Features
Cargo Cover Panels
For vehicles with a three-piece
cargo cover system, the cargo
panels can be removed and stored
in the cargo area of the vehicle.
{WARNING
Improperly stored cargo cover
panels could be thrown about the
vehicle during a collision or
sudden maneuver. Someone
could be injured. If a panel is
removed, always store it in the
proper storage location. When
putting it back, always make sure
that it is securely reattached.Notice:
Exceeding the weight
limit of 113 kg (250 lbs) can
damage the cargo covers, and the
repairs would not be covered by
the vehicle warranty. Do not put
anything on top of the cargo
covers over the weight limit.
To remove a cargo panel(s):
1. Lower the tailgate. See Tailgate
on page 2‑16 for more
information on the tailgate.
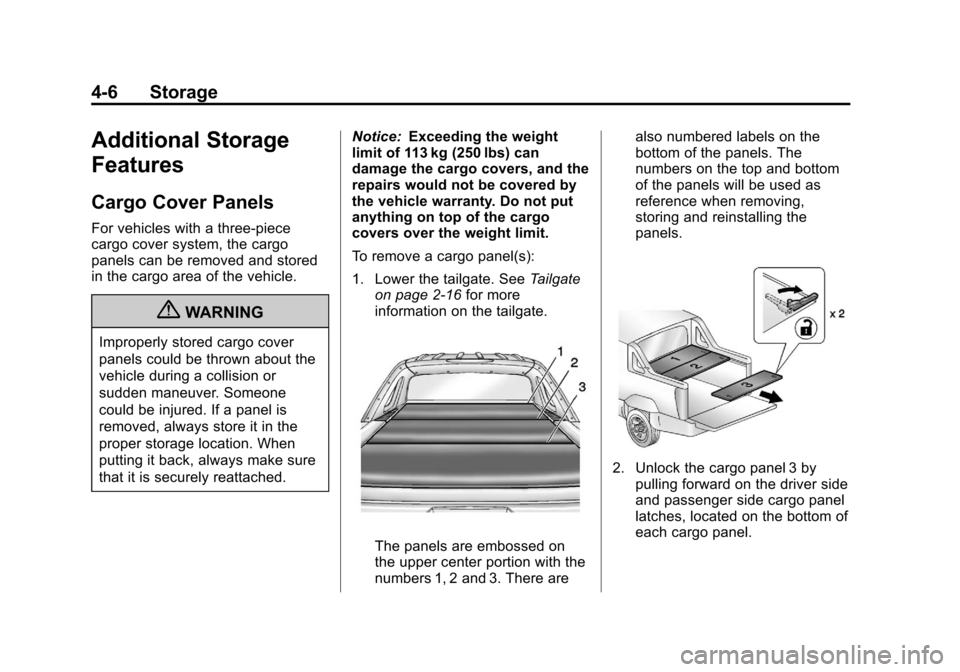
The panels are embossed on
the upper center portion with the
numbers 1, 2 and 3. There are also numbered labels on the
bottom of the panels. The
numbers on the top and bottom
of the panels will be used as
reference when removing,
storing and reinstalling the
panels.
2. Unlock the cargo panel 3 by
pulling forward on the driver side
and passenger side cargo panel
latches, located on the bottom of
each cargo panel.
Page 123 of 508
Black plate (7,1)Chevrolet Avalanche Owner Manual - 2012
Storage 4-7
3. Remove cargo panel 2 in thesame way and set it aside.
Remove as many cargo panels
as needed.
4. To remove cargo panel 1, unlock the two rear latches, lift the
cover slightly and pull rearward.
After each cargo panel has been
removed, store them within the
cargo storage area using the cargo
panel storage system.Cargo Panel Storage System
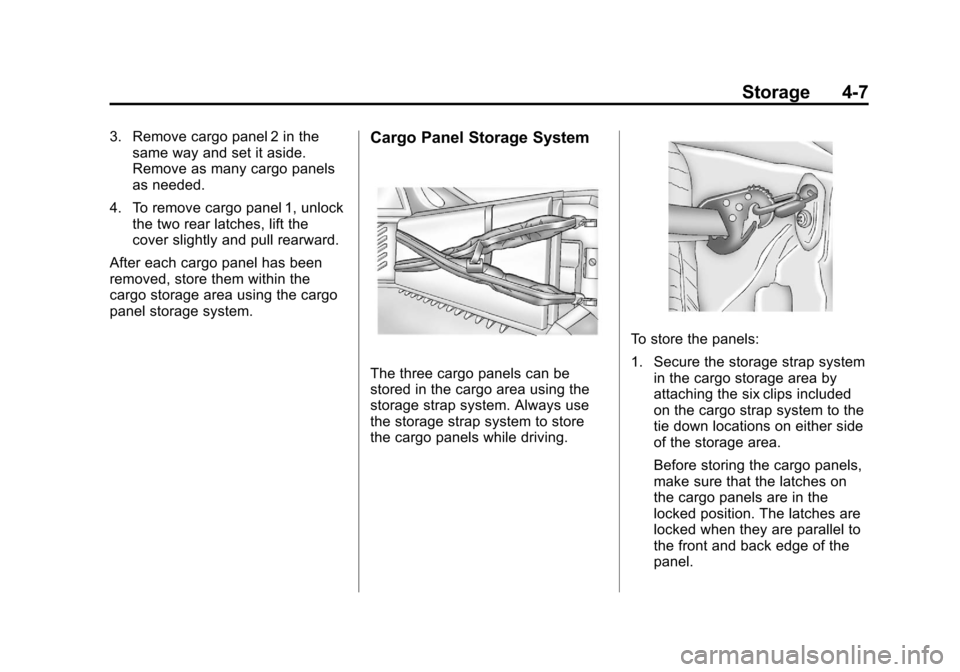
The three cargo panels can be
stored in the cargo area using the
storage strap system. Always use
the storage strap system to store
the cargo panels while driving.
To store the panels:
1. Secure the storage strap system in the cargo storage area by
attaching the six clips included
on the cargo strap system to the
tie down locations on either side
of the storage area.
Before storing the cargo panels,
make sure that the latches on
the cargo panels are in the
locked position. The latches are
locked when they are parallel to
the front and back edge of the
panel.
Page 124 of 508
Black plate (8,1)Chevrolet Avalanche Owner Manual - 2012
4-8 Storage
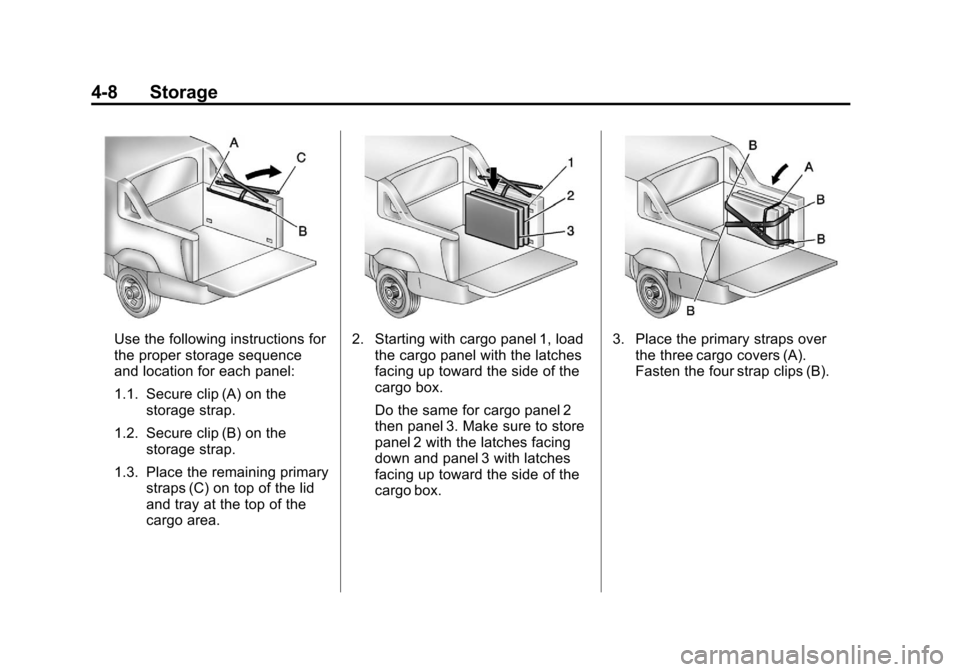
Use the following instructions for
the proper storage sequence
and location for each panel:
1.1. Secure clip (A) on thestorage strap.
1.2. Secure clip (B) on the storage strap.
1.3. Place the remaining primary straps (C) on top of the lid
and tray at the top of the
cargo area.2. Starting with cargo panel 1, loadthe cargo panel with the latches
facing up toward the side of the
cargo box.
Do the same for cargo panel 2
then panel 3. Make sure to store
panel 2 with the latches facing
down and panel 3 with latches
facing up toward the side of the
cargo box.3. Place the primary straps overthe three cargo covers (A).
Fasten the four strap clips (B).
Page 125 of 508
Black plate (9,1)Chevrolet Avalanche Owner Manual - 2012
Storage 4-9
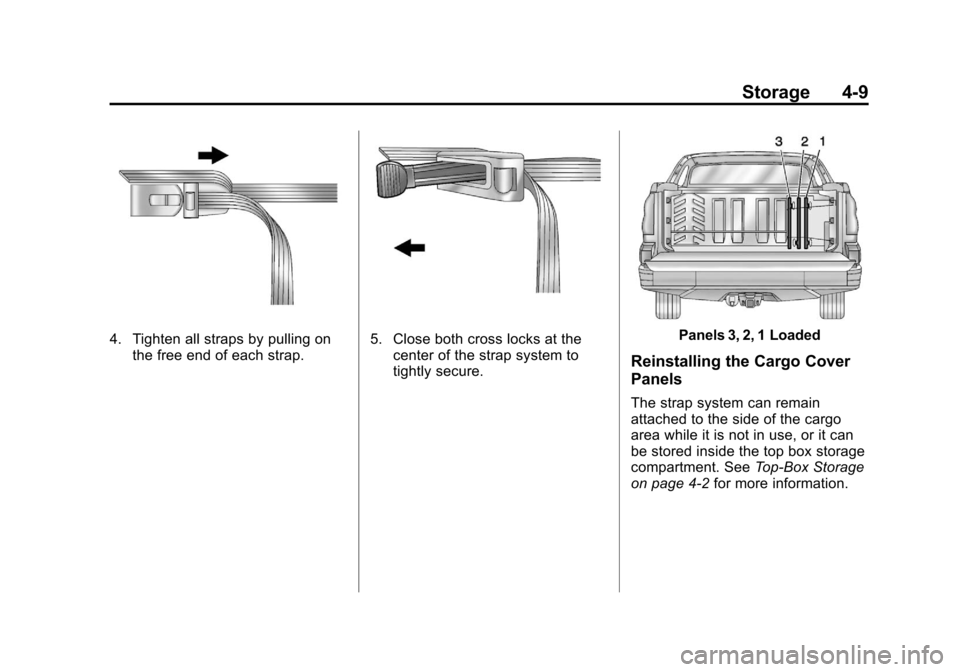
4. Tighten all straps by pulling onthe free end of each strap.5. Close both cross locks at thecenter of the strap system to
tightly secure.Panels 3, 2, 1 Loaded
Reinstalling the Cargo Cover
Panels
The strap system can remain
attached to the side of the cargo
area while it is not in use, or it can
be stored inside the top box storage
compartment. See Top-Box Storage
on page 4‑2 for more information.
Page 126 of 508
Black plate (10,1)Chevrolet Avalanche Owner Manual - 2012
4-10 Storage
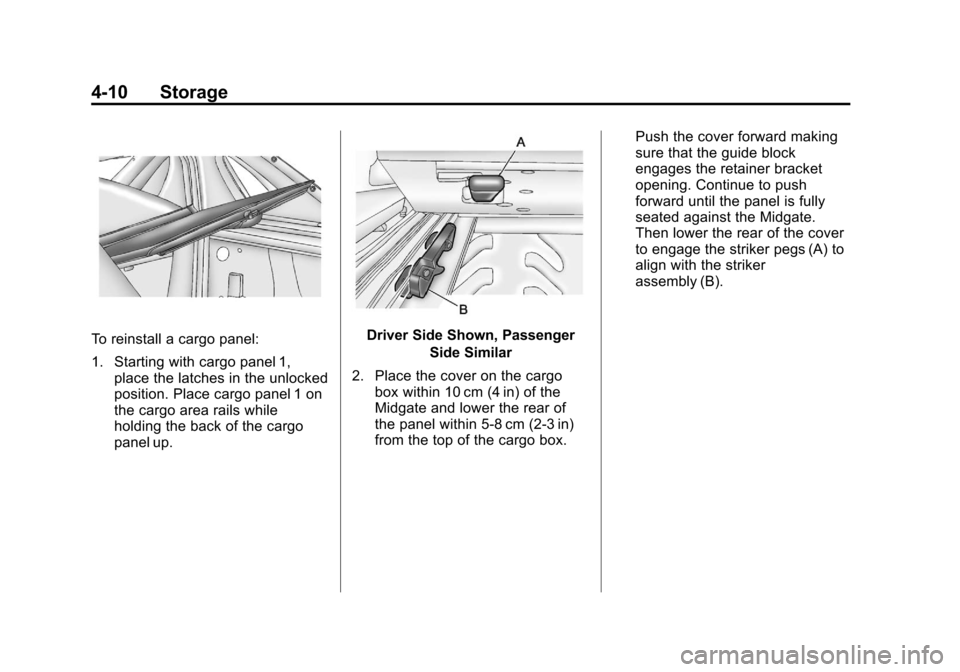
To reinstall a cargo panel:
1. Starting with cargo panel 1,place the latches in the unlocked
position. Place cargo panel 1 on
the cargo area rails while
holding the back of the cargo
panel up.Driver Side Shown, Passenger
Side Similar
2. Place the cover on the cargo box within 10 cm (4 in) of the
Midgate and lower the rear of
the panel within 5‐8 cm (2‐3 in)
from the top of the cargo box. Push the cover forward making
sure that the guide block
engages the retainer bracket
opening. Continue to push
forward until the panel is fully
seated against the Midgate.
Then lower the rear of the cover
to engage the striker pegs (A) to
align with the striker
assembly (B).
Page 127 of 508
Black plate (11,1)Chevrolet Avalanche Owner Manual - 2012
Storage 4-11
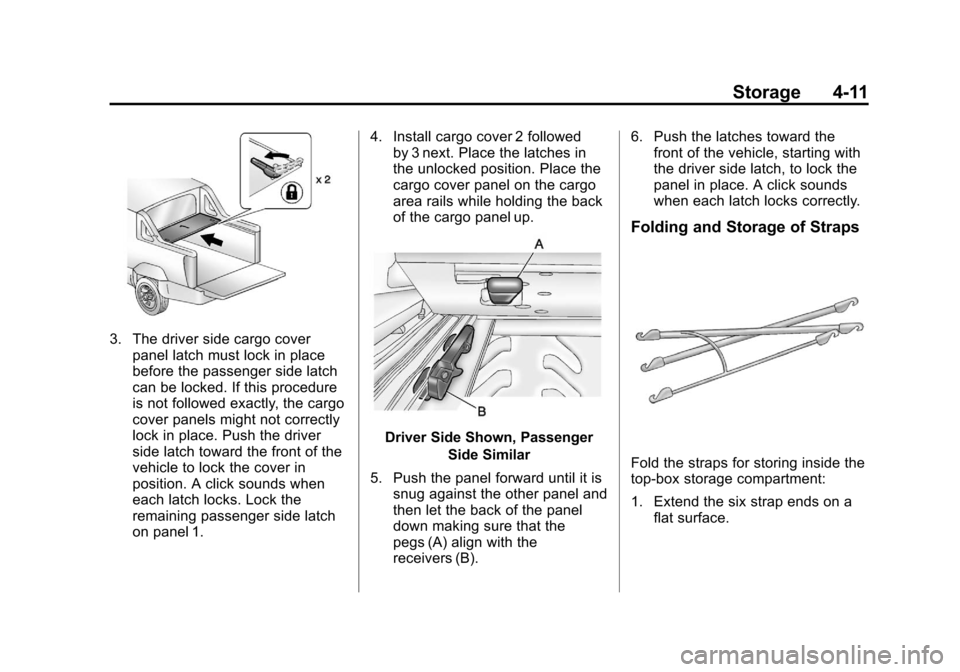
3. The driver side cargo coverpanel latch must lock in place
before the passenger side latch
can be locked. If this procedure
is not followed exactly, the cargo
cover panels might not correctly
lock in place. Push the driver
side latch toward the front of the
vehicle to lock the cover in
position. A click sounds when
each latch locks. Lock the
remaining passenger side latch
on panel 1. 4. Install cargo cover 2 followed
by 3 next. Place the latches in
the unlocked position. Place the
cargo cover panel on the cargo
area rails while holding the back
of the cargo panel up.
Driver Side Shown, Passenger
Side Similar
5. Push the panel forward until it is snug against the other panel and
then let the back of the panel
down making sure that the
pegs (A) align with the
receivers (B). 6. Push the latches toward the
front of the vehicle, starting with
the driver side latch, to lock the
panel in place. A click sounds
when each latch locks correctly.
Folding and Storage of Straps
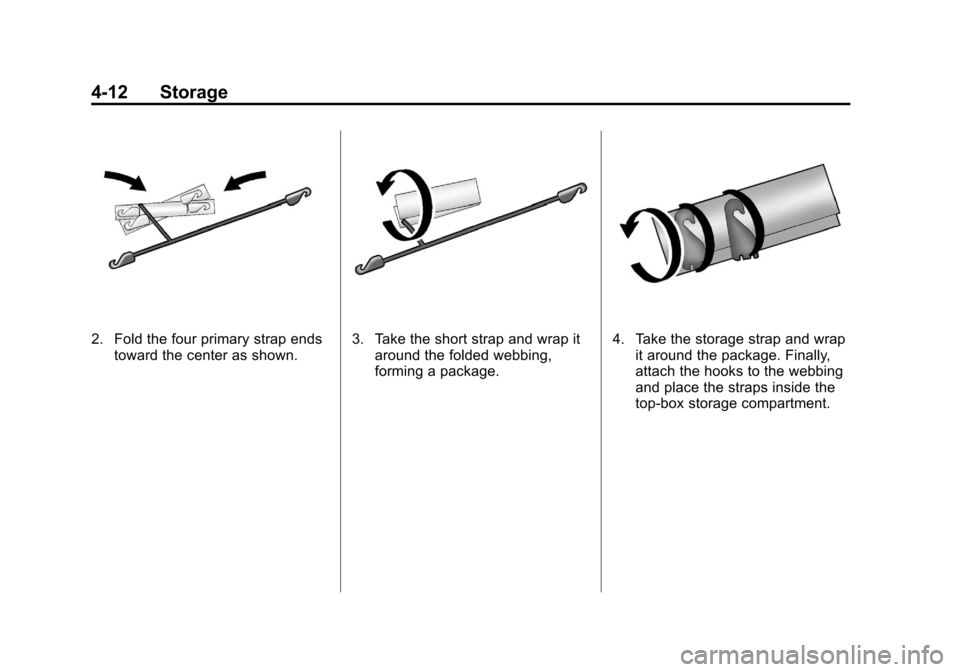
Fold the straps for storing inside the
top-box storage compartment:
1. Extend the six strap ends on aflat surface.
Page 128 of 508
Black plate (12,1)Chevrolet Avalanche Owner Manual - 2012
4-12 Storage
2. Fold the four primary strap endstoward the center as shown.3. Take the short strap and wrap itaround the folded webbing,
forming a package.4. Take the storage strap and wrapit around the package. Finally,
attach the hooks to the webbing
and place the straps inside the
top-box storage compartment.
Page 129 of 508
Black plate (13,1)Chevrolet Avalanche Owner Manual - 2012
Storage 4-13
Cargo Tie-Downs
The vehicle has cargo tie downs,
located in the rear cargo area.
These can be used to secure cargo.
The tie downs can also be used to
secure the cargo cover panel strap
system, if the vehicle has one. For
more information seeCargo Cover
Panels on page 4‑6.
Roof Rack System
{WARNING
If something is carried on top of
the vehicle that is longer or wider
than the roof rack —like paneling,
plywood, or a mattress —the
wind can catch it while the vehicle
is being driven. The item being
carried could be violently torn off,
and this could cause a collision
and damage the vehicle. Never
carry something longer or wider
than the roof rack on top of the
vehicle unless using a GM
certified accessory carrier. For vehicles with a roof rack, the
rack can be used to load items.
For roof racks that do not have
crossrails included, GM Certified
crossrails can be purchased as an
accessory. See your dealer for
additional information.
Notice:
Loading cargo on the
roof rack that weighs more than
91 kg (200 lbs) or hangs over the
rear or sides of the vehicle may
damage the vehicle. Load cargo
so that it rests evenly between
the crossrails, making sure to
fasten cargo securely.
Page 130 of 508
Black plate (14,1)Chevrolet Avalanche Owner Manual - 2012
4-14 Storage
To prevent damage or loss of cargo
when driving, check to make sure
crossrails and cargo are securely
fastened. Loading cargo on the roof
rack will make the vehicle’s center
of gravity higher. Avoid high speeds,
sudden starts, sharp turns, sudden
braking or abrupt maneuvers,
otherwise it may result in loss of
control. If driving for a long distance,
on rough roads, or at high speeds,
occasionally stop the vehicle to
make sure the cargo remains in its
place.
Do not exceed the maximum vehicle
capacity when loading the vehicle.
For more information on vehicle
capacity and loading, see Vehicle
Load Limits on page 9‑16.
.If small heavy objects are placed
on the roof, cut a piece of 9 mm
or 3/8 inch plywood to fit inside
the crossrails and siderails to
spread the load. Tie the plywood
to the siderail supports.
.Tie the load and secure it to the
crossrails or the siderail
supports. Use the crossrails only
to keep the load from sliding. To
move a crossrail, lift the release
lever up, on both sides of the
rail. Then slide the crossrail to
the desired position balancing
the force side to side. Press the
release lever down on both
sides of the rail, down to tighten
it. Try to slide the crossrail back
and forth slightly to make sure it
is tight..To carry long items, move the
crossrails as far apart as
possible. Tie the load to the
crossrails and the siderails or
siderail supports. Also tie the
load to the bumpers, but do not
tie the load so tightly that the
crossrails or siderails are
damaged.
.After moving a crossrail, be sure
it is securely locked into the
siderail.
A Center High-Mounted Stoplamp
(CHMSL) is located above the rear
window glass.
Make sure items loaded on the roof
of the vehicle do not block or
damage the CHMSL.