buttons CHEVROLET AVALANCHE 2012 2.G Owners Manual
[x] Cancel search | Manufacturer: CHEVROLET, Model Year: 2012, Model line: AVALANCHE, Model: CHEVROLET AVALANCHE 2012 2.GPages: 508, PDF Size: 7.78 MB
Page 9 of 508

Black plate (3,1)Chevrolet Avalanche Owner Manual - 2012
In Brief 1-3
A.Air Vents on page 8‑10.
B. Turn and Lane‐Change Lever. See Turn and Lane-Change
Signals on page 6‑5.
Windshield Wiper/Washer on
page 5‑5.
C. Instrument Cluster on
page 5‑11.
D. Hazard Warning Flashers on
page 6‑5 (Out of View).
E. Shift Lever. See Automatic
Transmission on page 9‑32.
F. Tow/Haul Mode on page 9‑36
(If Equipped).
G. Driver Information Center (DIC) Buttons. See Driver Information
Center (DIC) on page 5‑26.
H. AM-FM Radio on page 7‑8.
I. Exterior Lamp Controls on
page 6‑1. J. Dome Lamp Override. See
Dome Lamps on page 6‑7.
Instrument Panel Illumination
Control on page 6‑7.
Fog Lamps on page 6‑6
(If Equipped).
K. Automatic Transfer Case Control (If Equipped). See
Four-Wheel Drive (Two Speed
Automatic Transfer Case) on
page 9‑37 orFour-Wheel Drive
(Single Speed Automatic
Transfer Case) on page 9‑42.
L. Data Link Connector (DLC) (Out of View). See Malfunction
Indicator Lamp on page 5‑19.
M. Cruise Control on page 9‑51.
N. Steering Wheel Adjustment on
page 5‑2.
O. Horn on page 5‑5. P.
Steering Wheel Controls on
page 5‑3.
Q. Climate Control Systems on
page 8‑1 (If Equipped).
Dual Automatic Climate Control
System on page 8‑4
(If Equipped).
R. Power Outlets on page 5‑9.
S. StabiliTrak
®System on
page 9‑46.
Pedal Adjust Control (If
Equipped). See Adjustable
Throttle and Brake Pedal on
page 9‑22.
Ultrasonic Parking Assist on
page 9‑54 (If Equipped).
Power Assist Steps on
page 2‑16 (If Equipped).
T. Glove Box on page 4‑1.
Page 10 of 508
Black plate (4,1)Chevrolet Avalanche Owner Manual - 2012
1-4 In Brief
Initial Drive
Information
This section provides a brief
overview about some of the
important features that may or may
not be on your specific vehicle.
For more detailed information, refer
to each of the features which can be
found later in this owner manual.
Remote Keyless Entry
(RKE) System
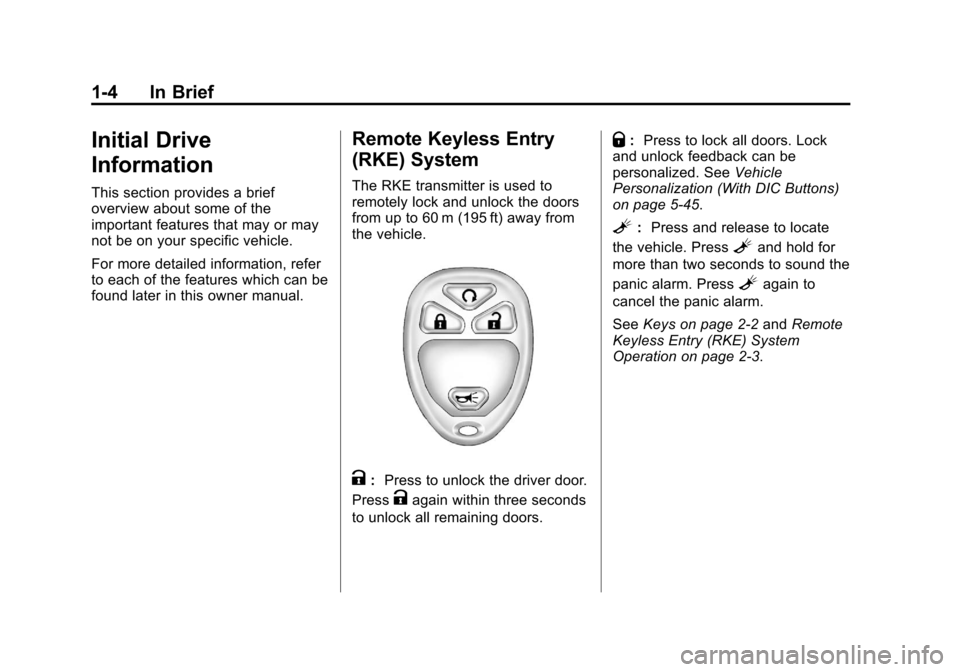
The RKE transmitter is used to
remotely lock and unlock the doors
from up to 60 m (195 ft) away from
the vehicle.
K:Press to unlock the driver door.
Press
Kagain within three seconds
to unlock all remaining doors.
Q: Press to lock all doors. Lock
and unlock feedback can be
personalized. See Vehicle
Personalization (With DIC Buttons)
on page 5‑45.
L: Press and release to locate
the vehicle. Press
Land hold for
more than two seconds to sound the
panic alarm. Press
Lagain to
cancel the panic alarm.
See Keys on page 2‑2 andRemote
Keyless Entry (RKE) System
Operation on page 2‑3.
Page 16 of 508
Black plate (10,1)Chevrolet Avalanche Owner Manual - 2012
1-10 In Brief
Storing Memory Positions
To save into memory:
1. Adjust the driver seat andseatback recliner, both outside
mirrors, and the throttle and
brake pedals, if equipped.
See Power Mirrors on page 2‑20
and Adjustable Throttle and
Brake Pedal on page 9‑22 for
more information.
Not all mirrors and adjustable
throttle and brake pedals will
have the ability to save and
recall their positions.
2. Press and hold “1”until
two beeps sound. 3. Repeat for a second driver
position using “2.”
To recall, press and release “1”or
“2.” The vehicle must be in P (Park).
A single beep will sound. The seat,
outside mirrors, and adjustable
throttle and brake pedals,
if equipped, will move to the
position previously stored for
the identified driver.
See Memory Seats on page 3‑7 and
Vehicle Personalization (With DIC
Buttons) on page 5‑45 for more
information. Easy Exit Driver Seat
This feature can move the seat
rearward to allow extra room to exit
the vehicle.
B:
Press to recall the easy exit
seat position. The vehicle must be
in P (Park).
See Memory Seats on page 3‑7 and
Vehicle Personalization (With DIC
Buttons) on page 5‑45 for more
information.
Second Row Seats
The rear seatbacks can be folded
to provide more cargo space and
access to the midgate.
For detailed instructions see Rear
Seats on page 3‑10.
Page 17 of 508
Black plate (11,1)Chevrolet Avalanche Owner Manual - 2012
In Brief 1-11
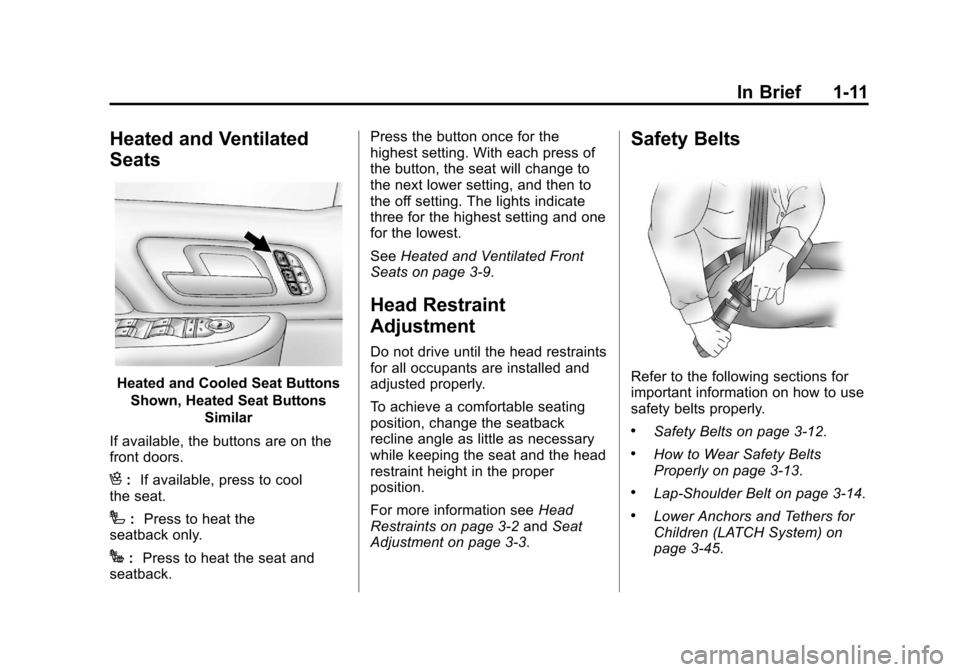
Heated and Ventilated
Seats
Heated and Cooled Seat ButtonsShown, Heated Seat Buttons Similar
If available, the buttons are on the
front doors.
H: If available, press to cool
the seat.
I: Press to heat the
seatback only.
J: Press to heat the seat and
seatback. Press the button once for the
highest setting. With each press of
the button, the seat will change to
the next lower setting, and then to
the off setting. The lights indicate
three for the highest setting and one
for the lowest.
See
Heated and Ventilated Front
Seats on page 3‑9.
Head Restraint
Adjustment
Do not drive until the head restraints
for all occupants are installed and
adjusted properly.
To achieve a comfortable seating
position, change the seatback
recline angle as little as necessary
while keeping the seat and the head
restraint height in the proper
position.
For more information see Head
Restraints on page 3‑2 andSeat
Adjustment on page 3‑3.
Safety Belts
Refer to the following sections for
important information on how to use
safety belts properly.
.Safety Belts on page 3‑12.
.How to Wear Safety Belts
Properly on page 3‑13.
.Lap-Shoulder Belt on page 3‑14.
.Lower Anchors and Tethers for
Children (LATCH System) on
page 3‑45.
Page 24 of 508
Black plate (18,1)Chevrolet Avalanche Owner Manual - 2012
1-18 In Brief
2. Press the plus/minus buttons,located on the steering column
shift lever, to select the desired
range of gears for current driving
conditions. See Manual Mode on
page 9‑35.
While using Range Selection Mode,
cruise control and the Tow/Haul
mode can be used.
Grade Braking is not available when
Range Selection Mode is active.
See Tow/Haul Mode on page 9‑36.Four-Wheel Drive
If the vehicle has Four-Wheel Drive,
you can send the engine's driving
power to all four wheels for extra
traction.
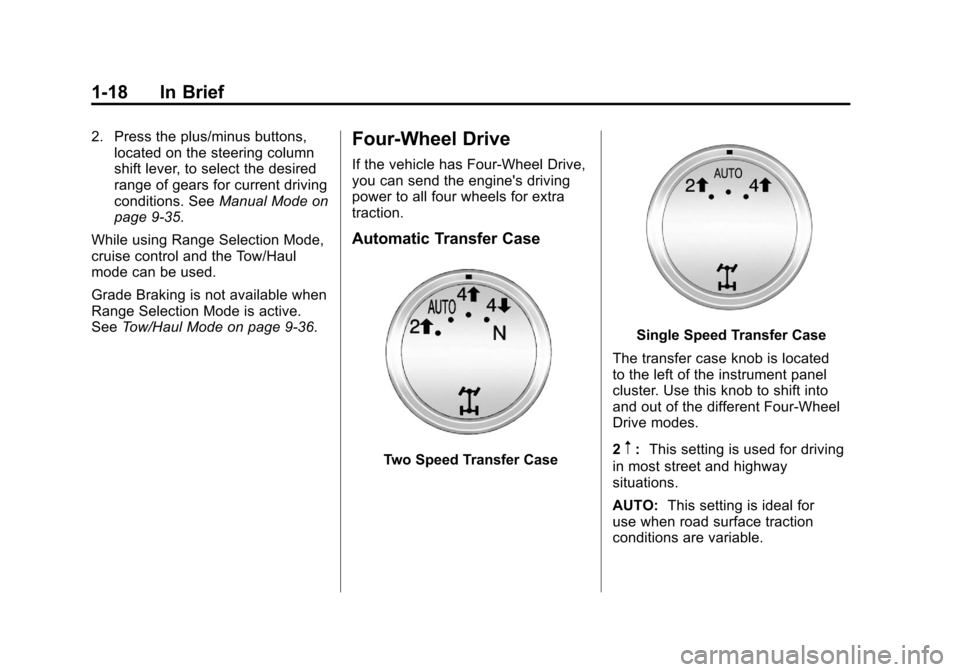
Automatic Transfer Case
Two Speed Transfer Case
Single Speed Transfer Case
The transfer case knob is located
to the left of the instrument panel
cluster. Use this knob to shift into
and out of the different Four-Wheel
Drive modes.
2
m: This setting is used for driving
in most street and highway
situations.
AUTO: This setting is ideal for
use when road surface traction
conditions are variable.
Page 29 of 508
Black plate (23,1)Chevrolet Avalanche Owner Manual - 2012
In Brief 1-23
Driver Information
Center (DIC)
The DIC display is located at the
bottom of the instrument panel
cluster. It shows the status of
many vehicle systems and enables
access to the personalization menu.
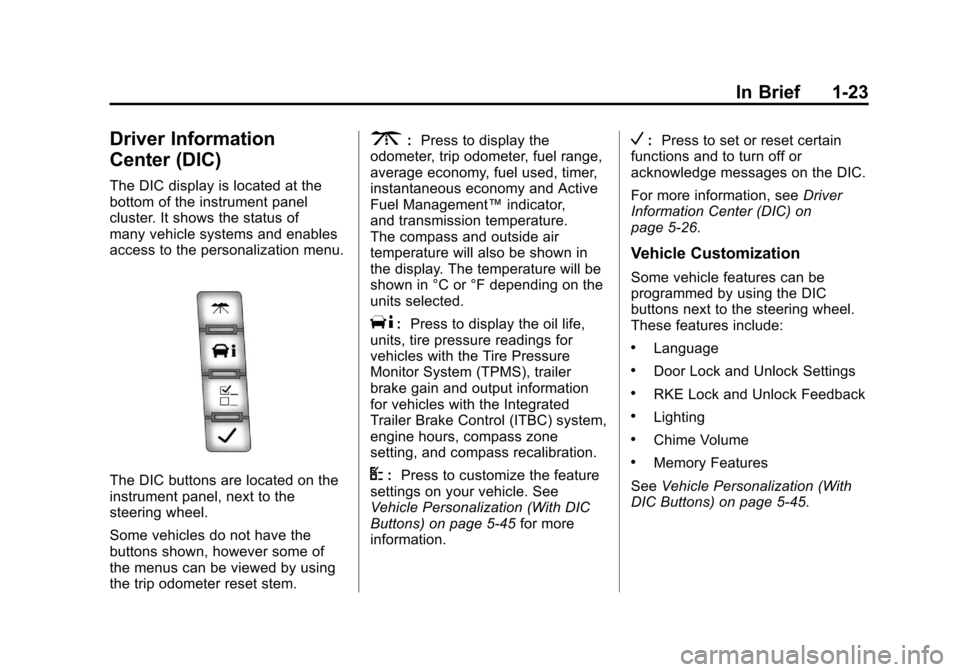
The DIC buttons are located on the
instrument panel, next to the
steering wheel.
Some vehicles do not have the
buttons shown, however some of
the menus can be viewed by using
the trip odometer reset stem.
3:Press to display the
odometer, trip odometer, fuel range,
average economy, fuel used, timer,
instantaneous economy and Active
Fuel Management™ indicator,
and transmission temperature.
The compass and outside air
temperature will also be shown in
the display. The temperature will be
shown in °C or °F depending on the
units selected.
T: Press to display the oil life,
units, tire pressure readings for
vehicles with the Tire Pressure
Monitor System (TPMS), trailer
brake gain and output information
for vehicles with the Integrated
Trailer Brake Control (ITBC) system,
engine hours, compass zone
setting, and compass recalibration.
U: Press to customize the feature
settings on your vehicle. See
Vehicle Personalization (With DIC
Buttons) on page 5‑45 for more
information.
V: Press to set or reset certain
functions and to turn off or
acknowledge messages on the DIC.
For more information, see Driver
Information Center (DIC) on
page 5‑26.
Vehicle Customization
Some vehicle features can be
programmed by using the DIC
buttons next to the steering wheel.
These features include:
.Language
.Door Lock and Unlock Settings
.RKE Lock and Unlock Feedback
.Lighting
.Chime Volume
.Memory Features
See Vehicle Personalization (With
DIC Buttons) on page 5‑45.
Page 30 of 508
Black plate (24,1)Chevrolet Avalanche Owner Manual - 2012
1-24 In Brief
Rear Vision
Camera (RVC)
If available, the RVC displays a
view of the area behind the vehicle
when the vehicle is shifted into
R (Reverse). This is displayed on
the inside rearview mirror or the
navigation screen, if equipped.
To clean the camera lens, located
in the bezel of the tailgate handle,
rinse it with water and wipe it with a
soft cloth.
For more information, seeRear
Vision Camera (RVC) on page 9‑56.
Ultrasonic Parking Assist
If available, Ultrasonic Rear Parking
Assist (URPA) system uses sensors
on the rear bumper to assist with
parking and avoiding objects while
in R (Reverse). It operates at
speeds less than 8 km/h (5 mph).
URPA uses audible beeps to
provide distance and system
information. Keep the sensors on the vehicle's
rear bumper clean to ensure proper
operation.
See
Ultrasonic Parking Assist on
page 9‑54 for more information.
Power Outlets
Accessory power outlets can be
used to plug in electrical equipment,
such as a cell phone or MP3 player.
The vehicle may have two
accessory power outlets located on
the instrument panel and one inside
the center floor console.
The vehicle may also have an
outlet on the rear of the center floor
console above the cupholder door.
The accessory power outlet is
operational at all times.
SeePower Outlets on page 5‑9.
Universal Remote System
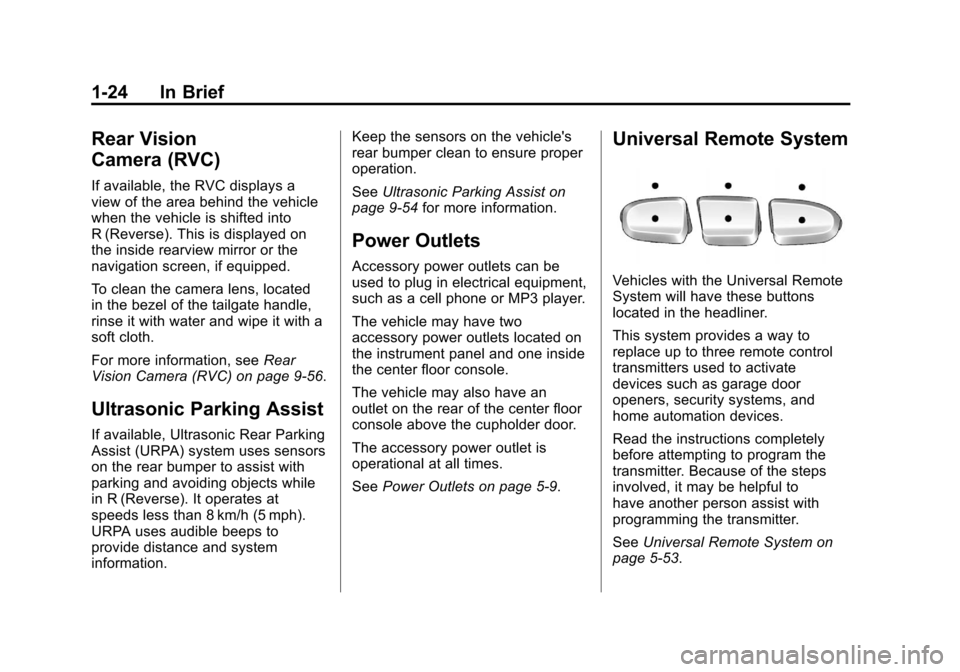
Vehicles with the Universal Remote
System will have these buttons
located in the headliner.
This system provides a way to
replace up to three remote control
transmitters used to activate
devices such as garage door
openers, security systems, and
home automation devices.
Read the instructions completely
before attempting to program the
transmitter. Because of the steps
involved, it may be helpful to
have another person assist with
programming the transmitter.
SeeUniversal Remote System on
page 5‑53.
Page 32 of 508
Black plate (26,1)Chevrolet Avalanche Owner Manual - 2012
1-26 In Brief
Resetting the Oil Life System
To reset the Engine Oil Life System
on most vehicles:
1. Display OIL LIFE REMAININGon the DIC. If the vehicle does
not have DIC buttons, the
vehicle must be in P (Park) to
access this display.
2. Press and hold the SET/RESET button on the DIC, or the trip
odometer reset stem if the
vehicle does not have DIC
buttons, for more than
five seconds. The oil life will
change to 100%. On all vehicles, the Engine Oil Life
System can be reset as follows:
1. Turn the ignition to ON/RUN with
the engine off.
2. Fully press the accelerator pedal slowly three times within
five seconds.
3. Display OIL LIFE REMAINING on the DIC. If the display shows
100%, the system is reset.
See Engine Oil Life System on
page 10‑11.
Fuel E85 (85% Ethanol)
Vehicles that have a FlexFuel badge
and a yellow fuel cap can use either
unleaded gasoline or ethanol fuel
containing up to 85% ethanol (E85).
See Fuel E85 (85% Ethanol) on
page 9‑63. For all other vehicles,
use only the unleaded gasoline
described under Recommended
Fuel on page 9‑61.
Driving for Better Fuel
Economy
Driving habits can affect fuel
mileage. Here are some driving tips
to get the best fuel economy
possible.
.Avoid fast starts and accelerate
smoothly.
.Brake gradually and avoid
abrupt stops.
.Avoid idling the engine for long
periods of time.
.When road and weather
conditions are appropriate, use
cruise control.
.Always follow posted speed
limits or drive more slowly when
conditions require.
.Keep vehicle tires properly
inflated.
.Combine several trips into a
single trip.
Page 37 of 508
Black plate (3,1)Chevrolet Avalanche Owner Manual - 2012
Keys, Doors, and Windows 2-3
.Check the transmitter's battery.
See“Battery Replacement” later
in this section.
.If the transmitter is still not
working correctly, see your
dealer or a qualified technician
for service.
Remote Keyless Entry
(RKE) System Operation
The Remote Keyless Entry (RKE)
transmitter functions work up to
60 m (195 ft) away from the vehicle.
There are other conditions which
can affect the performance of the
transmitter. See Remote Keyless
Entry (RKE) System on page 2‑2.
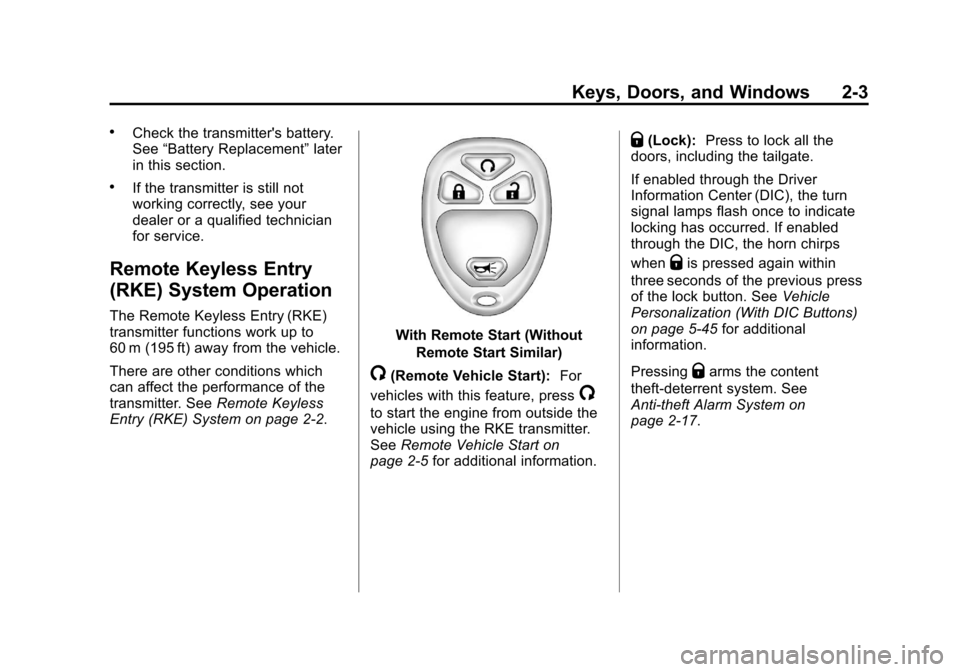
With Remote Start (Without
Remote Start Similar)
/(Remote Vehicle Start): For
vehicles with this feature, press
/
to start the engine from outside the
vehicle using the RKE transmitter.
See Remote Vehicle Start on
page 2‑5 for additional information.
Q(Lock):Press to lock all the
doors, including the tailgate.
If enabled through the Driver
Information Center (DIC), the turn
signal lamps flash once to indicate
locking has occurred. If enabled
through the DIC, the horn chirps
when
Qis pressed again within
three seconds of the previous press
of the lock button. See Vehicle
Personalization (With DIC Buttons)
on page 5‑45 for additional
information.
Pressing
Qarms the content
theft‐deterrent system. See
Anti-theft Alarm System on
page 2‑17.
Page 38 of 508
Black plate (4,1)Chevrolet Avalanche Owner Manual - 2012
2-4 Keys, Doors, and Windows
K(Unlock):Press once to unlock
only the driver door. If
Kis pressed
again within three seconds, all
remaining doors, including the
tailgate, unlock. The interior lamps
may come on and stay on for
20 seconds or until the ignition is
turned on.
If enabled through the DIC, the turn
signal lamps flash twice to indicate
unlocking has occurred. See Vehicle
Personalization (With DIC Buttons)
on page 5‑45. If enabled through the
DIC, the exterior lights may turn on.
See “APPROACH LIGHTING” under
Vehicle Personalization (With DIC
Buttons) on page 5‑45.
Pressing
Kon the RKE transmitter
disarms the content theft‐deterrent
system. See Anti-theft Alarm
System on page 2‑17.
L(Vehicle Locator/Panic
Alarm): Press and release to
locate the vehicle. The turn signal
lamps flash and the horn sounds
three times.
Press and hold
Lfor more than
two seconds to activate the panic
alarm. The turn signal lamps flash
and the horn sounds repeatedly for
30 seconds. The alarm turns off
when the ignition is moved to
ON/RUN or
Lis pressed again.
The ignition must be in LOCK/OFF
for the panic alarm to work.
Programming Transmitters to
the Vehicle
Only RKE transmitters programmed
to this vehicle will work. If a
transmitter is lost or stolen, a
replacement can be purchased and
programmed through your dealer. When the replacement transmitter
is programmed to this vehicle, all
remaining transmitters must also be
reprogrammed. Any lost or stolen
transmitters will no longer work
once the new transmitter is
programmed. Each vehicle can
have up to eight transmitters
programmed to it. See your dealer
to program transmitters to the
vehicle.
Battery Replacement
Replace the battery if the REPLACE
BATTERY IN REMOTE KEY
message displays in the DIC. See
“REPLACE BATTERY IN REMOTE
KEY”
under Key and Lock
Messages on page 5‑40 for
additional information.
Notice: When replacing the
battery, do not touch any of the
circuitry on the transmitter. Static
from your body could damage the
transmitter.