steering wheel CHEVROLET AVEO 2002 Service User Guide
[x] Cancel search | Manufacturer: CHEVROLET, Model Year: 2002, Model line: AVEO, Model: CHEVROLET AVEO 2002Pages: 5127, PDF Size: 41.82 MB
Page 1601 of 5127

Steering
Power Steering
If you lose power steering assist because the engine
stops or the system is not functioning, you can steer
but it will take much more effort.
Steering Tips
Driving on Curves
It is important to take curves at a reasonable speed.
A lot of the “driver lost control” accidents mentioned on
the news happen on curves.
Here is why:
Experienced driver or beginner, each of us is subject
to the same laws of physics when driving on curves. The
traction of the tires against the road surface makes it
possible for the vehicle to change its path when you turn
the front wheels. If there is no traction, inertia will
keep the vehicle going in the same direction. If you have
ever tried to steer a vehicle on wet ice,
you will understand this.
The traction you can get in a curve depends on the
condition of your tires and the road surface, the angle at
which the curve is banked, and your speed. While you
are in a curve, speed is the one factor you can control.Suppose you are steering through a sharp curve.
Then you suddenly apply the brakes. Both control
systems — steering and braking — have to do their
work where the tires meet the road. Unless you
have four-wheel anti-lock brakes, adding the hard
braking can demand too much of those places.
You can lose control.
The same thing can happen if you are steering through
a sharp curve and you suddenly accelerate. Those two
control systems — steering and acceleration — can
overwhelm those places where the tires meet the road
and make you lose control.
What should you do if this ever happens? Ease up on
the brake or accelerator pedal, steer the vehicle the way
you want it to go, and slow down.
Speed limit signs near curves warn that you should adjust
your speed. Of course, the posted speeds are based on
good weather and road conditions. Under less favorable
conditions you will want to go slower.
If you need to reduce your speed as you approach a
curve, do it before you enter the curve, while your front
wheels are straight ahead.
Try to adjust your speed so you can “drive” through the
curve. Maintain a reasonable, steady speed. Wait to
accelerate until you are out of the curve, and then
accelerate gently into the straightaway.
4-10
Page 1602 of 5127

Steering in Emergencies
There are times when steering can be more effective
than braking. For example, you come over a hill and find
a truck stopped in your lane, or a car suddenly pulls
out from nowhere, or a child darts out from between
parked cars and stops right in front of you. You can
avoid these problems by braking — if you can stop in
time. But sometimes you can not; there is not room.
That is the time for evasive action — steering around the
problem.
Your vehicle can perform very well in emergencies like
these. First apply your brakes — but, unless you
have anti-lock, not enough to lock your wheels.
SeeBraking on page 4-6. It is better to remove as much
speed as you can from a possible collision. Then steer
around the problem, to the left or right depending on the
space available.An emergency like this requires close attention and a
quick decision. If you are holding the steering wheel at
the recommended 9 and 3 o’clock positions, you
can turn it a full 180 degrees very quickly without
removing either hand. But you have to act fast, steer
quickly, and just as quickly straighten the wheel
once you have avoided the object.
The fact that such emergency situations are always
possible is a good reason to practice defensive driving
at all times and wear safety belts properly.
4-11
Page 1603 of 5127

Off-Road Recovery
You may find that your right wheels have dropped off the
edge of a road onto the shoulder while you’re driving.
If the level of the shoulder is only slightly below the
pavement, recovery should be fairly easy. Ease off the
accelerator and then, if there is nothing in the way,
steer so that your vehicle straddles the edge of
the pavement. You can turn the steering wheel up to
one-quarter turn until the right front tire contacts
the pavement edge. Then turn your steering wheel
to go straight down the roadway.
Passing
The driver of a vehicle about to pass another on a
two-lane highway waits for just the right moment,
accelerates, moves around the vehicle ahead, then
goes back into the right lane again. A simple maneuver?
Not necessarily! Passing another vehicle on a two-lane
highway is a potentially dangerous move, since the
passing vehicle occupies the same lane as oncoming
traffic for several seconds. A miscalculation, an error in
judgment, or a brief surrender to frustration or anger
can suddenly put the passing driver face to face with the
worst of all traffic accidents — the head-on collision.
So here are some tips for passing:
•“Drive ahead.” Look down the road, to the sides
and to crossroads for situations that might affect
your passing patterns. If you have any doubt
whatsoever about making a successful pass, wait
for a better time.
•Watch for traffic signs, pavement markings and
lines. If you can see a sign up ahead that might
indicate a turn or an intersection, delay your pass.
A broken center line usually indicates it is all
right to pass (providing the road ahead is clear).
Never cross a solid line on your side of the lane or
a double solid line, even if the road seems empty
of approaching traffic.
4-12
Page 1605 of 5127

Loss of Control
Let us review what driving experts say about what
happens when the three control systems (brakes,
steering and acceleration) do not have enough friction
where the tires meet the road to do what the driver
has asked.
In any emergency, do not give up. Keep trying to steer
and constantly seek an escape route or area of less
danger.
Skidding
In a skid, a driver can lose control of the vehicle.
Defensive drivers avoid most skids by taking reasonable
care suited to existing conditions, and by not “overdriving”
those conditions. But skids are always possible.
The three types of skids correspond to your vehicle’s
three control systems. In the braking skid, your wheels
are not rolling. In the steering or cornering skid, too much
speed or steering in a curve causes tires to slip and lose
cornering force. And in the acceleration skid, too much
throttle causes the driving wheels to spin.
A cornering skid is best handled by easing your foot off
the accelerator pedalIf your vehicle starts to slide, ease your foot off the
accelerator pedal and quickly steer the way you want
the vehicle to go. If you start steering quickly enough,
your vehicle may straighten out. Always be ready
for a second skid if it occurs.
Of course, traction is reduced when water, snow, ice,
gravel or other material is on the road. For safety,
you will want to slow down and adjust your driving to
these conditions. It is important to slow down on slippery
surfaces because stopping distance will be longer and
vehicle control more limited.
While driving on a surface with reduced traction,
try your best to avoid sudden steering, acceleration or
braking (including engine braking by shifting to a
lower gear). Any sudden changes could cause the tires
to slide. You may not realize the surface is slippery
until your vehicle is skidding. Learn to recognize warning
clues — such as enough water, ice or packed snow
on the road to make a “mirrored surface” — and slow
down when you have any doubt.
If you have the anti-lock braking system, remember:
It helps avoid only the braking skid. If you do not have
anti-lock, then in a braking skid (where the wheels
are no longer rolling), release enough pressure on the
brakes to get the wheels rolling again. This restores
steering control. Push the brake pedal down steadily
when you have to stop suddenly. As long as the wheels
are rolling, you will have steering control.
4-14
Page 1617 of 5127

Remember, unless you have anti-lock, if you brake so
hard that your wheels stop rolling, you will just slide.
Brake so your wheels always keep rolling and you can
still steer.
•Whatever your braking system, allow greater
following distance on any slippery road.
•Watch for slippery spots. The road might be fine
until you hit a spot that is covered with ice. On
an otherwise clear road, ice patches may appear in
shaded areas where the sun can not reach:
around clumps of trees, behind buildings or under
bridges. Sometimes the surface of a curve or
an overpass may remain icy when the surrounding
roads are clear. If you see a patch of ice ahead
of you, brake before you are on it. Try not to brake
while you are actually on the ice, and avoid
sudden steering maneuvers.
If You Are Caught in a Blizzard
If you are stopped by heavy snow, you could be in
a serious situation. You should probably stay with your
vehicle unless you know for sure that you are
near help and you can hike through the snow.
4-26
Page 1620 of 5127

Notice:Spinning your wheels can destroy parts of
your vehicle as well as the tires. If you spin the
wheels too fast while shifting your transaxle back
and forth, you can destroy your transaxle. See
“Rocking Your Vehicle To Get It Out.”
For information about using tire chains on your vehicle,
seeTire Chains on page 5-66.
Rocking Your Vehicle To Get It Out
First, turn your steering wheel left and right. That will
clear the area around your front wheels. Then shift back
and forth between REVERSE (R) and a forward gear
(or with a manual transaxle, between FIRST (1) or
SECOND (2) and REVERSE (R)), spinning the wheels
as little as possible. Release the accelerator pedal
while you shift, and press lightly on the accelerator pedal
when the transaxle is in gear. By slowly spinning your
wheels in the forward and reverse directions, you will
cause a rocking motion that may free your vehicle. If that
does not get you out after a few tries, you may need
to be towed out. If you do need to be towed out,
seeTowing Your Vehicle on page 4-29.
Towing
Towing Your Vehicle
Consult your dealer or a professional towing service
if you need to have your disabled vehicle towed.
SeeRoadside Assistance Program on page 7-6.
If you want to tow your vehicle behind another vehicle
for recreational purposes (such as behind a motorhome),
see “Recreational Vehicle Towing” following.
Recreational Vehicle Towing
Recreational vehicle towing means towing your vehicle
behind another vehicle, such as behind a motorhome.
The two most common types of recreational vehicle
towing are known as “dinghy towing” (towing your vehicle
with all four wheels on the ground) and “dolly towing”
(towing your vehicle with two wheels on the ground and
two wheels up on a device known as a “dolly”).
With the proper preparation and equipment, many
vehicles can be towed in these ways. See “Dinghy
Towing” and “Dolly Towing,” following.
4-29
Page 1622 of 5127
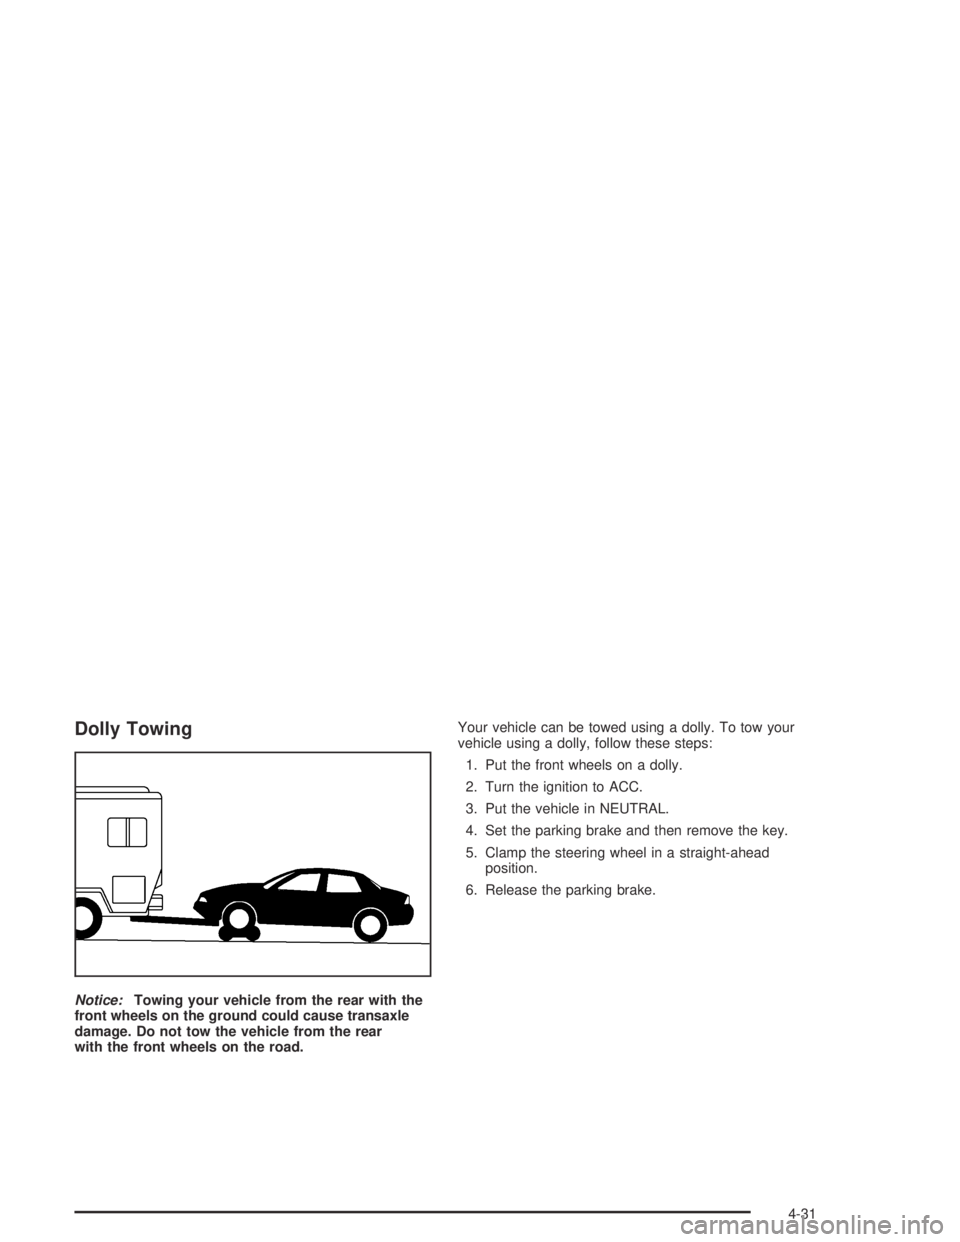
Dolly Towing
Notice:Towing your vehicle from the rear with the
front wheels on the ground could cause transaxle
damage. Do not tow the vehicle from the rear
with the front wheels on the road.Your vehicle can be towed using a dolly. To tow your
vehicle using a dolly, follow these steps:
1. Put the front wheels on a dolly.
2. Turn the ignition to ACC.
3. Put the vehicle in NEUTRAL.
4. Set the parking brake and then remove the key.
5. Clamp the steering wheel in a straight-ahead
position.
6. Release the parking brake.
4-31
Page 1695 of 5127
Tire Chains
Notice:Use tire chains only where legal and only
when you must. Use only SAE Class “S” type chains
that are the proper size for your tires. Install them on
the front tires and tighten them as tightly as possible
with the ends securely fastened. Drive slowly and
follow the chain manufacturer’s instructions. If you
can hear the chains contacting your vehicle, stop and
retighten them. If the contact continues, slow down
until it stops. Driving too fast or spinning the wheels
with chains on will damage your vehicle.
If a Tire Goes Flat
It’s unusual for a tire to “blowout” while you’re driving,
especially if you maintain your tires properly. If air goes
out of a tire, it’s much more likely to leak out slowly.
But if you should ever have a “blowout,” here are a few
tips about what to expect and what to do:
If a front tire fails, the flat tire will create a drag that
pulls the vehicle toward that side. Take your foot off the
accelerator pedal and grip the steering wheel firmly.
Steer to maintain lane position, and then gently brake to
a stop well out of the traffic lane.A rear blowout, particularly on a curve, acts much like a
skid and may require the same correction you’d use
in a skid. In any rear blowout, remove your foot from the
accelerator pedal. Get the vehicle under control by
steering the way you want the vehicle to go. It may be
very bumpy and noisy, but you can still steer. Gently
brake to a stop, well off the road if possible.
{CAUTION:
Lifting a vehicle and getting under it to do
maintenance or repairs is dangerous without
the appropriate safety equipment and training.
The jack provided with your vehicle is
designed only for changing a at tire. If it is
used for anything else, you or others could be
badly injured or killed if the vehicle slips off
the jack. Use the jack provided with your
vehicle only for changing a at tire.
If a tire goes flat, the next part shows how to use your
jacking equipment to change a flat tire safely.
5-66
Page 1743 of 5127

Automatic Transaxle Shift Lock Control
System Check
{CAUTION:
When you are doing this inspection, the vehicle
could move suddenly. If the vehicle moves, you
or others could be injured.
1. Before you start, be sure you have enough room
around the vehicle. It should be parked on a level
surface.
2. Firmly apply the parking brake. SeeParking Brake
on page 2-28if necessary.
Be ready to apply the regular brake immediately if
the vehicle begins to move.
3. With the engine off, turn the key to the RUN position,
but do not start the engine. Without applying the
regular brake, try to move the shift lever out of
PARK (P) with normal effort. If the shift lever moves
out of PARK (P), your vehicle needs service.
Ignition Transaxle Lock Check
While parked, and with the parking brake set, try to turn
the ignition key to LOCK in each shift lever position.
•With an automatic transaxle, the key should turn to
LOCK only when the shift lever is in PARK (P).
•With a manual transaxle, the key should turn to
LOCK only when you press the key release
button.
On all vehicles, the key should come out only in LOCK.
Turn the steering wheel to the left and to the right. It
should only lock when turned to the right.
6-22
Page 1775 of 5127
Service Bulletins.............................................7-11
Service Manuals.............................................7-11
Setting Preset Stations............................3-35, 3-36
Setting the Tone (Bass/Treble)..................3-35, 3-37
Sheet Metal Damage.......................................5-81
Shift Speeds..................................................2-27
Shifting Into Park (P).......................................2-29
Shifting Out of Park (P)...................................2-30
Short Trip/City Definition.................................... 6-5
Short Trip/City Intervals..................................... 6-5
Short Trip/City Scheduled Maintenance................ 6-7
Shoulder Belt Height Adjuster...........................1-17
Skidding........................................................4-14
Some Other Rainy Weather Tips.......................4-18
Special Fabric Cleaning Problems.....................5-77
Specifications, Capacities.................................5-91
Speedometer..................................................3-19
Starter Switch Check.......................................6-21
Starting Your Engine.......................................2-20
Steering........................................................4-10
Steering in Emergencies..................................4-11
Steering, Suspension and Front Drive Axle
Boot and Seal Inspection..............................6-24
Steering Tips..................................................4-10
Steering Wheel, Tilt Wheel................................. 3-4
Storage Areas................................................2-36
Cupholder(s)...............................................2-36
Glove Box..................................................2-36
Sunglasses Storage Compartment..................2-37Storing the Flat Tire and Tools..........................5-74
Storing the Spare Tire and Tools.......................5-74
Stuck in Sand, Mud, Ice or Snow......................4-28
Sun Visors.....................................................2-14
Sunglasses Storage Compartment.....................2-37
Sunroof.........................................................2-37
T
Tachometer....................................................3-19
Taillamps
Turn Signal, Stoplamps and Back-up Lamps......5-49
Theft-Deterrent, Radio.....................................3-43
Theft-Deterrent System....................................2-15
Theft-Deterrent Systems...................................2-15
Immobilizer.................................................2-17
Immobilizer Operation...................................2-17
Throttle System Inspection...............................6-25
Tilt Wheel........................................................ 3-4
Tire Inflation Check.........................................6-19
Tire Sidewall Labeling......................................5-52
Tire Size.......................................................5-55
Tire Terminology and Definitions........................5-56
Tires.............................................................5-51
Buying New Tires........................................5-62
Chains.......................................................5-66
Changing a Flat Tire....................................5-67
Compact Spare Tire.....................................5-75
12