steering wheel CHEVROLET AVEO 2002 Service Service Manual
[x] Cancel search | Manufacturer: CHEVROLET, Model Year: 2002, Model line: AVEO, Model: CHEVROLET AVEO 2002Pages: 5127, PDF Size: 41.82 MB
Page 1989 of 5127

If Your Vehicle is Stuck in Sand,
Mud, Ice, or Snow
In order to free your vehicle when it is stuck, you will
need to spin the wheels, but you do not want to
spin your wheels too fast. The method known as rocking
can help you get out when you are stuck, but you
must use caution.
{CAUTION:
If you let your tires spin at high speed, they
can explode, and you or others could be
injured. And, the transaxle or other parts of the
vehicle can overheat. That could cause an
engine compartment re or other damage.
When you are stuck, spin the wheels as little
as possible. Do not spin the wheels above
35 mph (55 km/h) as shown on the
speedometer.Notice:Spinning your wheels can destroy parts of
your vehicle as well as the tires. If you spin the
wheels too fast while shifting your transaxle back
and forth, you can destroy your transaxle. See
Rocking Your Vehicle to Get It Out on page 4-26.
For information about using tire chains on your vehicle,
seeTire Chains on page 5-57.
Rocking Your Vehicle to Get It Out
First, turn your steering wheel left and right. That
will clear the area around your front wheels. Then shift
back and forth between REVERSE (R) and a forward
gear, or with a manual transaxle, between FIRST (1) or
SECOND (2) and REVERSE (R), spinning the wheels
as little as possible. Release the accelerator pedal while
you shift, and press lightly on the accelerator pedal
when the transaxle is in gear. By slowly spinning your
wheels in the forward and reverse directions, you
will cause a rocking motion that may free your vehicle.
If that does not get you out after a few tries, you
may need to be towed out. If you do need to be towed
out, seeTowing Your Vehicle on page 4-34.
4-26
Page 1998 of 5127

Dolly Towing
Notice:Towing your vehicle from the rear with the
front wheels on the ground could cause transaxle
damage. Do not tow the vehicle from the rear
with the front wheels on the road.
Your vehicle can be towed using a dolly. To tow your
vehicle using a dolly, follow these steps:
1. Put the front wheels on a dolly.
2. Turn the ignition to ACC.3. Put the vehicle in NEUTRAL (N).
4. Set the parking brake and then remove the key.
5. Clamp the steering wheel in a straight-ahead
position.
6. Release the parking brake.
Towing a Trailer
Do not use your vehicle to tow a trailer. The vehicle is
not designed or intended for such a use. Towing a trailer
can adversely affect handling, durability and fuel
economy.
4-35
Page 2000 of 5127
Service............................................................5-3
Accessories and Modifications..........................5-3
California Proposition 65 Warning.....................5-3
Doing Your Own Service Work.........................5-4
Adding Equipment to the Outside of Your
Vehicle......................................................5-4
Fuel................................................................5-5
Gasoline Octane............................................5-5
Gasoline Specifications....................................5-5
California Fuel...............................................5-5
Additives.......................................................5-6
Fuels in Foreign Countries...............................5-6
Filling the Tank..............................................5-7
Filling a Portable Fuel Container.......................5-9
Checking Things Under the Hood....................5-10
Hood Release..............................................5-10
Engine Compartment Overview.......................5-12
Engine Oil...................................................5-13
Engine Air Cleaner/Filter................................5-17
Automatic Transaxle Fluid..............................5-19
Manual Transaxle Fluid..................................5-21
Hydraulic Clutch...........................................5-21
Engine Coolant.............................................5-22
Coolant Surge Tank Pressure Cap..................5-24
Engine Overheating.......................................5-24
Cooling System............................................5-26Power Steering Fluid.....................................5-30
Windshield Washer Fluid................................5-31
Brakes........................................................5-32
Battery........................................................5-35
Jump Starting...............................................5-36
Headlamp Aiming...........................................5-39
Bulb Replacement..........................................5-40
Halogen Bulbs..............................................5-40
Headlamps..................................................5-40
Front Turn Signal and Parking Lamps..............5-42
Turn Signal Lamps (Side)..............................5-42
Taillamps, Turn Signal, Stoplamps and
Back-up Lamps.........................................5-43
Replacement Bulbs.......................................5-44
Windshield Wiper Blade Replacement..............5-44
Tires..............................................................5-45
Tire Sidewall Labeling...................................5-46
Tire Terminology and Definitions.....................5-48
Inflation - Tire Pressure.................................5-51
Tire Inspection and Rotation...........................5-52
When It Is Time for New Tires.......................5-53
Buying New Tires.........................................5-54
Different Size Tires and Wheels......................5-54
Uniform Tire Quality Grading..........................5-55
Wheel Alignment and Tire Balance..................5-56
Wheel Replacement......................................5-56
Section 5 Service and Appearance Care
5-1
Page 2047 of 5127
Tire Size
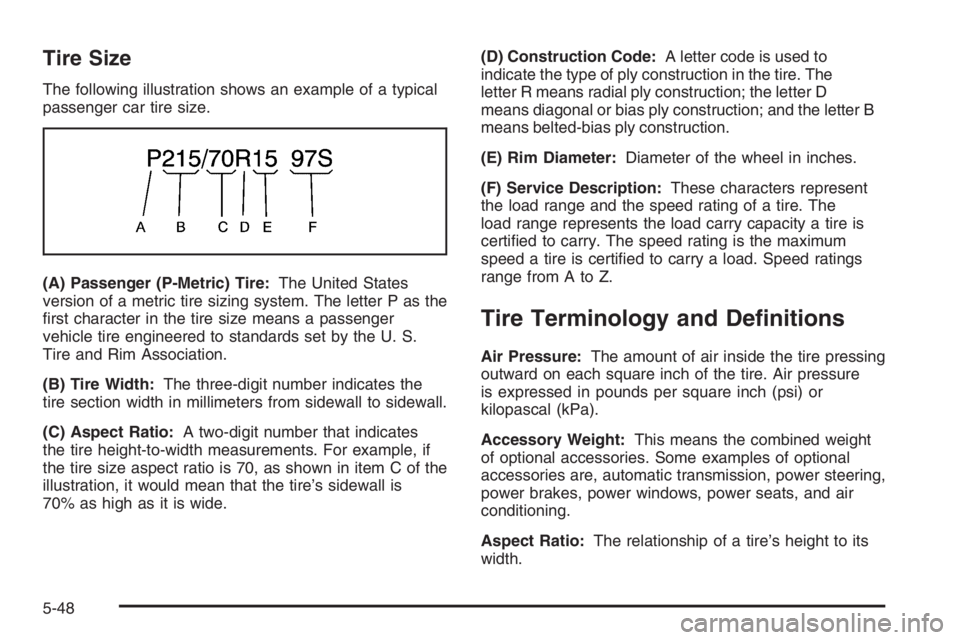
The following illustration shows an example of a typical
passenger car tire size.
(A) Passenger (P-Metric) Tire:The United States
version of a metric tire sizing system. The letter P as the
first character in the tire size means a passenger
vehicle tire engineered to standards set by the U. S.
Tire and Rim Association.
(B) Tire Width:The three-digit number indicates the
tire section width in millimeters from sidewall to sidewall.
(C) Aspect Ratio:A two-digit number that indicates
the tire height-to-width measurements. For example, if
the tire size aspect ratio is 70, as shown in item C of the
illustration, it would mean that the tire’s sidewall is
70% as high as it is wide.(D) Construction Code:A letter code is used to
indicate the type of ply construction in the tire. The
letter R means radial ply construction; the letter D
means diagonal or bias ply construction; and the letter B
means belted-bias ply construction.
(E) Rim Diameter:Diameter of the wheel in inches.
(F) Service Description:These characters represent
the load range and the speed rating of a tire. The
load range represents the load carry capacity a tire is
certified to carry. The speed rating is the maximum
speed a tire is certified to carry a load. Speed ratings
range from A to Z.
Tire Terminology and Denitions
Air Pressure:The amount of air inside the tire pressing
outward on each square inch of the tire. Air pressure
is expressed in pounds per square inch (psi) or
kilopascal (kPa).
Accessory Weight:This means the combined weight
of optional accessories. Some examples of optional
accessories are, automatic transmission, power steering,
power brakes, power windows, power seats, and air
conditioning.
Aspect Ratio:The relationship of a tire’s height to its
width.
5-48
Page 2057 of 5127

If a Tire Goes Flat
It is unusual for a tire to blowout while you are driving,
especially if you maintain your vehicle’s tires properly.
If air goes out of a tire, it is much more likely to leak out
slowly. But if you should ever have a blowout, here
are a few tips about what to expect and what to do:
If a front tire fails, the flat tire will create a drag that pulls
the vehicle toward that side. Take your foot off the
accelerator pedal and grip the steering wheel firmly.
Steer to maintain lane position, and then gently brake to
a stop well out of the traffic lane.
A rear blowout, particularly on a curve, acts much like a
skid and may require the same correction you would
use in a skid. In any rear blowout remove your foot from
the accelerator pedal. Get the vehicle under control
by steering the way you want the vehicle to go. It may
be very bumpy and noisy, but you can still steer. Gently
brake to a stop, well off the road if possible.{CAUTION:
Lifting a vehicle and getting under it to do
maintenance or repairs is dangerous without
the appropriate safety equipment and training.
The jack provided with your vehicle is
designed only for changing a at tire. If it is
used for anything else, you or others could be
badly injured or killed if the vehicle slips off
the jack. Use the jack provided with your
vehicle only for changing a at tire.
If a tire goes flat, the next part shows how to use the
jacking equipment to change a flat tire safely.
Changing a Flat Tire
If a tire goes flat, avoid further tire and wheel damage
by driving slowly to a level place. Turn on your
hazard warning flashers.
5-58
Page 2102 of 5127

Automatic Transaxle Shift Lock Control
System Check
{CAUTION:
When you are doing this inspection, the
vehicle could move suddenly. If the vehicle
moves, you or others could be injured.
1. Before you start, be sure you have enough room
around the vehicle. It should be parked on a level
surface.
2. Firmly apply the parking brake. SeeParking Brake
on page 2-26if necessary.
Be ready to apply the regular brake immediately if
the vehicle begins to move.
3. With the engine off, turn the ignition to ON, but do
not start the engine. Without applying the regular
brake, try to move the shift lever out of PARK (P)
with normal effort. If the shift lever moves out
of PARK (P), your vehicle needs service.
Ignition Transaxle Lock Check
While parked, and with the parking brake set, try to turn
the ignition to LOCK in each shift lever position.
•With an automatic transaxle, the ignition should turn
to LOCK only when the shift lever is in PARK (P).
•With a manual transaxle, the ignition should turn to
LOCK only when you press the key release button.
On all vehicles, the key should come out only in LOCK.
Turn the steering wheel to the left and to the right. It
should only lock when turned to the right.
6-21
Page 2137 of 5127

Safety Belts (cont.)
Questions and Answers About Safety Belts.....1-17
Rear Seat Passengers.................................1-25
Right Front Passenger Position......................1-25
Safety Belt Extender....................................1-29
Safety Belt Use During Pregnancy.................1-25
Safety Belts Are for Everyone.......................1-12
Shoulder Belt Height Adjuster........................1-24
Safety Warnings and Symbols.............................. iii
Seats
Driver Seat Height Adjuster............................. 1-3
Head Restraints............................................ 1-5
Manual........................................................ 1-2
Rear Seat Operation...............................1-6, 1-9
Reclining Seatbacks...................................... 1-3
Secondary Information Center (SIC)...................3-31
Securing a Child Restraint
Rear Seat Position......................................1-49
Right Front Seat Position..............................1-51
Selecting the Right Schedule, Maintenance.......... 6-5
Service........................................................... 5-3
Accessories and Modifications......................... 5-3
Adding Equipment to the Outside of Your
Vehicle..................................................... 5-4
California Proposition 65 Warning.................... 5-3
Doing Your Own Work................................... 5-4
Engine Soon Light.......................................3-34
Publications Ordering Information...................7-15Servicing Your Airbag-Equipped Vehicle..............1-69
Sheet Metal Damage.......................................5-72
Shifting Into Park (P).......................................2-27
Shifting Out of Park (P)...................................2-28
Short Trip/City Scheduled Maintenance................ 6-6
Shoulder Belt Height Adjuster...........................1-24
Signals, Turn and Lane-Change.......................... 3-7
Spare Tire
Compact....................................................5-66
Installing....................................................5-61
Removing...................................................5-60
Storing.......................................................5-65
Specifications, Capacities.................................5-80
Speedometer..................................................3-25
Starting Your Engine.......................................2-19
Steering.......................................................... 4-9
Steering, Suspension and Front Drive
Axle Boot and Seal Inspection.......................6-23
Steering Wheel, Tilt Wheel................................. 3-6
Storage Areas................................................2-34
Cupholder(s)...............................................2-34
Glove Box..................................................2-34
Sunglasses Storage Compartment..................2-35
Stuck in Sand, Mud, Ice, or Snow.....................4-26
Sun Visors.....................................................2-13
Sunroof.........................................................2-35
10
Page 4355 of 5127
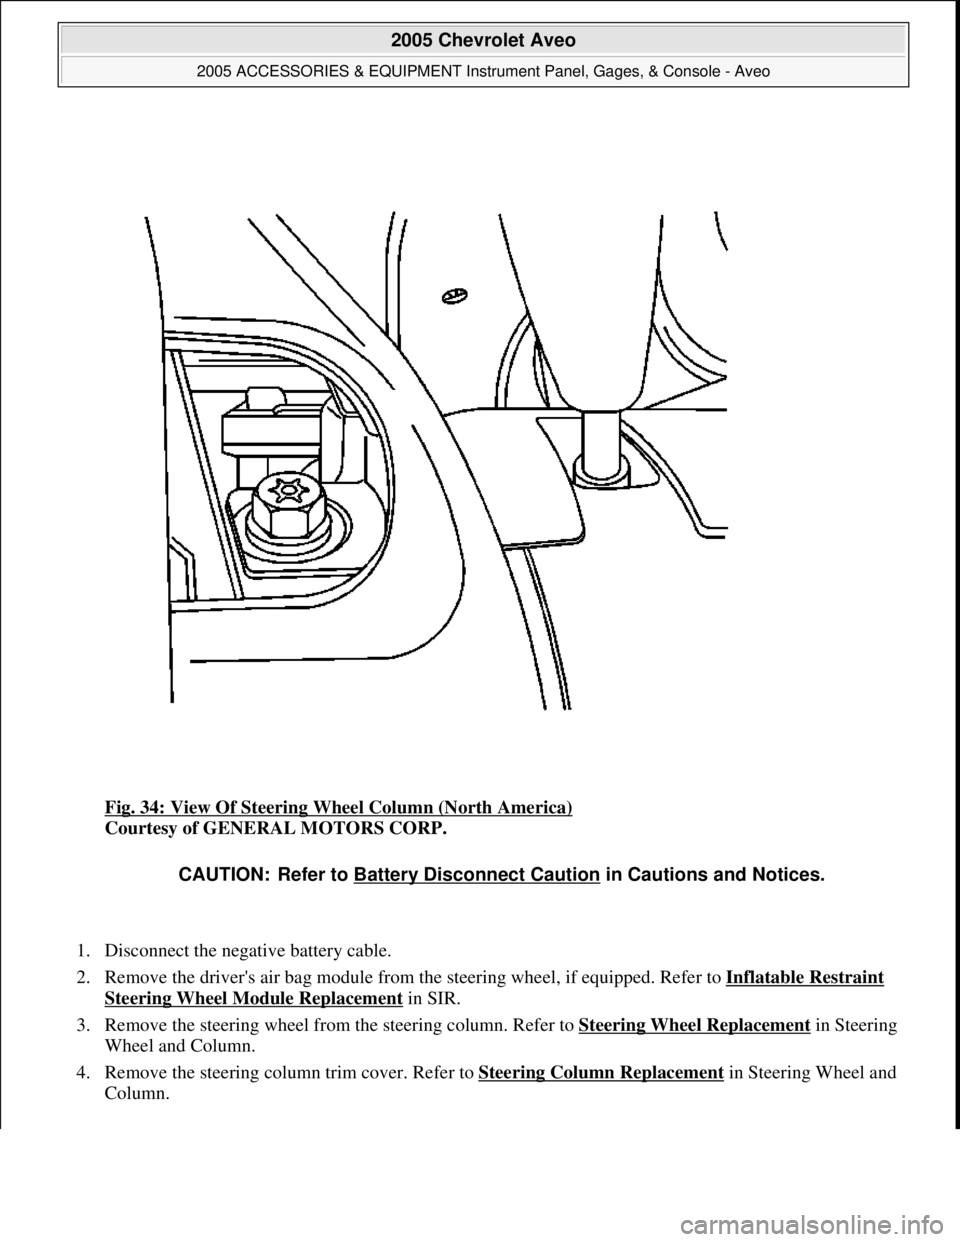
Fig. 34: View Of Steering Wheel Column (North America)
Courtesy of GENERAL MOTORS CORP.
1. Disconnect the negative battery cable.
2. Remove the driver's air bag module from the steering wheel, if equipped. Refer to Inflatable Restraint
Steering Wheel Module Replacement in SIR.
3. Remove the steering wheel from the steering column. Refer to Steering Wheel Replacement
in Steering
Wheel and Column.
4. Remove the steering column trim cover. Refer to Steering Column Replacement
in Steering Wheel and
Column.
CAUTION: Refer to Battery Disconnect Caution in Cautions and Notices.
2005 Chevrolet Aveo
2005 ACCESSORIES & EQUIPMENT Instrument Panel, Gages, & Console - Aveo
Microsoft
Friday, July 31, 2009 1:07:03 PMPage 62 © 2005 Mitchell Repair Information Company, LLC.
Page 4356 of 5127
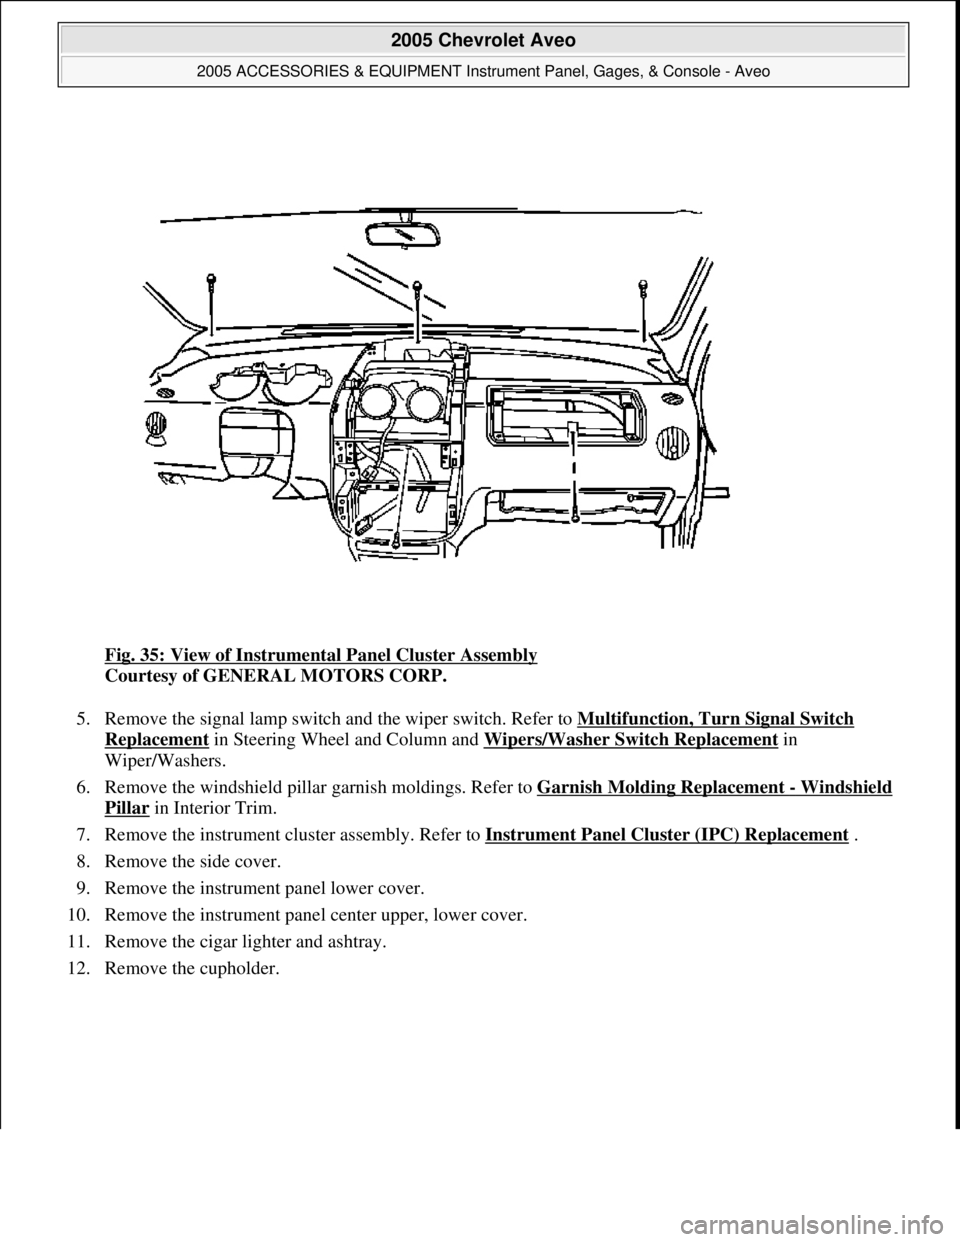
Fig. 35: View of Instrumental Panel Cluster Assembly
Courtesy of GENERAL MOTORS CORP.
5. Remove the signal lamp switch and the wiper switch. Refer to Multifunction, Turn Signal Switch
Replacement in Steering Wheel and Column and Wipers/Washer Switch Replacement in
Wiper/Washers.
6. Remove the windshield pillar garnish moldings. Refer to Garnish Molding Replacement
- Windshield
Pillar in Interior Trim.
7. Remove the instrument cluster assembly. Refer to Instrument Panel Cluster (IPC) Replacement
.
8. Remove the side cover.
9. Remove the instrument panel lower cover.
10. Remove the instrument panel center upper, lower cover.
11. Remove the cigar lighter and ashtray.
12. Remove the cupholder.
2005 Chevrolet Aveo
2005 ACCESSORIES & EQUIPMENT Instrument Panel, Gages, & Console - Aveo
Microsoft
Friday, July 31, 2009 1:07:03 PMPage 63 © 2005 Mitchell Repair Information Company, LLC.
Page 4362 of 5127
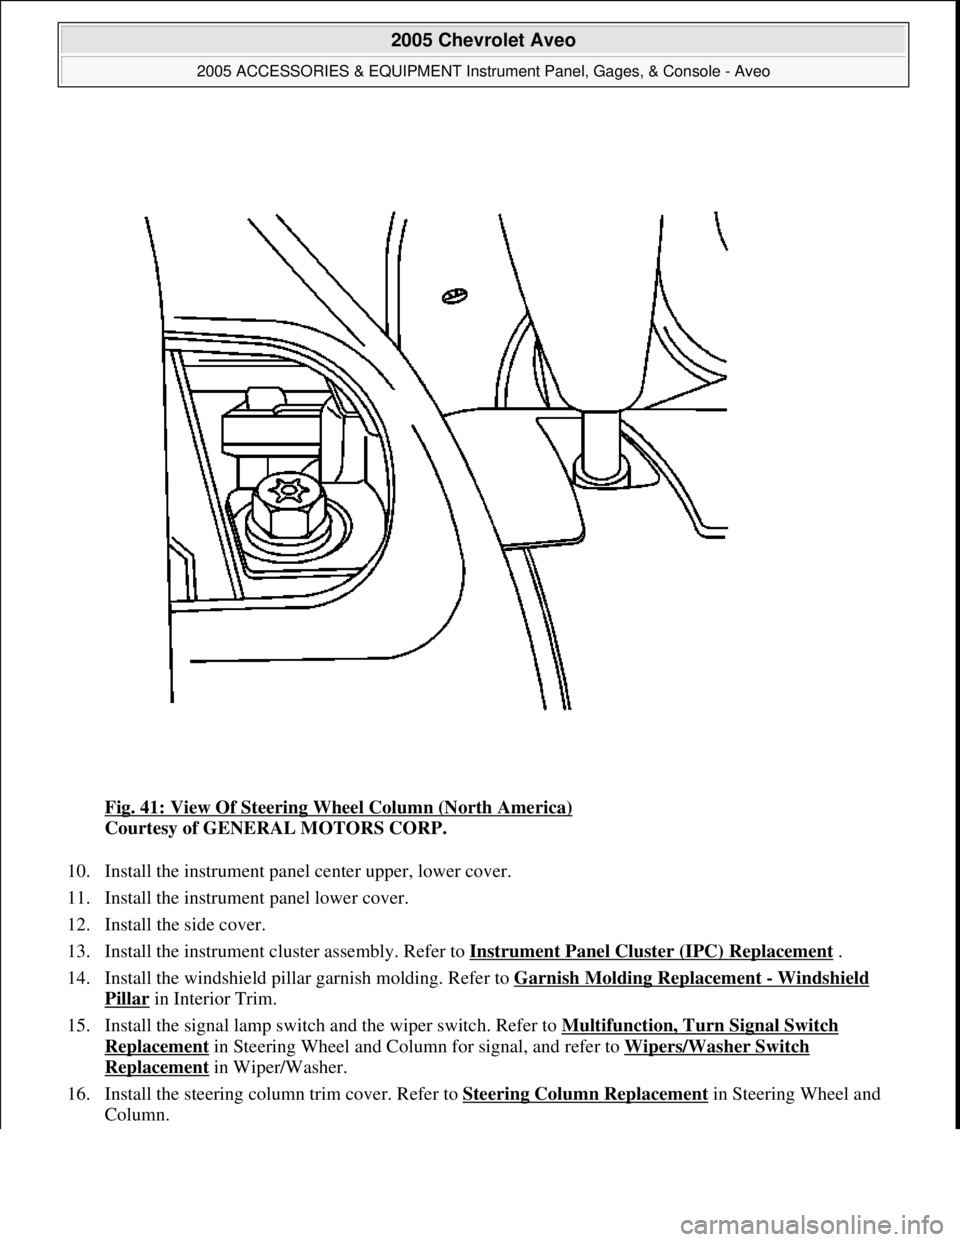
Fig. 41: View Of Steering Wheel Column (North America)
Courtesy of GENERAL MOTORS CORP.
10. Install the instrument panel center upper, lower cover.
11. Install the instrument panel lower cover.
12. Install the side cover.
13. Install the instrument cluster assembly. Refer to Instrument Panel Cluster (IPC) Replacement
.
14. Install the windshield pillar garnish molding. Refer to Garnish Molding Replacement
- Windshield
Pillar in Interior Trim.
15. Install the signal lamp switch and the wiper switch. Refer to Multifunction, Turn Signal Switch
Replacement in Steering Wheel and Column for signal, and refer to Wipers/Washer Switch
Replacement in Wiper/Washer.
16. Install the steering column trim cover. Refer to Steering Column Replacement
in Steering Wheel and
Column.
2005 Chevrolet Aveo
2005 ACCESSORIES & EQUIPMENT Instrument Panel, Gages, & Console - Aveo
Microsoft
Friday, July 31, 2009 1:07:03 PMPage 69 © 2005 Mitchell Repair Information Company, LLC.