hood release CHEVROLET AVEO 2008 1.G Owners Manual
[x] Cancel search | Manufacturer: CHEVROLET, Model Year: 2008, Model line: AVEO, Model: CHEVROLET AVEO 2008 1.GPages: 384, PDF Size: 6.67 MB
Page 119 of 384
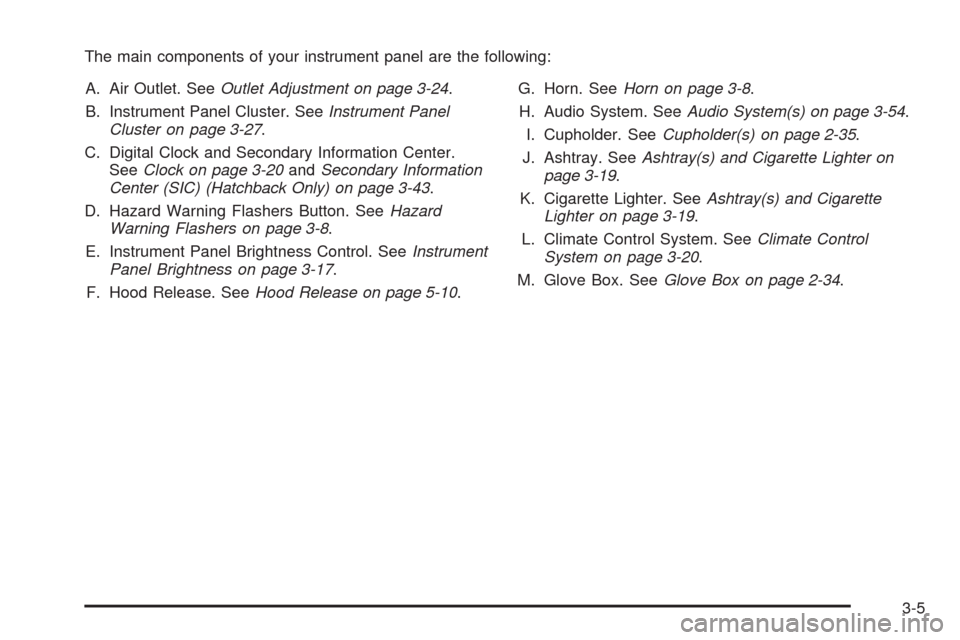
The main components of your instrument panel are the following:
A. Air Outlet. SeeOutlet Adjustment on page 3-24.
B. Instrument Panel Cluster. SeeInstrument Panel
Cluster on page 3-27.
C. Digital Clock and Secondary Information Center.
SeeClock on page 3-20andSecondary Information
Center (SIC) (Hatchback Only) on page 3-43.
D. Hazard Warning Flashers Button. SeeHazard
Warning Flashers on page 3-8.
E. Instrument Panel Brightness Control. SeeInstrument
Panel Brightness on page 3-17.
F. Hood Release. SeeHood Release on page 5-10.G. Horn. SeeHorn on page 3-8.
H. Audio System. SeeAudio System(s) on page 3-54.
I. Cupholder. SeeCupholder(s) on page 2-35.
J. Ashtray. SeeAshtray(s) and Cigarette Lighter on
page 3-19.
K. Cigarette Lighter. SeeAshtray(s) and Cigarette
Lighter on page 3-19.
L. Climate Control System. SeeClimate Control
System on page 3-20.
M. Glove Box. SeeGlove Box on page 2-34.
3-5
Page 121 of 384
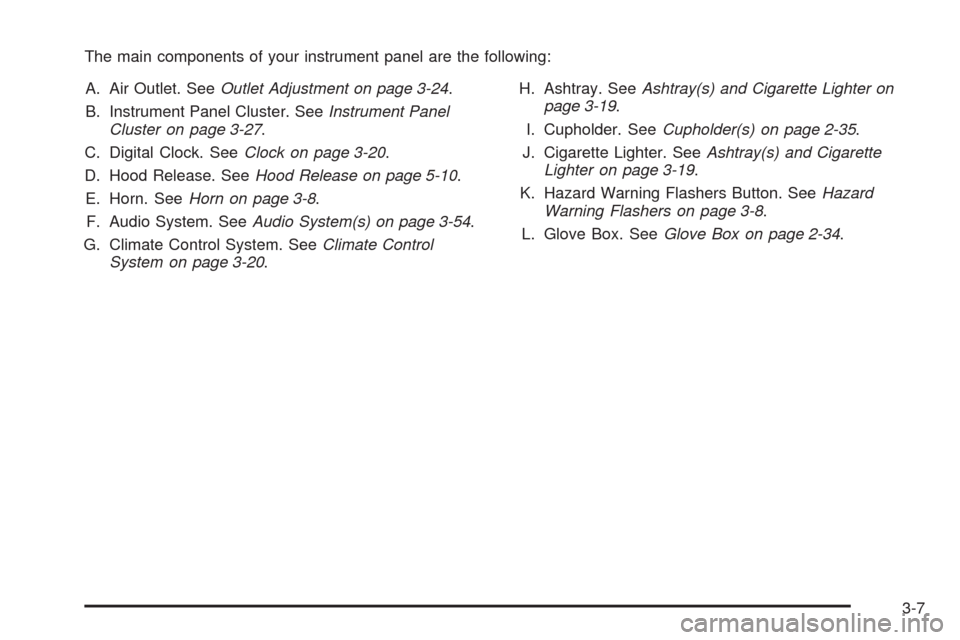
The main components of your instrument panel are the following:
A. Air Outlet. SeeOutlet Adjustment on page 3-24.
B. Instrument Panel Cluster. SeeInstrument Panel
Cluster on page 3-27.
C. Digital Clock. SeeClock on page 3-20.
D. Hood Release. SeeHood Release on page 5-10.
E. Horn. SeeHorn on page 3-8.
F. Audio System. SeeAudio System(s) on page 3-54.
G. Climate Control System. SeeClimate Control
System on page 3-20.H. Ashtray. SeeAshtray(s) and Cigarette Lighter on
page 3-19.
I. Cupholder. SeeCupholder(s) on page 2-35.
J. Cigarette Lighter. SeeAshtray(s) and Cigarette
Lighter on page 3-19.
K. Hazard Warning Flashers Button. SeeHazard
Warning Flashers on page 3-8.
L. Glove Box. SeeGlove Box on page 2-34.
3-7
Page 223 of 384
Service............................................................5-3
Accessories and Modifications..........................5-3
California Proposition 65 Warning.....................5-4
California Perchlorate Materials Requirements.....5-4
Doing Your Own Service Work.........................5-4
Adding Equipment to the Outside
of Your Vehicle...........................................5-5
Fuel................................................................5-5
Gasoline Octane............................................5-5
Gasoline Specifications....................................5-5
California Fuel...............................................5-6
Additives.......................................................5-6
Fuels in Foreign Countries...............................5-7
Filling the Tank..............................................5-7
Filling a Portable Fuel Container.......................5-9
Checking Things Under the Hood....................5-10
Hood Release..............................................5-10
Engine Compartment Overview.......................5-12
Engine Oil...................................................5-13
Engine Air Cleaner/Filter................................5-17
Automatic Transmission Fluid.........................5-19
Manual Transmission Fluid.............................5-21
Hydraulic Clutch...........................................5-21
Engine Coolant.............................................5-22
Coolant Surge Tank Pressure Cap..................5-25
Engine Overheating.......................................5-25
Cooling System............................................5-26Power Steering Fluid.....................................5-30
Windshield Washer Fluid................................5-31
Brakes........................................................5-32
Battery........................................................5-35
Jump Starting...............................................5-36
Headlamp Aiming...........................................5-40
Bulb Replacement..........................................5-41
Halogen Bulbs
..............................................5-41
Headlamps (Hatchback).................................5-41
Headlamps (Sedan)......................................5-42
Front Turn Signal and Parking Lamps
(Hatchback)..............................................5-43
Front Turn Signal and Parking Lamps (Sedan).....5-44
Turn Signal Lamps (Side)..............................5-45
Center High-Mounted Stoplamp (CHMSL)
(Sedan)...................................................5-46
Taillamps, Turn Signal, Stoplamps and
Back-up Lamps.........................................5-47
License Plate Lamp......................................5-48
Replacement Bulbs.......................................5-48
Windshield Wiper Blade Replacement..............5-49
Tires..............................................................5-50
Tire Sidewall Labeling...................................5-51
Tire Terminology and Definitions.....................5-54
Inflation - Tire Pressure.................................5-57
Tire Pressure Monitor System.........................5-58
Tire Pressure Monitor Operation.....................5-60
Section 5 Service and Appearance Care
5-1
Page 232 of 384
Checking Things Under
the Hood
{CAUTION:
An electric fan under the hood can start up
and injure you even when the engine is not
running. Keep hands, clothing, and tools away
from any underhood electric fan.
{CAUTION:
Things that burn can get on hot engine parts
and start a �re. These include liquids like fuel,
oil, coolant, brake �uid, windshield washer and
other �uids, and plastic or rubber. You or
others could be burned. Be careful not to drop
or spill things that will burn onto a hot engine.
Hood Release
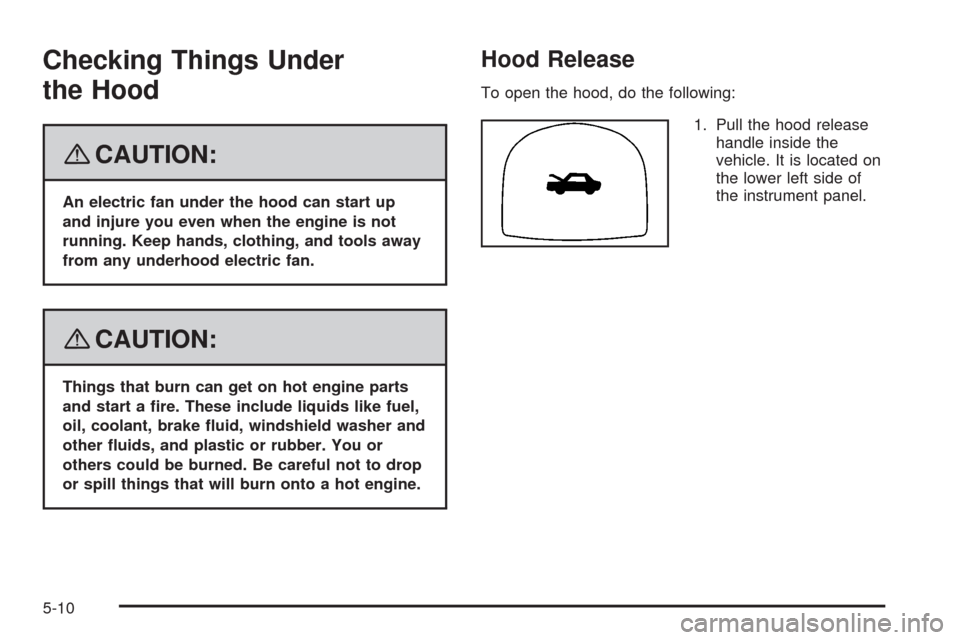
To open the hood, do the following:
1. Pull the hood release
handle inside the
vehicle. It is located on
the lower left side of
the instrument panel.
5-10
Page 233 of 384
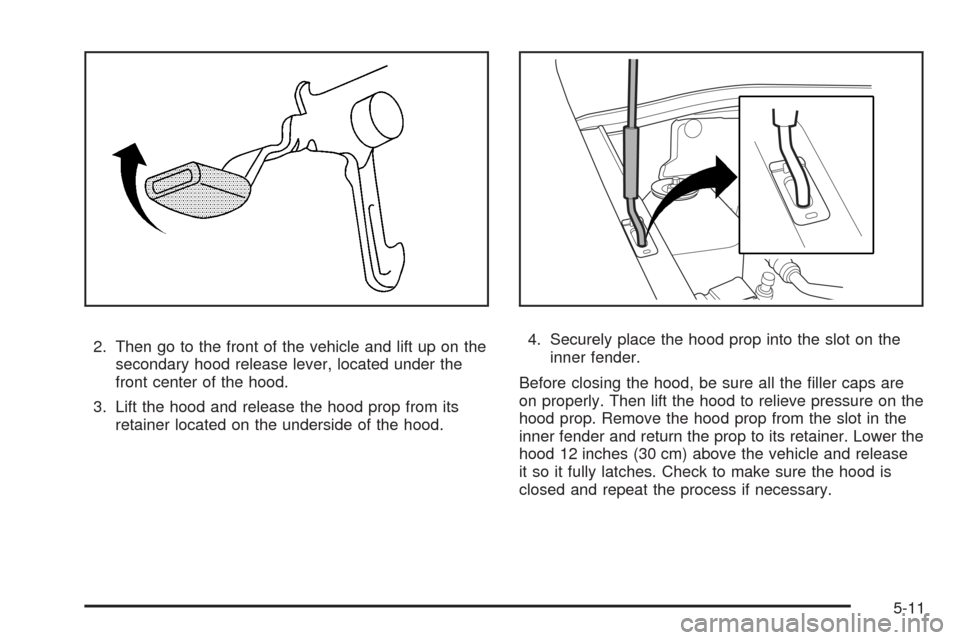
2. Then go to the front of the vehicle and lift up on the
secondary hood release lever, located under the
front center of the hood.
3. Lift the hood and release the hood prop from its
retainer located on the underside of the hood.4. Securely place the hood prop into the slot on the
inner fender.
Before closing the hood, be sure all the filler caps are
on properly. Then lift the hood to relieve pressure on the
hood prop. Remove the hood prop from the slot in the
inner fender and return the prop to its retainer. Lower the
hood 12 inches (30 cm) above the vehicle and release
it so it fully latches. Check to make sure the hood is
closed and repeat the process if necessary.
5-11
Page 263 of 384
Bulb Replacement
For the proper type of replacement bulbs, see
Replacement Bulbs on page 5-48.
For any bulb changing procedure not listed in this
section, contact your dealer/retailer.
Halogen Bulbs
{CAUTION:
Halogen bulbs have pressurized gas inside and
can burst if you drop or scratch the bulb. You or
others could be injured. Be sure to read and
follow the instructions on the bulb package.
Headlamps (Hatchback)
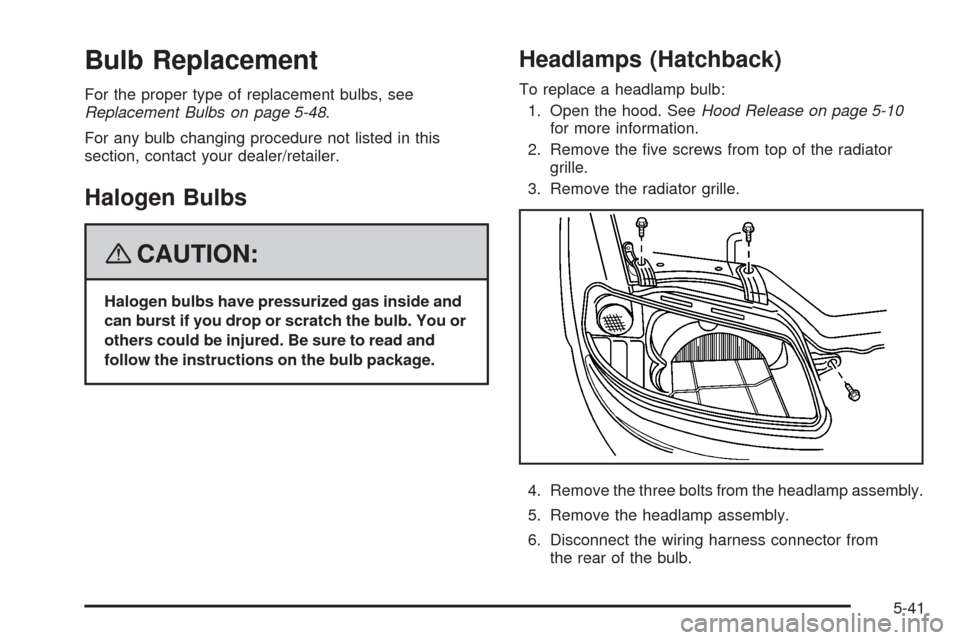
To replace a headlamp bulb:
1. Open the hood. SeeHood Release on page 5-10
for more information.
2. Remove the five screws from top of the radiator
grille.
3. Remove the radiator grille.
4. Remove the three bolts from the headlamp assembly.
5. Remove the headlamp assembly.
6. Disconnect the wiring harness connector from
the rear of the bulb.
5-41
Page 264 of 384
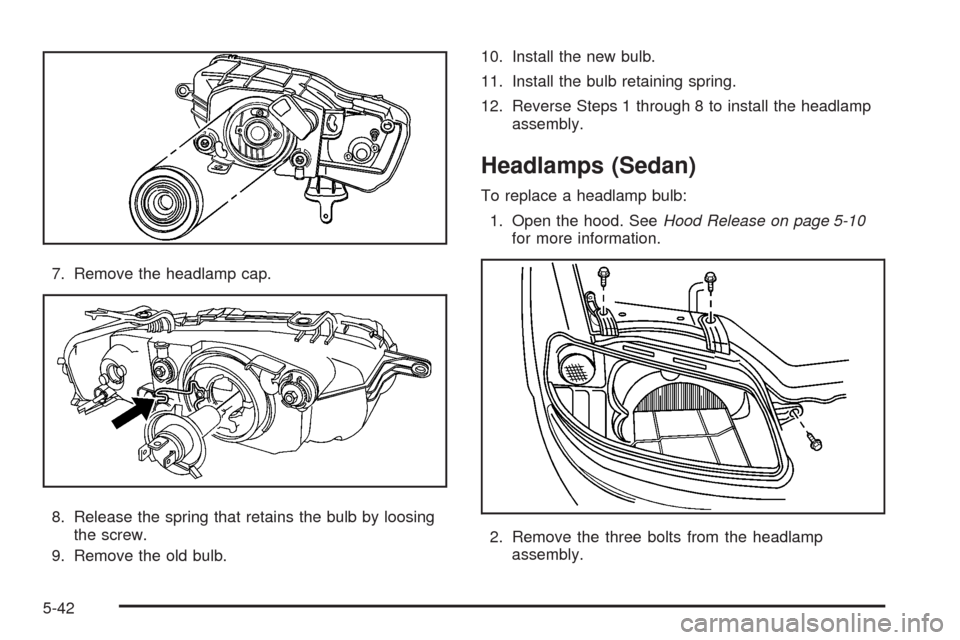
7. Remove the headlamp cap.
8. Release the spring that retains the bulb by loosing
the screw.
9. Remove the old bulb.10. Install the new bulb.
11. Install the bulb retaining spring.
12. Reverse Steps 1 through 8 to install the headlamp
assembly.
Headlamps (Sedan)
To replace a headlamp bulb:
1. Open the hood. SeeHood Release on page 5-10
for more information.
2. Remove the three bolts from the headlamp
assembly.
5-42
Page 266 of 384
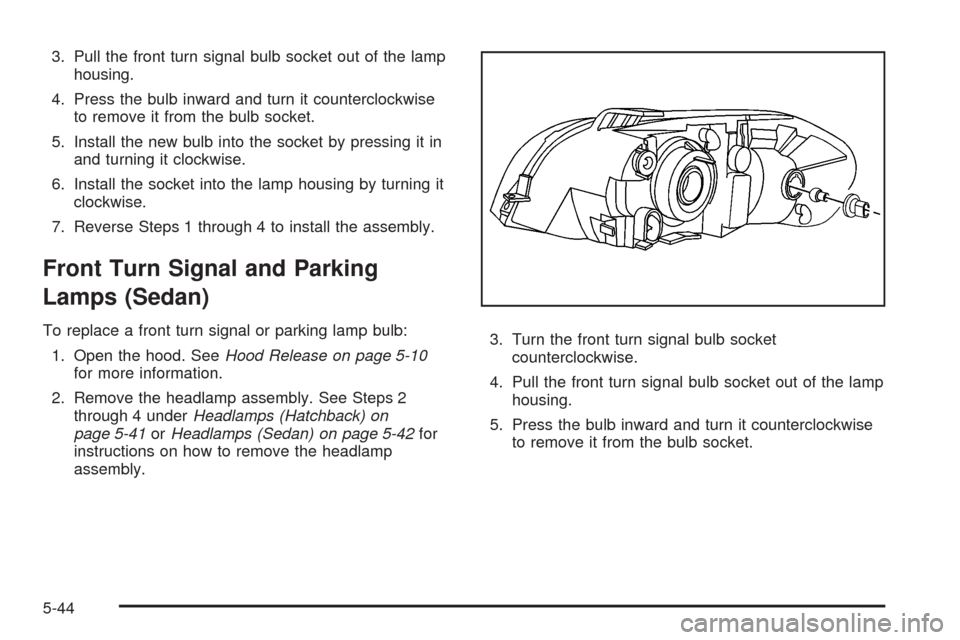
3. Pull the front turn signal bulb socket out of the lamp
housing.
4. Press the bulb inward and turn it counterclockwise
to remove it from the bulb socket.
5. Install the new bulb into the socket by pressing it in
and turning it clockwise.
6. Install the socket into the lamp housing by turning it
clockwise.
7. Reverse Steps 1 through 4 to install the assembly.
Front Turn Signal and Parking
Lamps (Sedan)
To replace a front turn signal or parking lamp bulb:
1. Open the hood. SeeHood Release on page 5-10
for more information.
2. Remove the headlamp assembly. See Steps 2
through 4 underHeadlamps (Hatchback) on
page 5-41orHeadlamps (Sedan) on page 5-42for
instructions on how to remove the headlamp
assembly.3. Turn the front turn signal bulb socket
counterclockwise.
4. Pull the front turn signal bulb socket out of the lamp
housing.
5. Press the bulb inward and turn it counterclockwise
to remove it from the bulb socket.
5-44
Page 267 of 384
6. Install the new bulb into the socket by pressing it in
and turning it clockwise.
7. Install the socket into the lamp housing by turning it
clockwise.
8. Reverse Steps 1 through 2 underHeadlamps
(Hatchback) on page 5-41orHeadlamps (Sedan)
on page 5-42to install the assembly.
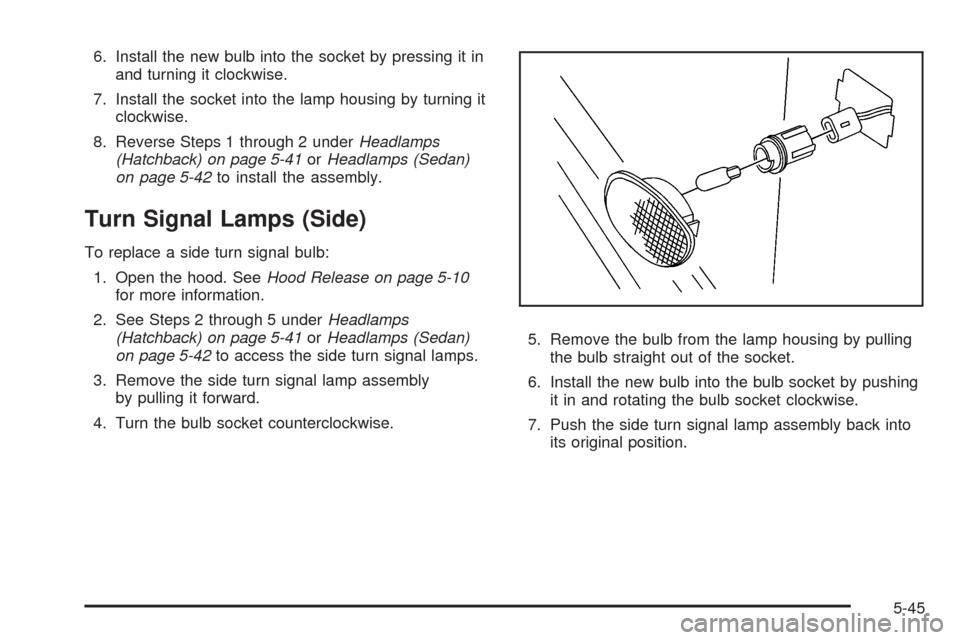
Turn Signal Lamps (Side)
To replace a side turn signal bulb:
1. Open the hood. SeeHood Release on page 5-10
for more information.
2. See Steps 2 through 5 underHeadlamps
(Hatchback) on page 5-41orHeadlamps (Sedan)
on page 5-42to access the side turn signal lamps.
3. Remove the side turn signal lamp assembly
by pulling it forward.
4. Turn the bulb socket counterclockwise.5. Remove the bulb from the lamp housing by pulling
the bulb straight out of the socket.
6. Install the new bulb into the bulb socket by pushing
it in and rotating the bulb socket clockwise.
7. Push the side turn signal lamp assembly back into
its original position.
5-45
Page 343 of 384
Wiper Blade Check
Inspect wiper blades for wear, cracking, or
contamination. Clean the windshield and wiper blades,
if contaminated. Replace wiper blades that are worn
or damaged. SeeWindshield Wiper Blade Replacement
on page 5-49andWindshield and Wiper Blades on
page 5-84for more information.
Weatherstrip Lubrication
Silicone grease on weatherstrips will make them last
longer, seal better, and not stick or squeak. Apply
silicone grease with a clean cloth. During very cold,
damp weather more frequent application may be
required. SeePart D: Recommended Fluids and
Lubricants on page 6-23.
Manual Transmission Check
It is not necessary to check the transmission fluid level.
Check for leaks. A fluid leak is the only reason for fluid
loss. Have the system inspected and repaired if needed.
Automatic Transmission Check
Check the transmission fluid level; add if needed.
A fluid loss may indicate a problem. Check the
system and repair if needed.
Hydraulic Clutch System Check
Check the fluid level in the brake/clutch reservoir.
SeeHydraulic Clutch on page 5-21. A fluid loss in
this system could indicate a problem. Have the
system inspected and repaired at once.
At Least Once a Year
Key Lock Cylinders Service
Lubricate the key lock cylinders with the lubricant
specified in Part D.
Body Lubrication Service
Lubricate all hood latch assemblies, secondary latch,
pivots, spring anchor, release pawl, hood and body
door hinges, rear compartment, and any folding
seat hardware. Part D tells you what to use.
More frequent lubrication may be required when
exposed to a corrosive environment.
6-19