horn CHEVROLET BLAZER 2020 Owner's Manual
[x] Cancel search | Manufacturer: CHEVROLET, Model Year: 2020, Model line: BLAZER, Model: CHEVROLET BLAZER 2020Pages: 390, PDF Size: 6.5 MB
Page 7 of 390
Chevrolet Blazer Owner Manual (GMNA-Localizing-U.S./Canada/Mexico-
13557845) - 2020 - CRC - 3/24/20
6 Introduction
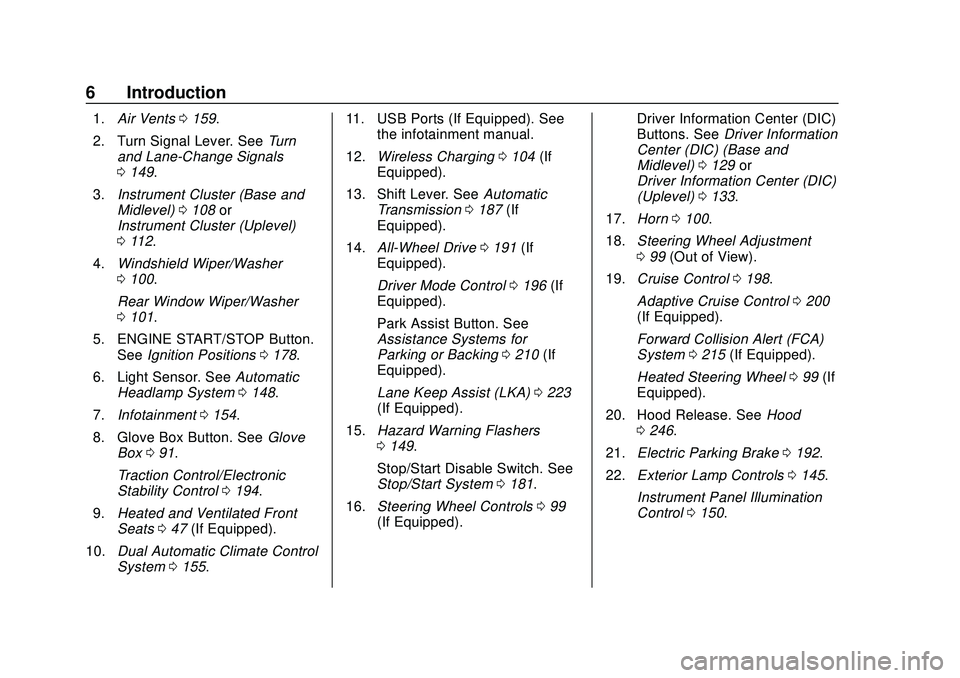
1.Air Vents 0159.
2. Turn Signal Lever. See Turn
and Lane-Change Signals
0 149.
3. Instrument Cluster (Base and
Midlevel) 0108 or
Instrument Cluster (Uplevel)
0 112.
4. Windshield Wiper/Washer
0100.
Rear Window Wiper/Washer
0 101.
5. ENGINE START/STOP Button. See Ignition Positions 0178.
6. Light Sensor. See Automatic
Headlamp System 0148.
7. Infotainment 0154.
8. Glove Box Button. See Glove
Box 091.
Traction Control/Electronic
Stability Control 0194.
9. Heated and Ventilated Front
Seats 047 (If Equipped).
10. Dual Automatic Climate Control
System 0155. 11. USB Ports (If Equipped). See
the infotainment manual.
12. Wireless Charging 0104 (If
Equipped).
13. Shift Lever. See Automatic
Transmission 0187 (If
Equipped).
14. All-Wheel Drive 0191 (If
Equipped).
Driver Mode Control 0196 (If
Equipped).
Park Assist Button. See
Assistance Systems for
Parking or Backing 0210 (If
Equipped).
Lane Keep Assist (LKA) 0223
(If Equipped).
15. Hazard Warning Flashers
0149.
Stop/Start Disable Switch. See
Stop/Start System 0181.
16. Steering Wheel Controls 099
(If Equipped). Driver Information Center (DIC)
Buttons. See
Driver Information
Center (DIC) (Base and
Midlevel) 0129 or
Driver Information Center (DIC)
(Uplevel) 0133.
17. Horn 0100.
18. Steering Wheel Adjustment
099 (Out of View).
19. Cruise Control 0198.
Adaptive Cruise Control 0200
(If Equipped).
Forward Collision Alert (FCA)
System 0215 (If Equipped).
Heated Steering Wheel 099 (If
Equipped).
20. Hood Release. See Hood
0 246.
21. Electric Parking Brake 0192.
22. Exterior Lamp Controls 0145.
Instrument Panel Illumination
Control 0150.
Page 10 of 390
Chevrolet Blazer Owner Manual (GMNA-Localizing-U.S./Canada/Mexico-
13557845) - 2020 - CRC - 3/24/20
Keys, Doors, and Windows 9
Other conditions can affect the
performance of the transmitter. See
Remote Keyless Entry (RKE)
System08.
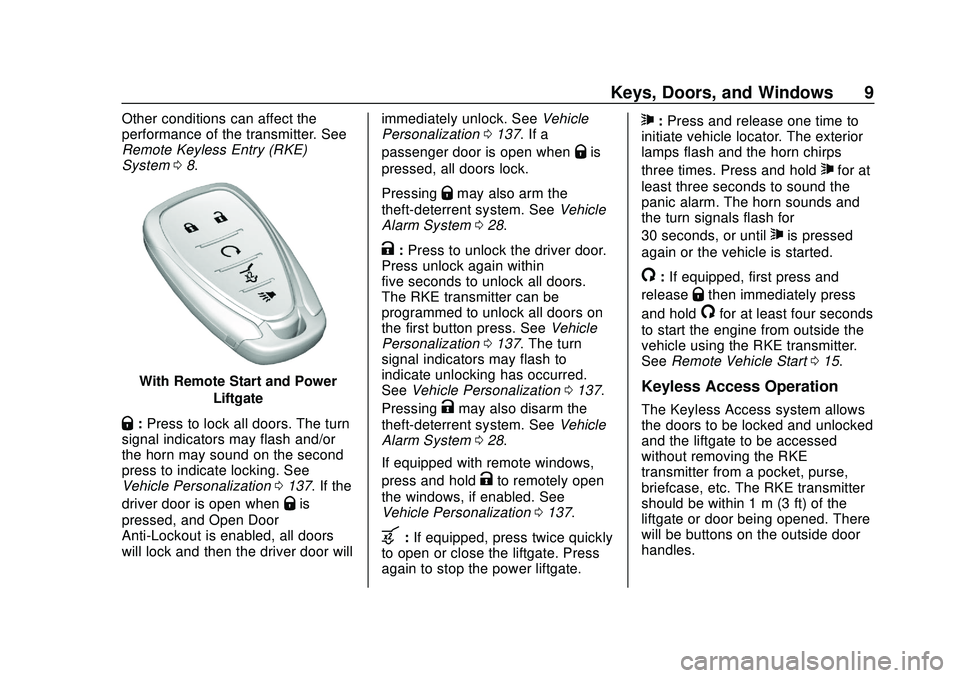
With Remote Start and Power
Liftgate
Q:Press to lock all doors. The turn
signal indicators may flash and/or
the horn may sound on the second
press to indicate locking. See
Vehicle Personalization 0137. If the
driver door is open when
Qis
pressed, and Open Door
Anti-Lockout is enabled, all doors
will lock and then the driver door will immediately unlock. See
Vehicle
Personalization 0137. If a
passenger door is open when
Qis
pressed, all doors lock.
Pressing
Qmay also arm the
theft-deterrent system. See Vehicle
Alarm System 028.
K:Press to unlock the driver door.
Press unlock again within
five seconds to unlock all doors.
The RKE transmitter can be
programmed to unlock all doors on
the first button press. See Vehicle
Personalization 0137. The turn
signal indicators may flash to
indicate unlocking has occurred.
See Vehicle Personalization 0137.
Pressing
Kmay also disarm the
theft-deterrent system. See Vehicle
Alarm System 028.
If equipped with remote windows,
press and hold
Kto remotely open
the windows, if enabled. See
Vehicle Personalization 0137.
b:If equipped, press twice quickly
to open or close the liftgate. Press
again to stop the power liftgate.
7: Press and release one time to
initiate vehicle locator. The exterior
lamps flash and the horn chirps
three times. Press and hold
7for at
least three seconds to sound the
panic alarm. The horn sounds and
the turn signals flash for
30 seconds, or until
7is pressed
again or the vehicle is started.
/: If equipped, first press and
release
Qthen immediately press
and hold
/for at least four seconds
to start the engine from outside the
vehicle using the RKE transmitter.
See Remote Vehicle Start 015.
Keyless Access Operation
The Keyless Access system allows
the doors to be locked and unlocked
and the liftgate to be accessed
without removing the RKE
transmitter from a pocket, purse,
briefcase, etc. The RKE transmitter
should be within 1 m (3 ft) of the
liftgate or door being opened. There
will be buttons on the outside door
handles.
Page 12 of 390
Chevrolet Blazer Owner Manual (GMNA-Localizing-U.S./Canada/Mexico-
13557845) - 2020 - CRC - 3/24/20
Keys, Doors, and Windows 11
any exterior handle to unlock the
doors or open the liftgate will cause
the turn signal lamps to flash four
times quickly, indicating access is
disabled. If disabled, disarm the
alarm system before starting the
vehicle.
Disabling Keyless Unlocking may
also be configured underVehicle
Personalization 0137.
Enabling Keyless Unlocking:
With the vehicle off, press and hold
QandKon the RKE transmitter at
the same time for approximately
three seconds. The turn signal
lamps will flash twice quickly to
indicate access is enabled.
Enabling Keyless Unlocking may
also be configured under Vehicle
Personalization 0137.
Passive Locking
This vehicle will lock several
seconds after all doors are closed if
the vehicle is off and at least one
RKE transmitter has been removed
or none remain in the interior. If other electronic devices interfere
with the RKE transmitter signal, the
vehicle may not detect the RKE
transmitter inside the vehicle.
If passive locking is enabled, the
doors may lock with the RKE
transmitter inside the vehicle. Do
not leave the RKE transmitter in an
unattended vehicle.
To customize the doors to
automatically lock when exiting the
vehicle, see
“Remote Lock, Unlock,
Start” under Vehicle Personalization
0 137.
Temporary Disable of Passive
Locking
Temporarily disable passive locking
by pressing and holding
Kon the
interior door switch with a door open
for at least four seconds, or until
three chimes are heard. Passive
locking will then remain disabled
until
Qon the interior door is
pressed, or until the vehicle is
turned on. Remote Left in Vehicle Alert
When the vehicle is turned off and
an RKE transmitter is left in the
vehicle, the horn will chirp three
times after all doors are closed. To
turn on or off, see
Vehicle
Personalization 0137.
Remote No Longer in Vehicle Alert
If the vehicle is on with a door open,
and then all doors are closed, the
vehicle will check for RKE
transmitters inside. If an RKE
transmitter is not detected, the
Driver Information Center (DIC) will
display NO REMOTE DETECTED
and the horn will chirp three times.
This occurs only once each time the
vehicle is driven. See Vehicle
Personalization 0137.
Keyless Liftgate Opening
Press the touch pad in the liftgate
handle to open the liftgate if the
RKE transmitter is within 1 m (3 ft).
Key Access
To access a vehicle with a weak
transmitter battery, see Door Locks
0 17.
Page 21 of 390
Chevrolet Blazer Owner Manual (GMNA-Localizing-U.S./Canada/Mexico-
13557845) - 2020 - CRC - 3/24/20
20 Keys, Doors, and Windows
removed from the brake or the
vehicle speed becomes faster than
13 km/h (8 mph).
To unlock the doors:
.Press
Kon a door.
. Shift the transmission into
P (Park).
Automatic door locking cannot be
disabled. Automatic door unlocking
can be programmed. See Vehicle
Personalization 0137.
Lockout Protection
If the ignition is on or in ACC/
ACCESSORY and the power door
lock switch is pressed with the
driver door open, all the doors will
lock and only the driver door will
unlock.
If the vehicle is off and locking is
requested while a door is open,
when all doors are closed the
vehicle will check for RKE
transmitters inside. If an RKE
transmitter is detected and the
number of RKE transmitters inside has not reduced, the driver door will
unlock and the horn will chirp three
times.
Lockout Protection can be manually
overridden by pressing and holding
Qon the power door lock switch.
Open Door Anti-Lockout
If Open Door Anti-Lockout is turned
on and the vehicle is off, the driver
door is open, and locking is
requested, all the doors will lock and
the driver door will unlock. The
Open Door Anti-Lockout feature can
be turned on or off. See Vehicle
Personalization 0137.
Safety Locks
The rear door safety locks prevent
passengers from opening the rear
doors from inside the vehicle.
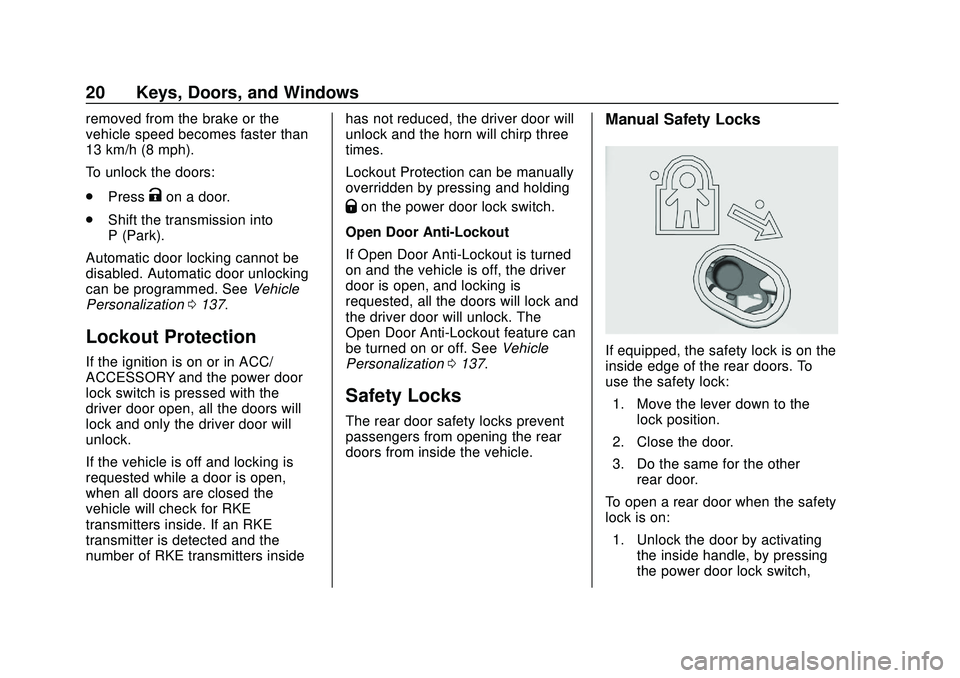
Manual Safety Locks
If equipped, the safety lock is on the
inside edge of the rear doors. To
use the safety lock:
1. Move the lever down to the lock position.
2. Close the door.
3. Do the same for the other rear door.
To open a rear door when the safety
lock is on: 1. Unlock the door by activating the inside handle, by pressing
the power door lock switch,
Page 25 of 390
Chevrolet Blazer Owner Manual (GMNA-Localizing-U.S./Canada/Mexico-
13557845) - 2020 - CRC - 3/24/20
24 Keys, Doors, and Windows
Obstacle Detection Features
If the liftgate encounters an obstacle
during a power open or close cycle,
a warning chime may sound and the
liftgate will automatically reverse
direction and move a short distance
away from the obstacle. After
removing the obstruction, the power
liftgate operation can be used again.
If the liftgate encounters multiple
obstacles on the same power cycle,
the power function will deactivate.
After removing the obstructions,
manually close the liftgate which will
allow normal power operation
functions to resume.
If the vehicle is locked while the
liftgate is closing, and an obstacle is
encountered that prevents the
liftgate from completely closing, the
horn will sound as an alert that the
liftgate did not close.
Pinch sensors are on the side
edges of the liftgate. If an object is
caught between the liftgate and the
vehicle and presses against this
sensor, the liftgate will reversedirection and open fully. The liftgate
will remain open until it is activated
again or closed manually.
Setting the 3/4 Mode
To change the position the liftgate
stops at when opening:
1. Select MAX or 3/4 mode and power open the liftgate.
2. Stop the liftgate movement at the desired height by pressing
any liftgate switch. Manually
adjust the liftgate position if
needed.
3. Press and hold
lat the
bottom of the liftgate until the
turn signals flash and a beep
sounds. This indicates the
setting has been recorded.
The liftgate cannot be set below a
minimum programmable height.
If there is no light flash or sound,
then the height adjustment may be
too low.
Manual Operation
Select OFF to manually operate the
liftgate. See “Manual Liftgate” at the
beginning of this section.
Caution
Attempting to move the liftgate
too quickly and with excessive
force may result in damage to the
vehicle.
Operate the liftgate manually with a
smooth motion and moderate
speed. The system includes a
feature that limits the manual
closing speed to protect the
components.
Hands-Free Operation
If equipped, the liftgate may be
operated with a kicking motion
under the left side of the rear
bumper at the location of the
projected logo. See "Projected
Logo" later in this section. The RKE
transmitter must be within 1 m (3 ft).
Page 29 of 390
Chevrolet Blazer Owner Manual (GMNA-Localizing-U.S./Canada/Mexico-
13557845) - 2020 - CRC - 3/24/20
28 Keys, Doors, and Windows
Vehicle Security
This vehicle has theft-deterrent
features; however, they do not make
the vehicle impossible to steal.
Vehicle Alarm System
This vehicle has an anti-theft alarm
system.
Arming the Alarm System
1. Close the liftgate and the hood.Turn off the vehicle.
2. Lock the vehicle in one of three ways:
.Use the RKE transmitter.
. Use the Keyless Access
system.
. With a door open, press the
inside
Q.
3. After 30 seconds the alarm system will arm. Pressing
Qon
the RKE transmitter a second
time will bypass the 30-second
delay and immediately arm the
alarm system. The vehicle alarm system will not
arm if the doors are locked with
the key.
If the driver door is opened without
first unlocking with the RKE
transmitter, the horn will chirp and
the lights will flash to indicate
pre-alarm. If the vehicle is not
started, or the door is not unlocked
by pressing
Kon the RKE
transmitter during the 10-second
pre-alarm, the alarm will be
activated.
The alarm will also be activated if a
passenger door, the liftgate, or the
hood is opened without first
disarming the system. When the
alarm is activated, the turn signals
flash and the horn sounds for about
30 seconds. The alarm system will
then re-arm to monitor for the next
unauthorized event.
Disarming the Alarm System
To disarm the alarm system or turn
off the alarm if it has been activated:
. Press
Kon the RKE transmitter. .
Unlock the vehicle using the
Keyless Access system.
. Start the vehicle.
To avoid setting off the alarm by
accident:
. Lock the vehicle after all
occupants have left the vehicle
and all doors are closed.
. Always unlock a door with the
RKE transmitter or use the
Keyless Access system.
Unlocking the driver door with the
key will not disarm the system or
turn off the alarm.
How to Detect a Tamper
Condition
IfKis pressed and the horn chirps
and the lights flash three times, the
alarm was activated while the alarm
system was armed.
If the alarm system has been
activated, a message will appear on
the Driver Information Center (DIC).
Page 99 of 390
Chevrolet Blazer Owner Manual (GMNA-Localizing-U.S./Canada/Mexico-
13557845) - 2020 - CRC - 3/24/20
98 Instruments and Controls
Instruments and
Controls
Controls
Steering Wheel Adjustment . . . . 99
Steering Wheel Controls . . . . . . . 99
Heated Steering Wheel . . . . . . . . 99
Horn . . . . . . . . . . . . . . . . . . . . . . . . . . 100
Windshield Wiper/Washer . . . . 100
Rear Window Wiper/Washer . . . . . . . . . . . . . . . . . . . . . 101
Compass . . . . . . . . . . . . . . . . . . . . . 102
Clock . . . . . . . . . . . . . . . . . . . . . . . . . 102
Power Outlets . . . . . . . . . . . . . . . . 102
Wireless Charging . . . . . . . . . . . . 104
Warning Lights, Gauges, and
Indicators
Warning Lights, Gauges, and Indicators . . . . . . . . . . . . . . . . . . . 107
Instrument Cluster (Base and
Midlevel) . . . . . . . . . . . . . . . . . . . . 108
Instrument Cluster (Uplevel) . . . . . . . . . . . . . . . . . . . . 112
Speedometer . . . . . . . . . . . . . . . . . 114
Odometer . . . . . . . . . . . . . . . . . . . . . 114
Trip Odometer . . . . . . . . . . . . . . . . 114
Tachometer . . . . . . . . . . . . . . . . . . . 114 Fuel Gauge . . . . . . . . . . . . . . . . . . . 115
Engine Oil Temperature
Gauge . . . . . . . . . . . . . . . . . . . . . . 116
Engine Coolant Temperature Gauge . . . . . . . . . . . . . . . . . . . . . . 116
Voltmeter Gauge . . . . . . . . . . . . . . 117
Seat Belt Reminders . . . . . . . . . . 118
Airbag Readiness Light . . . . . . . 119
Passenger Airbag Status Indicator . . . . . . . . . . . . . . . . . . . . . 119
Charging System Light . . . . . . . 120
Malfunction Indicator Lamp (Check Engine Light) . . . . . . . . 120
Brake System Warning Light . . . . . . . . . . . . . . . . . . . . . . . . 122
Electric Parking Brake Light . . . . . . . . . . . . . . . . . . . . . . . . 123
Service Electric Parking Brake Light . . . . . . . . . . . . . . . . . . . . . . . . 123
Antilock Brake System (ABS) Warning Light . . . . . . . . . . . . . . . 123
Tow/Haul Mode Light . . . . . . . . . 124
Lane Keep Assist (LKA) Light . . . . . . . . . . . . . . . . . . . . . . . . 124
Vehicle Ahead Indicator . . . . . . 124
Pedestrian Ahead Indicator . . . 125
Traction Off Light . . . . . . . . . . . . . 125
StabiliTrak OFF Light . . . . . . . . . 125
Traction Control System (TCS)/ StabiliTrak Light . . . . . . . . . . . . . 126 Engine Coolant Temperature
Warning Light . . . . . . . . . . . . . . . 126
Tire Pressure Light . . . . . . . . . . . 126
Engine Oil Pressure Light . . . . 127
Low Fuel Warning Light . . . . . . 127
Security Light . . . . . . . . . . . . . . . . . 128
High-Beam On Light . . . . . . . . . . 128
Lamps On Reminder . . . . . . . . . 128
Cruise Control Light . . . . . . . . . . 128
Door Ajar Light . . . . . . . . . . . . . . . 129
Information Displays
Driver Information Center (DIC) (Base and Midlevel) . . . . . . . . . 129
Driver Information Center (DIC) (Uplevel) . . . . . . . . . . . . . . . . . . . . 133
Vehicle Messages
Vehicle Messages . . . . . . . . . . . . 136
Engine Power Messages . . . . . 136
Vehicle Speed Messages . . . . . 136
Vehicle Personalization
Vehicle Personalization . . . . . . . 137
Universal Remote System
Universal Remote System . . . . 141
Universal Remote SystemProgramming . . . . . . . . . . . . . . . 141
Universal Remote System Operation . . . . . . . . . . . . . . . . . . . 144
Page 101 of 390
Chevrolet Blazer Owner Manual (GMNA-Localizing-U.S./Canada/Mexico-
13557845) - 2020 - CRC - 3/24/20
100 Instruments and Controls
If equipped with a remote start
heated steering wheel, the heated
steering wheel may turn on
automatically in remote start along
with the heated seats when it is cold
outside. The heated steering wheel
indicator light may not come on.
SeeHeated and Ventilated Front
Seats 047 and
Vehicle Personalization 0137.
Horn
Pressaon the steering wheel pad
to sound the horn.
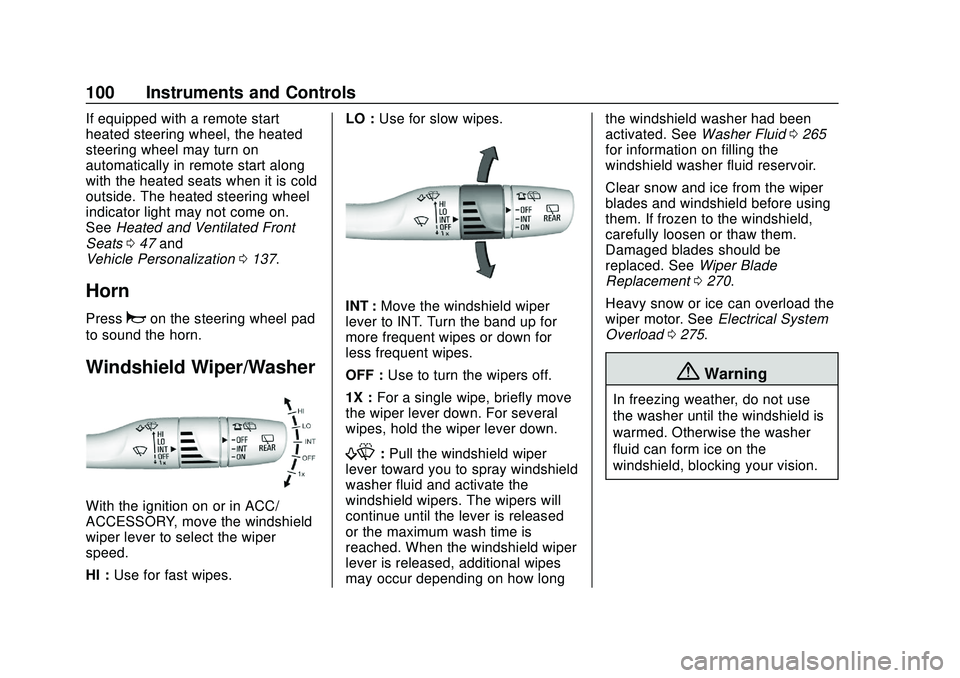
Windshield Wiper/Washer
With the ignition on or in ACC/
ACCESSORY, move the windshield
wiper lever to select the wiper
speed.
HI : Use for fast wipes. LO :
Use for slow wipes.
INT : Move the windshield wiper
lever to INT. Turn the band up for
more frequent wipes or down for
less frequent wipes.
OFF : Use to turn the wipers off.
1X : For a single wipe, briefly move
the wiper lever down. For several
wipes, hold the wiper lever down.
f: Pull the windshield wiper
lever toward you to spray windshield
washer fluid and activate the
windshield wipers. The wipers will
continue until the lever is released
or the maximum wash time is
reached. When the windshield wiper
lever is released, additional wipes
may occur depending on how long the windshield washer had been
activated. See
Washer Fluid0265
for information on filling the
windshield washer fluid reservoir.
Clear snow and ice from the wiper
blades and windshield before using
them. If frozen to the windshield,
carefully loosen or thaw them.
Damaged blades should be
replaced. See Wiper Blade
Replacement 0270.
Heavy snow or ice can overload the
wiper motor. See Electrical System
Overload 0275.
{Warning
In freezing weather, do not use
the washer until the windshield is
warmed. Otherwise the washer
fluid can form ice on the
windshield, blocking your vision.
Page 141 of 390
Chevrolet Blazer Owner Manual (GMNA-Localizing-U.S./Canada/Mexico-
13557845) - 2020 - CRC - 3/24/20
140 Instruments and Controls
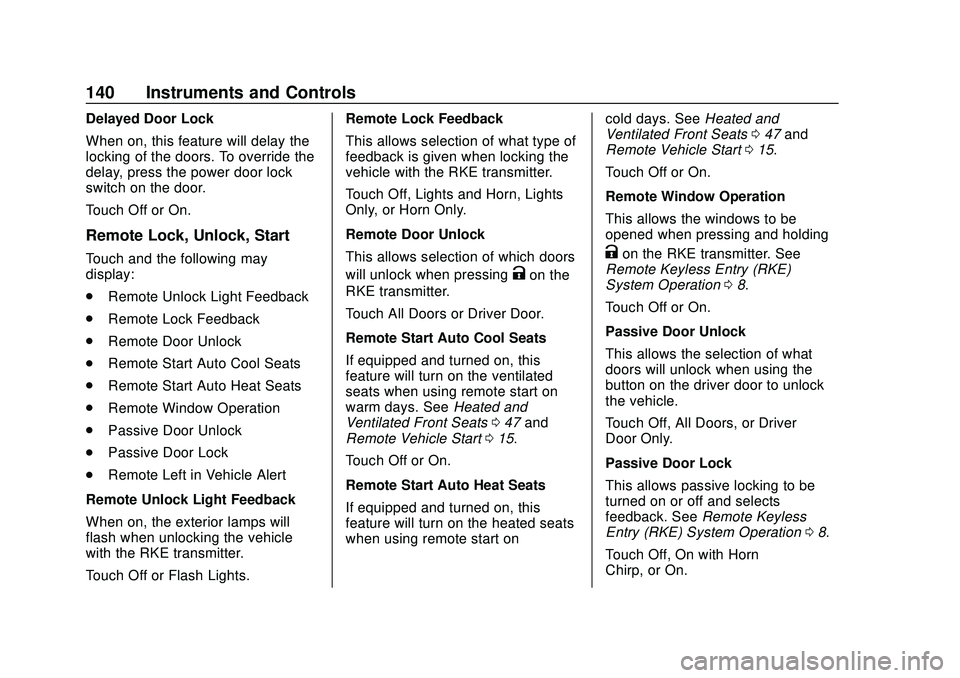
Delayed Door Lock
When on, this feature will delay the
locking of the doors. To override the
delay, press the power door lock
switch on the door.
Touch Off or On.
Remote Lock, Unlock, Start
Touch and the following may
display:
.Remote Unlock Light Feedback
. Remote Lock Feedback
. Remote Door Unlock
. Remote Start Auto Cool Seats
. Remote Start Auto Heat Seats
. Remote Window Operation
. Passive Door Unlock
. Passive Door Lock
. Remote Left in Vehicle Alert
Remote Unlock Light Feedback
When on, the exterior lamps will
flash when unlocking the vehicle
with the RKE transmitter.
Touch Off or Flash Lights. Remote Lock Feedback
This allows selection of what type of
feedback is given when locking the
vehicle with the RKE transmitter.
Touch Off, Lights and Horn, Lights
Only, or Horn Only.
Remote Door Unlock
This allows selection of which doors
will unlock when pressing
Kon the
RKE transmitter.
Touch All Doors or Driver Door.
Remote Start Auto Cool Seats
If equipped and turned on, this
feature will turn on the ventilated
seats when using remote start on
warm days. See Heated and
Ventilated Front Seats 047 and
Remote Vehicle Start 015.
Touch Off or On.
Remote Start Auto Heat Seats
If equipped and turned on, this
feature will turn on the heated seats
when using remote start on cold days. See
Heated and
Ventilated Front Seats 047 and
Remote Vehicle Start 015.
Touch Off or On.
Remote Window Operation
This allows the windows to be
opened when pressing and holding
Kon the RKE transmitter. See
Remote Keyless Entry (RKE)
System Operation 08.
Touch Off or On.
Passive Door Unlock
This allows the selection of what
doors will unlock when using the
button on the driver door to unlock
the vehicle.
Touch Off, All Doors, or Driver
Door Only.
Passive Door Lock
This allows passive locking to be
turned on or off and selects
feedback. See Remote Keyless
Entry (RKE) System Operation 08.
Touch Off, On with Horn
Chirp, or On.
Page 279 of 390
Chevrolet Blazer Owner Manual (GMNA-Localizing-U.S./Canada/Mexico-
13557845) - 2020 - CRC - 3/24/20
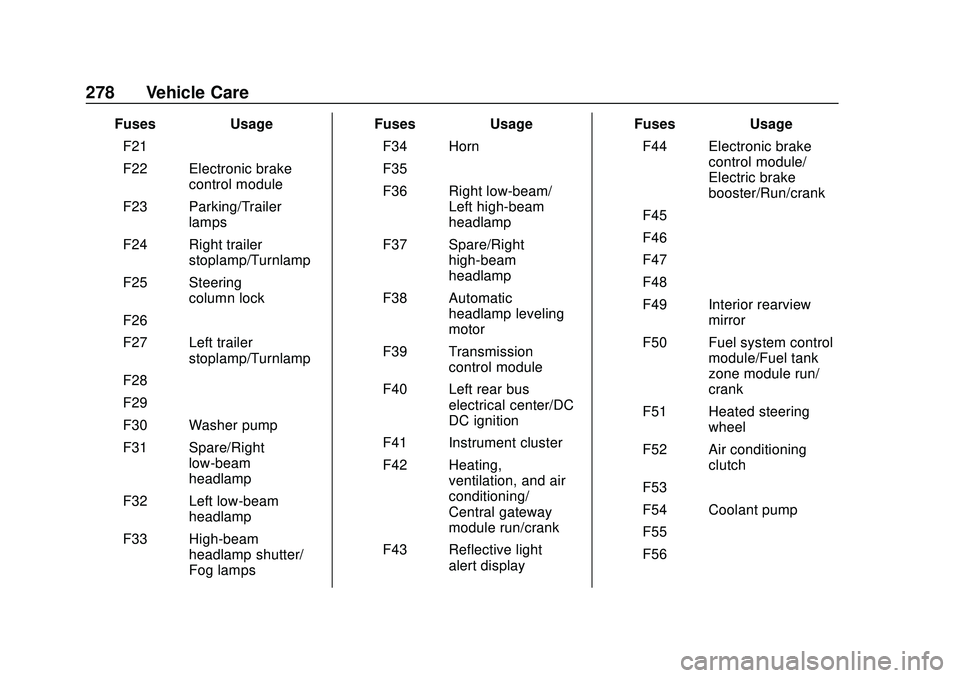
278 Vehicle Care
FusesUsage
F21 –
F22 Electronic brake control module
F23 Parking/Trailer lamps
F24 Right trailer stoplamp/Turnlamp
F25 Steering column lock
F26 –
F27 Left trailer stoplamp/Turnlamp
F28 –
F29 –
F30 Washer pump
F31 Spare/Right low-beam
headlamp
F32 Left low-beam headlamp
F33 High-beam headlamp shutter/
Fog lamps Fuses
Usage
F34 Horn
F35 –
F36 Right low-beam/ Left high-beam
headlamp
F37 Spare/Right high-beam
headlamp
F38 Automatic headlamp leveling
motor
F39 Transmission control module
F40 Left rear bus electrical center/DC
DC ignition
F41 Instrument cluster
F42 Heating, ventilation, and air
conditioning/
Central gateway
module run/crank
F43 Reflective light alert display Fuses
Usage
F44 Electronic brake control module/
Electric brake
booster/Run/crank
F45 –
F46 –
F47 –
F48 –
F49 Interior rearview mirror
F50 Fuel system control module/Fuel tank
zone module run/
crank
F51 Heated steering wheel
F52 Air conditioning clutch
F53 –
F54 Coolant pump
F55 –
F56 –