front exterior CHEVROLET BLAZER 2021 Owner's Manual
[x] Cancel search | Manufacturer: CHEVROLET, Model Year: 2021, Model line: BLAZER, Model: CHEVROLET BLAZER 2021Pages: 380, PDF Size: 9.1 MB
Page 6 of 380
Chevrolet Blazer Owner Manual (GMNA-Localizing-U.S./Canada/Mexico-
14608203) - 2021 - CRC - 10/29/20
Introduction 5
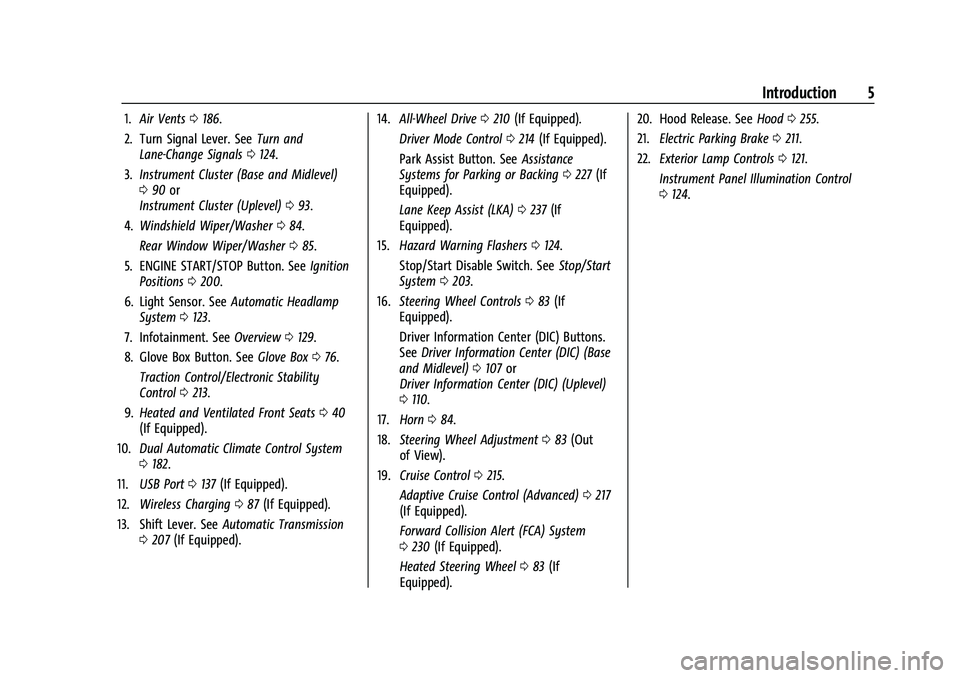
1.Air Vents 0186.
2. Turn Signal Lever. See Turn and
Lane-Change Signals 0124.
3. Instrument Cluster (Base and Midlevel)
090 or
Instrument Cluster (Uplevel) 093.
4. Windshield Wiper/Washer 084.
Rear Window Wiper/Washer 085.
5. ENGINE START/STOP Button. See Ignition
Positions 0200.
6. Light Sensor. See Automatic Headlamp
System 0123.
7. Infotainment. See Overview0129.
8. Glove Box Button. See Glove Box076.
Traction Control/Electronic Stability
Control 0213.
9. Heated and Ventilated Front Seats 040
(If Equipped).
10. Dual Automatic Climate Control System
0182.
11. USB Port 0137 (If Equipped).
12. Wireless Charging 087 (If Equipped).
13. Shift Lever. See Automatic Transmission
0 207 (If Equipped). 14.
All-Wheel Drive 0210 (If Equipped).
Driver Mode Control 0214 (If Equipped).
Park Assist Button. See Assistance
Systems for Parking or Backing 0227 (If
Equipped).
Lane Keep Assist (LKA) 0237 (If
Equipped).
15. Hazard Warning Flashers 0124.
Stop/Start Disable Switch. See Stop/Start
System 0203.
16. Steering Wheel Controls 083 (If
Equipped).
Driver Information Center (DIC) Buttons.
See Driver Information Center (DIC) (Base
and Midlevel) 0107 or
Driver Information Center (DIC) (Uplevel)
0 110.
17. Horn 084.
18. Steering Wheel Adjustment 083 (Out
of View).
19. Cruise Control 0215.
Adaptive Cruise Control (Advanced) 0217
(If Equipped).
Forward Collision Alert (FCA) System
0 230 (If Equipped).
Heated Steering Wheel 083 (If
Equipped). 20. Hood Release. See
Hood0255.
21. Electric Parking Brake 0211.
22. Exterior Lamp Controls 0121.
Instrument Panel Illumination Control
0 124.
Page 51 of 380
Chevrolet Blazer Owner Manual (GMNA-Localizing-U.S./Canada/Mexico-
14608203) - 2021 - CRC - 10/29/20
50 Seats and Restraints
reversing the latch plate on the webbing.
If the twist cannot be corrected, ask your
dealer to fix it.
Make sure the seat belt reminder light is
working. SeeSeat Belt Reminders 098.
Keep seat belts clean and dry. See Seat Belt
Care 050.
Seat Belt Care
Keep belts clean and dry.
Seat belts should be properly cared for and
maintained.
Seat belt hardware should be kept dry and
free of dust or debris. As necessary, exterior
hard surfaces and seat belt webbing may be
lightly cleaned with mild soap and water.
Ensure there is not excessive dust or debris
in the mechanism. If dust or debris exists in
the system please see the dealer. Parts may
need to be replaced to ensure proper
functionality of the system.
{Warning
Do not bleach or dye seat belt webbing.
It may severely weaken the webbing. In
a crash, they might not be able to
(Continued)
Warning (Continued)
provide adequate protection. Clean and
rinse seat belt webbing only with mild
soap and lukewarm water. Allow the
webbing to dry.
Replacing Seat Belt System Parts
after a Crash
{Warning
A crash can damage the seat belt system
in the vehicle. A damaged seat belt
system may not properly protect the
person using it, resulting in serious injury
or even death in a crash. To help make
sure the seat belt systems are working
properly after a crash, have them
inspected and any necessary
replacements made as soon as possible.
After a minor crash, replacement of seat
belts may not be necessary. But the seat
belt assemblies that were used during any
crash may have been stressed or damaged.
See your dealer to have the seat belt
assemblies inspected or replaced. New parts and repairs may be necessary
even if the seat belt system was not being
used at the time of the crash.
Have the seat belt pretensioners checked if
the vehicle has been in a crash, or if the
airbag readiness light stays on after you
start the vehicle or while you are driving.
See
Airbag Readiness Light 098.
Airbag System
The vehicle has the following airbags:
.A frontal airbag for the driver
.A frontal airbag for the front outboard
passenger
.A knee airbag for the driver
.A seat-mounted side impact airbag for the
driver
.A seat-mounted side impact airbag for the
front outboard passenger
.A roof-rail airbag for the driver and the
passenger seated directly behind the
driver
.A roof-rail airbag for the front outboard
passenger and the passenger seated
directly behind the front outboard
passenger
Page 116 of 380
Chevrolet Blazer Owner Manual (GMNA-Localizing-U.S./Canada/Mexico-
14608203) - 2021 - CRC - 10/29/20
Instruments and Controls 115
SeeFront Pedestrian Braking (FPB) System
0 234.
Touch Off, Alert, or Alert and Brake.
Adaptive Cruise Go Notifier
This setting determines if an alert will
appear when Adaptive Cruise Control brings
the vehicle to a complete stop and the
vehicle ahead of you starts moving again.
See Adaptive Cruise Control (Advanced)
0 217.
Touch Off or On.
Lane Change Alert
The LCA system is a lane-changing aid that
assists drivers with avoiding lane change
crashes. See Lane Change Alert (LCA) 0236.
When Lane Change Alert is disabled, Side
Blind Zone Alert is also disabled.
Touch Off or On.
Rear Camera Park Assist Symbols
This setting enables the Rear Camera Park
Assist Symbols. See Assistance Systems for
Parking or Backing 0227.
Touch Off or On. Rear Cross Traffic Alert
This allows the Rear Cross Traffic Alert
feature to be turned on or off. See
Assistance Systems for Parking or Backing
0
227.
Touch Off or On.
Comfort and Convenience
Touch and the following may display:
.Chime Volume
.Hands Free Liftgate/Trunk Control
.Reverse Tilt Mirror
.Auto Wipe in Reverse Gear
Chime Volume
This determines the chime volume level.
Touch the controls on the infotainment
display to adjust the volume.
Hands Free Liftgate/Trunk Control
The liftgate may be operated with a kicking
motion under the rear bumper between the
left exhaust pipe and the license plate. See
Liftgate 018.
Touch Off, On-Open and Close,
or On-Open Only. Reverse Tilt Mirror
When on, the driver, passenger, or both
driver and passenger outside mirrors will tilt
downward when the vehicle is shifted into
R (Reverse) to improve visibility of the
ground near the rear wheels. They may
move from their tilted position when the
vehicle is shifted out of R (Reverse) or
turned off. See
Reverse Tilt Mirrors 026.
Touch Off, On - Driver and Passenger, On -
Driver, or On - Passenger.
Auto Wipe in Reverse Gear
When on and the front wiper is on, the rear
wiper will automatically activate when the
vehicle is shifted to R (Reverse).
Touch Off or On.
Lighting
Touch and the following may display:
.Vehicle Locator Lights
.Exit Lighting
Vehicle Locator Lights
This feature will flash the exterior lamps and
allows some of the exterior lamps and most
of the interior lamps to turn on briefly
when
Kon the Remote Keyless Entry (RKE)
transmitter is pressed to locate the vehicle.
Page 117 of 380
Chevrolet Blazer Owner Manual (GMNA-Localizing-U.S./Canada/Mexico-
14608203) - 2021 - CRC - 10/29/20
116 Instruments and Controls
Touch Off or On.
Exit Lighting
This allows the selection of how long the
exterior lamps stay on when leaving the
vehicle when it is dark outside.
Touch Off, 30 Seconds, 60 Seconds,
or 120 Seconds.
Power Door Locks
Touch and the following may display:
.Open Door Anti Lockout
.Auto Door Unlock
.Delayed Door Lock
Open Door Anti Lock Out
When on, this feature will keep the driver
door from locking when the door is open.
If Off is selected, the Delayed Door Lock
menu will be available.
Touch Off or On.
Auto Door Unlock
This allows selection of which of the doors
will automatically unlock when the vehicle is
shifted into P (Park).
Touch Off, All Doors, or Driver Door. Delayed Door Lock
When on, this feature will delay the locking
of the doors. To override the delay, press
the power door lock switch on the door.
Touch Off or On.
Remote Lock, Unlock, and Start
Touch and the following may display:
.Remote Unlock Light Feedback
.Remote Lock Feedback
.Remote Door Unlock
.Remote Start Auto Cool Seats
.Remote Start Auto Heat Seats
.Remote Window Operation
.Passive Door Unlock
.Passive Door Lock
.Remote Left in Vehicle Alert
Remote Unlock Light Feedback
When on, the exterior lamps will flash when
unlocking the vehicle with the RKE
transmitter.
Touch Off or Flash Lights. Remote Lock Feedback
This allows selection of what type of
feedback is given when locking the vehicle
with the RKE transmitter.
Touch Off, Lights and Horn, Lights Only,
or Horn Only.
Remote Door Unlock
This allows selection of which doors will
unlock when pressing
Kon the RKE
transmitter.
Touch All Doors or Driver Door.
Remote Start Auto Cool Seats
If equipped and turned on, this feature will
turn on the ventilated seats when using
remote start on warm days. See Heated and
Ventilated Front Seats 040 and
Remote Vehicle Start 013.
Touch Off or On.
Remote Start Auto Heat Seats
If equipped and turned on, this feature will
turn on the heated seats when using remote
start on cold days. See Heated and
Ventilated Front Seats 040 and
Remote Vehicle Start 013.
Touch Off or On.
Page 123 of 380

Chevrolet Blazer Owner Manual (GMNA-Localizing-U.S./Canada/Mexico-
14608203) - 2021 - CRC - 10/29/20
122 Lighting
Turning On and Enabling IntelliBeam
To enable the IntelliBeam system, press
bon the turn signal lever when it is
dark outside and the exterior lamp control is
in AUTO or
5.
Driving with IntelliBeam
The system only activates the high beams
when driving over 40 km/h (25 mph).
The blue high-beam on light appears on the
instrument cluster when the high beams
are on.
There is a sensor near the top center of the
windshield that automatically controls the
system. Keep this area of the windshield
clear of debris to allow for best system
performance. The high-beam headlamps remain on, under
the automatic control, until one of the
following situations occurs:
.The system detects an approaching
vehicle's headlamps.
.The system detects a preceding vehicle's
taillamps.
.The outside light is bright enough that
high-beam headlamps are not required.
.The vehicle's speed drops below 20 km/h
(12 mph).
.The IntelliBeam system is disabled by the
button on the turn signal lever. If this
happens, press
bon the turn signal
lever when the exterior lamp control is in
the AUTO or
5position to reactivate the
IntelliBeam system. The instrument
cluster light will come on to indicate the
IntelliBeam system is reactivated.
The high beams may not turn off
automatically if the system cannot detect
another vehicle's lamps because of any of
the following:
.The other vehicle's lamps are missing,
damaged, obstructed from view,
or otherwise undetected.
.The other vehicle's lamps are covered
with dirt, snow, and/or road spray.
.The other vehicle's lamps cannot be
detected due to dense exhaust, smoke,
fog, snow, road spray, mist, or other
airborne obstructions.
.The vehicle's windshield is dirty, cracked,
or obstructed by something that blocks
the view of the light sensor.
.The vehicle is loaded such that the front
end points upward, causing the light
sensor to aim high and not detect
headlamps and taillamps.
.The vehicle is being driven on winding or
hilly roads.
The IntelliBeam system may need to be
disabled if any of the above conditions exist.
Exterior Lamps Off Reminder
A warning chime sounds if the driver door is
opened while the ignition is off and the
exterior lamps are on.
Headlamp High/Low-Beam
Changer
Push the turn signal lever away from you
and release, to turn the high beams on. To
return to low beams, push the lever again
or pull it toward you and release.
Page 124 of 380
Chevrolet Blazer Owner Manual (GMNA-Localizing-U.S./Canada/Mexico-
14608203) - 2021 - CRC - 10/29/20
Lighting 123
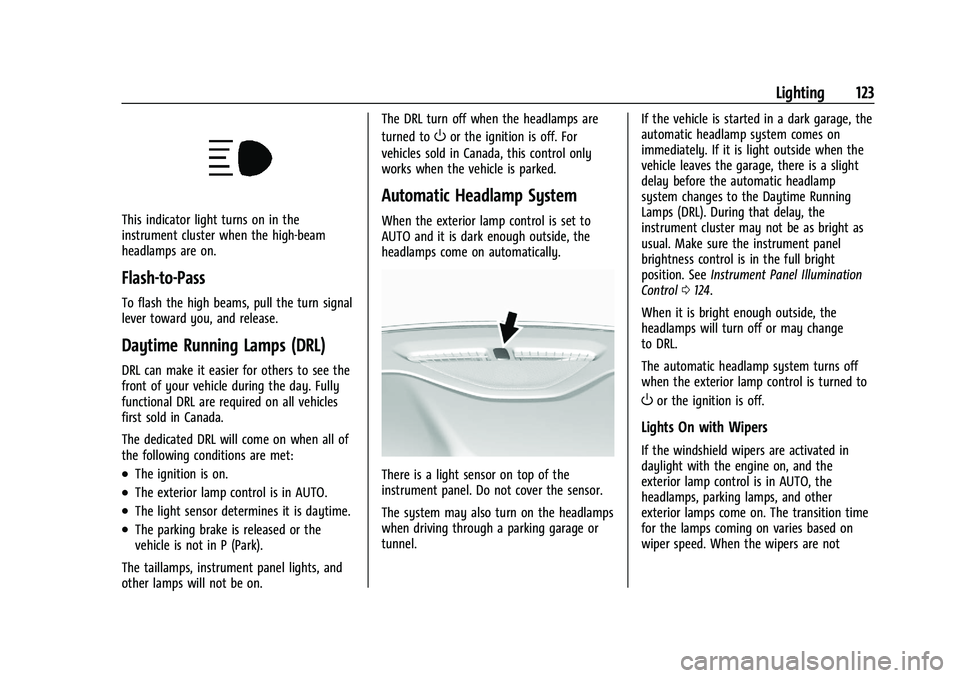
This indicator light turns on in the
instrument cluster when the high-beam
headlamps are on.
Flash-to-Pass
To flash the high beams, pull the turn signal
lever toward you, and release.
Daytime Running Lamps (DRL)
DRL can make it easier for others to see the
front of your vehicle during the day. Fully
functional DRL are required on all vehicles
first sold in Canada.
The dedicated DRL will come on when all of
the following conditions are met:
.The ignition is on.
.The exterior lamp control is in AUTO.
.The light sensor determines it is daytime.
.The parking brake is released or the
vehicle is not in P (Park).
The taillamps, instrument panel lights, and
other lamps will not be on. The DRL turn off when the headlamps are
turned to
Oor the ignition is off. For
vehicles sold in Canada, this control only
works when the vehicle is parked.
Automatic Headlamp System
When the exterior lamp control is set to
AUTO and it is dark enough outside, the
headlamps come on automatically.
There is a light sensor on top of the
instrument panel. Do not cover the sensor.
The system may also turn on the headlamps
when driving through a parking garage or
tunnel. If the vehicle is started in a dark garage, the
automatic headlamp system comes on
immediately. If it is light outside when the
vehicle leaves the garage, there is a slight
delay before the automatic headlamp
system changes to the Daytime Running
Lamps (DRL). During that delay, the
instrument cluster may not be as bright as
usual. Make sure the instrument panel
brightness control is in the full bright
position. See
Instrument Panel Illumination
Control 0124.
When it is bright enough outside, the
headlamps will turn off or may change
to DRL.
The automatic headlamp system turns off
when the exterior lamp control is turned to
Oor the ignition is off.
Lights On with Wipers
If the windshield wipers are activated in
daylight with the engine on, and the
exterior lamp control is in AUTO, the
headlamps, parking lamps, and other
exterior lamps come on. The transition time
for the lamps coming on varies based on
wiper speed. When the wipers are not
Page 125 of 380
Chevrolet Blazer Owner Manual (GMNA-Localizing-U.S./Canada/Mexico-
14608203) - 2021 - CRC - 10/29/20
124 Lighting
operating, these lamps turn off. Move the
exterior lamp control to
Oor;to disable
this feature.
Hazard Warning Flashers
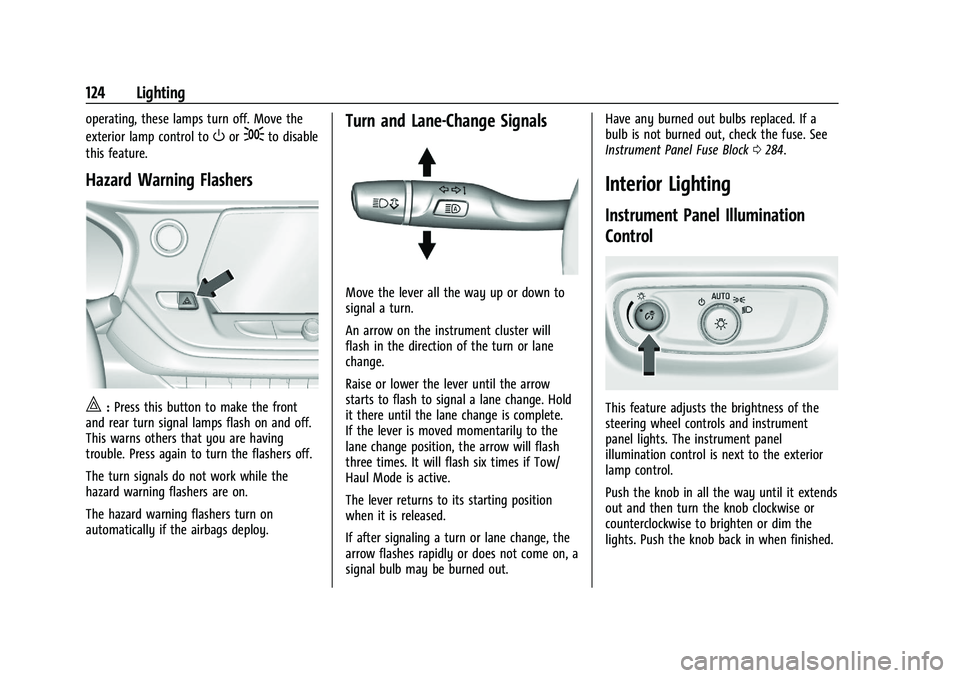
|: Press this button to make the front
and rear turn signal lamps flash on and off.
This warns others that you are having
trouble. Press again to turn the flashers off.
The turn signals do not work while the
hazard warning flashers are on.
The hazard warning flashers turn on
automatically if the airbags deploy.
Turn and Lane-Change Signals
Move the lever all the way up or down to
signal a turn.
An arrow on the instrument cluster will
flash in the direction of the turn or lane
change.
Raise or lower the lever until the arrow
starts to flash to signal a lane change. Hold
it there until the lane change is complete.
If the lever is moved momentarily to the
lane change position, the arrow will flash
three times. It will flash six times if Tow/
Haul Mode is active.
The lever returns to its starting position
when it is released.
If after signaling a turn or lane change, the
arrow flashes rapidly or does not come on, a
signal bulb may be burned out. Have any burned out bulbs replaced. If a
bulb is not burned out, check the fuse. See
Instrument Panel Fuse Block
0284.
Interior Lighting
Instrument Panel Illumination
Control
This feature adjusts the brightness of the
steering wheel controls and instrument
panel lights. The instrument panel
illumination control is next to the exterior
lamp control.
Push the knob in all the way until it extends
out and then turn the knob clockwise or
counterclockwise to brighten or dim the
lights. Push the knob back in when finished.
Page 226 of 380
Chevrolet Blazer Owner Manual (GMNA-Localizing-U.S./Canada/Mexico-
14608203) - 2021 - CRC - 10/29/20
Driving and Operating 225
Do not use ACC when driving on steep hills
or when towing a trailer. ACC will not detect
a vehicle in the lane while driving on steep
hills. The driver will often need to take over
acceleration and braking on steep hills,
especially when towing a trailer. If the
brakes are applied, the ACC disengages.
Disengaging ACC
There are three ways to disengage ACC:
.Step lightly on the brake pedal.
.Press*.
.PressJ.
Erasing Speed Memory
The ACC set speed is erased from memory if
Jis pressed or if the ignition is turned off.
Weather Conditions Affecting ACC
System operation may be limited under
snow, heavy rain, or road spray conditions.
Accessory Installations and Vehicle
Modifications
Do not install or place any object around
the front camera windshield area that would
obstruct the front camera view. Do not install objects on top of the vehicle
that overhang and obstruct the front
camera, such as a canoe, kayak, or other
items that can be transported on a roof rack
system. See
Roof Rack System 081.
Do not modify the hood, headlamps, or fog
lamps, as this may limit the camera’s ability
to detect an object.
Cleaning the Sensing System
The camera sensor on the windshield behind
the rearview mirror and the radar sensors
on the front of the vehicle can become
blocked by snow, ice, dirt, or mud. These
areas need to be cleaned for ACC to operate
properly.
If ACC will not operate, regular cruise control
may be available. See “Switching Between
ACC and Regular Cruise Control” in this
section. Always consider driving conditions
before using either cruise control system.
For cleaning instructions, see “Washing the
Vehicle” underExterior Care 0323.
Driver Assistance Systems
This vehicle may have features that work
together to help avoid crashes or reduce
crash damage while driving, backing, and
parking. Read this entire section before
using these systems.
{Warning
Do not rely on the Driver Assistance
Systems. These systems do not replace
the need for paying attention and driving
safely. You may not hear or feel alerts or
warnings provided by these systems.
Failure to use proper care when driving
may result in injury, death, or vehicle
damage. See Defensive Driving 0188.
Under many conditions, these systems
will not:
.Detect children, pedestrians, bicyclists,
or animals.
.Detect vehicles or objects outside the
area monitored by the system.
.Work at all driving speeds.
.Warn you or provide you with enough
time to avoid a crash. (Continued)
Page 254 of 380
Chevrolet Blazer Owner Manual (GMNA-Localizing-U.S./Canada/Mexico-
14608203) - 2021 - CRC - 10/29/20
Vehicle Care 253
Vehicle Care
General Information
General Information . . . . . . . . . . . . . . . . . . . 254
California Proposition 65 Warning . . . . . 254
California Perchlorate MaterialsRequirements . . . . . . . . . . . . . . . . . . . . . . . . 254
Accessories and Modifications . . . . . . . . . 254
Vehicle Checks
Doing Your Own Service Work . . . . . . . . . 255
Hood . . . . . . . . . . . . . . . . . . . . . . . . . . . . . . . . . . 255
Engine Compartment Overview . . . . . . . . 257
Engine Oil . . . . . . . . . . . . . . . . . . . . . . . . . . . . . 262
Engine Oil Life System . . . . . . . . . . . . . . . . 264
Automatic Transmission Fluid . . . . . . . . . 265
Engine Air Filter Life System . . . . . . . . . . 265
Engine Air Cleaner/Filter . . . . . . . . . . . . . . 265
Cooling System . . . . . . . . . . . . . . . . . . . . . . . . 267
Engine Overheating . . . . . . . . . . . . . . . . . . . . 271
Washer Fluid . . . . . . . . . . . . . . . . . . . . . . . . . . 272
Brakes . . . . . . . . . . . . . . . . . . . . . . . . . . . . . . . . . 273
Brake Fluid . . . . . . . . . . . . . . . . . . . . . . . . . . . . 273
Battery - North America . . . . . . . . . . . . . . . 274
All-Wheel Drive . . . . . . . . . . . . . . . . . . . . . . . . 275
Automatic Transmission Shift Lock Control Function Check . . . . . . . . . . . . . . 275
Park Brake and P (Park) Mechanism Check . . . . . . . . . . . . . . . . . . . . . . . . . . . . . . . . 275
Wiper Blade Replacement . . . . . . . . . . . . . 276 Windshield Replacement . . . . . . . . . . . . . . . 277
Gas Strut(s) . . . . . . . . . . . . . . . . . . . . . . . . . . . . 277
Headlamp Aiming
Front Headlamp Aiming . . . . . . . . . . . . . . . 278
Bulb Replacement
Bulb Replacement . . . . . . . . . . . . . . . . . . . . . 278
High Intensity Discharge (HID)
Lighting . . . . . . . . . . . . . . . . . . . . . . . . . . . . . 278
LED Lighting . . . . . . . . . . . . . . . . . . . . . . . . . . . 278
Back-Up Lamps . . . . . . . . . . . . . . . . . . . . . . . . 278
Electrical System
High Voltage Devices and Wiring . . . . . . 279
Electrical System Overload . . . . . . . . . . . . 279
Fuses and Circuit Breakers . . . . . . . . . . . . 280
Engine Compartment Fuse Block . . . . . . 280
Instrument Panel Fuse Block . . . . . . . . . . 284
Rear Compartment Fuse Block . . . . . . . . . 285
Wheels and Tires
Tires . . . . . . . . . . . . . . . . . . . . . . . . . . . . . . . . . . . 287
All-Season Tires . . . . . . . . . . . . . . . . . . . . . . . 288
Winter Tires . . . . . . . . . . . . . . . . . . . . . . . . . . . 288
Summer Tires . . . . . . . . . . . . . . . . . . . . . . . . . 289
Tire Sidewall Labeling . . . . . . . . . . . . . . . . . 289
Tire Designations . . . . . . . . . . . . . . . . . . . . . . 291
Tire Terminology and Definitions . . . . . . 292
Tire Pressure . . . . . . . . . . . . . . . . . . . . . . . . . . 294
Tire Pressure for High-Speed Operation . . . . . . . . . . . . . . . . . . . . . . . . . . . 295 Tire Pressure Monitor System . . . . . . . . . 296
Tire Pressure Monitor Operation . . . . . . 297
Tire Inspection . . . . . . . . . . . . . . . . . . . . . . . . 300
Tire Rotation . . . . . . . . . . . . . . . . . . . . . . . . . . 300
When It Is Time for New Tires . . . . . . . . 301
Buying New Tires . . . . . . . . . . . . . . . . . . . . . 302
Different Size Tires and Wheels . . . . . . . 303
Uniform Tire Quality Grading . . . . . . . . . 303
Wheel Alignment and Tire Balance . . . . 305
Wheel Replacement . . . . . . . . . . . . . . . . . . . 305
Tire Chains . . . . . . . . . . . . . . . . . . . . . . . . . . . . 305
If a Tire Goes Flat . . . . . . . . . . . . . . . . . . . . . 306
Tire Sealant and Compressor Kit . . . . . . . 307
Storing the Tire Sealant and
Compressor Kit . . . . . . . . . . . . . . . . . . . . . . . 313
Tire Changing . . . . . . . . . . . . . . . . . . . . . . . . . . 313
Compact Spare Tire . . . . . . . . . . . . . . . . . . . . 317
Jump Starting
Jump Starting - North America . . . . . . . . 318
Towing the Vehicle
Towing the Vehicle . . . . . . . . . . . . . . . . . . . . 320
Recreational Vehicle Towing . . . . . . . . . . . 321
Appearance Care
Exterior Care . . . . . . . . . . . . . . . . . . . . . . . . . . 323
Interior Care . . . . . . . . . . . . . . . . . . . . . . . . . . . 327
Floor Mats . . . . . . . . . . . . . . . . . . . . . . . . . . . . 329
Page 338 of 380
Chevrolet Blazer Owner Manual (GMNA-Localizing-U.S./Canada/Mexico-
14608203) - 2021 - CRC - 10/29/20
Service and Maintenance 337
Footnotes—Maintenance Schedule
Additional Required Services - Severe
(1) Or every four years, whichever comes
first. If driving in dusty conditions, inspect
the filter at each oil change or more often
as needed. See Engine Air Cleaner/Filter
0 265.
(2) Or every two years, whichever comes
first. More frequent passenger compartment
air filter replacement may be needed if
driving in areas with heavy traffic, poor air
quality, high dust levels, or environmental
allergens. Passenger compartment air filter
replacement may also be needed if there is
reduced airflow, window fogging, or odors.
Your GM dealer can help determine when to
replace the filter.
(3) Do not directly power wash the transfer
case and/or front/rear axle output seals.
High pressure water can overcome the seals
and contaminate the transfer case fluid.
Contaminated fluid will decrease the life of
the transfer case and/or axles and should be
replaced.
(4) Or every five years, whichever comes
first. See Cooling System 0267. (5)
Or every 10 years, whichever comes first.
Inspect for fraying, excessive cracking,
or damage; replace, if needed.
(6) Replace brake fluid every five years. See
Brake Fluid 0273.
(7) Or every 12 months, whichever comes
first. See Wiper Blade Replacement 0276.
(8) Or every 10 years, whichever comes first.
See Gas Strut(s) 0277.
(9) Replace air conditioning desiccant every
seven years.
Special Application Services
.Severe Commercial Use Vehicles Only:
Lubricate chassis components every oil
change.
.Have underbody flushing service
performed. See "Underbody Maintenance"
in Exterior Care 0323.
Additional Maintenance
and Care
Your vehicle is an important investment and
caring for it properly may help to avoid
future costly repairs. To maintain vehicle
performance, additional maintenance
services may be required.
It is recommended that your dealer perform
these services —their trained dealer
technicians know your vehicle best. Your
dealer can also perform a thorough
assessment with a multi-point inspection to
recommend when your vehicle may need
attention.
The following list is intended to explain the
services and conditions to look for that may
indicate services are required.
Battery
The 12-volt battery supplies power to start
the engine and operate any additional
electrical accessories.
.To avoid break-down or failure to start
the vehicle, maintain a battery with full
cranking power.