torque CHEVROLET CAMARO 1967 1.G Chassis Repair Manual
[x] Cancel search | Manufacturer: CHEVROLET, Model Year: 1967, Model line: CAMARO, Model: CHEVROLET CAMARO 1967 1.GPages: 659, PDF Size: 114.24 MB
Page 232 of 659
REAR SUSPENSION AND DRIVE LINE 4-42
Fig.
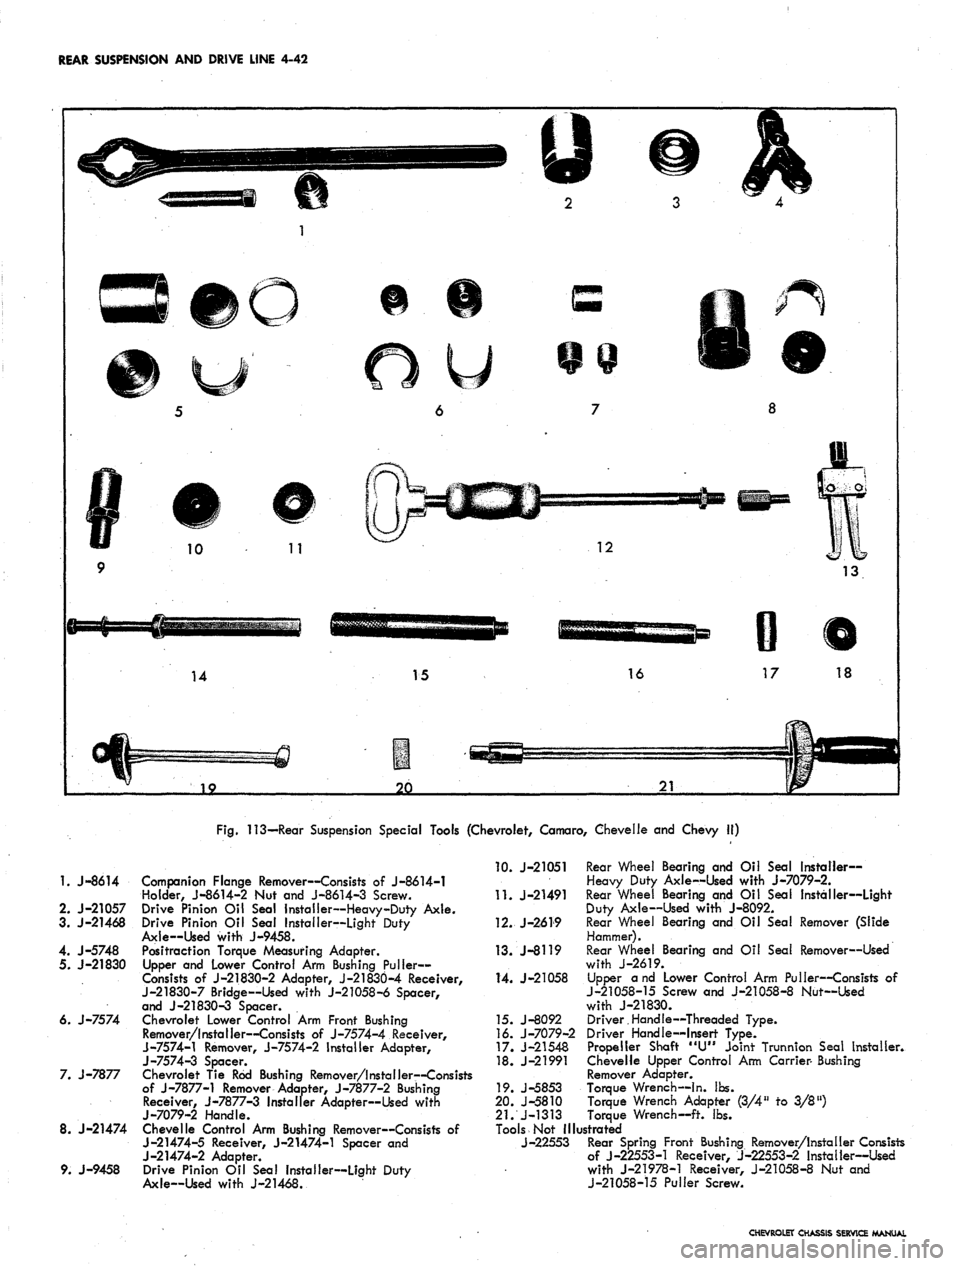
113—Rear Suspension Special Tools (Chevrolet, Camaro, Chevelle and Chevy II)
1.
J-8614
2.
J-21057
3. J-21468
4. J-5748
5. J-21830
6. J-7574
7. J-7877
8. J-21474
9. J-9458
Companion Flange Remover—Consists of J-8614-1
Holder, J-8614-2 Nut and J-8614-3 Screw.
Drive Pinion Oil Seal Installer—Heavy-Duty Axle.
Drive Pinion Oil Seal Installer—Light Duty
Axle—Used with J-9458.
Positraction Torque Measuring Adapter.
Upper and Lower Control Arm Bushing Puller-
Consists of J-21830-2 Adapter, J-21830-4 Receiver,
J-21830-7 Bridge—Used with J-21058-6 Spacer,
and J-21830-3 Spacer.
Chevrolet Lower Control Arm Front Bushing
Remover/Installer—Consists of J-7574-4 Receiver,
J-7574-1 Remover, J-7574-2 Installer Adapter,
J-7574-3 Spacer.
Chevrolet Tie Rod Bushing Remover/Installer—Consists
of J-7877-1 Remover Adapter, J-7877-2 Bushing
Receiver, J-7877-3 Installer Adapter—Used with
j-7079-2
Handle.
Chevelle Control Arm Bushing Remover—Consists of
J-21474-5 Receiver, J-21474-1 Spacer and
J-21474-2 Adapter.
Drive Pinion Oil Seal Installer—Light Duty
Axle—Used with J-21468.
10.
J-21051 Rear Wheel Bearing and Oil Seal Installer-
Heavy Duty Axle—Used with J-7079-2.
11.
J-21491 Rear Wheel Bearing and Oil Seal Installer—Light
Duty Axle—Used with J-8092.
12.
J-2619 Rear Wheel Bearing and Oil Seal Remover (Slide
Hammer).
13.
J-8119 Rear Wheel Bearing and Oil Seal Remover—Used
with J-2619.
14.
J-21058 Upper and Lower Control Arm Puller—Consists of
J-21058-15 Screw and J-21058-8 Nut—Used
with J-21830.
15.
J-8092 Driver.Handle—Threaded Type.
16.
J-7079-2 Driver Handle—Insert Type.
17.
J-21548 Propeller Shaft "U" Joint Trunnion Seal Installer.
18.
J-21991 Chevelle Upper Control Arm Carrier- Bushing
Remover Adapter.
19.
J-5853 Torque Wrench—In. lbs.
20.
J-5810 Torque Wrench Adapter (3/4" to 3/8")
21.
J-1313 Torque Wrench—ft. lbs.
Tools Not Illustrated
J-22553 Rear Spring Front Bushing Remover/Installer Consists
of J-22553-1 Receiver, J-22553-2 Installer—Used
with J-21978-1 Receiver, J-21058-8 Nut and
J-21058-15 Puller Screw.
CHEVROLET CHASSIS SERVICE MANUAL
Page 233 of 659
REAR SUSPENSION AND DRIVE LINE 4-43
Fig.
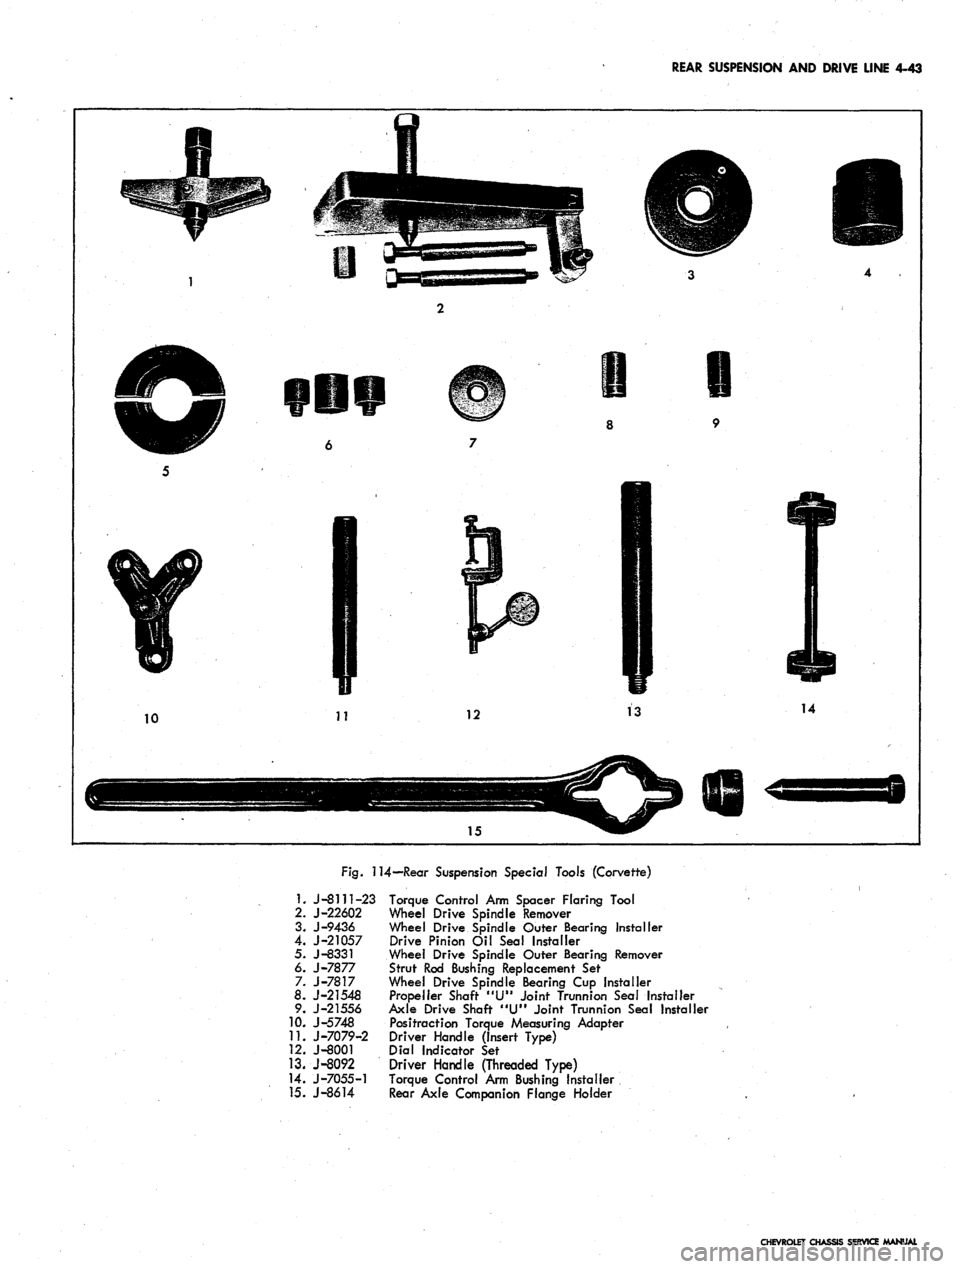
114—Rear Suspension Special Tools (Corvette)
1.
J-8111-23 Torque Control Arm Spacer Flaring Tool
2.
J-22602 Wheel Drive Spindle Remover
3.
J-9436 Wheel Drive Spindle Outer Bearing Installer
4.
J-21057 Drive Pinion Oil Seal Installer
5. J-8331 Wheel Drive Spindle Outer Bearing Remover
6.
J-7877 Strut Rod Bushing Replacement Sef
7. J-7817 Wheel Drive Spindle Bearing Cup Installer
8.
J-21548 Propeller Shaft "U" Joint Trunnion Seal Installer
9. J-21556 Axle Drive Shaft "U" Joint Trunnion Sea! Installer
10.
J-5748 Positraction Torque Measuring Adapter
11.
J-7079-2 Driver Handle (Insert Type)
12.
J-8001 Dial Indicator Set
13.
J-8092 Driver Handle (Threaded Type)
14.
J-7055-1 Torque Control Arm Bushing Installer
15.
J-8614 Rear Axle Companion Flange Holder
CHEVROLET CHASSIS SERVICE MANUAL
Page 255 of 659
BRAKES 5-22
2.
Replace ail push rods and pull back springs.
3.
Connect hose or line to wheel cylinder.
NOTE:
If replacing front wheel cylinder, con-
nect hose and inspect installation as outlined in
"Hydraulic Brake Hose Replacement".
4.
Install drum and wheel.
5. Bleed brakes as outlined in this section.
ANCHOR PIN
Front Wheel
1.
Raise front of vehicle and place on jack stands.
2.
Remove wheel and drum as outlined in this section.
3.
Remove brake shoe pull back springs, link and guide
plate.
4.
Disengage anchor pin lock and remove anchor pin by
turning counterclockwise.
5. Place new lock plate on anchor pin and pass pin
through the hole in flange plate and screw into tapped
hole in spindle support.
6. Torque pin to 130 lb. ft. and lock by peening over
washer tabs.
7. Install brake shoe guide plate, link and pull back
springs.
8. Adjust brakes, install drum and wheel as outlined
in this section. Test brake operation.
Rear Wheel
Two type anchor pins are used in production for the
rear wheels. The riveted type is not serviced and if
failure or damage should occur to either the anchor
pin or flange plate, both parts will have to be replaced
and the threaded type anchor pin used.
Threaded Type
1.
Raise rear of vehicle and place on jack stands,
2.
Remove wheel and drum as outlined in this section.
3.
Remove brake shoe pull back springs, link and guide
plate.
4.
Remove anchor pin retaining nut and washer and
remove pin from flange plate.
5. Position anchor pin to flange plate, install lock
washer and nut, and torque pin to 80 lb. ft.
6. Install brake shoe guide plate, link and pull back
springs.
7. Adjust brakes and install drum and wheel as outlined
in this section.
8. Test brake operation.
BRAKE DRUMS
Front brake drums are the demountable type; that is,
they can be removed without removing the hub. Rear
brake drums are demountable and may be removed
wihtout removing the axle shaft.
A lanced "knock out" area (fig. 34) is provided in
the web of the brake drum for servicing purposes in
the event retracting of the brake shoes is required in
order to remove the drum.
A small screw driver or hooked wire may be inserted
to disengage the automatic adjuster actuating lever so
the star wheel may be turned.
Removal
1.
Raise vehicle and place on jack stand.
2.
Remove wheel and tire assembly, back off brake
adjustment and remove drum.
Inspection and Reconditioning
Whenever brake drums are removed they should be
thoroughly cleaned and inspected for cracks, scores,
deep grooves, and out-of-round. Any of these conditions
must be corrected since they can impair the efficiency
of brake operation and also can cause premature failure
of other parts.
Smooth up any slight scores by polishing with fine
emery cloth. Heavy or extensive scoring will cause
excessive brake lining wear and it will probably be
necessary to rebore in order to true up the braking
surface.
An out-of-round drum makes accurate brake shoe
adjustment impossible and is likely to cause excessive
wear of other parts of brake mechanism due to its
eccentric action.
A drum that is more than .008" out-of-round on the
diameter is unfit for service and should be rebored.
Out-of^round, as well as taper and wear can be ac-
curately measured with an inside micrometer fitted
with proper extension rods.
If drum is to be rebored for use with standard size
brake facings which are worn very little, only enough
metal should be removed to obtain a true smooth braking
surface.
If drum has to be rebored more than .020" over the
standard diameter, it should be rebored to .060" diameter
oversize and the brake facing should be replaced with
.030"
oversize facings.
A brake drum must not be rebored more than .060"
over the maximum standard diameter, since removal
of more metal will effect, dissipation of heat and may
cause distortion of drum. Chevrolet brake facing is
not furnished larger than .030" oversize and this will
not work efficiently in drums bored more than .060"
oversize.
Brake drums may be refinished either by turning or
grinding. Best brake performance is obtained by turning
drums with a very fine feed. To insure maximum lining
life,
the refinished braking surface must be smooth and
free from chatter or tool marks, and run-out must not
exceed .005" total indicator reading.
Cleaning
New brake drums in parts stock are given a light.
coating of rust proofing oil to prevent the formation of
rust on the critical braking surfaces during the time
that the drums are in storage.
This rust proofing oil must be carefully removed
before the drum is placed in service to prevent any
of this oil from getting on the brake shoe facings, which
might cause an extreme brake grab condition.
It is recommended that a suitable volatile, non-toxic,
greaseless type solvent be used to clean the oil from the
braking surface of the new brake drums before they are
•placed in service to insure the cleanest possible surface.
Gasoline or kerosene should not be used as there is
danger that a portion of the diluated oil substance may
be left on the braking surface that may later cause
difficulty.
Installation
1.
Make brake adjustment as outlined in this section.
CHEVROLET CHASSIS SERVICE MANUAL
Page 261 of 659
BRAKES 5-28
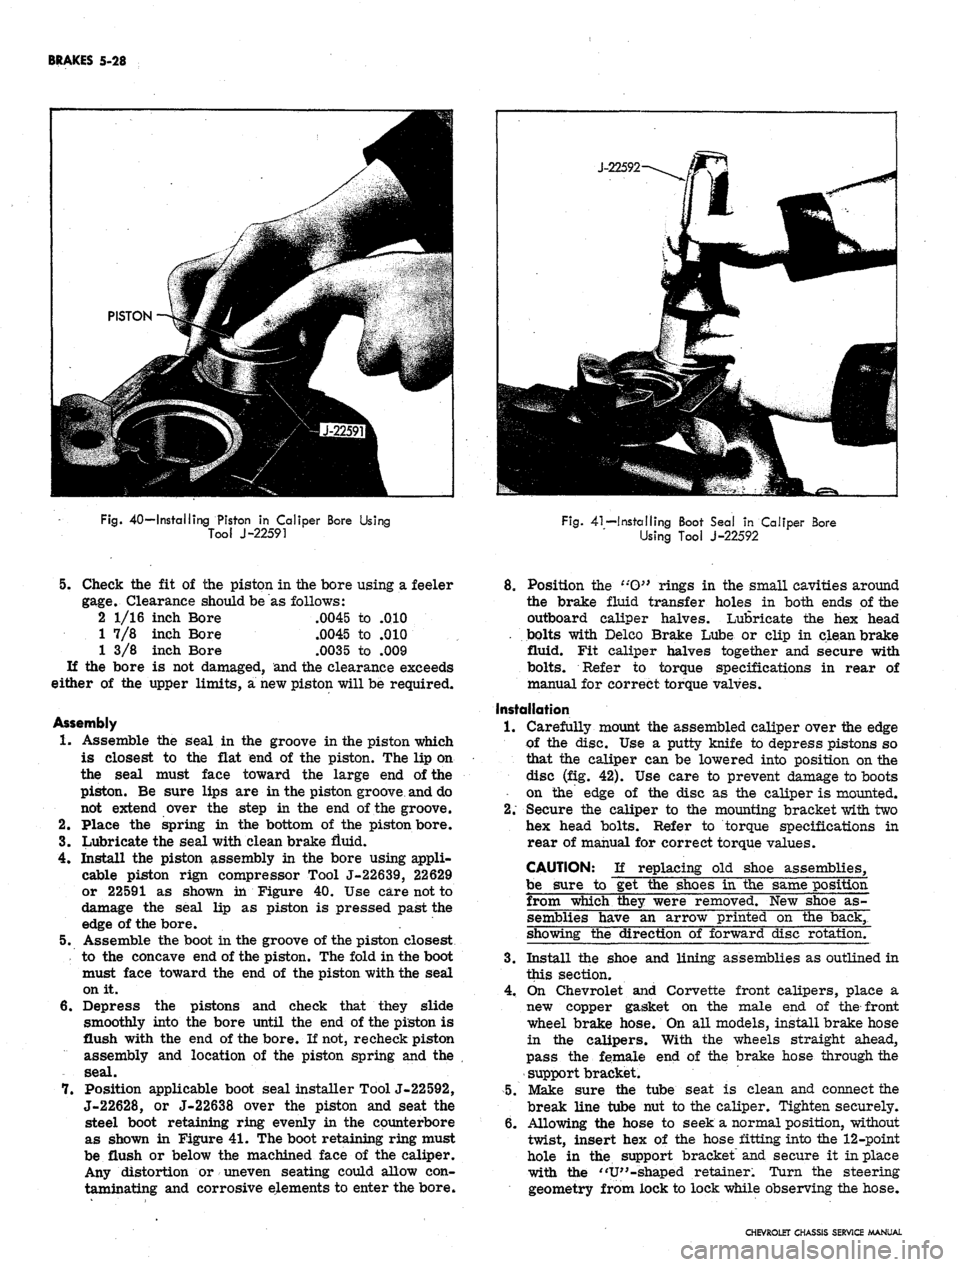
Fig.
40—Installing Piston in Caliper Bore Using
Tool J-22591
Fig.
41—Installing Boot Seal in Caliper Bore
Using Tool J-22592
5.
Check the fit of the piston in the bore using a feeler
gage.
Clearance should be as follows:
2 1/16 inch Bore .0045 to .010
1 7/8 inch Bore .0045 to .010
1 3/8 inch Bore .0035 to .009
If the bore is not damaged, and the clearance exceeds
either of the upper limits, a new piston will be required.
Assembly
1.
Assemble the seal in the groove in the piston which
is closest to the flat end of the piston. The lip on
the seal must face toward the large end of the
piston. Be sure lips are in the piston groove and do
not extend over the step in the end of the groove.
2.
Place the spring in the bottom of the piston bore.
3.
Lubricate the seal with dean brake fluid.
4.
Install the piston assembly in the bore using appli-
cable piston rign compressor Tool J-22639, 22629
or 22591 as shown in Figure 40. Use care not to
damage the seal lip as piston is pressed past the
edge of the bore. .
5.
Assemble the boot in the groove of the piston closest
to the concave end of the piston. The fold in the boot
must face toward the end of the piston with the seal
on it.
6. Depress the pistons and check that they slide
smoothly into the bore until the end of the piston is
flush with the end of the bore. If not, re check piston
assembly and location of the piston spring and the
seal.
7.
Position applicable boot seal installer Tool J-22592,
J-22628, or J-22638 over the piston and seat the
steel boot retaining ring evenly in the counterbore
as shown in Figure 41. The boot retaining ring must
be flush or below the machined face of the caliper.
Any distortion or uneven seating could allow con-
taminating and corrosive elements to enter the bore.
8. Position the t:O}> rings in the small cavities around
the brake fluid transfer holes in both ends of the
outboard caliper halves. Lubricate the hex head
. bolts with Delco Brake Lube or clip in clean brake
fluid. Fit caliper halves together and secure with
bolts.
Refer to torque specifications in rear of
manual for correct torque valves.
Installation
1.
Carefully mount the assembled caliper over the edge
of the disc. Use a putty knife to depress pistons so
that the caliper can be lowered into position on the
disc (fig. 42). Use care to prevent damage to boots
• on the edge of the disc as the caliper is mounted.
2.
Secure the caliper to the mounting bracket with two
hex head bolts. Refer to torque specifications in
rear of manual for correct torque values.
CAUTION: If replacing old shoe assemblies,
be sure to get the shoes in the same position
from which they were removed. New shoe as-
semblies have an arrow printed on the back,
showing the direction of forward disc rotation.
3.
Install the shoe and lining assemblies as outlined in
this section.
4.
On Chevrolet and Corvette front calipers, place a
new copper gasket on the male end of the front
wheel brake hose. On all models, install brake hose
in the calipers. With the wheels straight ahead,
pass the female end of the brake hose through the
support bracket.
5.
Make sure the tube seat is clean and connect the
break line tube nut to the caliper. Tighten securely.
6. Allowing the hose to seek a normal position, without
twist, insert hex of the hose fitting into the 12-point
hole in the support bracket and secure it in place
with the "V"-shaped retainer. Turn the steering
geometry from lock to lock while observing the hose.
CHEVROLET CHASSIS SERVICE MANUAL
Page 266 of 659
SECTION 6
ENGINE
CONTENTS
OF
THIS SECTION
Page
Engine Tune Up
6-1
Torque Sequence
Engine Mechanical
(In
Line)
6-12
Special Tools
. .
Engine Mechanical (V8)
6-24
Page
6-39
6-40
ENGINE TUNE UP
INDEX
Page
General Description
. 6-1
Mechanical Checks and Adjustments
6-1
Spark Plug Removal
6-1
Test Compression
6-1
Service and Install Spark Plugs
6-2
Service Ignition System
6-3
Service Battery
and
Battery Cables
6-5
Service Delcotron
and
Regulator
6-5
Service
Fan
Belt
6-5
Service Manifold Heat Valve
6-5
Tighten Manifold
6-5
Service Fuel Lines
and
Fuel Filter ..........
6-6
Service Cooling System
6-6
Check and Adjust Accelerator Linkage
6-6
Service Crankcase Ventilation
6-6
Service
Air
Injection Reactor System
6-6
Choke Adjustment
6-7
Page
Instrument Cheek-Out
6-7
Instrument Hook-Up.
. 6*7
Check and Adjust Dwell
6-7
Check Dwell Variation
6-7
Check and Adjust Timing
6-8
Adjust Idle Speed
and
Mixture
6-8
Additional Checks and Adjustments
. 6-8
Testing Crankcase Ventilation Valve
. 6-8
Testing Cranking Voltage
6-8
Cylinder Balance Test
. 6-8
Battery
6-8
Ignition
; 6-8
Carburetor
6-11
Fuel Pump
6-11
Cooling System
. 6-11
Cylinder Head Torque and Valve Adjustment
..... 6-11
GENERAL DESCRIPTION
The engine tune up
is
important
to the
modern automo-
tive engine with
its
vastly improved power and perform-
ance.
The
higher compression ratios, improved electri-
cal systems
and
other advances
in
design, make today1 s
engines more sensitive
and
have
a
decided effect
on
power, performance and fuel consumption.
It
is
seldom advisable
to
attempt
a
tune up
by
correc-
tion
of one or two
items only. Time will normally
be
saved
and
more lasting results assured
if the
technician
will follow
a
definite
and
thorough procedure
of
analysis
and correction
of all
items affecting power, performance
and economy.
The tune
up
will
be
performed
in
two parts.
The
first
part will consist
of
visual and mechanical checks and
ad-
justments;
the
second part will consist
of
an instrument
checkout that
can be
performed with
any one of the
units
of service equipment available
for
this purpose. Always
follow
the
instructions provided
by the
manufacturer
of
the particular equipment
to be
used.
Additional checks
and
adjustments
are
included
in the
latter part
of
this section
for use as
required. Many
of
these operations
can be
used
to
isolate and correct trou-
ble located during
the
tune up. Where conditions
are
UB-
covered requiring major corrective action, refer
to the
appropriate section
of
this manual
or the
Passenger
Chassis Overhaul Manual
for
detailed service informa-
tion.
Typical illustrations
and
procedures
are
used except
where specific illustrations
or
procedures
are
necessary
to clarify
the
operation. Illustrations showing bench
op-
erations
are
used
for
clarification however
all
operations
can
be
performed
on the
vehicle.
MECHANICAL CHECKS
AND
ADJUSTMENTS
Spark Plug Removal
Remove any foreign matter from around spark plugs
by
blowing
out
with compressed
air,
then disconnect wires
and remove plugs.
Test Compression
(Fig. 1)
The compression check
is
important because
an
engine
with
low or
uneven compression cannot
be
tuned success-
fully.
It is
essential that improper compression
be cor-
rected before proceeding with
the
engine tune
up.
1.
Remove
air
cleaner
and
block throttle
and
choke
in
wide open position.
2.
Hook
up
starter remote control cable
and
insert
compression gauge firmly
in
spark plug port.
CAUTION: Whenever
the
engine
is
cranked
CHEVROLET
C*
IS SERVICE MANUAL
Page 268 of 659
ENGINE
6-3
(ROUND) Y~~fll^H
CENTRIFUGAL
A ^k
ADVANCE--jflgKpl
MECHANISM
UB|
CAM
KSK^2
LUBRICATOR
VlSMi
REPLACEMENT
^BK
-^ADJUST
SQUARELY
AND
JUST
TOUCHING
LOBE
OF
CAM
/ROTOR
HBB
__
I^BH^F
?
(SOUARE)
^K^ I /—
CAM
jKft^J / LUBRICATOR
H^T^
CAUTION!
QV NEVER
OIL
•L-^
CAM LUBRICATOR-
REPLACE
WICK
WHEN
NECESSARY
LATERAL
MISALIGNMENT
PROPER
LATERAL ALIGNMENT
Fig.
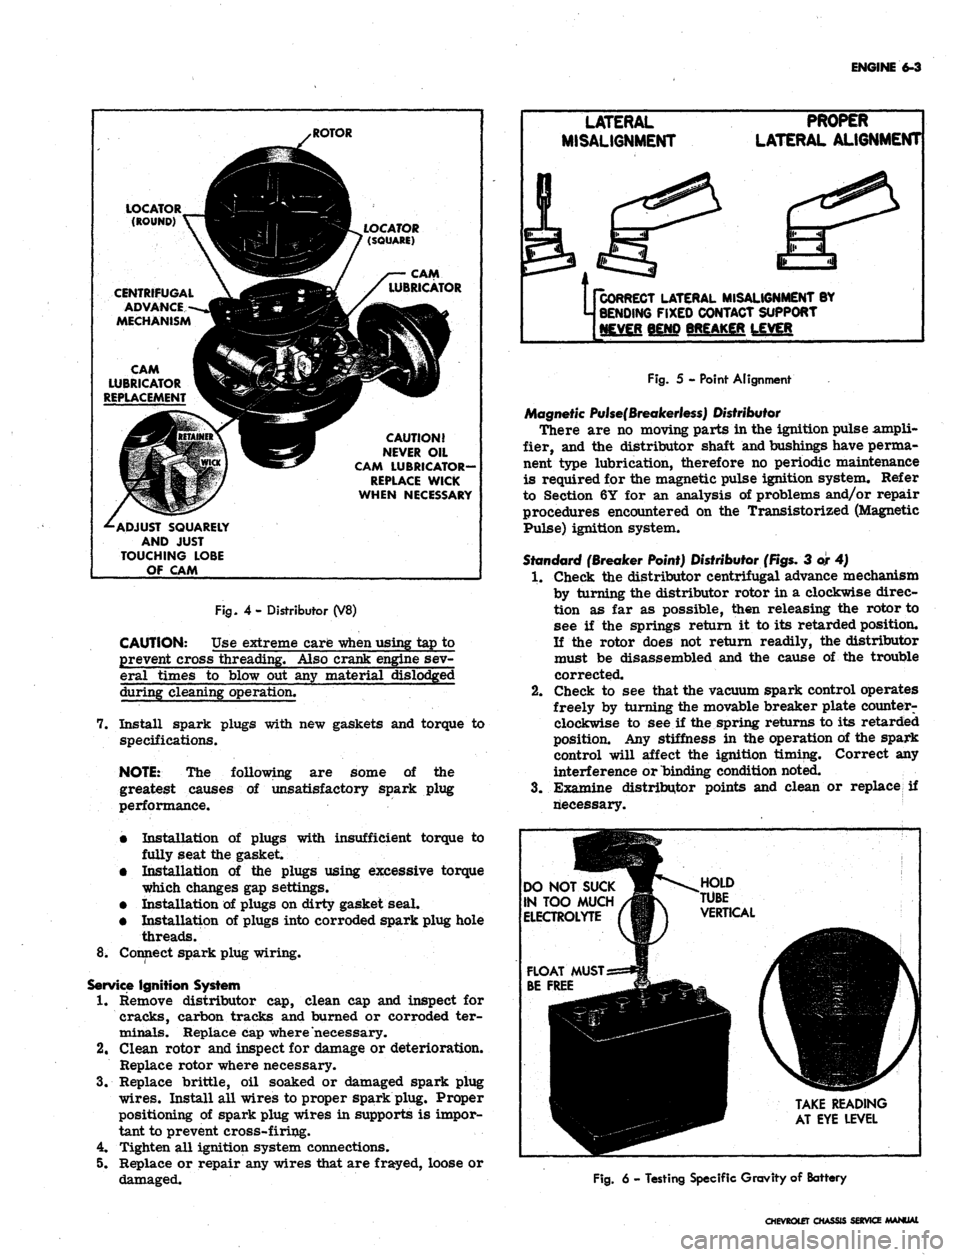
4- Distributor (V8)
CAUTION: Use extreme care
-when
using tap to
prevent cross threading. Also crank engine sev-
eral times to blow out any material dislodged
during cleaning operation.
7. Install spark plugs with new gaskets and torque to
specifications.
NOTE:
The following are some of the
greatest causes of unsatisfactory spark plug
performance.
•
Installation of plugs with insufficient torque to
fully seat the gasket.
•
Installation of the plugs using excessive torque
which changes gap settings.
•
Installation of plugs on dirty gasket seal.
•
Installation of plugs into corroded spark plug hole
threads.
8^ Connect spark plug wiring.
Service
Ignition System
1.
Remove distributor cap, clean cap and inspect for
cracks, carbon tracks and burned or corroded ter-
minals. Replace cap where necessary.
2.
Clean rotor and inspect for damage or deterioration.
Replace rotor where necessary.
3.
Replace brittle, oil soaked or damaged spark plug
wires.
Install all wires to proper spark plug. Proper
positioning of spark plug wires in supports is impor-
tant to prevent cross-firing.
4.
Tighten all ignition system connections.
5. Replace or repair any wires that are frayed, loose or
damaged.
Us
CORRECT
LATERAL MISALIGNMENT BY
j BENDING
FIXED CONTACT SUPPORT
[NEVER
BEND BREAKER LEVER
Fig.
5 - Point Alignment
Magnetic
Pulse(Breakerless)
Distributor
There are no moving parts in the ignition pulse ampli-
fier, and the distributor shaft and bushings have perma-
nent type lubrication, therefore no periodic maintenance
is required for the magnetic pulse ignition system. Refer
to Section 6Y for an analysis of problems and/or repair
procedures encountered on the Transistorized (Magnetic
Pulse) ignition system.
Standard
(Breaker Point) Distributor
(Figs.
3 or 4)
1.
Check the distributor centrifugal advance mechanism
by turning the distributor rotor in a clockwise direc-
tion as far as possible, then releasing the rotor to
see if the springs return it to its retarded position.
If the rotor does not return readily, the distributor
must be disassembled and the cause of the trouble
corrected.
2.
Check to see that the vacuum spark control operates
freely by turning the movable breaker plate counter-
clockwise to see if the spring returns to its retarded
position. Any stiffness in the operation of the spark
control will affect the ignition timing. Correct any
interference or binding condition noted.
3.
Examine distributor points and clean or replace if
riecessary.
DO
NOT SUCK
IN
TOO MUCH
ELECTROLYTE
TAKE
READING
AT
EYE LEVEL
Fig.
6 - Testing Specific Gravity of Battery
CHEVROtET
CHASSIS SERVICE MANUAL
Page 271 of 659
ENGINE 6-6
CHOKE VALVE
COMPLETELY
CLOSED
PULL UPWARD ON
ROD TO END OF
TRAVEL
BEND ROD
TO ADJUST
ROD IN BOTTOM
OF SLOT
BOTTOM OF
ROD SHOULD
EVENWITH
TOP OF
HOLE
CHOKE VALVE
CLOSED
BOTTOM OF
ROD SHOULD
BE EVEN WITH
TOP OF HOLE
TOP OF ROD
SHOULD BE EVEN
WITH BOTTOM
OF HOLE (CHOKE
CLOSED)
^..BEND ROD TO
ADJUST
_PULL DOWNWARD
ON ROD TO CON-
TACT STOP
L6 (TYPICAL)
V8 327-275 HP
V8 350-295 HP
BEND ROI
TO ADJUST
PULL UPWARD ON
ROD TO CONTACT
STOP ON BRACKET
ALL V8 (EXCEPT 327-275 HP
AND 350-295 HP)
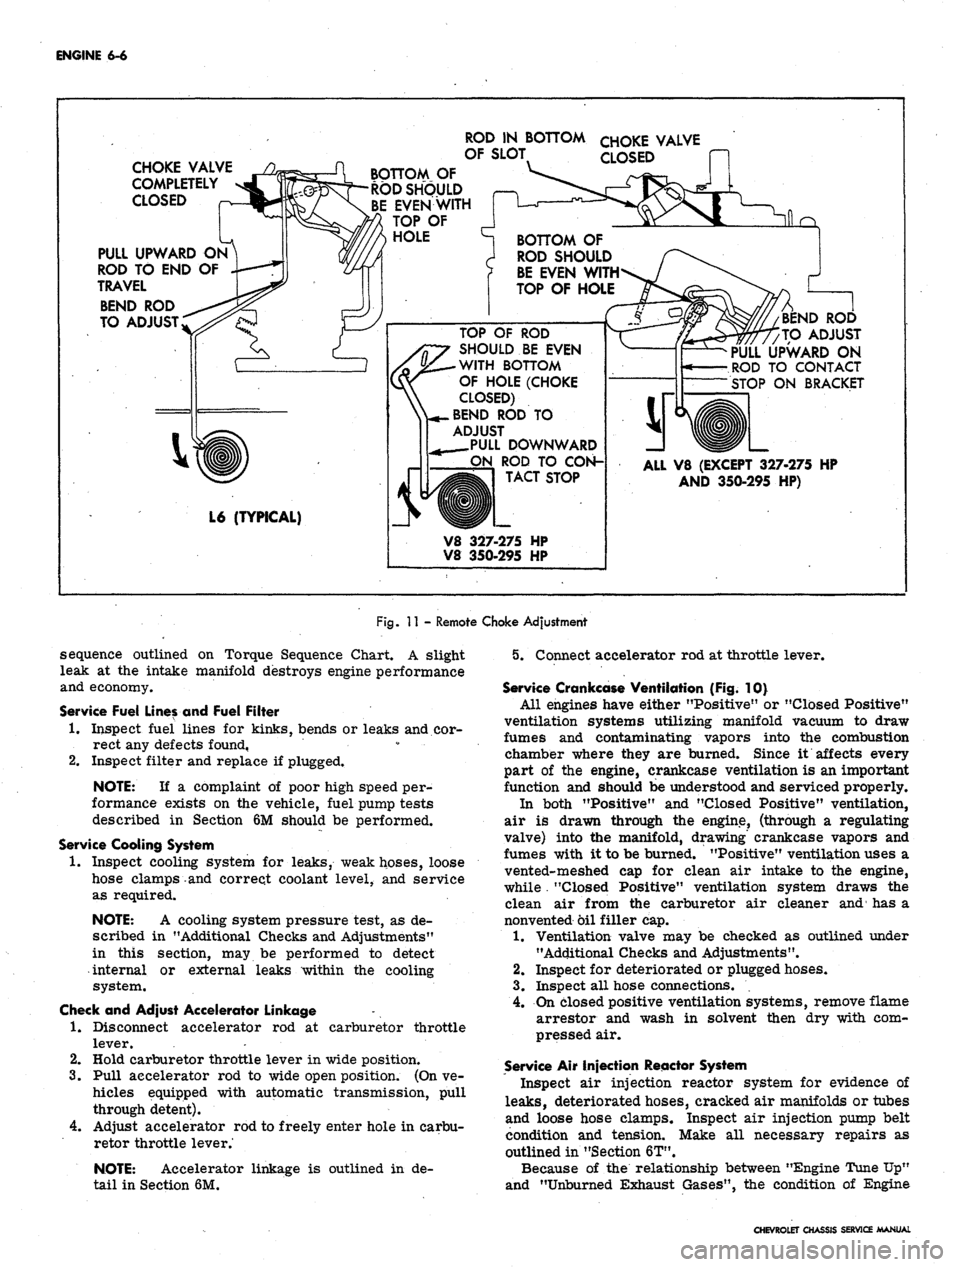
Fig.
11 - Remote Choke Adjustment
sequence outlined on Torque Sequence Chart. A slight
leak at the intake manifold destroys engine performance
and economy.
Service Fuel Lines and Fuel Filter
1.
Inspect fuel lines for kinks, bends or leaks and cor-
rect any defects found, • • •
2.
Inspect filter and replace if plugged.
NOTE:
If a complaint of poor high speed per-
formance exists on the vehicle, fuel pump tests
described in Section 6M should be performed.
Service Cooling System
1.
Inspect cooling system for leaks, weak hoses, loose
hose clamps and correct coolant level, and service
as required.
NOTE:
A cooling system pressure test, as de-
scribed in "Additional Checks and Adjustments"
in this section, may be performed to detect
internal or external leaks within the cooling
system.
Check and Adjust Accelerator Linkage
1.
Disconnect accelerator rod at carburetor throttle
lever.
2.
Hold carburetor throttle lever in wide position.
3.
Pull accelerator rod to wide open position. (On ve-
hicles equipped with automatic transmission, pull
through detent).
4.
Adjust accelerator rod to freely enter hole in carbu-
retor throttle lever.'
NOTE:
Accelerator linkage is outlined in de-
tail in Section 6M.
5. Connect accelerator rod at throttle lever.
Service Crankcase Ventilation (Fig. 10}
All engines have either "Positive" or "Closed Positive"
ventilation systems utilizing manifold vacuum to draw
fumes and contaminating vapors into the combustion
chamber where they are burned. Since it affects every
part of the engine, crankcase ventilation is an important
function and should be understood and serviced properly.
In both "Positive" and "Closed Positive" ventilation,
air is drawn through the engine, (through a regulating
valve) into the manifold, drawing' crankcase vapors and
fumes with it to be burned. "Positive" ventilation uses a
vented-meshed cap for clean air intake to the engine,
while . "Closed Positive" ventilation system draws the
clean air from the carburetor air cleaner and has a
nonvented oil filler cap.
1.
Ventilation valve may be checked as outlined under
"Additional Checks and Adjustments".
2.
Inspect for deteriorated or plugged hoses.
3.
Inspect all hose connections.
4.
On closed positive ventilation systems, remove flame
arrestor and wash in solvent then dry with com-
pressed air.
Service Air Injection Reactor System
Inspect air injection reactor system for evidence of
leaks,
deteriorated hoses, cracked air manifolds or tubes
and loose hose clamps. Inspect air injection pump belt
condition and tension. Make all necessary repairs as
outlined in "Section 6T".
Because of the relationship between "Engine Tune Up"
and "Unburned Exhaust Gases", the condition of Engine
CHEVROLET CHASSIS SERVICE MANUAL
Page 276 of 659
ENGINE 6-11
Fig.
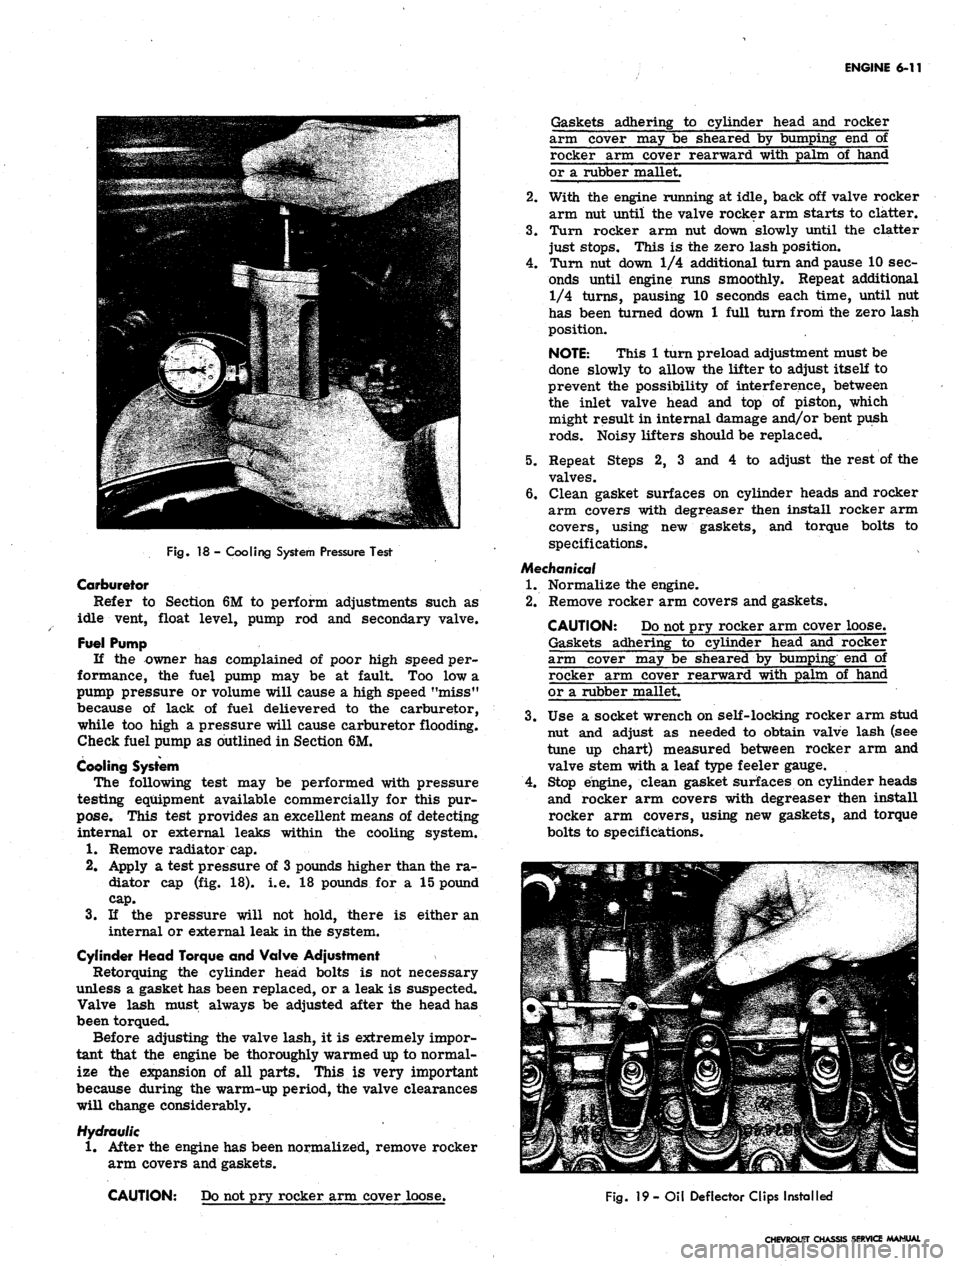
18 - Cooling System Pressure Test
Carburetor
Refer to Section 6M to perform adjustments such as
idle vent, float level, pump rod and secondary valve.
Fuel Pump
If the owner has complained of poor high speed per-
formance, the fuel pump may be at fault. Too low a
pump pressure or volume will cause a high speed "miss"
because of lack of fuel delievered to the carburetor,
while too high a pressure will cause carburetor flooding.
Check fuel pump as outlined in Section 6M.
Cooling System
The following test may be performed with pressure
testing equipment available commercially for this pur-
pose.
This test provides an excellent means of detecting
internal or external leaks within the cooling system.
1.
Remove radiator cap.
2.
Apply a test pressure of 3 pounds higher than the ra-
diator cap (fig. 18). i.e. 18 pounds for a 15 pound
cap.
3.
If the pressure will not hold, there is either an
internal or external leak in the system.
Cylinder Head Torque and Valve Adjustment
Retorquing the cylinder head bolts is not necessary
unless a gasket has been replaced, or a leak is suspected.
Valve lash must always be adjusted after the head has
been torqued.
Before adjusting the valve lash, it is extremely impor-
tant that the engine be thoroughly warmed up to normal-
ize the expansion of all parts. This is very important
because during the warm-up period, the valve clearances
will change considerably.
Hydraulic
1.
After the engine has been normalized, remove rocker
arm covers and gaskets.
CAUTION: Do not pry rocker arm cover loose.
Gaskets adhering to cylinder head and rocker
arm cover may be sheared by bumping end of
rocker arm cover rearward with palm of hand
or a rubber mallet.
2.
With the engine running at idle, back off valve rocker
arm nut until the valve rocker arm starts to clatter.
3.
Turn rocker arm nut down slowly until the clatter
just stops. This is the zero lash position.
4.
Turn nut down 1/4 additional turn and pause 10 sec-
onds until engine runs smoothly* Repeat additional
1/4 turns, pausing 10 seconds each time, until nut
has been turned down 1 full turn from the zero lash
position.
NOTE: This 1 turn preload adjustment must be
done slowly to allow the lifter to adjust itself to
prevent the possibility of interference, between
the inlet valve head and top of piston, which
might result in internal damage and/or bent push
rods.
Noisy lifters should be replaced.
5.
Repeat Steps 2, 3 and 4 to adjust the rest of the
valves.
6. Clean gasket surfaces on cylinder heads and rocker
arm covers with degreaser then install rocker arm
covers, using new gaskets, and torque bolts to
specifications.
Mechanical
1.
Normalize the engine.
2.
Remove rocker arm covers and gaskets.
CAUTION: Do not pry rocker arm cover loose.
Gaskets adhering to cylinder head and rocker
arm cover may be sheared by bumping end of
rocker arm cover rearward with palm of hand
or a rubber mallet.
3.
Use a socket wrench on self-locking rocker arm stud
nut and adjust as needed to obtain valve lash (see
tune up chart) measured between rocker arm and
valve stem with a leaf type feeler gauge.
4.
Stop engine, clean gasket surfaces on cylinder heads
and rocker arm covers with degreaser then install
rocker arm covers, using new gaskets, and torque
bolts to specifications.
Fig.
19
- Oil Deflector Clips Installed
CHEVROLET CHASSIS SERVICE MANUAL
Page 279 of 659
ENGINE 6-14
b.
Bolt transmission to engine, then raise engine and
transmission assembly and install flywheel to
converter attaching bolts.
c. Install converter
housing*
underpan and starter.
3.
Tilt and lower engine and transmission assembly into
the chassis as a unit, guiding engine to align front
mounts with frame supports.
4.
Install front mount through bolts and torque to
specifications.
5.
Raise engine enough to install rear crossmember,
then install crossmember, install rear mount, lower
engine and torque bolts to specifications.
6. Remove lifting device and lifting adapter then install
rocker arm cover as outlined.
7.
On synchromesh equipped vehicles, install clutch
cross shaft engine bracket, then adjust and connect
clutch as outlined in Section 7.
8. Connect:
• Speedometer cable.
• Shift linkage at transmission.
9; Install propeller shaft.
10.
Remove jack stands and lower vehicle.
11.
Connect:
Power steering pump lines (if disconnected).
Vacuum line to power brake unit (if disconnected).
Fuel line at fuel pump.
Exhaust pipe at manifold flange.
Accelerator linkage at manifold bellcrank.
12.
Connect wires at:
Coil
Oil pressure switch
Temperature switch
Delcotron
Starter solenoid
13.
Install pulley, fan blade and fan belt as outlined in
Section 6K.
14.
Install radiator and shroud as outlined in Section 13.
15.
Install and adjust hood as outlined in Section 11.
16.
Connect battery cables.
17.
Fill with coolant, engine oil and transmission oil,
then start engine and check for leaks.
18.
Perform necessary adjustments and install air
cleaner.
MANIFOLD ASSEMBLY
Removal
1.
Remove air cleaner.
2.
Disconnect both throttle rods at bellcrank and re-
move throttle return spring.
3.
Disconnect fuel and vacuum lines at carburetor.
Disconnect choke cable on \A engines.
4.
Disconnect crankcase ventilation hose at rocker arm
cover.
5.
Disconnect exhaust pipe at manifold flange and dis-
card packing.
6. Remove manifold attaching bolts and clamps then
remove manifold assembly and discard gaskets.
7.
Check for cracks in manifold castings.
8. If necessary to replace either intake or exhaust
manifolds, separate them by removing one bolt and
two nuts at center of assembly. Reassemble mani-
folds using a new gasket. Tighten finger tight and
torque to specifications after assembly to cylinder
head. Transfer all necessary parts.
Installation
1.
Clean gasket surfaces on cylinder head and
manifolds*
2.
Position new gasket over manifold end studs on head
and carefully install the manifold in position making
sure the gaskets are in place.
3.
Install bolts and clamps while holding manifold in
place with hand.
4.
Torque bolts to specifications.
NOTE: On L6 engines center bolt and end bolt
torque differ.
5.
Connect exhaust pipe to manifold using a new
packing.
6. Connect crankcase ventilation hose at rocker arm
cover.
7.
Connect fuel and vacuum lines at carburetor.
8. On L4 engines connect choke cable and adjust as out-
lines in Section 6M.
9. Connect throttle rods at bellcrank and install throttle
return spring.
10.
Install air cleaner, start engine, check for leaks and
adjust carburetor idle speed and mixture.
ROCKER ARM COVER
Removal
1.
Disconnect crankcase ventilation hose(s) at rocker
arm cover.
2.
Remove air cleaner.
3.
Disconnect temperature wire from rocker arm cover
clips.
4.
Remove rocker arm cover. '
CAUTION: Do Not pry rocker arm cover loose
Gaskets adhering to cylinder head and rocker
arm cover may be sheared by bumping end of
rocker arm cover rearward with palm of hand or
a rubber mallet.
Installation
1.
Clean gasket surfaces on cylinder head and rocker
arm cover with degreaser then, using anew gasket,
install rocker arm cover and torque bolts to
specifications.
2.
Connect temperature wire at rocker arm cover clips.
3.
Install air cleaner.
4.
Connect crankcase ventilation hoses.
VALVE MECHANISM
Removal
1.
Remove rocker arm cover as outlined.
2.
Remove rocker arm nuts, rocker arm
balls,
rocker
arms and push rods.
NOTE:
Place rocker arms, rocker arm balls
and push rods in a rack so they may be rein-
stalled in the same location.
Installation and Adjustment
NOTE:
Whenever new rocker arms and/or
rocker arm balls are being installed, coat bear-
ing surfaces of rocker arms and rocker arm
balls with Molykote or its equivalent.
1.
Install push rods,
socket.
Be sure push rods seat in lifter
CHEVROLET CHASSIS SERVICE MANUAL
Page 280 of 659
ENGINE 6-15
2.
Install rocker arms, rocker arm balls and rocker
arm
nuts.
\
Tighten rocker arm nuts until all lash is
eliminated. .
3.
Adjust valves when lifter is on base circle of cam-
shaft lobe as follows:
a. Mark distributor housing, with chalk, at each cyl-
inder position (plug wire) then disconnect plug
wires at spark plugs and coil and remove distri-
butor cap and plug wire assembly (if not previ-
ously done).
b.
Crank engine until distributor rotor points to
number one cylinder position and breaker points
are open. Both valves on number one cylinder
may now be adjusted.
c. Back out adjusting nut until lash is felt at the push
rod then turn in adjusting nut until all lash is re-
moved. This can be determined by checking push
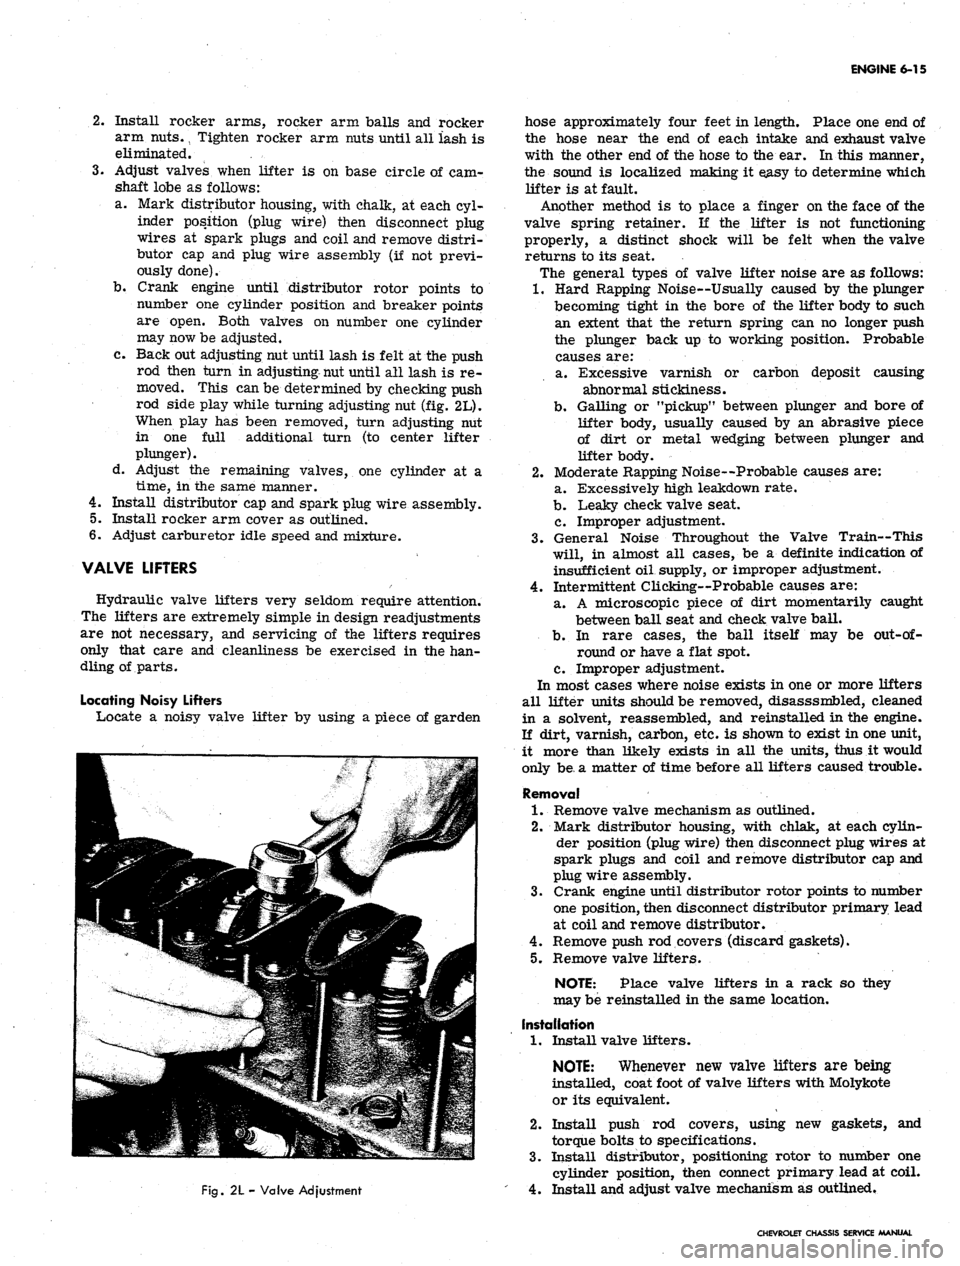
rod side play while turning adjusting nut (fig. 2L).
When play has been removed, turn adjusting nut
in one full additional turn (to center lifter
plunger).
d. Adjust the remaining valves, one cylinder at a
time,
in the same manner.
4.
Install distributor cap and spark plug wire assembly.
5.
Install rocker arm cover as outlined.
6. Adjust carburetor idle speed and mixture.
VALVE LIFTERS
Hydraulic valve lifters very seldom require attention.
The lifters are extremely simple in design readjustments
are not necessary, and servicing of the lifters requires
only that care and cleanliness be exercised in the han-
dling of parts.
Locating Noisy Lifters
Locate a noisy valve lifter by using a piece of garden
Fig.
2L - Valve Adjustment
hose approximately four feet in length. Place one end of
the hose near the end of each intake and exhaust valve
with the other end of the hose to the ear. In this manner,
the sound is localized making it easy to determine which
lifter is at fault.
Another method is to place a finger on the face of the
valve spring retainer. If the lifter is not functioning
properly, a distinct shock will be felt when the valve
returns to its seat.
The general types of valve lifter noise are as follows:
1.
Hard Rapping Noise--Usually caused by the plunger
becoming tight in the bore of the lifter body to such
an extent that the return spring can no longer push
the plunger back up to working position. Probable
causes are:
a. Excessive varnish or carbon deposit causing
abnormal stickiness.
b.
Galling or "pickup" between plunger and bore of
lifter body, usually caused by an abrasive piece
of dirt or metal wedging between plunger and
lifter body.
2.
Moderate Rapping Noise--Probable causes are:
a. Excessively high leakdown rate.
b.
Leaky check valve seat.
c. Improper adjustment.
3.
General Noise Throughout the Valve Train—This
will, in almost all cases, be a definite indication of
insufficient oil supply, or improper adjustment.
4.
Intermittent Clicking—Probable causes are:
a. A microscopic piece of dirt momentarily caught
between ball seat and check valve ball.
b.
In rare cases, the ball itself may be
out-of-
round or have a flat spot.
c. Improper adjustment.
In most cases where noise exists in one or more lifters
all lifter units should be removed, disasssmbled, cleaned
in a solvent, reassembled, and reinstalled in the engine.
If dirt, varnish, carbon, etc. is shown to exist in one unit,
it more than likely exists in all the units, thus it would
only be, a matter of time before all lifters caused trouble.
Removal
1.
Remove valve mechanism as outlined.
2.
Mark distributor housing, with chlak, at each cylin-
der position (plug wire) then disconnect plug wires at
spark plugs and coil and remove distributor cap and
plug wire assembly.
3.
Crank engine until distributor rotor points to number
one position, then disconnect distributor primary lead
at coil and remove distributor.
4.
Remove push rod covers (discard gaskets).
5.
Remove valve lifters.
NOTE: Place valve lifters in a rack so they
may be reinstalled in the same location.
Installation
1.
Install valve lifters.
NOTE:
Whenever new valve lifters are being
installed, coat foot of valve lifters with Molykote
or its equivalent.
2.
Install push rod covers, using new gaskets, and
torque bolts to specifications.
3.
Install distributor, positioning rotor to number one
cylinder position, then connect primary lead at coil.
4.
Install and adjust valve mechanism as outlined.
CHEVROLET CHASSIS SERVICE MANUAL