compression ratio CHEVROLET CAMARO 1967 1.G Chassis Workshop Manual
[x] Cancel search | Manufacturer: CHEVROLET, Model Year: 1967, Model line: CAMARO, Model: CHEVROLET CAMARO 1967 1.GPages: 659, PDF Size: 114.24 MB
Page 179 of 659
FRONT SUSPENSION 3-15
4.
Insert Spring Compressor J-
6874-
4-
5 with Adapters
J-6874-8-9 into upp^r spring tower so that lower
MU"
bolt fits into shock absorber mounting holes in
spring seat (fig. 23). Secure the two lower studs to
the spring seat with nuts.
5.
Fit the tool upper pilot to top of spring and compress
spring by tightening upper nut (fig. 24). Compress
spring until screw is bottomed out.
6. Remove lower spring seat retaining nuts, lift spring
and seat assembly from control arm and guide it
down and out through fender skirt (fig. 25).
Spring Seat Replacement (Fig. 26)
1.
Release spring tension and disconnect spring com-
pressor from spring seat.
2.
Install new spring seat to spring compressor.
Installation
1.
If spring is to be replaced, install new spring into
tool and compress spring until screw is bottomed
out.
NOTE: Spring coil ends must be against spring
stops in upper and lower seats.
2.
Lift spring and tool assembly into place and position
so that the upper spring stop is inboard.
NOTE: Locating tab on upper spring seat may
be flattened before reinstalling spring.
3.
Install lower spring seat to control arm and torque
nuts as shown in the Specifications.
4.
Loosen spring compressor until spring is properly
seated in upper spring tower and remove.
5.
Install shock abosrber as outlined under Shock Ab-
sorber—Installation in this section.
Corvette
Removal
1.
With car on suitable hoist or jack, (support vehicle
by frame so control arms may swing free) remove
wheel and tire assembly, stabilizer bar and shock
absorber. Loosen the lower ball joint to steering
knuckle nut, and the' two lower control arm cross
shaft bushing bolts.
2.
Place Tool J-6874-1 across top of sixth coil (ap-
prox.),
then loosely secure Tool J-6874-2 to the up-
per shoe, with attaching capscrews and lock washers.
The upper shoe "V" notch and lower shoe raised land
should contact spring.
3.
Insert Tool J-6874 up through center of spring and
attach to upper and lower shoe assembly.
4.
Position spacers under shock absorber mounting hole
and against bottom of lower control arm. Install
special bearing washer and Tool J-6874-5. Locate
bearing against spacer and large washer against
bearing. Feed screw up through large washer bear-
ing and spacer and thread into Tool J-6874 and
tighten snugly (fig. 22).
5.
Center shoe assembly on spring and tighten screw
until a very slight compression is placed on spring
(fig. '22). Then firmly tighten down the two cap-
screws securing the upper and lower shoes to lock
these shoes to spring.
6. Turn head of screw until spring is compressed just
enough to clear the spring tower, then remove the
lower ball joint to steering knuckle nut (fig. 22).
NOTE: It may be necessary to assist the
spring out of the spring tower with a pry bar or
a similar tool.
7.
Disconnect the lower ball joint from the steering
knuckle and lower the control arm with the com-
pressed spring. Immediately release compression
on spring by backing off long screw. Release spring
and tool and withdraw spring.
CAUTION: The spring force under compres-
sion is very large. Exercise every safety pre-
caution when performing this operation to see
that individuals and materials subject to damage
are removed from the path of the spring when
the control arm is being lowered. Also, the
compressed spring
be relaxed immedi-
ately after lowering the control arm to reduce
the time of exposure to the large compressive
force.
Installation
1.
Position spring with closely coiled end up. Place
Tool J-6874-1 across the top of the sixth coil (ap-
prox.) then loosely secure Tool J-6874-2 to the
upper shoe with attaching capscrews and lock wash-
ers.
The upper shoe MV" notch and lower shoe
raised land should contact spring.
2.
Insert Tool J-6874 up through center of spring and
attach to upper and lower shoe assembly with bolt
and nut.
3.
Set spring in its seat on the lower control arm.
4.
Position spacers centrally under shock absorber
mounting hole and against bottom of lower control
arm. Install bearing, large washer and Tool
J-6874-5.
Locate bearing against spacer and large
washer against bearing. Feed the screw up through
large washer, bearing and spacer and thread into
yoke rod. Tighten snugly, but do not start to draw
down yet
5.
Center the shoe assembly on the spring and tighten
the lag screw until a very slight compression is
placed on spring, then firmly tighten down the two
capscrews securing the upper and lower shoes. This
will lock the shoes to the coil spring.
6. Turn head of screw until spring is compressed just
enough to clear the spring tower.
NOTE: It may be necessary to assist the
spring into the spring tower with a pry bar or
similar tool.
7.
Immediately install the lower ball joint into steering
knuckle and secure in place with attaching nut.
8. Release compression on spring and at the same time
use a drift to guide the coil spring into its proper
seat. End of coils must be 3/8" from coil stops in
spring seat.
9. Tighten the lower ball joint to steering knuckle nut
and lock with cotter key.
10.
Install shock absorber and stabilizer bar.
11.
Install wheel, tire and drum assembly.
12.
Remove car from hoist or jack stands.
13.
Tighten the two lower control cross shaft bushing
bolts to 45-55 lbs. ft. torque.
NOTE: If a suitable adjustable jack-stand is
CHEVROLET CHASSIS SERVICE MANUAL
Page 240 of 659
BRAKES 5-7
LATCH PLATE
DIE BLOCK
TUBE
UPSET FLARE PUNCH
RAM GUIDE
STOP PLATE
Fig.
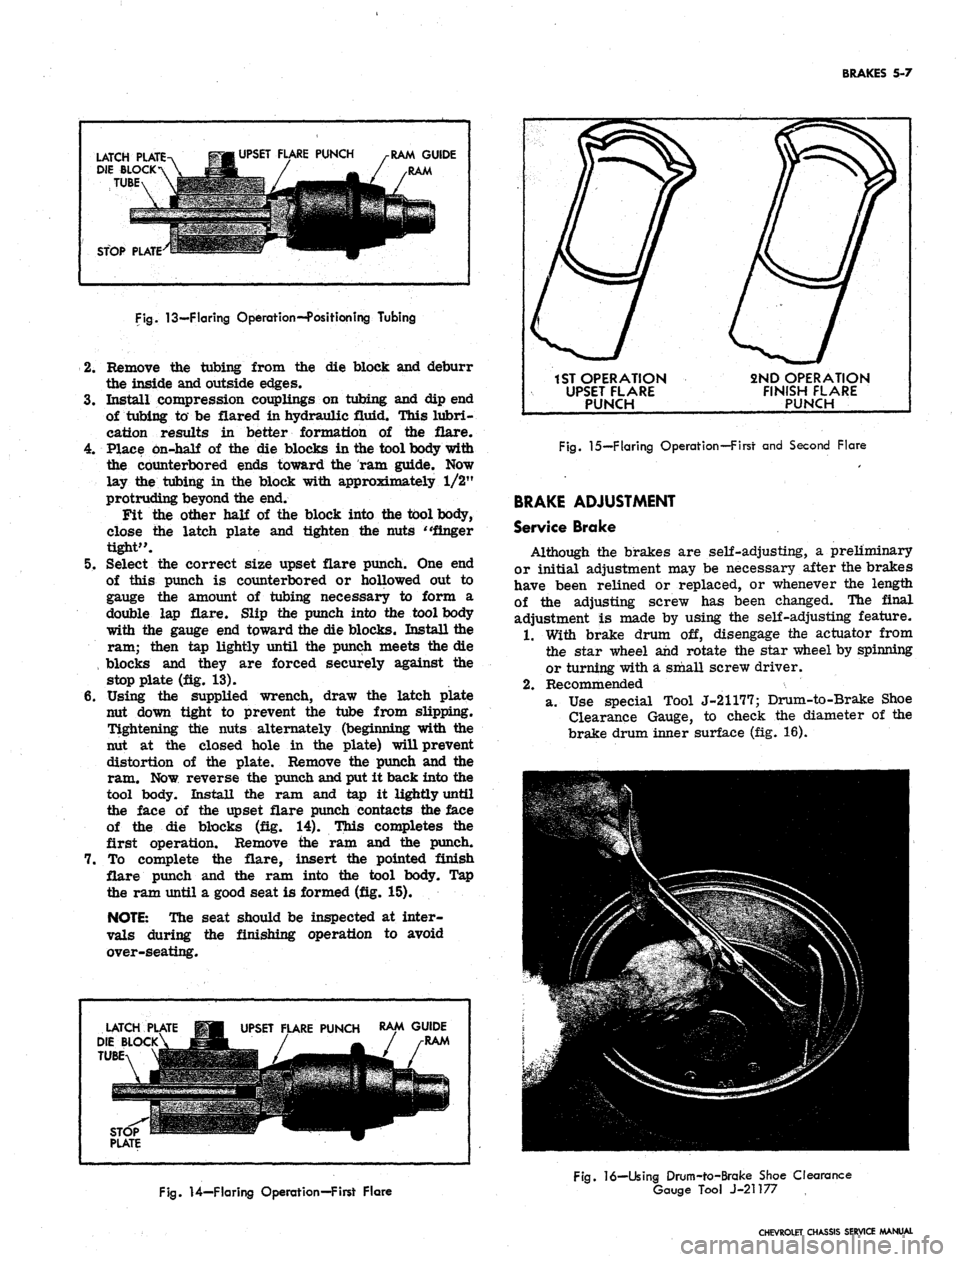
13—Flaring Operation--Position ing Tubing
2.
Remove the tubing from the die block and deburr
the inside and outside edges.
3.
Install compression couplings on tubing and dip end
of tubing to be flared in hydraulic fluid. This lubri-
cation results in better formation of the flare.
4.
Place on-half of the die blocks in the tool body with
the counterbored ends toward the ram guide. Now
lay the tubing in the block with approximately 1/2"
protruding beyond the end.
Fit the other half of the block into the tool body,
close the latch plate and tighten the nuts "finger
tight".
5. Select the correct size upset flare punch. One end
of this punch is counterbored or hollowed out to
gauge the amount of tubing necessary to form a
double lap flare. Slip the punch into the tool body
with the gauge end toward the die blocks. Install the
ram; then tap lightly until the punch meets the die
, blocks and they are forced securely against the
stop plate (fig. 13).
6. Using the supplied wrench, draw the latch plate
nut down tight to prevent the tube from slipping.
Tightening the nuts alternately (beginning with the
nut at the closed hole in the plate) will prevent
distortion of the plate. Remove the punch and the
ram. Now reverse the punch and put it back into the
tool body. Install the ram and tap it lightly until
the face of the upset flare punch contacts the face
of the die blocks (fig. 14). This completes the
first operation. Remove the ram and the punch.
7. To complete the flare, insert the pointed finish
flare punch and the ram into the tool body. Tap
the ram until a good seat is formed (fig. 15).
NOTE:
The seat should be inspected at inter-
vals during the finishing operation to avoid
over-seating.
LATCH
DIE BLOCK
TUBE
UPSET FLARE PUNCH
RAM GUIDE
RAM
1ST OPERATION
UPSET FLARE
PUNCH
2ND OPERATION
FINISH FLARE
PUNCH
Fig.
15—Flaring Operation—First and Second Flare
BRAKE ADJUSTMENT
Service Brake
Although the brakes are self-adjusting, a preliminary
or initial adjustment may be necessary after the brakes
have been relined or replaced, or whenever the length
of the adjusting screw has been changed. The final
adjustment is made by using the self-adjusting feature.
1.
With brake drum off, disengage the actuator from
the star wheel and rotate the star wheel by spinning
or turning with a small screw driver.
2.
Recommended
a. Use special Tool J-21177; Drum-to-Brake Shoe
Clearance Gauge, to check the diameter of the
brake drum inner surface (fig. 16).
Fig.
14—Flaring Operation—First Flare
Fig.
16—Using Drum-to-Brake Shoe Clearance
Gauge Tool J-21177
CHEVROLET CHASSIS SERVICE MANUAL
Page 266 of 659
SECTION 6
ENGINE
CONTENTS
OF
THIS SECTION
Page
Engine Tune Up
6-1
Torque Sequence
Engine Mechanical
(In
Line)
6-12
Special Tools
. .
Engine Mechanical (V8)
6-24
Page
6-39
6-40
ENGINE TUNE UP
INDEX
Page
General Description
. 6-1
Mechanical Checks and Adjustments
6-1
Spark Plug Removal
6-1
Test Compression
6-1
Service and Install Spark Plugs
6-2
Service Ignition System
6-3
Service Battery
and
Battery Cables
6-5
Service Delcotron
and
Regulator
6-5
Service
Fan
Belt
6-5
Service Manifold Heat Valve
6-5
Tighten Manifold
6-5
Service Fuel Lines
and
Fuel Filter ..........
6-6
Service Cooling System
6-6
Check and Adjust Accelerator Linkage
6-6
Service Crankcase Ventilation
6-6
Service
Air
Injection Reactor System
6-6
Choke Adjustment
6-7
Page
Instrument Cheek-Out
6-7
Instrument Hook-Up.
. 6*7
Check and Adjust Dwell
6-7
Check Dwell Variation
6-7
Check and Adjust Timing
6-8
Adjust Idle Speed
and
Mixture
6-8
Additional Checks and Adjustments
. 6-8
Testing Crankcase Ventilation Valve
. 6-8
Testing Cranking Voltage
6-8
Cylinder Balance Test
. 6-8
Battery
6-8
Ignition
; 6-8
Carburetor
6-11
Fuel Pump
6-11
Cooling System
. 6-11
Cylinder Head Torque and Valve Adjustment
..... 6-11
GENERAL DESCRIPTION
The engine tune up
is
important
to the
modern automo-
tive engine with
its
vastly improved power and perform-
ance.
The
higher compression ratios, improved electri-
cal systems
and
other advances
in
design, make today1 s
engines more sensitive
and
have
a
decided effect
on
power, performance and fuel consumption.
It
is
seldom advisable
to
attempt
a
tune up
by
correc-
tion
of one or two
items only. Time will normally
be
saved
and
more lasting results assured
if the
technician
will follow
a
definite
and
thorough procedure
of
analysis
and correction
of all
items affecting power, performance
and economy.
The tune
up
will
be
performed
in
two parts.
The
first
part will consist
of
visual and mechanical checks and
ad-
justments;
the
second part will consist
of
an instrument
checkout that
can be
performed with
any one of the
units
of service equipment available
for
this purpose. Always
follow
the
instructions provided
by the
manufacturer
of
the particular equipment
to be
used.
Additional checks
and
adjustments
are
included
in the
latter part
of
this section
for use as
required. Many
of
these operations
can be
used
to
isolate and correct trou-
ble located during
the
tune up. Where conditions
are
UB-
covered requiring major corrective action, refer
to the
appropriate section
of
this manual
or the
Passenger
Chassis Overhaul Manual
for
detailed service informa-
tion.
Typical illustrations
and
procedures
are
used except
where specific illustrations
or
procedures
are
necessary
to clarify
the
operation. Illustrations showing bench
op-
erations
are
used
for
clarification however
all
operations
can
be
performed
on the
vehicle.
MECHANICAL CHECKS
AND
ADJUSTMENTS
Spark Plug Removal
Remove any foreign matter from around spark plugs
by
blowing
out
with compressed
air,
then disconnect wires
and remove plugs.
Test Compression
(Fig. 1)
The compression check
is
important because
an
engine
with
low or
uneven compression cannot
be
tuned success-
fully.
It is
essential that improper compression
be cor-
rected before proceeding with
the
engine tune
up.
1.
Remove
air
cleaner
and
block throttle
and
choke
in
wide open position.
2.
Hook
up
starter remote control cable
and
insert
compression gauge firmly
in
spark plug port.
CAUTION: Whenever
the
engine
is
cranked
CHEVROLET
C*
IS SERVICE MANUAL
Page 620 of 659
ACCESSORIES 15-11
12 VOLTS D.C.
ELECTRIC BRAKE
RELEASE
IGNITION
SWITCH
ENGINE
VACUUM
TRANSDUCER
Fig.
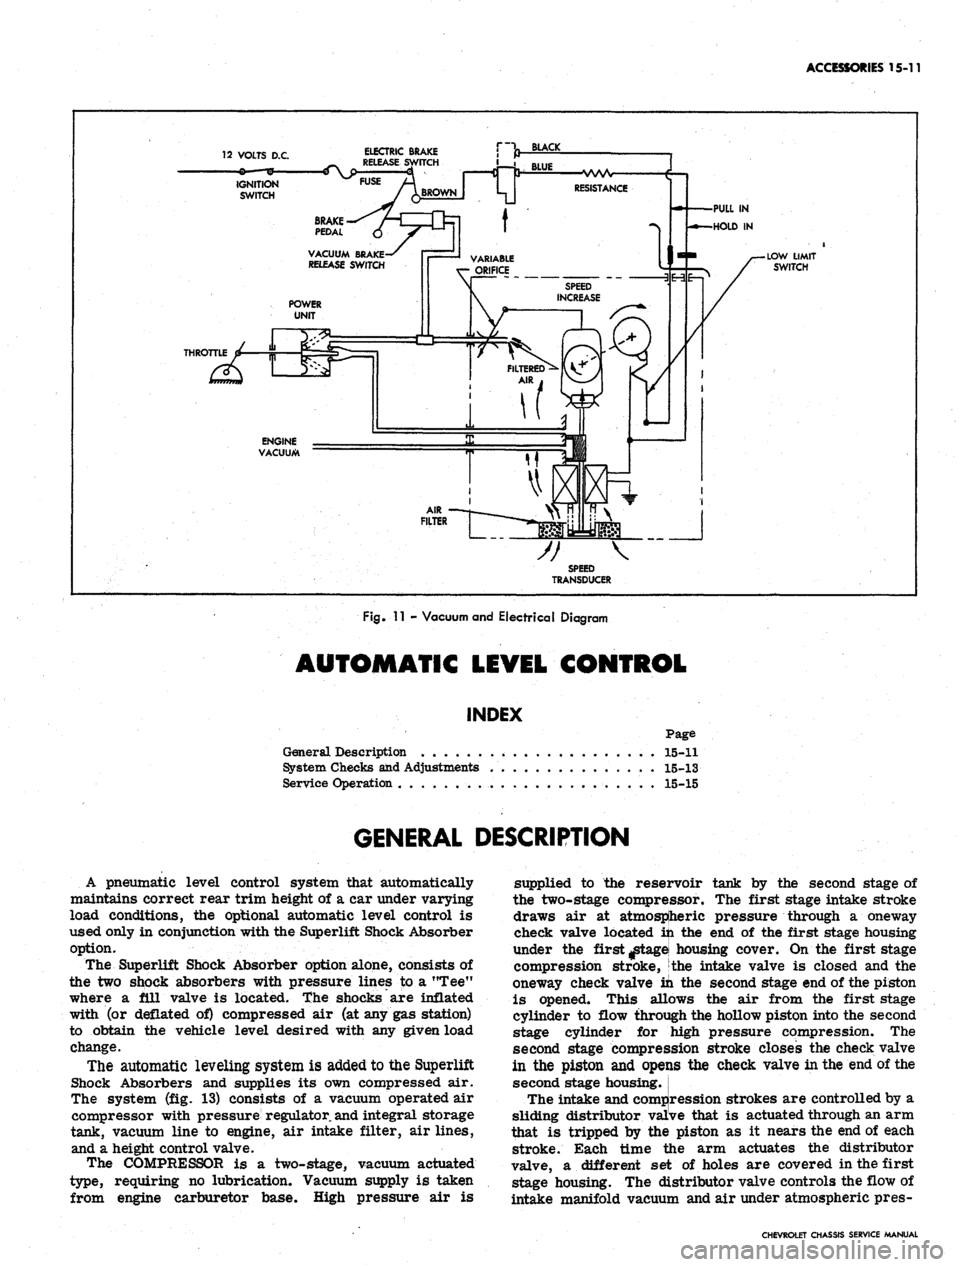
11 - Vacuum and Electrical Diagram
AUTOMATIC LEVEL CONTROL
INDEX
Page
General Description . . 15-11
System Checks and Adjustments 15-13
Service Operation . 15-15
GENERAL DESCRIPTION
A pneumatic level control system that automatically
maintains correct rear trim height of a car under varying
load conditions, the optional automatic level control is
used only in conjunction with the Superlift Shock Absorber
option.
The Superlift Shock Absorber option alone, consists of
the two shock absorbers with pressure lines to a "Tee"
where a ill valve is located, the shocks are inflated
with (or deflated of) compressed air (at any gas station)
to obtain the vehicle level desired with any given load
change.
The automatic leveling system is added to the Superlift
Shock Absorbers and supplies its own compressed air.
The system (fig. 13) consists of a vacuum operated air
compressor with pressure regulator,
and
integral storage
tank, vacuum line to engine, air intake filter, air lines,
and a height control valve.
The COMPRESSOR is a two-stage, vacuum actuated
type, requiring no lubrication. Vacuum supply is taken
from engine carburetor base. High pressure air is
supplied to the reservoir tank by the second stage of
the two-stage compressor. The first stage intake stroke
draws air at atmospheric pressure through a oneway
check valve located in the end of the first stage housing
under the first ^tagei housing cover. On the first stage
compression stroke, the intake valve is closed and the
oneway check valve in the second stage end of the piston
is opened. This allows the air from the first stage
cylinder to flow through the hollow piston into the second
stage cylinder for jhigh pressure compression. The
second stage compression stroke closes the check valve
in the piston and opeijis the check valve in the end of the
second stage housing.
The intake and compression strokes are controlled by a
sliding distributor valive that is actuated through an arm
that is tripped by the piston as it nears the end of each
stroke. Each time the arm actuates the distributor
valve, a different set of holes are covered in the first
stage housing. The distributor valve controls the flow of
intake manifold vacuum and air under atmospheric pres-
CHEVROLET CHASSIS SERVICE MANUAL
Page 633 of 659
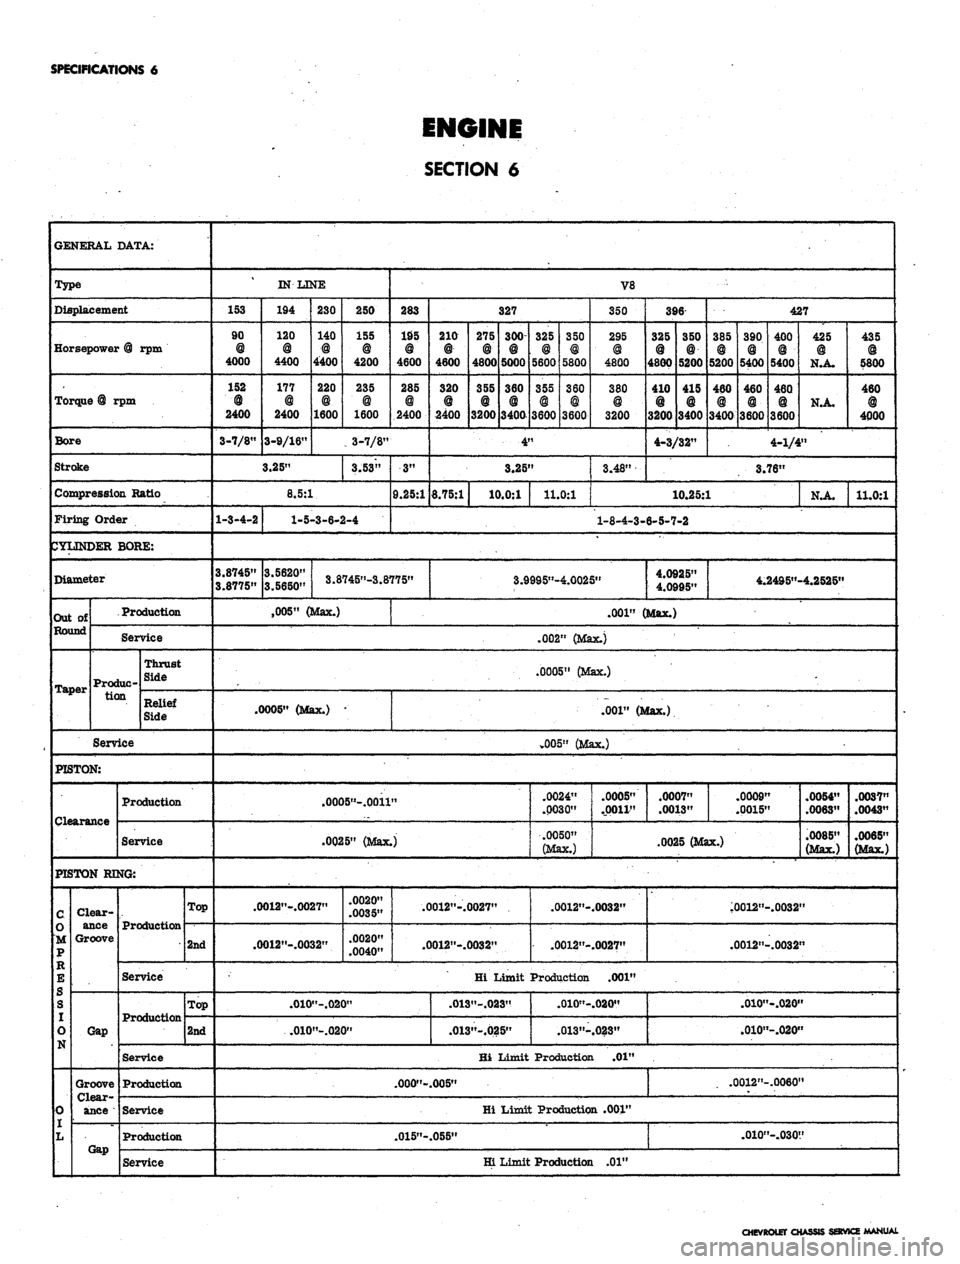
SPECIFICATIONS 6
ENGINE
SECTION 6
GENERAL DATA:
Type
Displacement
Horsepower
@
rpm
Torque
@
rpm
Bore
Stroke
Compression Ratio
Firing Order
CYLINDER BORE:
Diameter
Out of
Round
Taper
. Production
Service
Produc-
tion
Thrust
Side
Relief
Side
Service
PISTON:
Production
Service
PISTON RING:
C
O
M
P
K
E
g
S
I
o
0
r
L
Clear-
ance
Groove
Gap
Groove
Clear-
ance
Gap
Production
Top
2nd
Service
Production
Top
2nd
Service
Production
Service
Production
Service
IN LINE
153
90
@
4000
152
@
2400
3-7/8"
194
120
4400
177
2400
3-9/16"
230
140
@
4400
220
@
1600
250
155
@
4200
235
@
1600
V8
283
195
@
4600
285
@
2400
3-7/8"
3.25"
3.53"
8.5:1
1-3-4-2
3.8745"
3.8775"
1-5-3-6-2-4
3.5620"
3.5650"
3"
9.25:1
327
210
@
4600
320
@
2400
275
@
4800
355
@
3200
300
@
5000
360
@
3400
325
@
5600
355
©
3600
350
5800
360
3600
350
295
@
4800
380
@
3200
4"
3.25"
«.75:1
10.0:1
11.0:1
3.48"
396
325
@
4800
410
@
3200
350
@
5200
415
3400
4-3/32"
427
385
5200
460
@
3400
390
@
5400
460
3600
400
@
5400
460
3600
425
N.A.
N.A.
435
@
5800
460
@
4000
4-1/4"
3.76"
10.25:
L
N«A.
11.0:1
1-8-4-3-6-5-7-2
3.8745"-3.8775"
,005"
(Max.)
.0005"
(Max.) -'
3.9995n-4.0025"
4.0925"
4.0995"
.001"
(Max.)
.002"
(Max.)
.0005"
(Max.)
.001"
(Max.)
v005» (Max.)
4.2495"-4.2525"
.OOO5»-.OO11
"
.0025"
(Max.)
.0012"-.0027"
.0012"-.0032"
;•
.0020"
.0035"
.0020"
.0040"
.0012"-.0O27"
.0012"-.0032"
.010"-.020"
.010"-.020"
.000"-
.015"-
.01S
.01;
.005"
.055"
Hi Limit
"-.023"
l"-.025"
Hi Limit
Hi Limil
.0024"
.0030"
.0050"
(Max.)
.0005"
.0007"
.0013"
.0009"
.0015"
.0025 (Max.)
.0012"-.0032"
.0012"-.OO27"
Production .001"
.010"-.020"
.013"-.023"
Production .01"
: Production .001"
f0012"-.0032
.0012"-.0032
.0054"
.0063"
.0085"
(Max.)
ii
tt
.0037"
.0043"
.0065"
(Max.)
.010"-.020"
.010"-.020"
.0012"-.0060
.010"-.030
t
t
Hi Limit Production .01"
CHEVROLET CHASSIS S8RVICE MANUAL