service CHEVROLET CAMARO 1967 1.G Chassis Workshop Manual
[x] Cancel search | Manufacturer: CHEVROLET, Model Year: 1967, Model line: CAMARO, Model: CHEVROLET CAMARO 1967 1.GPages: 659, PDF Size: 114.24 MB
Page 3 of 659
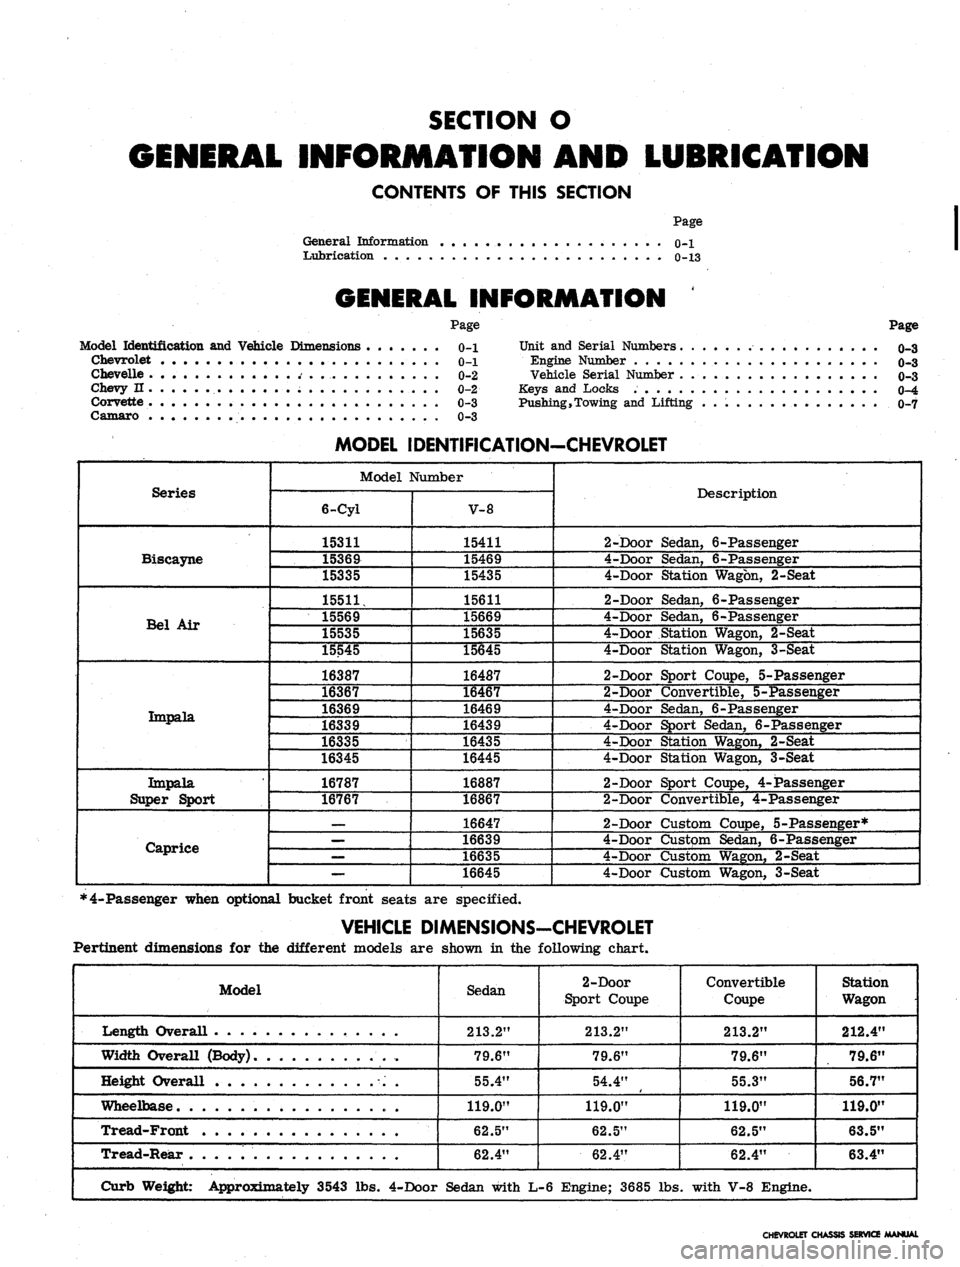
SECTION O
INFORMATION AND LUBRICATION
CONTENTS OF THIS SECTION
Page
General Information o-l
Lubrication 0-13
GENERAL INFORMATION
Model Identification and Vehicle Dimensions
Chevrolet
Chevelle
Chevy n
Corvette
Camaro
Page
0-1
0-1
0-2
0-2
0-3
0-3
Page
Unit and Serial Numbers o-3
Engine Number o-3
Vehicle Serial Number 0r3
Keys and Locks 0-4
Pushing,Towing and Lifting 0-7
Series
Biscayne
Bel Air
Tmpala.
Impala
Super Sport
Caprice
MODEL IDENTIFICATION-CHEVROLET
Model Number
6-Cyl
15311
15369
15335
15511,
15569
15535
15545
16387
16367
16369
16339
16335
16345
16787
16767
—
—
—
—
V-8
15411
15469
15435
15611
15669
15635
15645
16487
16467
16469
16439
16435
16445
16887
16867
16647
16639
16635
16645
Description
2-Door Sedan, 6-Passenger
4-Door Sedan, 6-Passenger
4-Door Station Wagon, 2-Seat
2-Door Sedan, 6-Passenger
4-Door Sedan, 6-Passenger
4-Door Station Wagon, 2-Seat
4-Door Station Wagon, 3-Seat
2-Door Sport Coupe, 5-Passenger
2-Door Convertible, 5-Passenger
4-Door Sedan, 6-Passenger
4-Door Sport Sedan, 6-Passenger
4-Door Station Wagon, 2-Seat
4-Door Station Wagon, 3-Seat
2-Door Sport Coupe, 4-Passenger
2-Door Convertible, 4-Passenger
2-Door Custom Coupe, 5-Passenger*
4-Door Custpm Sedan, 6-Passenger
4-Door Custom Wagon, 2-Seat
4-Door Custom Wagon, 3-Seat
*4-Passenger when optional bucket front seats are specified.
VEHICLE DIMENSIONS-CHEVROLET
Pertinent dimensions for the different models are shown in the following chart.
Model
Length Overall . .
Width Overall (Body)
Height Overall
Wheelbase
Tread-Front
Tread-Rear
Curb Weight: Approximately 3543 lbs.
Sedan
213.2"
79.6"
55.4"
119.0"
62.5"
62.4"
4-Door Sedan with
2-Door
Sport Coupe
213.2"
79.6"
54.4"
119.0"
62.5"
62.4"
L-6 Engine; 3685 lbs
Convertible
Coupe
213.2"
79.6"
55.3"
119.0"
62.5"
62.4"
. with V-8 Engine.
Station
Wagon
212.4"
79.6"
56.7"
119.0"
63.5"
63.4"
CHEVROLET CHASSIS SERVICE MANUAL
Page 4 of 659
GENERAL INFORMATION 0-2
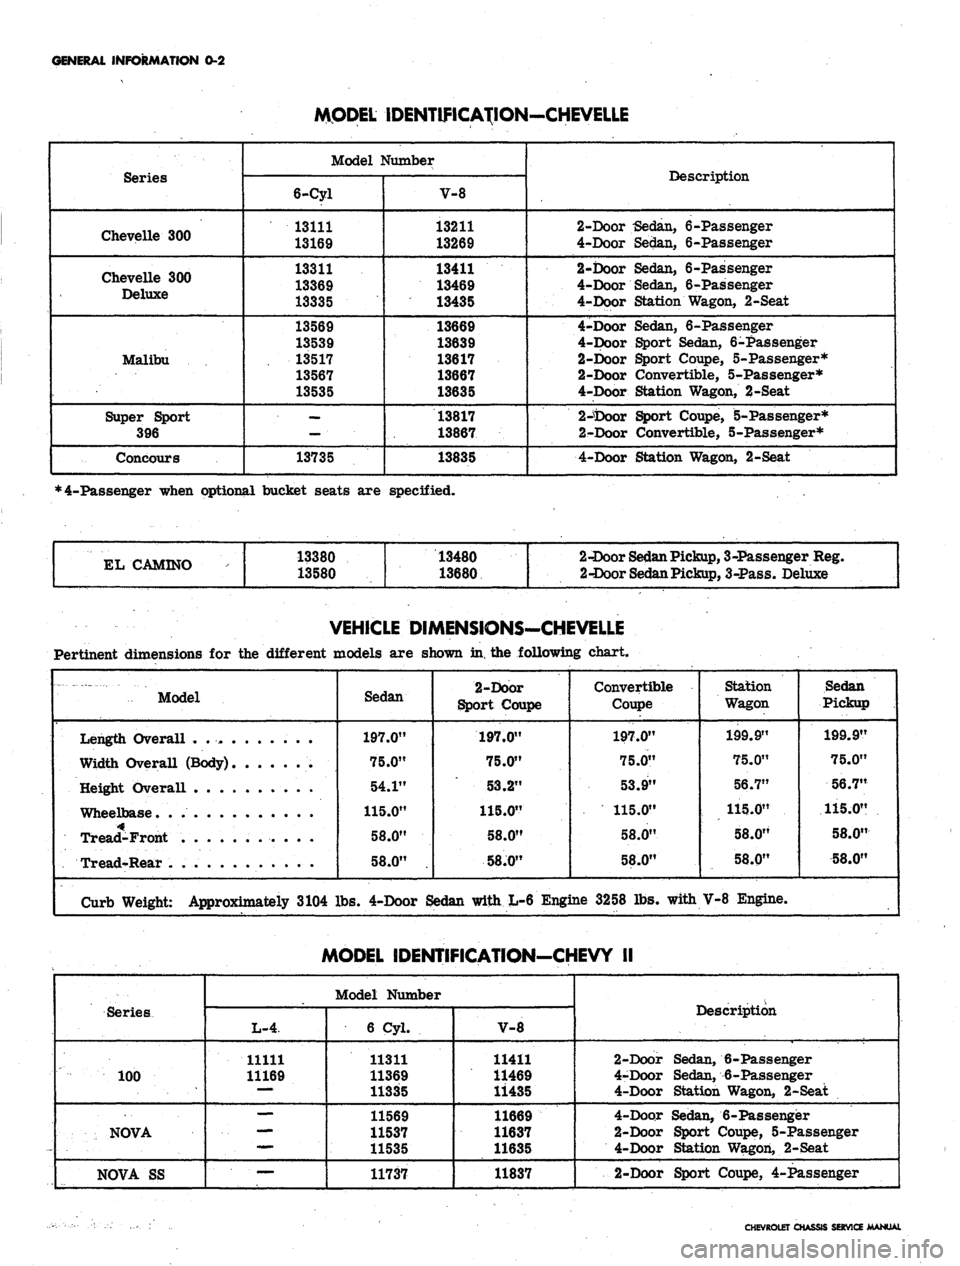
MODEL IDENTIFICATION-CHEVELLE
Series
Chevelle 300
Chevelle 300
Deluxe
Malibu
Super Sport
396
Concours
Model Number
6-Cyl
13111
13169
13311
13369
13335
13569
13539
13517
13567
13535
—
13735
V-8
13211
13269
13411
13469
13435
13669
13639
13617
13667
13635
13817
13867
13835
Description
2-Door -Sedan, 6-Passenger
4-Door Sedan, 6-Passenger
2-Door Sedan, 6-Passenger
4-Door Sedan, 6-Passenger
4-Door Station Wagon, 2-Seat
4-Door Sedan, 6-Passenger
4-Door Sport Sedan, 6-Passenger
2-Door Sport Coupe, 5-Passenger*
2-Door Convertible, 5-Passenger*
4-Door Station Wagon, 2-Seat
2-tooor Sport Coupe, 5-Passenger*
2-Door Convertible, 5-Passenger*
4-Door Station Wagon, 2-Seat
*4-Passenger when optional bucket seats are specified.
EL CAMINO
13380
13580
13480
13680
2-Door
Sedan
Pickup,
3-Passenger Reg.
2-Door
Sedan
Pickup,
3-Pass. Deluxe
VEHICLE DIMENSIONS-CHEVELLE
Pertinent dimensions for the different models are shown in, the following chart.
Model
Sedan
197.0"
75.0"
54.1"
115.0"
58.0"
58.0"
2-Door
Sport Coupe
197.0"
75.0"
53.2"
115.0"
58.0"
58J0"
Convertible
Coupe
197.0"
75.0"
53.9"
115.0"
58.0"
58.0"
Station
Wagon
199.9"
75.0"
56.7"
115.0"
58.0"
58.0"
Sedan
Pickup
199.9"
75.0"
56.7"
115.0"
58.0"
58.0"
Length Overall .
Width Overall (Body)
Height Overall . . .
Wheelbase. .
Tread-Front
Tread-Rear .
Curb Weight: Approximately 3104 lbs. 4-Door Sedan with L-6 Engine 3258 lbs. with V-8 Engine.
MODEL IDENTIFICATION-CHEVY II
Series
100
NOVA
NOVA SS
Model Number
L-4
11111
11169
mmm.
—
6 Cyl.
11311
11369
11335
11569
11537
11535
11737
V-8
11411
11469
11435
11669
11637
11635
11837
Description
2-Door Sedan, 6-Passenger
4-Door Sedan, 6-Passenger
4-Door Station Wagon, 2-Seat
4-Door Sedan, 6-Passenger
2-Door Sport Coupe, 5-Passenger
4-Door Station Wagon, 2-Seat
2-Door Sport Coupe, 4-Passenger
CHEVROLET CHASSIS SERVICE MANUAL
Page 5 of 659
GENERAL INFORMATION 0-3
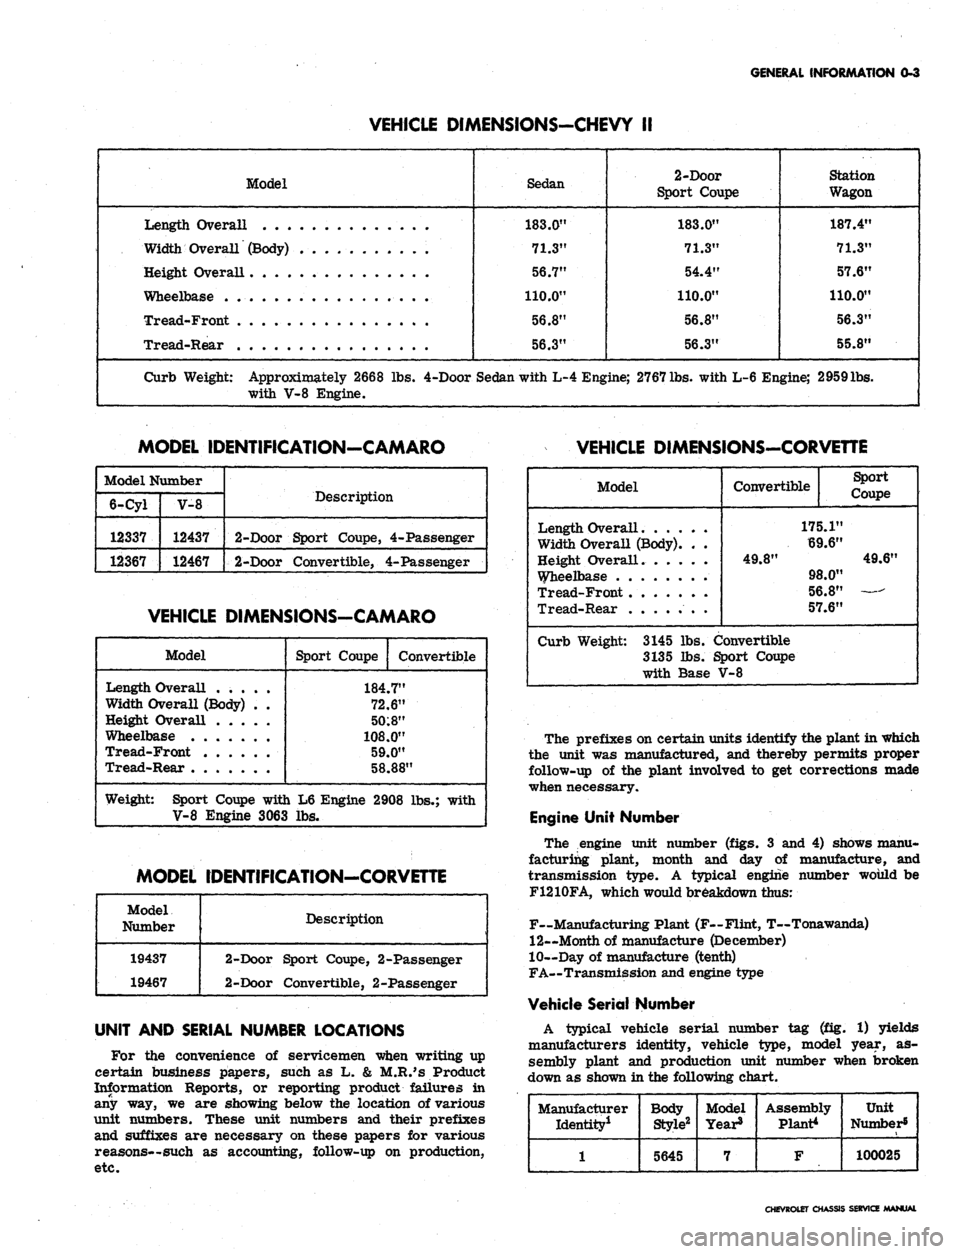
VEHICLE DIMENSIONS-CHEVY II
Model
Length Overall
Width Overall (Body) . . . .
Height Overall
Wheelbase
Tread-Front
Tread-Rear . . .
Sedan
183.0"
71.3"
56.7"
110.0"
56.8"
56.3"
2-Door
Sport Coupe
183.0"
71.3"
54.4"
110.0"
56.8"
56.3"
Station
Wagon
187.4"
71.3"
57.6"
110.0"
56.3"
55.8"
Curb Weight: Approximately 2668 lbs. 4-Door Sedan with L-4 Engine; 2767
lbs.
with L-6 Engine; 2959lbs.
with V-8 Engine.
MODEL IDENTIFICATION-CAMARO
VEHICLE DIMENSIONS-CORVEnE
Model Number
6-Cyl
12337
12367
V-8
12437
12467
Description
2-Door Sport Coupe, 4-Passenger
2-Door Convertible, 4-Passenger
VEHICLE DIMENSIONS-CAMARO
Model
Length Overall .....
Width Overall (Body) . .
Height Overall
Wheelbase
Tread-Front
Tread-Rear
Sport Coupe
Convertible
184.7"
72.6"
50:8"
108.0"
59.0"
58.88"
Weight: Sport Coupe with L6 Engine 2908 lbs.; with
V-8 Engine 3063 lbs.
MODEL IDENTIFICATION-CORVETTE
Model
Number
19437
19467
Description
2-Door Sport Coupe, 2-Passenger
2-Door Convertible, 2-Passenger
UNIT AND SERIAL NUMBER LOCATIONS
For the convenience of servicemen when writing up
certain business papers, such as L. & M.R.'s Product
Information Reports, or reporting product failures in
any way, we are showing below the location of various
unit numbers. These unit numbers and their prefixes
and suffixes are necessary on these papers for various
reasons—such as accounting, follow-up on production,
etc.
Model
Length Overall
Width Overall (Body). . .
Height Overall.
Wheelbase
Tread-Front
Tread-Rear .
Convertible
Sport
Coupe
175.1"
69.6"
49.8"
49.6"
98.0"
56.8"
57.6"
Curb Weight: 3145 lbs. Convertible
3135 lbs. Sport Coupe
with Base V-8
The prefixes on certain units identify the plant in which
the unit was manufactured, and thereby permits proper
follow-up of the plant involved to get corrections made
when necessary.
Engine Unit Number
The engine unit number (figs. 3 and 4) shows manu-
facturing plant, month and day of manufacture, and
transmission type. A typical engine number would be
F1210FA, which would breakdown thus:
F~Manufacturing Plant (F—Flint, T—Tonawanda)
12—Month of manufacture (December)
10—Day of manufacture (tenth)
FA—Transmission and engine type
Vehicle Serial Number
A typical vehicle serial number tag (fig. 1) yields
manufacturers identity, vehicle type, model year, as-
sembly plant and production unit number when broken
down as shown in the following chart.
Manufacturer
Identity1
1
Body
Style2
5645
Model
Year8
7
Assembly
Plant*
F
Unit
Number5
100025
CHEVROLET CHASSIS SERVICE /MANUAL
Page 6 of 659
GENERAL INFORMATION 0-4
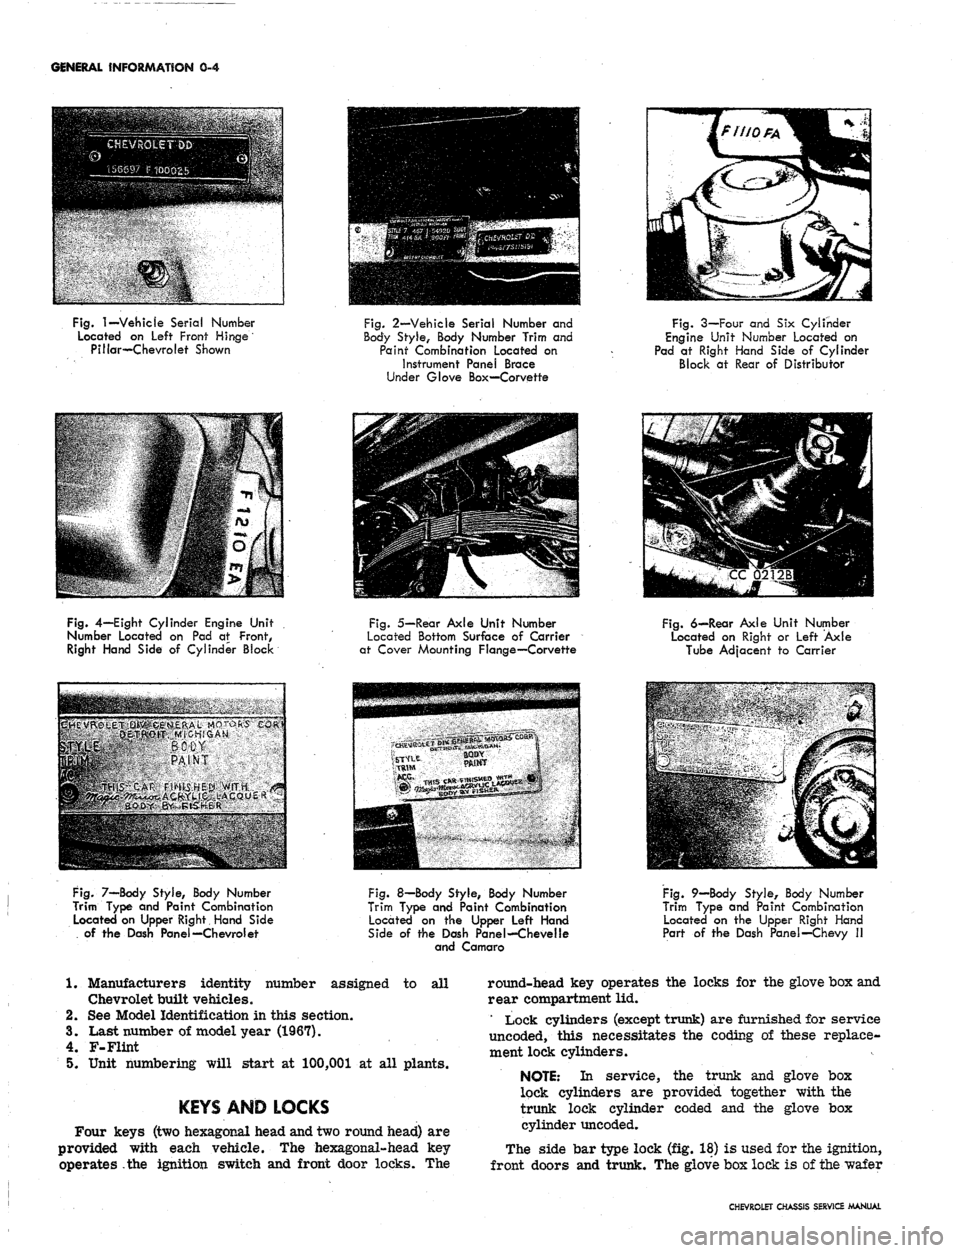
Fig.
1—Vehicle
Serial Number
Located on Left Front Hinge
Pillar—Chevrolet Shown
Fig.
2—Vehicle Serial Number and
Body Style, Body Number Trim and
Paint Combination Located on
Instrument Panel Brace
Under Glove Box—Corvette
Fig. 3—Four and Six Cylinder
Engine Unit Number Located on
Pad at Right Hand Side of Cylinder
Block at Rear of Distributor
Fig.
4—Eight Cylinder Engine Unit
Number Located on Pad at Front,
Right Hand Side of Cylinder Block
Fig.
5—Rear Axle Unit Number
Located Bottom Surface of Carrier
at Cover Mounting Flange—Corvette
Fig.
6—Rear Axle Unit Number
Located on Right or Left Axle
Tube Adjacent to Carrier
BSHfi^;^
PAINT
HRIKI5"tM>
fIHIsS
HE|St.>MfT*
^^ * *•'"
•<"'
Fig.
7—Body Style, Body Number
Trim Type and Paint Combination
Located on Upper Right Hand Side
of the Dash Panel—Chevrol et
Fig.
8—Body Style, Body Number
Trim Type and Paint Combination
Located on the Upper Left Hand
Side of the Dash Panel—Chevelle
and Camaro
Fig.
9—Body Style, Body Number
Trim Type and Paint Combination
Located on the Upper Right Hand
Part of the Dash Panel—Chevy II
1. Manufacturers identity number assigned to all
Chevrolet built vehicles.
2.
See Model Identification in this section.
3.
Last number of model year (1967).
4.
F-Flint
5.
Unit numbering will start at 100,001 at all plants.
KEYS AND LOCKS
Four keys (two hexagonal head and two round head) are
provided with each vehicle. The hexagonal-head key
operates the ignition switch and front door locks. The
round-head key operates the locks for the glove box and
rear compartment lid.
' Lock cylinders (except trunk) are furnished for service
uncoded, this necessitates the coding of these replace-
ment lock cylinders.
NOTE: In service, the trunk and glove box
lock cylinders are provided together with the
trunk lock cylinder coded and the glove box
cylinder uncoded.
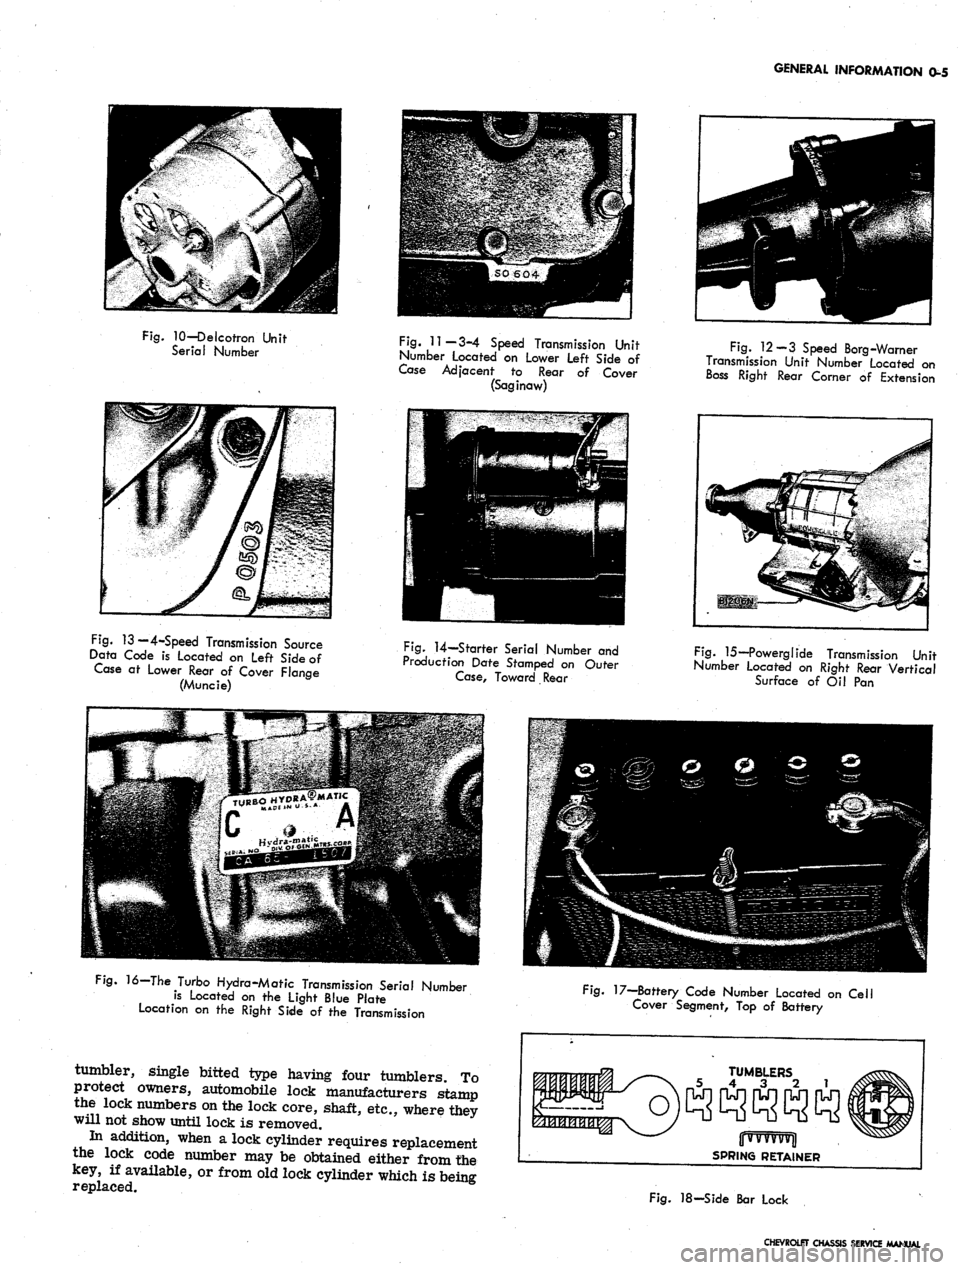
The side bar type lock (fig. 18) is used for the ignition,
front doors and trunk. The glove box lock is of the wafer
CHEVROLET CHASSIS SERVICE MANUAL
Page 7 of 659
GENERAL INFORMATION 0-5
Fig.
10—Delcotron Unit
Serial Number
Fig.
11—3-4 Speed Transmission Unit
Number Located on Lower Left Side of
Case Adjacent to Rear of Cover
(Saginaw)
Fig.
12-3 Speed Borg-Warner
Transmission Unit Number Located on
Boss Right Rear Comer of Extension
Fig.
13 — 4-Speed Transmission Source
Data Code is Located on Left Side of
Case at Lower Rear of Cover Flange
(Muncie)
Fig.
14—Starter Serial Number and
Production Date Stamped on Outer
Case,
Toward Rear
Fig.
15—Powerglide Transmission Unit
Number located on Right Rear Vertical
Surface of Oil Pan
16—The Turbo Hydra-Matic Transmission Serial Number
is Located on the Light Blue Plate
Location on the Right Side of the Transmission
tumbler, single bitted type having four tumblers. To
protect owners, automobile lock manufacturers stamp
the lock numbers on the lock core, shaft, etc., where they
will not show until lock is removed.
In addition, when a lock cylinder requires replacement
the lock code number may be obtained either from the
key, if available, or from old lock cylinder which is being
replaced.
Fig.
17—Battery Code Number Located on Cell
Cover Segment, Top of Battery
TUMBLERS
5 4 3 2 1
jjwvvvvvjl
SPRING RETAINER
Fig.
18-Side Bar Lock
CHEVROLET CHASSIS SERVICE MANUAL
Page 8 of 659
GENERAL INFORMATION
0-6
Once the code number of the lock is obtained look up
this number in a key cutting book.
All side bar locks (except trunk) furnished to the field
by the Parts' Department are uncoded, that is, they are
furnished without tumblers, springs or spring retainers,
these parts are serviced separately. The tumblers come
in five different depths, indicated by numbers.
The side bar locks have six tumbler positions, and in
looking up the cutting code, the following may be used as
an example. After key code number is determined, either
from key or from number stamped on lock cylinder refer
to your code book and record the key cutting information
as follows:
Key of Lock
Code Number
0V11
Cutting or Tumbler
position from head
of lock
Key Cutting
Code Numerical
545431
123456
NOTE:
Key blanks used for ignition and door
locks are stamped with an "A" while rear com-
partment and glove box blanks are stamped with
a "B".
The number that is written above the cutting or tumbler
position indicates each different tumbler which is to be
dropped into each tumbier slot of the lock.
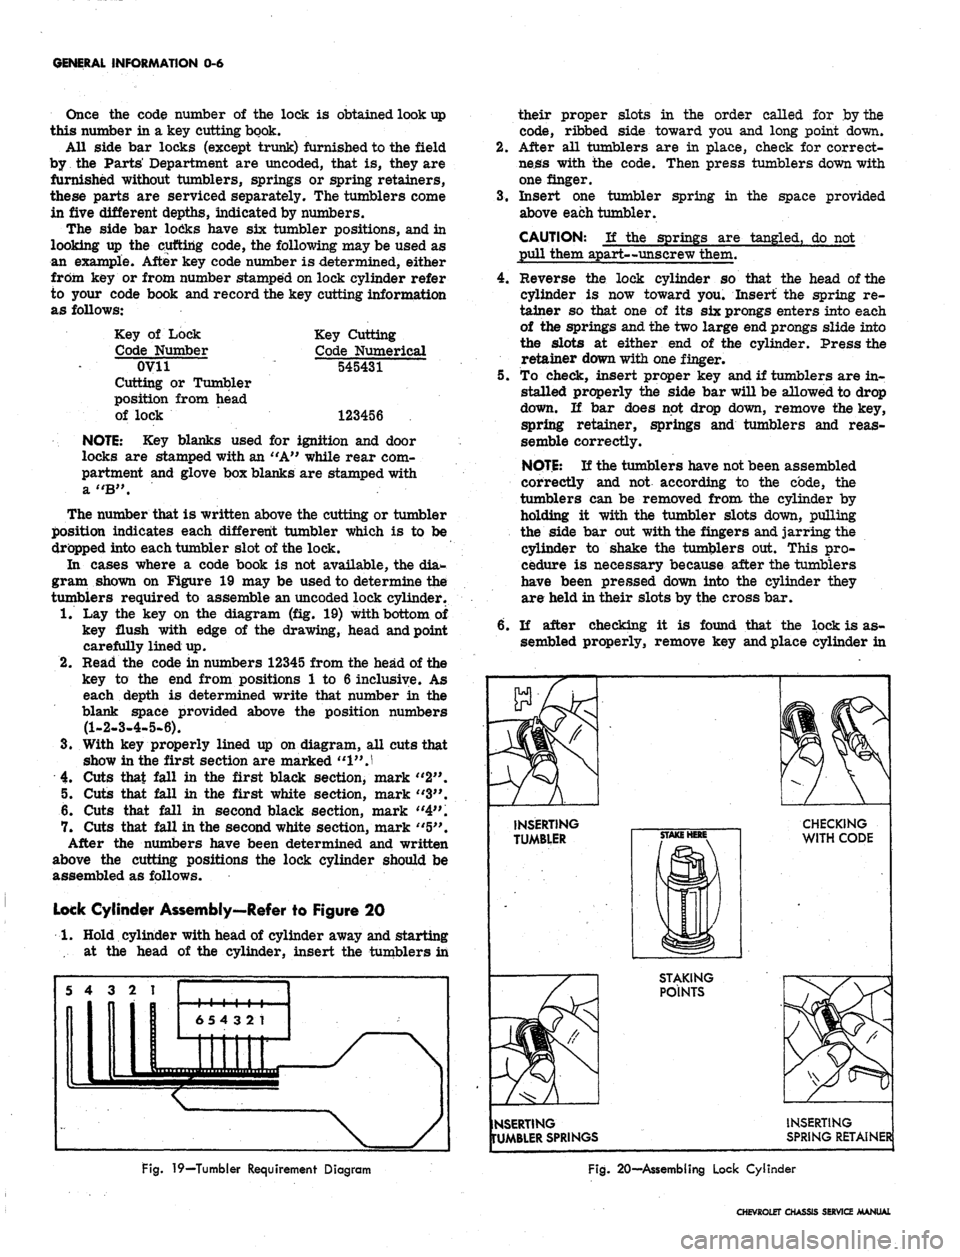
In cases where a code book is not available, the dia-
gram shown on Figure 19 may be used to determine the
tumblers required to assemble an uncoded lock cylinder.
1.
Lay the key on the diagram (fig. 19) with bottom of
key flush with edge of the drawing, head and point
carefully lined up.
2.
Read the code in numbers 12345 from the head of the
key to the end from positions 1 to 6 inclusive. As
each depth is determined write that number in the
blank space provided above the position numbers
(1-2-3-4-5-6).
3.
With key properly lined up on diagram, all cuts that
show in the first section are marked
"1"
J
4.
Cuts that fall in the first black section, mark "2".
5. Cuts that fall in the first white section, mark "3".
6. Cuts that fall in second black section, mark "4".
7. Cuts that fall in the second white section, mark "5".
After the numbers have been determined and written
above the cutting positions the lock cylinder should be
assembled as follows.
Lock Cylinder Assembly—Refer to Figure 20
1.
Hold cylinder with head of cylinder away and starting
•... at the head of the cylinder, insert the tumblers in
their proper slots in the order called for by the
code, ribbed side toward you and long point down.
2.
After all tumblers are in place, check for correct-
ness with the code. Then press tumblers down with
one finger.
3.
Insert one tumbler spring in the space provided
above each tumbler.
CAUTION: If the springs are tangled, do not
pull them apart—unscrew them.
4.
Reverse the lock cylinder so that the head of the
cylinder is now toward you. Insert the spring re-
tainer so that one of its six prongs enters into each
of the springs and the two large end prongs slide into
the slots at either end of the cylinder. Press the
retainer down with one finger.
5. To check, insert proper key and if tumblers are in-
stalled properly the side bar will be allowed to drop
down. If bar does not drop down, remove the key,
spring retainer, springs and tumblers and reas-
semble correctly.
NOTE:
If the tumblers have not been assembled
correctly and not according to the code, the
tumblers can be removed from the cylinder by
holding it with the tumbler slots down, pulling
the side bar out with the fingers and jarring the
cylinder to shake the tumblers out. This pro-
cedure is necessary because after the tumblers
have been pressed down into the cylinder they
are held in their slots by the cross bar.
6. If after checking it is found that the lock is as-
sembled properly, remove key and place cylinder in
INSERTING
TUMBLER
CHECKING
WITH CODE
STAKING
POINTS
NSERTING
TUMBLER SPRINGS
INSERTING
SPRING RETAINER
Fig.
19—Tumbler Requirement Diagram
Fig.
20—Assembling Lock Cylinder
CHEVROLET CHASSIS SERVICE MANUAL
Page 9 of 659
GENERAL INFORMATION 0-7
a vise using leather or wood on each side to prevent
damage to the cylinder,
7. Stake the retainer securely in place by staking the
cylinder metal over both edges of the retainer ends
using a suitable staking tool at right angles to the
top of the retainer and from the cast metal of the
cylinder over the retainer at each corner.
PUSHING, TOWING AND LIFTING
Pushing
NOTE:
Towing car to start is not recommended
due to the possibility of the disabled car ac-
celerating into tow car.
AUTOMATIC TRANSMISSION
Do not attempt to start the engine by pushing the car.
Should the battery become discharged, it will be neces-
sary to use an auxiliary battery with jumper cables to
start the engine.
CAUTION: To prevent damage to electrical
system, never connect booster batteries in ex-
cess of 12 volts and connect positive to positive
and negative to negative.
Manual Transmission
When a push start is necessary turn off all electrical
loads such as heater, radio, and if possible, lights, turn
on the key, depress the clutch, and place the shift lever
in high gear. Release the clutch when your speed reaches
10 to 15 miles per hour.
TOWING
The car may be towed safely on its rear wheels with
the (selector lever in "N" (Neutral) position at speeds
of 35 miles per hour or less under most conditions.
However, the drive shaft must be disconnected or the
car towed on its front wheels if 1) Tow speeds in excess
of 35 MPH are necessary, 2) Car must be towed for ex-
tended distances (over 50 miles) or, 3) Transmission is
not operating properly. If car is towed on its front
wheels, the steering wheel should be secured to maintain
a straight ahead position.
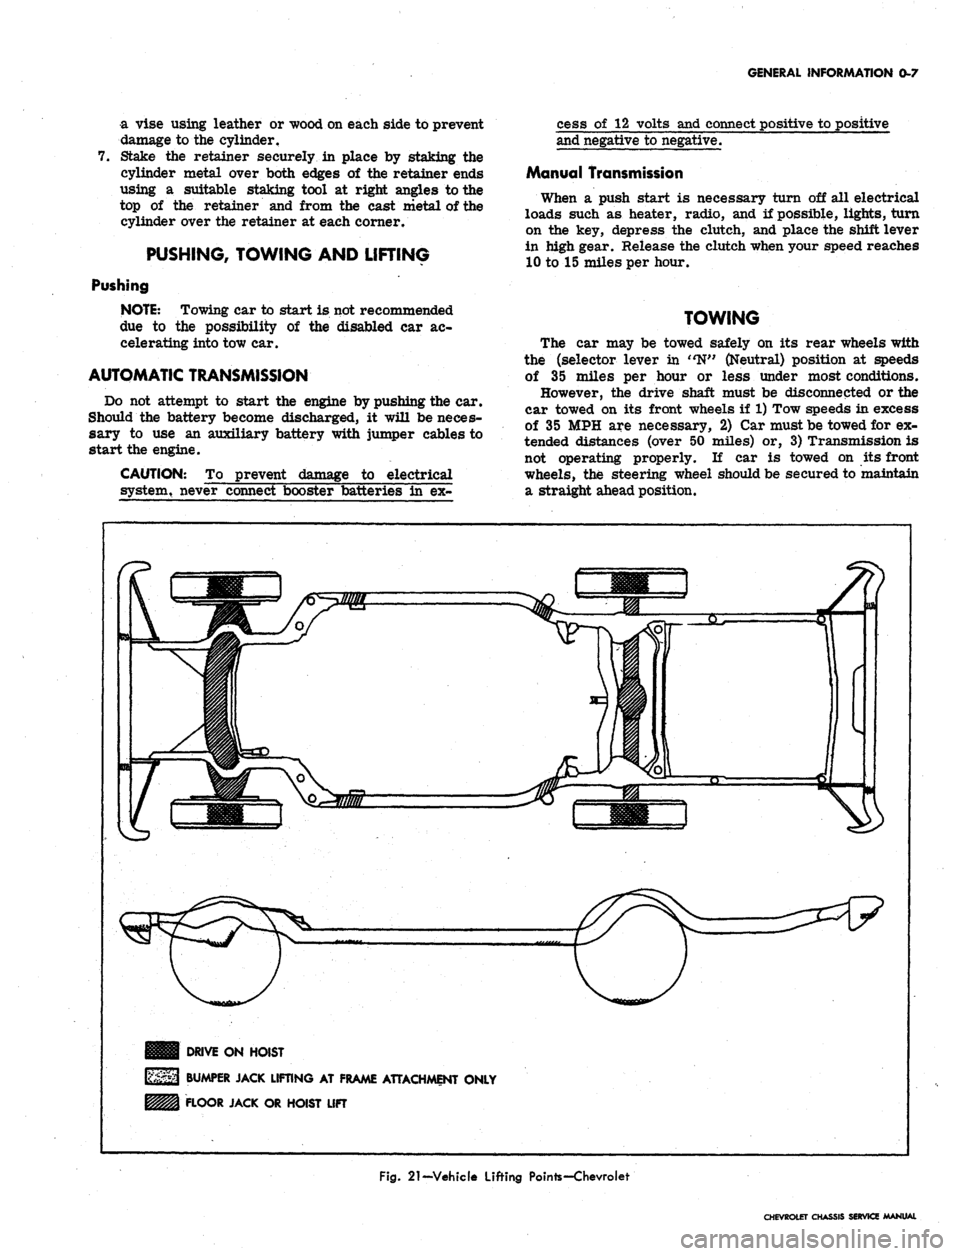
DRIVE ON HOIST
BUMPER JACK LIFTING AT FRAME ATTACHMENT ONLY
FLOOR JACK OR HOIST LIFT
Fig.
21-Vehicle Lifting Pointe-Chevroiet
CHEVROLET CHASSIS SERVICE MANUAL
Page 10 of 659
GENERAL INFORMATION 0-8
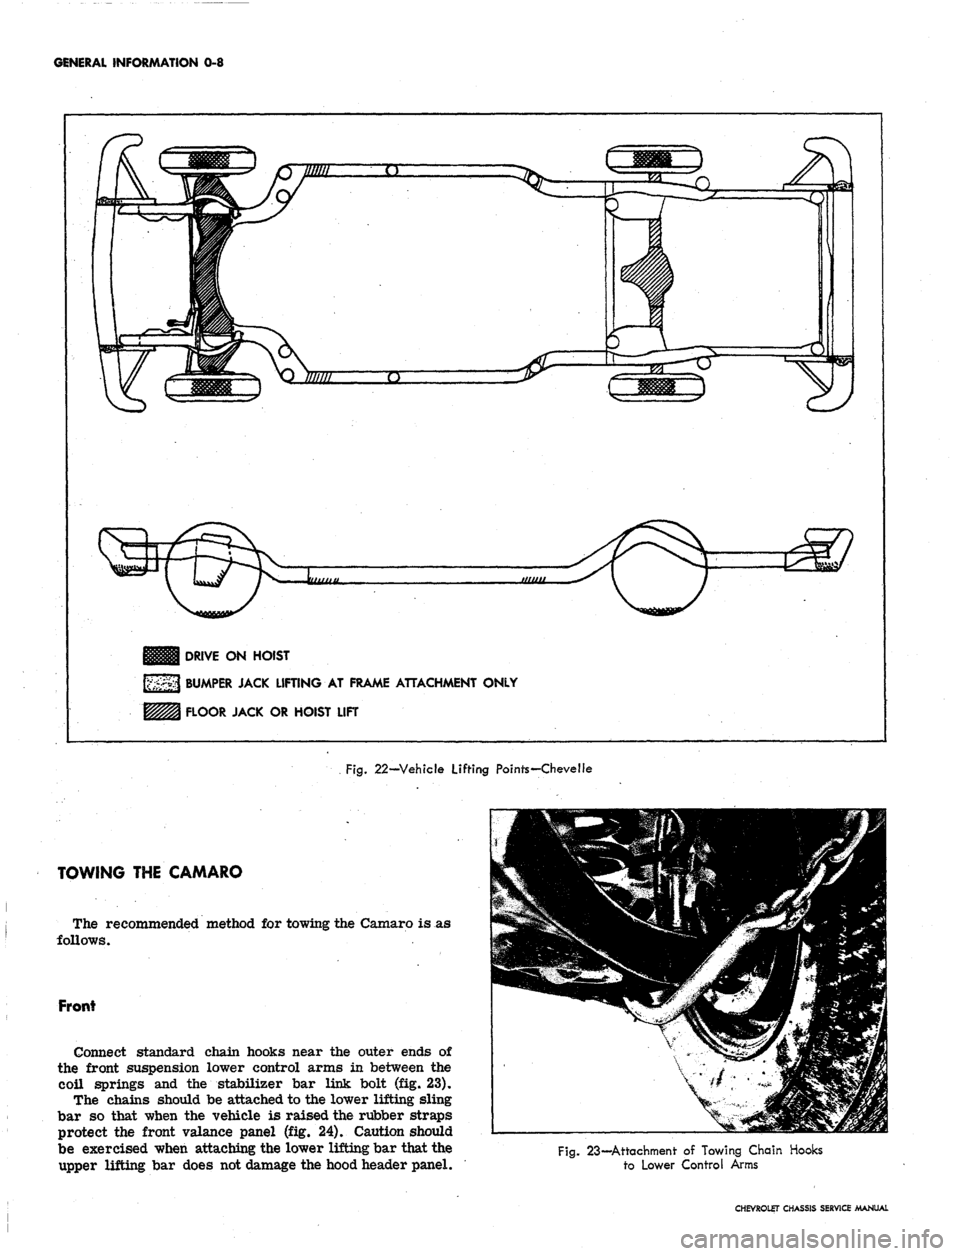
nun
Illllfl Q
i,,,,,,,,
DRIVE ON HOIST
BUMPER JACK LIFTING AT FRAME ATTACHMENT ONLY
FLOOR JACK OR HOIST LIFT
Fig.
22—Vehicle Lifting Points—Chevelle
TOWING THE CAMARO
The recommended method for towing the Camaro is
follows.
Front
Connect standard chain hooks near the outer ends of
the front suspension lower control arms in between the
coil springs and the stabilizer bar link bolt (fig. 23).
The chains should be attached to the lower lifting sling
bar so that when the vehicle is raised the rubber straps
protect the front valance panel (fig. 24). Caution should
be exercised when attaching the lower lifting bar that the
upper lifting bar does not damage the hood header panel.
Fig. 23—Attachment of Towing Chain Hooks
to Lower Control Arms
CHEVROLET CHASSIS SERVICE MANUAL
Page 11 of 659
GENERAL INFORMATION
0-9
Fig.
25—Attachment
of
Towing Chain Hooks
to
Axle Tube
Fig.
24—Towing Sling Attachment—Front
Rear
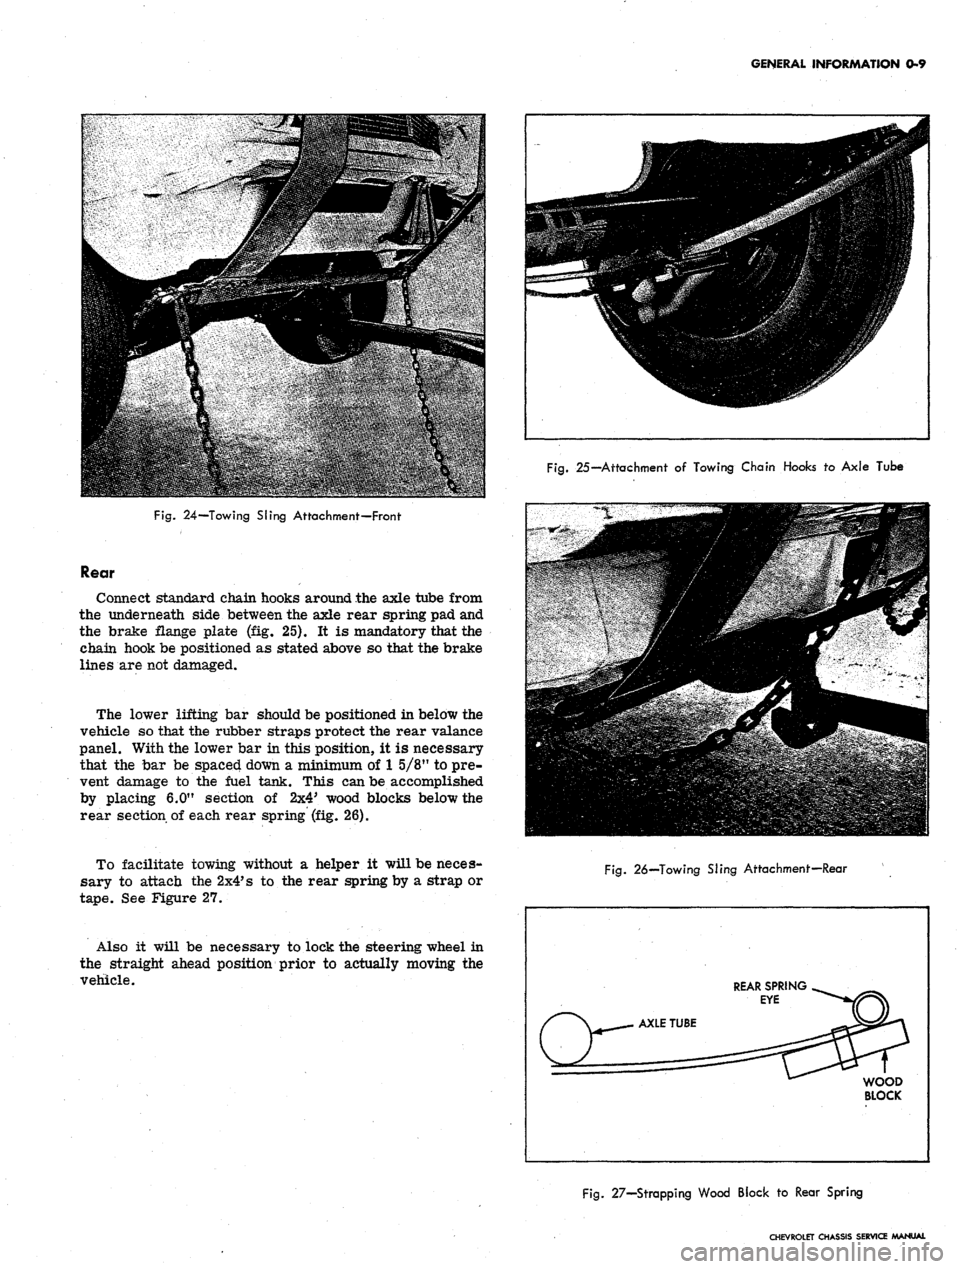
Connect standard chain hooks around the axle tube from
the underneath side between the axle rear spring pad and
the brake flange plate (fig. 25). It is mandatory that the
chain hook be positioned as stated above so that the brake
lines are not damaged.
The lower lifting bar should be positioned in below the
vehicle so that the rubber straps protect the rear valance
panel. With the lower bar in this position, it is necessary
that the bar be spaced down a minimum of
1
5/8" to pre-
vent damage to the fuel tank. This can be accomplished
by placing 6.0" section of 2x4' wood blocks below the
rear section of each rear spring (fig. 26).
To facilitate towing without a helper it will be neces-
sary to attach the
2x4*
s to the rear spring by a strap or
tape.
See Figure 27.
Also it will be necessary to lock the steering wheel in
the straight ahead position prior to actually moving the
vehicle.
Fig.
26—Towing SJing Attachment—Rear
REAR SPRING
EYE
WOOD
BLOCK
Fig.
27—Strapping Wood Block
to
Rear Spring
CHEVROLET CHASSIS SERVICE MANUAL
Page 12 of 659
GENERAL INFORMATION 0-10
THIS DIMENSION MUST NOT
BE EXCEEDED DUE TO
POSSIBLE DAMAGE TO THE
STEERING KNUCKLE LOWER
CONTROL ARM STOP.
LIFT ONLY ON THE
4"
AREA EXTENDING
REARWARD FROM
THE FRAME RAMP.
CAUTION:
CARE MUST BE USED
TO PREVENT JACK
PAD FROM DAMAGING
DO NOT LIFT ON
REAR SPRING FRONT
MOUNTING BRACKET
BUMPER JACK LIFTING AT
FRAME ATTACHMENT AREA ONLY.
FLOOR JACK OR HOIST LIFT
DRIVE ON HOIST
FLOOR JACK ONLY
Fig.
28-Vehicle Lifting Points-Chevy II
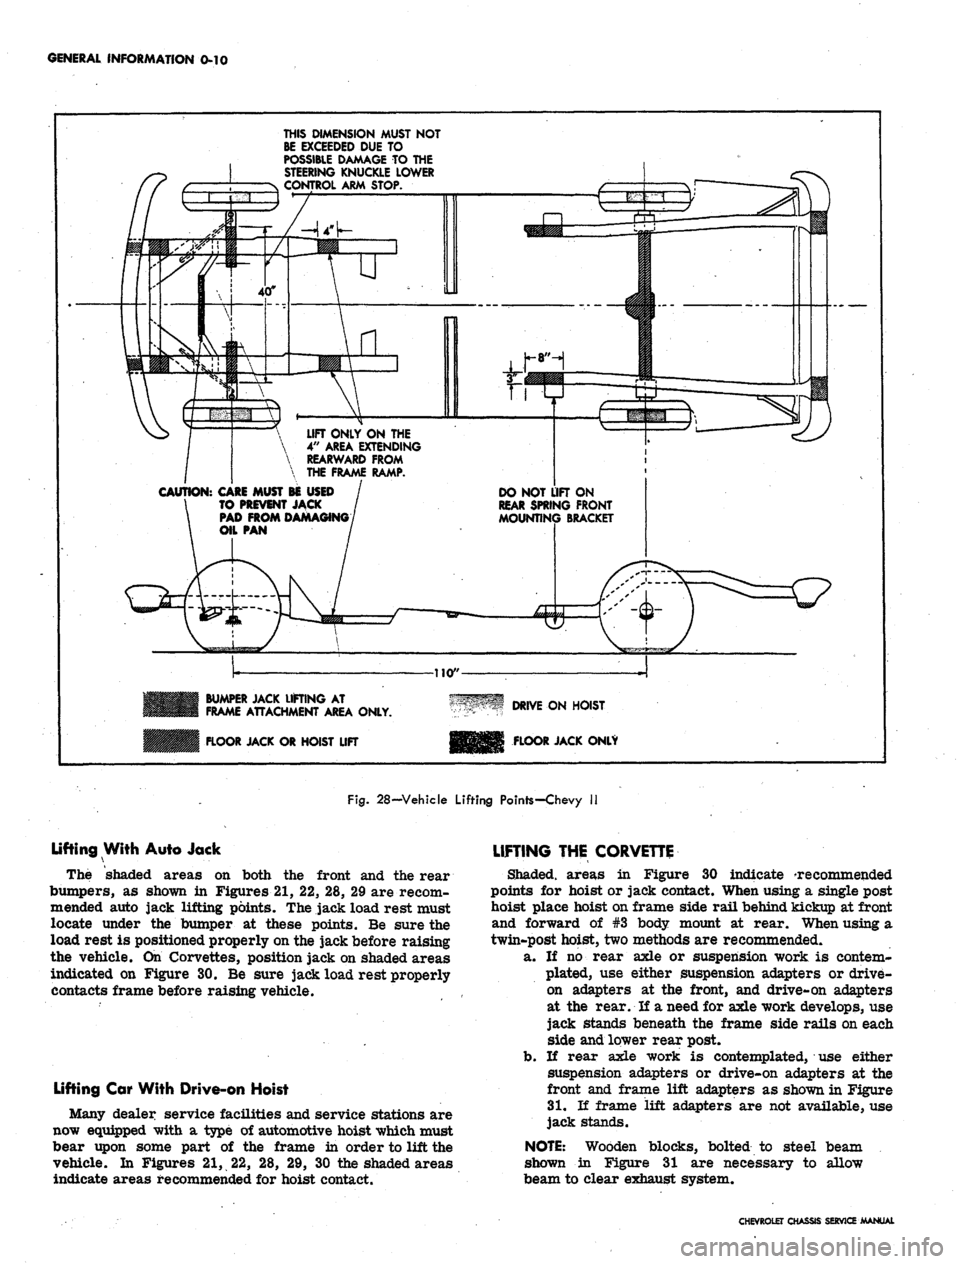
Lifting With Auto Jack
The shaded areas on both the front and the rear
bumpers, as shown in Figures 21, 22, 28, 29 are recom-
mended auto jack lifting points. The jack load rest must
locate under the bumper at these points. Be sure the
load rest is positioned properly on the jack before raising
the vehicle. On Corvettes, position jack on shaded areas
indicated on Figure 30. Be sure jack load rest properly
contacts frame before raising vehicle.
Lifting Car With Drive-on Hoist
Many dealer service facilities and service stations are
now equipped with a type of automotive hoist which must
bear upon some part of the frame in order to lift the
vehicle. In Figures 21, 22, 28, 29, 30 the shaded areas
indicate areas recommended for hoist contact.
LIFTING THE CORVETTE
Shaded, areas in Figure 30 indicate 'recommended
points for hoist or jack contact. When using a single post
hoist place hoist on frame side rail behind kickup at front
and forward of #3 body mount at rear. When using a
twin-post hoist, two methods are recommended.
a. If no rear axle or suspension work is contem-
plated, use either suspension adapters or drive-
on adapters at the front, and drive-on adapters
at the rear. If a need for axle work develops, use
jack stands beneath the frame side rails on each
side and lower rear post.
b.
If rear axle work is contemplated, use either
suspension adapters or drive-on adapters at the
front and frame lift adapters as shown in Figure
31.
If frame lift adapters are not available, use
jack stands.
NOTE:
Wooden blocks, bolted to steel beam
shown in Figure 31 are necessary to allow
beam to clear exhaust system.
CHEVROLET CHASSIS SERVICE MANUAL