CHEVROLET CAMARO 1973 2.G Service Manual
Manufacturer: CHEVROLET, Model Year: 1973, Model line: CAMARO, Model: CHEVROLET CAMARO 1973 2.GPages: 84, PDF Size: 32.64 MB
Page 41 of 84
Downloaded from www.Manualslib.com manuals search engine present in either battery when
connecting
"live" booster bat
teries to
"dead" batteries.
3 . Attach one end of one jumper
cable to the positive terminal of
the
booster battery (identified by
a red color,
"+" or "P" on
the battery case, post or clamp)
and the other end of same cable
to. positive terminal of dis
charged 6attery. Do NOT per
mit cars to touch each other, as
this could establish a ground
connection and counteract the
benefits of this procedure.
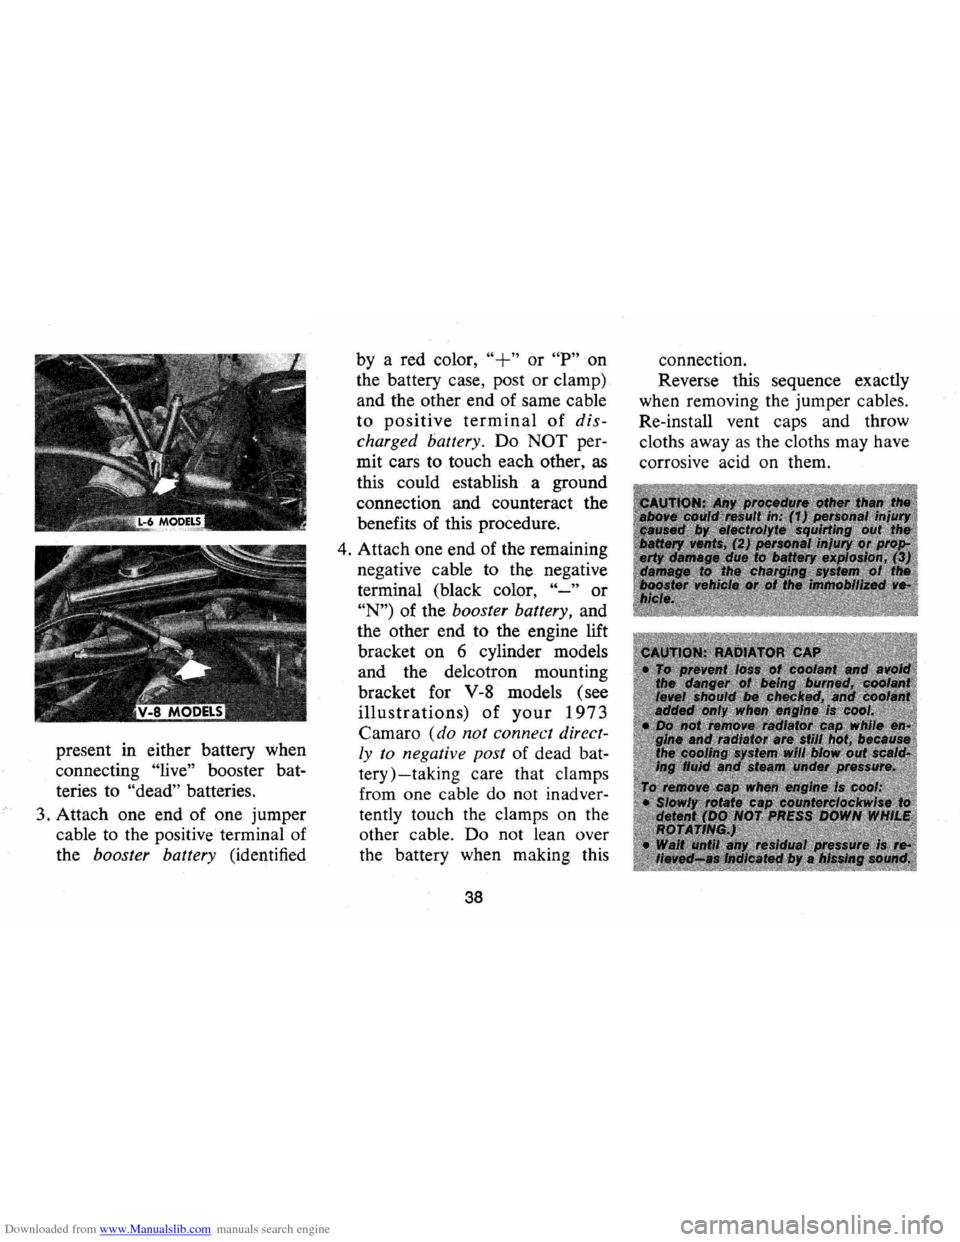
4. Attach one end of the remaining
negative cable to the negative
terminal (black color,
"-" or
"N") of the booster battery, and
the other end to the engine lift
bracket on 6 cylinder models
and the delcotron mounting
bracket for
V-8 models (see
illustrations) of your 1973
Camaro (do not connect direct
ly to negative post
of dead bat
tery)
-taking care that clamps
from one cable do not inadver
tently touch the clamps on the
other cable. Do not lean over
the battery when making this
38
connection.
Reverse this sequence exactly
when removing the jumper cables.
Re-install vent caps and throw
cloths away
as the cloths may have
corrosive acid on them.
Page 42 of 84
Downloaded from www.Manualslib.com manuals search engine Changing Tires
Preparations:
• Park on a level surface and set
parking brake firmly.
• Set automatic transmission in
"P ARK" (manual transmission
in reverse).
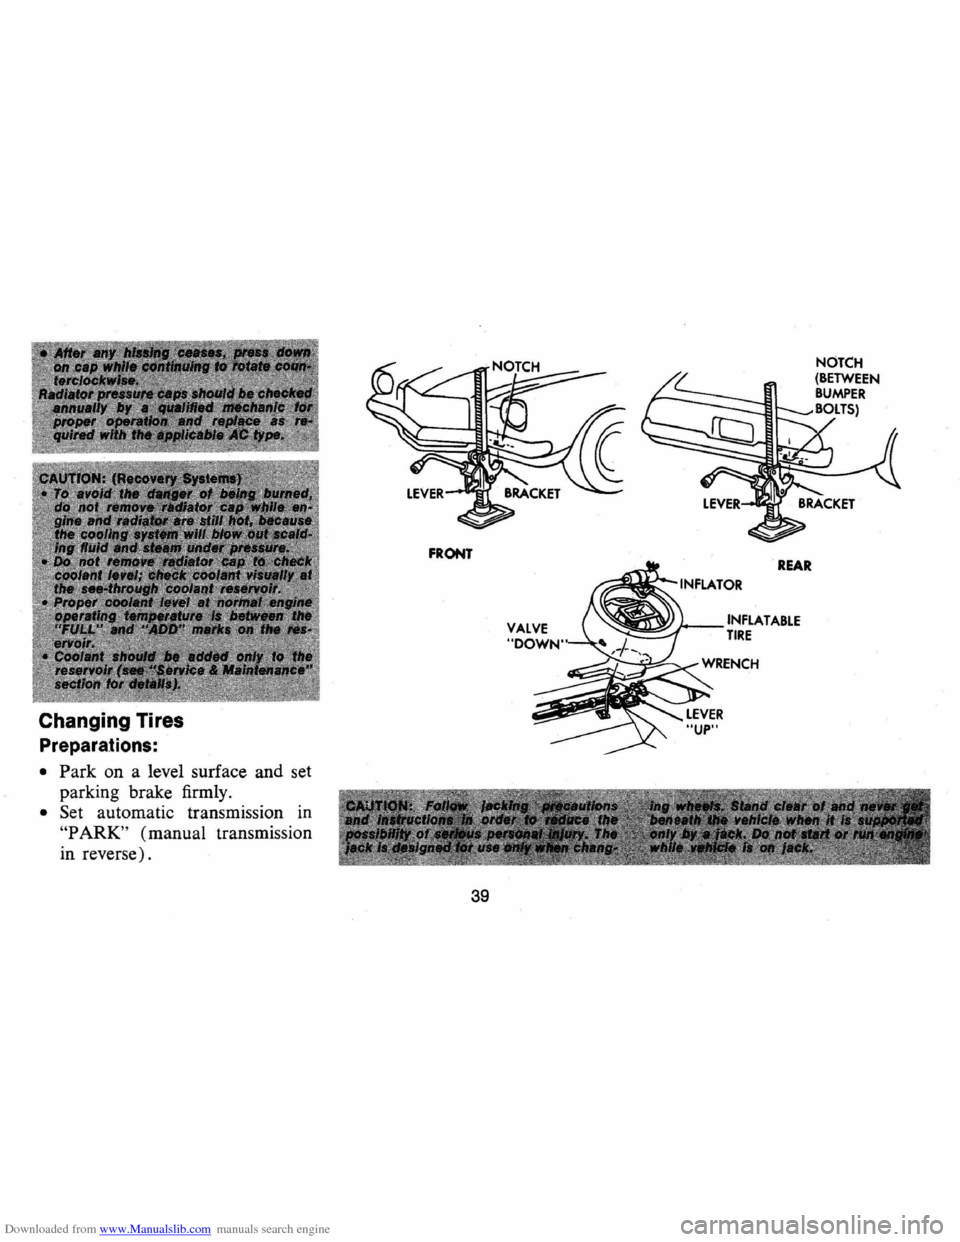
FRONT
39
REAR
INFLATABLE TIRE
Page 43 of 84

Downloaded from www.Manualslib.com manuals search engine • Activate hazard warning flasher.
• Block both the front and back
of the wheel diagonally opposite
the jack position.
Remove
hubcap or wheel cover
with flat end of wheel
nut wrench
and loosen wheel nuts slightly.
Set
lever on jack to UP position.
Properly position load rest which
engages bumper by moving base of
NOTE: Base of jack column
should be slightly angled in toward
car since it will straighteri
as car is
raised.
jack slightly under car and engage
tang of
bracket in bumper notch,
then bring jack base back toward
upright position. Check that
l~ad
rest is positioned before operatmg
jack.
40
Jack Operation
After jack is positioned as noted
above use
wheel nut wrench as . ,
jack handle and raise car until tire
clears ground. Remove wheel nuts
and wheel, install spare and tighten
wheel nuts. Move jack lever to
DOWN and install hub cap or
wheel cover.
Page 44 of 84
Downloaded from www.Manualslib.com manuals search engine APPEARANCE CARE
Care and Cleaning
of Interior
Soft Trim
Dust and loose dirt that accumu
late on interior fabric trim should
be removed frequently with a vac
uum cleaner, whisk broom
or soft
brush. Vinyl
or leather trim should
be wiped clean with a damp cloth.
Normal cleanable trim soilage,
spots or stains can be cleaned with
the proper use of trim cleaners
available through General Motors
dealers
or other reputable supply
outlets. Before attempting to re
move spots
or stains from uphol
stery, determine as accurately
as
possible the nature and age of the
spot
or stain. Some spots or stains
can be removed satisfactorily with
water
or mild soap solution (refer
to accompanying
"Removal of Spe
cific Stains"). For best results, spots
or stains
should be removed
as soon as possible. Some types of
stains
or soilage such as lipsticks,
some inks, certain types of grease,
mustard, etc., are extremely
diffi
cult and, in some cases, impossible
to completely remove. When clean
ing this type of stain
or soilage, care
must be taken not to enlarge the
soiled area. It
is sometimes more
desirable to have a small stain than
an enlarged stain as a result of care
less cleaning.
41
I
Page 45 of 84
Downloaded from www.Manualslib.com manuals search engine Cleaning Fabrics with
Cleaning
Fluid
This type of cleaner should be
used for cleaning stains containing
grease, oil or fats. Exces s stain
should be gently scraped off with
a clean dull knife
or scraper. Use
very little cleaner, light pressure,
and clean cloths (preferably cheese
cloths) . Cleaning action with cloth
should be from outside of stain to
wards center and constantly chang
ing to a clean section of cloth.
When stain
is cleaned from fabric,
immediately wipe
area briskly with
a clean absorbent towel or cheese
cloth to help dry area and prevent
a cleaning ring.
If ring forms, im
mediately clean entire area or panel
section of the trim assembly.
NOTE: Sometimes a difficult spot
may require a second application
of cleaning fluid followed immedi- ately
by a soft brush to completely
remove the spot.
Cleaning Fabrics with
Detergent Foam Cleaners
This type of cleaner is excellent
for cleaning general soilage from
fabrics and for cleaning a panel sec
tion where a minor cleaning ring
may be left from spot cleaning.
Vacuum area to remove excess
loose dirt. Always clean at least a
full trim panel or section of trim.
Mask adjacent trim along stitch or
weld lines. Mix detergent type foam
cleaners in strict accordance with
directions on label of container.
Use
foam only on a clean sponge or
soft bristle brush -Do not wet
fabric excessively or rub harshly
with brush. Wipe clean with a
slightly damp absorbent towel
or
cloth. Imm~diately after cleaning
fabric, dry fabric with a dry towel
42
or hair dryer. Rewipe fabric with
dry absorbent towel
or cloth to re
store the luster of the trim and to
eliminate any dried residue.
Seat Belt Care
• Clean only with mild soap solu
tion and lukewarm water.
• Do not bleach or dye belts since
this may severely weaken belts.
Removal of Specific Stains
Candy -Chocolate, use cloth
soaked in lukewarm water; other
than chocolate, use very hot water.
Dry.
If necessary, clean lightly with
fabric cleaning fluid.
Chewing Gum-Harden gum with
ice cube and scrape off with dull
knife. Moisten with fabric cleaning
fluid and scrape again.
Page 46 of 84
Downloaded from www.Manualslib.com manuals search engine Fruit Stains, Coffee, Soft Drinks,
Ice Cream and Milk-Wipe with
cloth soaked in cold water.
If nec
essary clean lightly with fabric
cleaning fluid.
Soap and water is
not recommended as it might set
the stain.
Catsup-Wipe with cloth soaked in
cool water.
If further cleaning is
necessary, use a detergent foam
cleaner.
Grease, Oil, Butter, Margarine
and Crayon -
Scrape off excess
with dull knife.
Use fabric cleaning
fluid.
Paste or Wax Type Shoe Polish
-Light applications of fabric clean
ing fluid.
Exterior Appearance
Your car is finished with General
Motors "Magic-Mirror" acrylic
lacquer. This is a finish of maxi
mum beauty which, in depth of
color, gloss retention and durability
Tar -Remove excess with dull
knife, moisten with fabric cleaning
fluid, scrape again, rub lightly with
additional cleaner.
Blood -Wipe with clean cloth
moistened with cold water. Use no
soap.
Urine -Sponge stain with luke
warm soap suds from mild neutral
soap on clean cloth, rinse with cloth
soaked in cold water, saturate cloth
with one
part household ammonia
and 5 parts water, apply for 1 min
ute, rinse with clean, wet cloth.
Vomitus-Sponge with clean cloth
dipped
in clean, cold water. Wash
lightly with lukewarm water
and
is superior to conventional lacquer
finishes.
Washing Your Car
The best way to preserve the
finish and maintain original beauty
43
mild neutral soap. If odor persists,
treat area with a water-baking soda
solution (1 teaspoon
baking soda
to one cup of tepid water).
Rub
again with cloth and cold water.
Finally , if necessary , clean lightly
with fabric cleaning fluid.
Interior Glass Surface
The interior glass surface should
be cleaned on a periodic basis for
continued good visibility. A com
mercial household glass cleaning
agent containing ammonia will re
move normal tobacco smoke and
dust films sometimes caused by in
gredients used in vinyls, plastics
or
other interior trim materials.
of appearance
is to keep it clean .
Wash the car
in lukewarm or cold
water. Never use strong so ap
or
chemical detergents. Cleaning
agents should be quickly flushed
from the surfaces.
Page 47 of 84
Downloaded from www.Manualslib.com manuals search engine Polishing and Waxing
Your Car
Although acrylic paint on your
car
is durable, you may wish to wax
or polish for added protection.
Your Chevrolet Dealer offers many
polishes and waxes now available
which have proven of real value in
maintaining a good paint finish.
When using a tar and road oil re
mover, be certain it
is safe for use
on acrylic painted surfaces.
Protection of Exterior
Bright Metal Parts
Bright metal parts should be
cleaned regularly to maintain lus
ter. Washing with water
is all that
is usually required. However, G.M.
Chrome Polish may be used on
CHROME or STAINLESS STEEL
trim if necessary.
Use special care with ALU-
MINUM trim. Never use auto or
.chrome polish, steam or any caustic
soap to clean aluminum.
A coating of wax, rubbed to a
high polish,
is recommended for all
bright metal parts.
Cleaning White Sidewall
Tires
Use a tire cleaner which will not
harm aluminum trim. A stiff brush
may be used with the cleaner to
remove road grime and dirt from
white sidewall tires.
Cleaning the Optional
Vinyl Top
The top should be washed fre
quently with neutral soap suds,
lukewarm water and a brush with
soft bristles. Rinse top with
suffi
cient quantities of clear water to re
move all traces of soap.
44
If the top requires additional
clea~ing after using soap and water,
a
mtld foaming cleanser can be
used. Rinse the whole top with
water; then apply a mild foaming
~pe cleanser on an area of approx
Imately two square feet.
Scrub area
with a small soft bristle hand brush
adding water
as necessary until th~
cleanser foams to a soapy consis
tency. Remove the first accumu
lated soilage with a cloth or sponge
before it can be ground into the top
material. Apply additional cleanser
~o the area and scrub until the top
IS clean. Care must be exercised to
keep the cleanser from running onto
body finish
as it may cause streaks
if allowed to run down and dry.
After the entire top has been
cleaned, rinse generously with clear
water to remove all traces of
cleanser. Do not use volatile cleaner
or household bleaching agents on
the top material.
Page 48 of 84
Downloaded from www.Manualslib.com manuals search engine SERVICE AND MAINTENANCE
The time or mileage intervals on
the following pages are intended
as
a guide for establishing regular
maintenance and lubrication
periods for your car. Sustained
heavy duty
or high speed operations
or operation under adverse condi
tions may necessitate more frequent
servicing. To determine specific
recommendations for conditions
under which you use your car, con-
Fuel
Requirements
Your Camaro is designed to op
erate on a good quality fuel of
ap
proximately 91 Research Octane
Number or higher, commonly sold
in the United
States and Canada.
Use of a fuel which is too low in
suIt your Authorized Chevrolet
Dealer.
Maintenance Schedule
For owner convenience, a sep
arate maintenance folder has been
provided with your car which con
tains a complete schedule and
brief explanation of the safety,
emission control, lubrication and
anti-knock quality will result
in
"spark knock", a metallic rapping
noise generated during the
com
bustion process. It should be noted
that Research
Octane Number
does not completely describe fuel
octane quality. Therefore ,
if you
hear knock in your engine you
may wish
to try a different gaso
line.
If knocking persists consult
45
general maintenance it requires.
The maintenance folder informa
tion
is supplemented by this sec
tion of the
Owner's Manual, as
well as the separate emission con
trol systems folder also furnished
with your car. Read all three
pub
lications for a full understanding
of vehicle maintenance require
ments.
your authorized Chevrolet dealer.
In any case, continuous
or exces-
sive knocking may result in engine
.1
damage and constitutes misuse of
the engine for which Chevrolet
Motor Division
is not responsible
under the terms of the
New Vehi-
cle Warranty.
General Motors recommends
the
use of unleaded or low-lead (0
Page 49 of 84
Downloaded from www.Manualslib.com manuals search engine to 0.5 grams per gallon) gasolines
to minimize emissions
or hydro
carbons and particulates.
If un
leaded or low-lead gasolines are
not available, gasolines containing
more than
0.5 grams per gallon
may be used.
In states using the Gasoline
Performance and Information
Sys
tem of fuel designation, unleaded
or low-lead fuels having an anti
knock designation of
"2" or higher
are recommended.
Gas Cap-The fuel tank filler cap
has a new two-step removal and
installation procedure plus a pres
sure-vacuum safety relief valve. It
is equipped with a double set of
locking tangs.
To remove:
• Rotate cap one-half turn coun
terclockwise to clear the first set
of tangs from the slots inside the
filler neck. This will allow any
residual pressure to escape.
• Pull the cap outward and rotate
one-quarter turn counterclock
wise to clear second set of tangs
and remove the cap.
• To install, reverse this procedure.
NOTE: If this cap requires a re
placement, only a cap with these
same features should be used. Fail
ure
to use the correct cap can re
sult in a serious malfunction of the
system. Correct replacement caps
may be obtained from your Au
thorized Chevrolet Dealer.
Engine Oil and Filter
Recommendations
• Use only SE engine oil.
• Change oil each 4 months or
6,000 miles. If more than 6,000
miles are driven in a 4-month
period, change oil each
6,000
miles.
46
• Change oil each 2 months or
3,000 miles, whichever occurs
first, under
th~ following con
ditions:
- driving in dusty conditions,
- trailer pulling,
- extensive idling,
- short-trip operation at freez-
ing temperatures (engine not
thoroughly warmed-up).
• Operation in dust storms may
require an immediate oil change.
• Replace the oil filter at the first
oil change, and every second oil
change thereafter. AC oil filters
provide excellent engine pro
tection.
See your Chevrolet dealer for ad
vice on the frequency of oil and
filter changes under unusual driv
ing conditions.
The above recommendations ap
ply to the first change
as well as
subsequent oil changes. The oil
change interval for your Camaro
Page 50 of 84
Downloaded from www.Manualslib.com manuals search engine engine is based on the use of SE oils
and quality oil filters.
Oil change in
tervals longer than those listed
above will seriously reduce engine
life and may affect Chevrolet obli
gation under the provisions of the
New Vehicle Warranty.
A high quality
SE oil was in
stalled in your engine at the fac
tory.
It is not necessary to change
this factory-installed oil prior to the
recommended normal change pe
riod. However, check the oil level
more frequently during the break
in period since higher oil consump
tion
is normal until the piston rings
become seated.
NOTE: Non-detergent and other
low quality oils are specifically
not recommended.
Only the use
of
SE engine oils and proper oil
and filter change intervals assure
you of continued proper lubrica
tion of your Camaro engine.
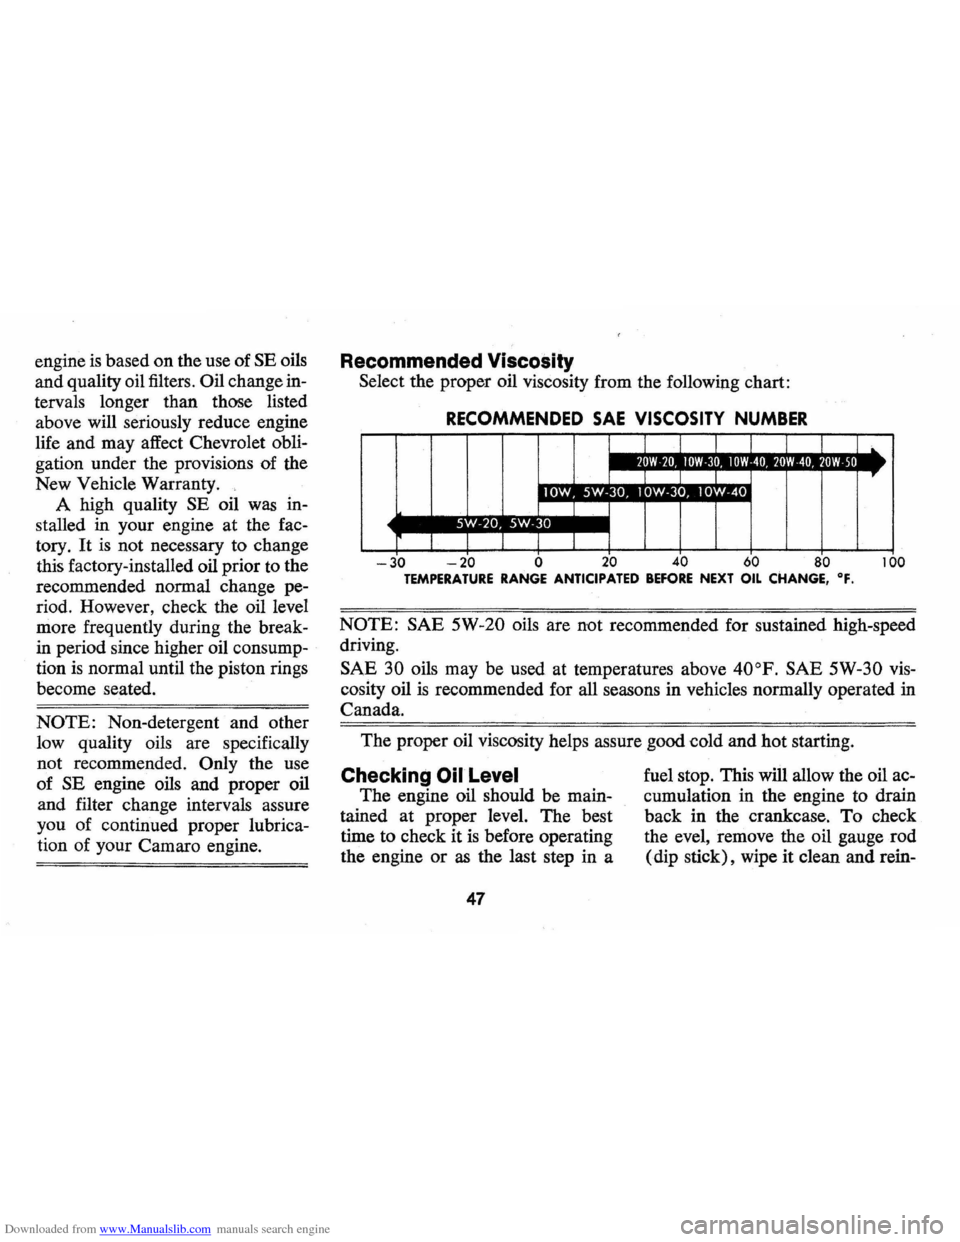
Recommended Viscosity
Select the proper oil viscosity from the following chart:
RECOMMENDED SAE VISCOSITY NUMBER
I I _111'1.11 11II'laU.III'11 .. 1_111'.'l!! :1. 11'1&'1_
I I
. I
I r I
-30 -20 0 20 40 60 80 100 TEMPERATURE RANGE ANTICIPATED BEFORE NEXT OIL CHANGE, OF.
NOTE: SAE 5W-20 oils are not recommended for sustained high-speed
driving.
SAE 30 oils may be used at temperatures above 40oP. SAE 5W-30 vis
cosity oil is recommended for all seasons in vehicles normally operated in
Canada.
The proper oil viscosity helps assure good cold and hot starting.
Checking Oil Level
The engine oil should be main
tained at proper level. The best
time to check it
is before operating
the engine
or as the last step in a
47
fuel stop. This will allow the oil ac
cumulation in the engine to drain
back in the crankcase. To check
the
eve!, remove the oil gauge rod
(dip stick), wipe it clean and rein-