CHEVROLET CAMARO 1973 2.G Repair Manual
Manufacturer: CHEVROLET, Model Year: 1973, Model line: CAMARO, Model: CHEVROLET CAMARO 1973 2.GPages: 84, PDF Size: 32.64 MB
Page 61 of 84
Downloaded from www.Manualslib.com manuals search engine ... ... ... ...
---",,"'"
-..... .
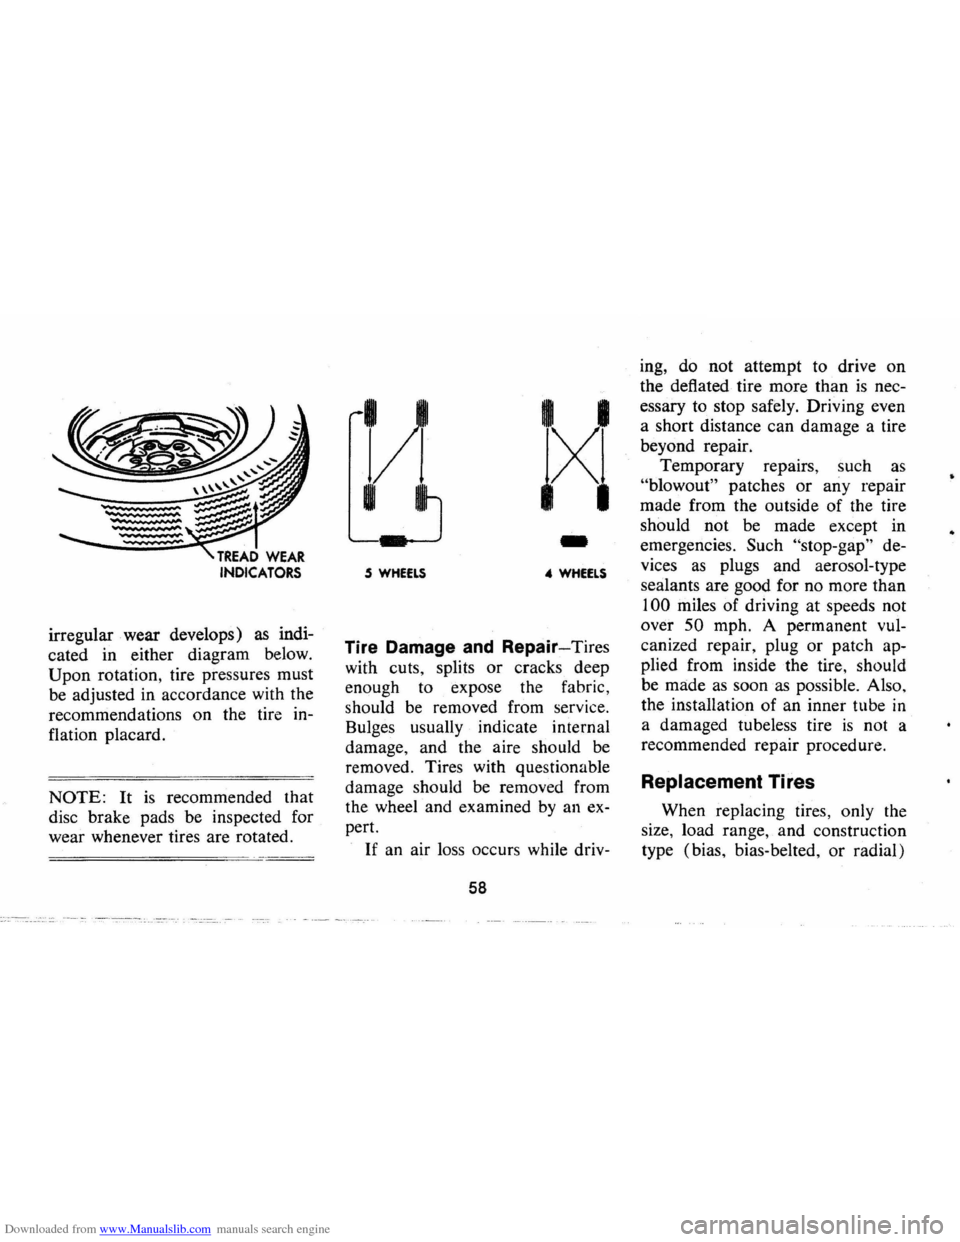
irregular . wear develops) as indi
cated in either diagram below.
Upon rotation, tire pressures must
be adjusted in accordance with the
recommendations on the tire in
flation placard.
NOTE: It is recommended that
disc brake pads be inspected for
wear whenever tires are rotated.
)11
I I
~Xl l.j
-.5 WHEELS 4 WHEELS
Tire Damage and Repair-Tires
with cuts, splits or cracks deep
enough to expose the fabric,
should be removed from service.
Bulges usually indicate internal
damage , and the aire should be
removed. Tires with questionable
damage should be removed from
the wheel and examined
by an ex
pert.
H an air loss occurs while driv-
58
ing, do not attempt to drive on
the deflated tire more than
is nec
essary to stop safely. Driving even
a short distance can damage a tire
beyond repair.
Temporary repairs, such as
"blowout" patches or any repair
made from the outside of the tire
should not be made except in
emergencies.
Such "stop-gap" de
vices
as plugs and aerosol-type
sealants are good for no more than
100 miles of driving at speeds not
over
50 mph. A permanent vul
canized repair, plug or patch ap
plied from inside the tire, should
be
made as soon as possible . Also,
the installation of an inner tube
in
a damaged tubeless tire is not a
recommended repair procedure.
Replacement Tires
When replacing tires, only the
size, load range , and construction
type (bias, bias-belted, or radial)
•
Page 62 of 84
Downloaded from www.Manualslib.com manuals search engine originally installed on your vehi
cle are recommended.
Use of any
other tire size or type tire may
seriously affect ride, handling ,
speedometer / odometer calibration
vehicle ground clearance and tire
clearance to the body and chassis.
The following also should be con
sidered when replacing tires:
• To achieve best all around ve
hicle performance, belted-bias
tires and bias tires should not
be mixed
on the same car.
• Because of possible adverse ef
fects on vehicle handling, do
not mix radial ply tires with
other type tires on the same
vehicle.
• It is recommended that new
tires be installed in pairs on the
same axle.
.. When replacing only one tire, it
should be paired with the tire having
the least wear, to equal
ize braking traction.
• When replacing original tires
with an optional recommended
size of different diameter, the
speedometer must be recali
brated by installing the correct
speedometer driven gear.
Snow Tires
If you equip your vehicle with
snow tires, they should be inflated
4 psi above the recommended
pressures shown on the tire pla
card up to a maximum of 32 psi
( cold) for load range B tires and
40 psi for load range D tires. It is
recommended that vehicle speeds
be limited to a maximum of 75
mph if snow tires are installed.
Replacement Wheels
When replacing wheels for any
reason, care should be taken to in-
59
sure that the wheels are equiva
lent to those removed in diameter,
rim width and off-set.
Warranty
Tires are warranted by the tire
manufacturers
as covered in the
New Vehicle Warranty and Policy
on Owner Service folder furnished
with your vehicle. However, for
the added convenience of owners,
many Chevrolet dealers are
equipped to handle tire warranty
adjustments
on certain makes of
tires provided
on 1973 Chevrolet
cars.
Tire Traction
A decrease in driving, corner
ing, and braking traction occurs
when water, snow, ice, gravel,
or
other material is on the road sur
face. Driving practices and car
speed should be adjusted to the
road conditions.
Page 63 of 84
Downloaded from www.Manualslib.com manuals search engine When driving on wet or slushy
roads, it
is possible for a wedge of
water to build up between the tire
and road surface. This phenom
enon, known
as hydroplaning.
may cause partial
or complete loss
of traction, which adversely affects
vehicle control and stopping abil
ity.
To reduce the possiblity of
traction loss, the following precau
tions should be observed:
1. Slow down during rainstorms or
when roads are slushy.
2. Slow down if road has standing
water
or puddles.
3. Replace tires when tread wear
indicators are visible .
4. Keep tires properly inflated.
For temporary assistance when
traction
is lost on ice or snow. the
use of AC Liquid Tire Chain is
recommended.
Inflation Instructions for
Space Saver Spare Tire
I. Install deflated space saver
spare
on car with valve stem at
the bottom and tighten all
five
lug nuts.
2. Remove valve qp and make
sure valve core is screwed tight
in valve stem.
3. Remove plastic cap from
in
flator.
4 . Place inflator over valve
stern
and push onto stem until sound
of gas entering tire can
be
heard .
5 . Keep pressure against valve and
hold can upright against wheel
to ensure complete draining of
fluid.
60
6 . Hold the inflator in position one
minute. After sound stops. then
remove inflator for disposal
in
proper receptacle.
7 . Replace valve cap.
NOTE: It is recommended that
the inflation pressure be checked
and adjusted to 28 psi
(Space
Saver Spare
only), as soon as pos
sible after installing tire on car.
To stow , deflate tire by remov
ing tire valve stem core with tool
on end of valve cap. Flatten tire
and replace core and cap. Do not
inhale gas.
Store tire in trunk com
partment. The
Space Saver Spare tire has
an approximate tread life of
2,000
miles; therefore, its continued use
other than for emergency purposes
is not recommended. The Space
Saver Spare
has the same warranty
as all original equipment tires.
Page 64 of 84

Downloaded from www.Manualslib.com manuals search engine However, this warranty is void if
any inflator containing sealants
is
used. Approved inflation gases are
air, carbon dioxide, nitrogen, and
Freon 22.
Underbody Maintenance
The effects of salt and other
corrosive materials used for ice
and snow removal and dust con
trol can result in accelerated rust
ing and deterioration of under
body component s such
as brake
and fuel lines, frame, underbody
floor pan, exhaust system, brac
kets, parking brake cables. These
corrosive effects, however , can be
reduced
by periodic flushing of the underbody
with plain water. In
geographic areas having a heavy
concentration of such corrosive
materials, it
is recommended that
the complete underbody be in
spected and flushed at least
once
each year, preferably after a win
ter's exposure.
Particular attention
should be given to cleaning out
underbody members where dirt
and other foreign materials may
have collected .
If desired, your Chevrolet deal
er can perform
this service for
you. In addition , he can provide
recommendations on undercoat
ing materials which will help pro
tect your vehicle from corrosion.
61
Battery Care (Energizer)
Check fluid level monthly utiliz
ing the level indicator cap marked
"Delco Eye". If the transparent eye
within the cap glows, fluid level
is
low. Add only colorless, odorless
drinking water or distilled water to
bring level to split ring in filler
opening.
Page 65 of 84
Downloaded from www.Manualslib.com manuals search engine MINOR TROUBLE SHOOTING GUIDE
IMPORTANT: For maximum performance and economy, keep your GM car all GM. Specify General Motors parts identified by one of these trademarks.
62
Page 66 of 84
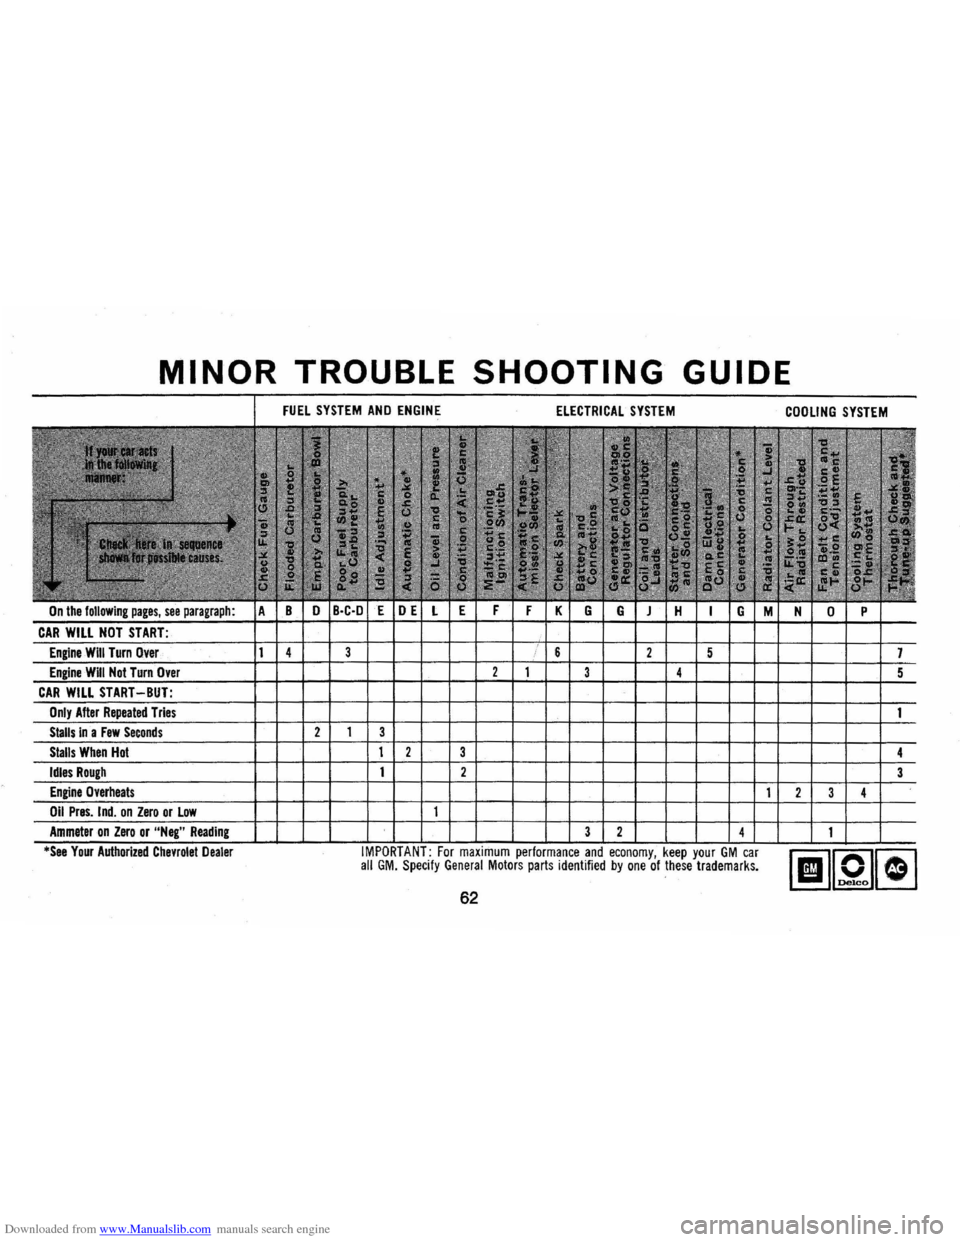
Downloaded from www.Manualslib.com manuals search engine The chart on the previous page, and the, information on the pages
which follow, contains information designed to aid the average
driver to discover, and possibly correct, conditions resulting in minor
mechanical difficulties
in his car. The chart, designed to point out
possible solutions to several
of the most common automotive malfunctions and point out a logical checking sequence, will lead step
by step to the most
likely causes and corrective procedures. If, after
making the checks and adjustments suggested, the source of the
trouble
has not been found and corrected, it is strongly recom
mended that an Authorized Chevrolet Dealer inspect the vehicle and make whatever repairs or adjustments are necessary.
FUEL SYSTEM AND ENGINE
If the ignition switch will cause the engine to "turn over" or
"crank" but the car will not start, check Steps A through 0 below.
NOTE: If continual ··f1ooding··, of the carburetor is evidenced by a
carburetor wet with fuel or black exhaust smoke, perform the
operation suggested in paragraph D only.
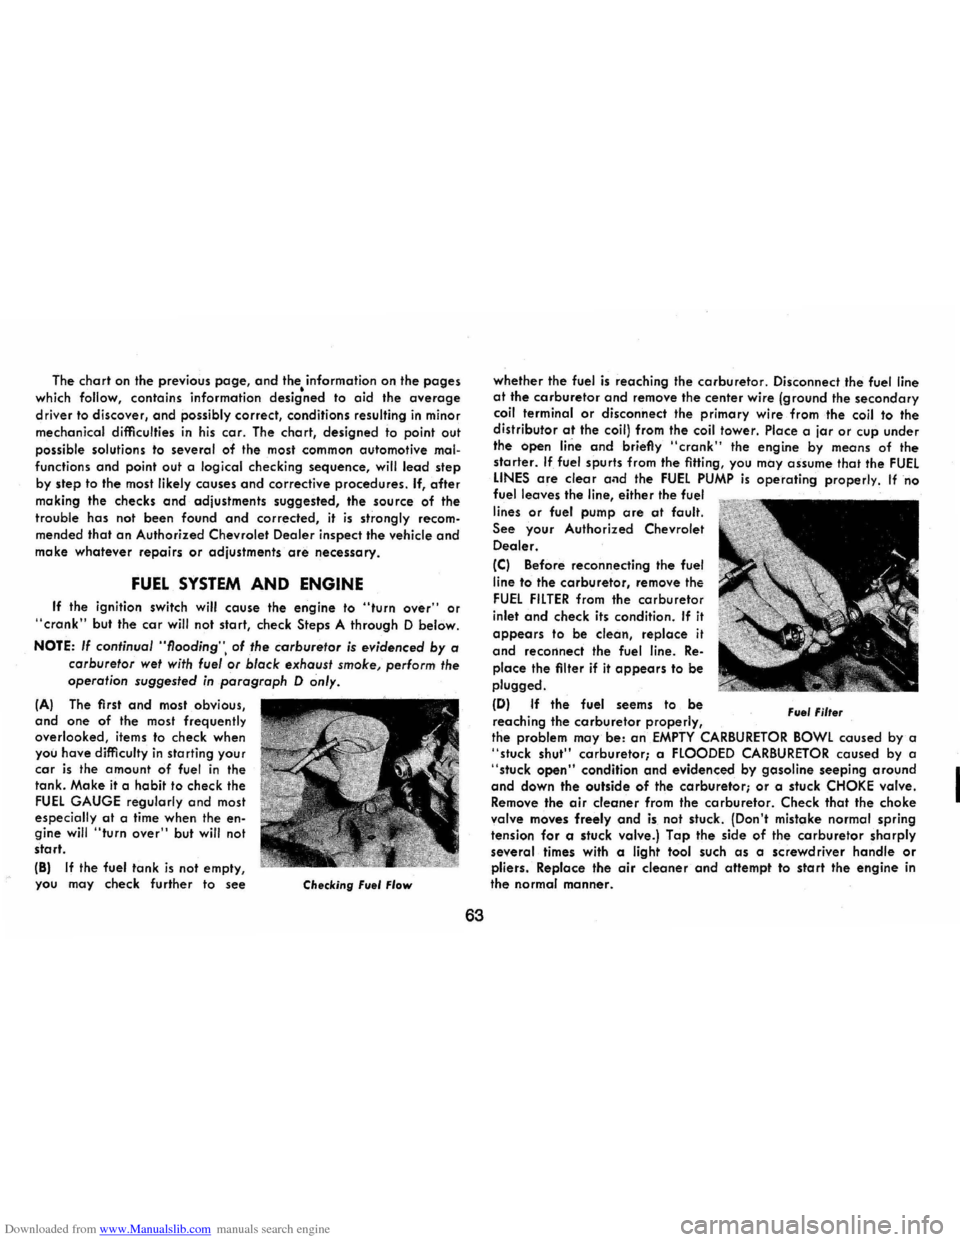
(A) The first and most obvious, and one of the most frequently
overlooked, items to check when
you have difficulty in starting your car is the amount of fuel in the
tank. Make it a habit to check the
FUEL GAUGE regularly and most
especially at a time when the engine will "turn over" but will not
start.
(8)
If the fuel tank is not empty,
you may check further to see
Checking Fuel Flow
63
whether the fuel is reaching the carburetor. Disconnect .the fuel line at the carburetor and remove the center wire (ground the secondary coil terminal or disconnect the primary wire from the coil to the
distributor at the coil) from the coil tower. Place a jar or cup under
the open line and briefly "crank" the engine by means of the
starter. If fuel spurts from the fitting, you may assume that the FUEL LINES are clear and the FUEL PUMP is operating properly. If no
fuel leaves the line, either the fuel
lines
or fuel pump are at fault.
See your Authorized Chevrolet
Dealer.
(C) Before reconnecting the fuel
line to the carburetor, remove
the
FUEL FILTER from the carburetor
inlet and check its condition. If it
appears to be clean, replace it
and recorinect the fuel line. Re
place the filter if it appears to be
plugged.
(D) If the fuel seems to be
reaching the carburetor properly, Fuel Filter
the problem may be: an EMPTY CARBURETOR BOWL caused by a "stuck shut" carburetor; a FLOODED CARBURETOR caused by a "stuck open" condition and evidenced by gasoline seeping around and down the outside of the carburetor; or a stuck CHOKE valve.
Remove the air cleaner from the carburetor. Check that the choke
valve moves freely and is not stuck. (Don't mistake normal spring
tension for a stuck valve.) Tap the side of the carburetor sharply
several times with a light tool such as a screwdriver handle or pliers. Replace the air cleaner and attempt to start the engine in the normal manner.
I
Page 67 of 84
Downloaded from www.Manualslib.com manuals search engine IE) If the car will start but stalls when hot or has a rough idle,
you can suspect a faulty IDLE ADJUSTMENT, a malfunctioning AUTOMATIC CHOKE or an extremely dirty and blocked AIR CLEANER ELEMENT. Replace paper element air cleaner if necessary. Idle adjustment or automatic choke service (other than that outlined in paragraph 0 above) should be performed by your
Chevrolet Dealer.
If the above Fuel System checks and the checks suggested under the Electrical System following do not correct the malfunction, it is recommended that you return to your Authorized Chevrolet Dealer
for further checks, adjustments or repairs.
ELECTRICAL SYSTEM If, when the ignition key is turned to "Start", the engine will not
turn over, you have good reason to suspect electrical trouble. NOTE: Never remove Delcotron bat lead without first disconnecting
battery ground cable.
IF) When there is no response at all to attempts to start the car, check the obvious-your AUTOMATIC TRANSMISSION SELECTOR LEVER must be in Neutral or Park position (manual transmission
must have clutch depressed all the way to floor) before the engine can be started. Turning the IGNITION SWITCH rapidly back and forth several times will sometimes correct a poor internal switch
contact.
IG) The BATIERY may be discharged. If so, lights will be dim and the horn will have a poor tone if it will blow at all.
Usually a garage recharge will be necessary to return the battery to operation. Occasionally, however, a long drive will recharge the battery. NOTE: If the battery is determined to be dead, and for no apparent reason, have your Authorized Chevrolet Dealer check the
battery, the GENERATOR and the VOLTAGE REGULATOR.
GENERATOR trouble should already have been indicated by the generator indicator light on the instrument panel.
64
POOR BATIERY CONNECTIONS may be suspected if the car has operated properly a short time before and now not even the horn
will operate. Check both ends of both battery cables. If the connections are corroded, a car may sometimes be restored to operation by removing all cable ends, scraping all contacting surfaces
clean with a pen knife, and reassembling. If the cables are broken,
they must be replaced. The power supply should now be restored
unless the battery is dead.
IH) If, however, the lights and horn work properly but the starter will still not turn over, check the STARTER connections. A "click" from the starter solenoid indicates that the wiring to the starter is properly installed. If the wiring seems to be clean and tightly in
stalled, the trouble is probably in the starter itself and should be referred to your Authorized Chevrolet Dealer.
When the engine will
"turn over" but will not start, the foilowing
items may be checked along with the Fuel Systems Checks listed
previously.
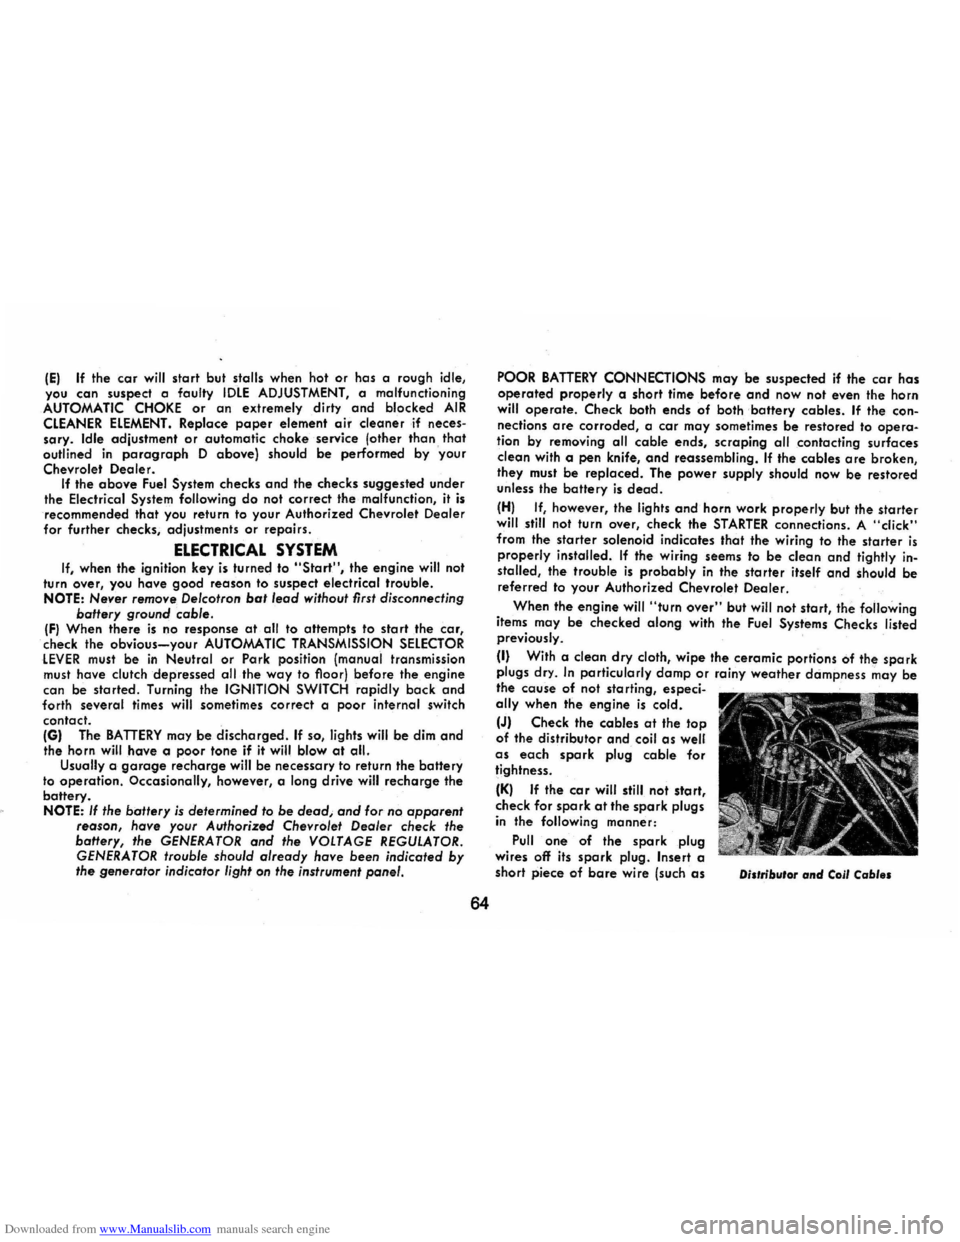
II) With a clean dry cloth, wipe the ceramic portions of the spark plugs dry. In particularly damp or rainy weather dampness may be
the cause of not sta rting, especi
ally when the engine is cold.
IJ) Check the cables at the top of the distributor and coil as well as each spark plug cable for
tightness.
IK) If the co r will still not sta rt,
check for spark at the spark plugs in the following manner:
Pull one of the spark plug
wires off its spark plug. Insert a
short piece of bare wire (such as Di.,ribu'or and Coil Cab I ••
Page 68 of 84
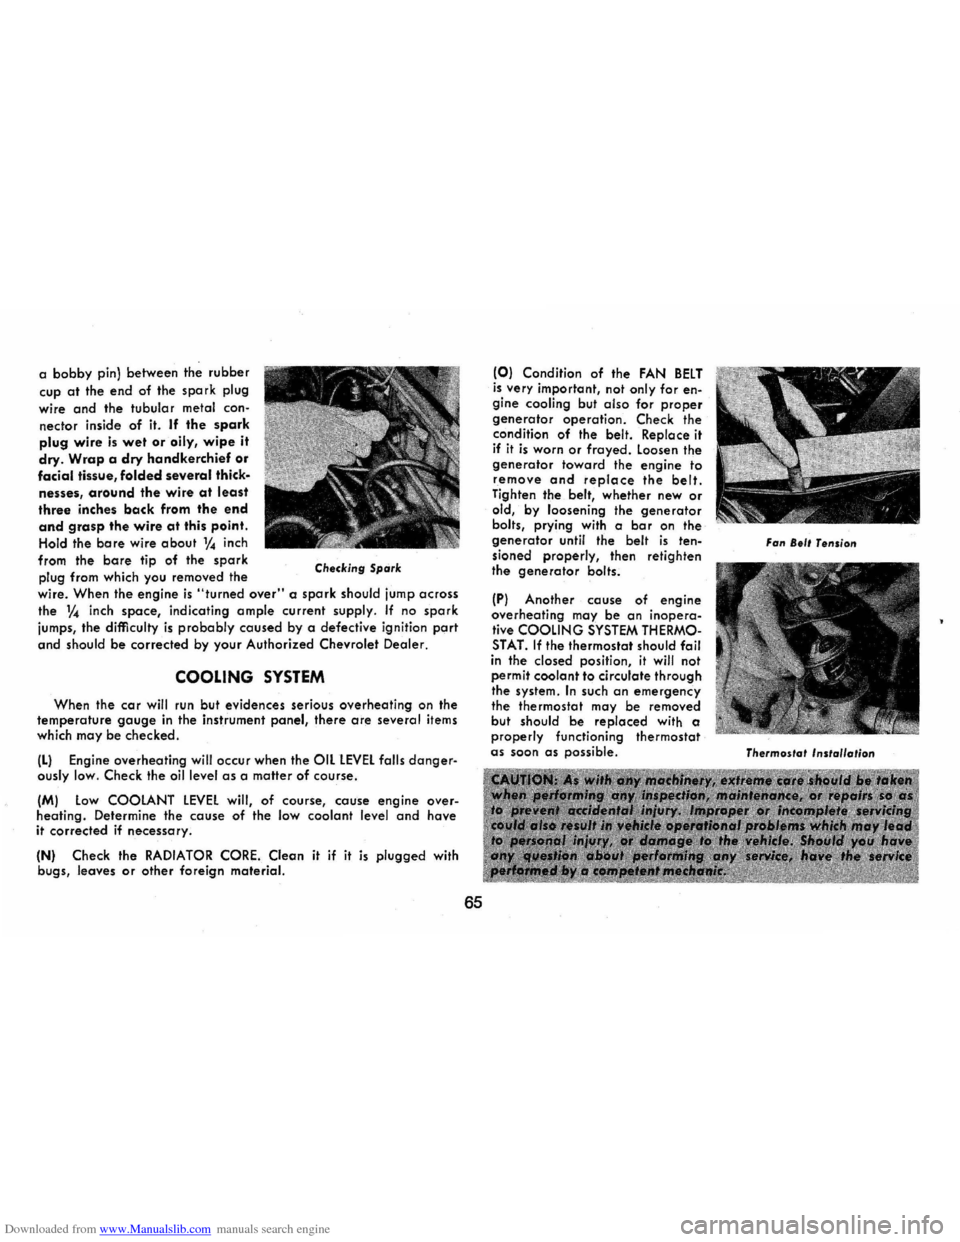
Downloaded from www.Manualslib.com manuals search engine a bobby pin) between the rubber
cup at the end of the spark plug
wire and the tubular metal con
nector inside of it. If the spark
plug wire is wet or oily, wipe it
dry. Wrap a dry handkerchief or facial tissue, folded several thick.
nesses, around the wire at least three inches back from the end
and grasp the wire at this point.
Hold the bare wire about 1f4 inch
from the
bare tip of the spark
plug from which you removed the Checking Spark
wire. When the engine is "turned over" a spark should jump across
the V" inch space, indicating ample current supply. If no spark
jumps, the difficulty is probably caused by a defective ignition port
and should be corrected by your Authorized Chevrolet Dealer.
COOLING SYSTEM
When the cor will run but evidences serious overheating on the temperature gauge in the instrument panel, there are several items
which may be checked .
(L) Engine overheating will occur when the OIL lEVEL falls dangerously low. Check the oil level as a matter of course.
(M) Low COOLANT LEVEL will , of course, couse engine overheating. Determine . the cause of the low coolant level and have
it corrected if necessary.
(N) Check the RADIATOR CORE. Clean it if it is plugged with
bugs, leaves or other foreign material.
65
(0) Condition of the FAN BELT is very important, not only for engine cooling but also for proper generator operation. Check the
condition of the belt. Replace it if it is worn or frayed. Loosen the generator toward the engine to remove and replace the belt. Tighten the belt, whether new or old, by loosening the generator bolts, prying with a bar on the generator until the belt is tensioned properly, then retighten
the generator bolts.
(PI Another couse of engine ove rheating may be on inopera
tive COOLING SYSTEM THERMOSTAT. If the thermostat should foil in the closed position, it will not
perm it coolant to circulate through
the system . In such on emergency the thermostat may be removed
but should be replaced with a properly functioning thermostat as soon as possible.
Fan 8.11 Tension
Thermoslal Inslollo/ion
Page 69 of 84
Downloaded from www.Manualslib.com manuals search engine SPECIFICATIONS
VEHICLE IDENTIFICATION NUMBER
Car-Stamped on Vehicle Identification Plate attached to left
of instrument panel.
Engine-Stamped on boss on block.
6-Cylinder-On right side of block to rear of distributor.
S-Cylinder-On right side of block at front.
Body-Stamped
on plate attached to cowl panel.
DIMENSIONS
Overall Length (Coupe) ....................... 1 SS.5"
Height ..................................... 49.1"
Width .............•............•......... 74.4"
Wheelbase ................................ 10S.0"
66
BATTERY RATING
L6 and 307-VS engine equipped vehicles-I 2 volt, 54 plate, 2300 watts'
350 VS engine equipped vehicles-12 volt, 66 plate, 2900 watts'
Heavy Duty-I 2 volt, 90 plate, 3750 watts'
'Cranking power at O°F.
CAPACITIES
Gasoline Tank
(Approx.)
Crankcase
(Refill)
6 and S Cylinder
U.S. Measure
IS.O gal.
Oil
change only . . . . . . . . . . .. 4 qt.
Oil and Filter change . . . . . . .. 5 qt.
Imperial Measure
15.0 gal.
3% qt.
4% qt.
Page 70 of 84
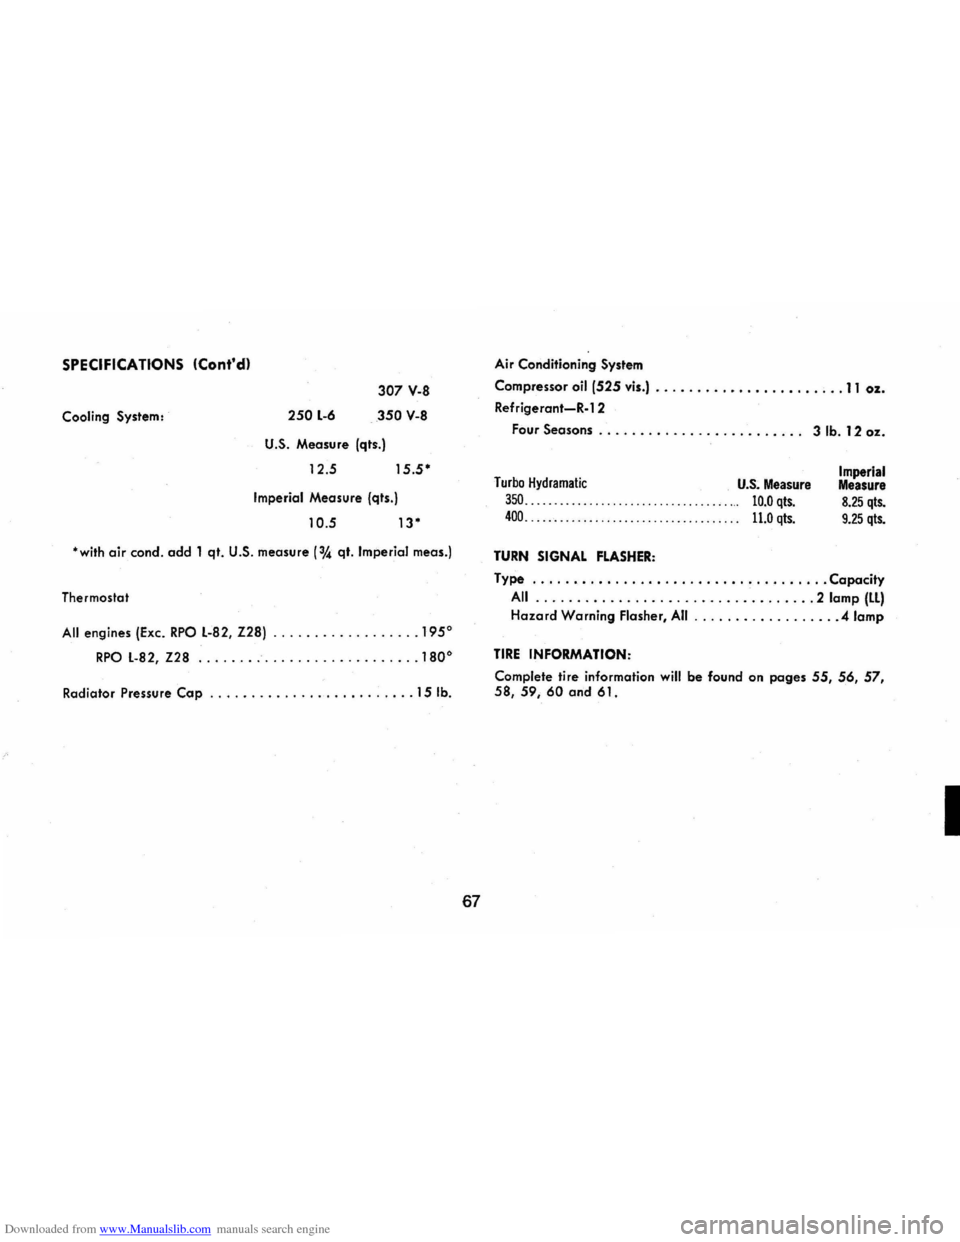
Downloaded from www.Manualslib.com manuals search engine SPECIFICATIONS (Cont'dl
Cooling System: 250 L-6
307 V-8
350 V-8
U.S. Measure (qts.)
12.5
15.5·
Imperial Measure (qts.)
10.5 13·
·with air condo add 1 qt. U.S. measure (3,4 qt. Imperial meas.)
Thermostat
All engines (Exc. RPO L-82, Z28) .............. .... 1950
RPO L-82, Z28 ........................... 1800
Radiator Pressure Cap ......................... 15 lb.
67
Air Conditioning System
Compressor
oil (525 vis.) .................... , .. 11 oz.
Refrigerant-R-l 2
Four
Seasons . . . . . . . . . . . . . . . . . . . . . . . .. 3 lb. 12 oz.
Turbo Hydramatic U.S. Measure
350. . . . . . . . . . . . . . . . . . . . . . . . . . . . . . . . . . . ... 10.0 qts.
400. . . . . . . . . . . . . . . . . . . . . . . . . . . . . . . . . . . . . 11.0 qts.
TURN SIGNAL FLASHER:
Imperial Measure
8.25 qts.
9.25 qts.
Type .................................... Capacity
All .................................. 2 lamp (LL)
Hazard Warning Flasher, All ................. .4 lamp
TIRE INFORMATION:
Complete tire information will be found on pages 55, 56, 57, 58,59,60 and 61.
I