radio CHEVROLET CAMARO 1997 4.G Owner's Manual
[x] Cancel search | Manufacturer: CHEVROLET, Model Year: 1997, Model line: CAMARO, Model: CHEVROLET CAMARO 1997 4.GPages: 404, PDF Size: 20.96 MB
Page 159 of 404
Downloaded from www.Manualslib.com manuals search engine PREV (1): Press this button or the left SEEK arrow to
go back to the start of a current track.
If you hold the
button or press it more than once, the player will
continue moving back through the disc. The sound will
mute while seeking.
RDM (2): Press this button to hear the tracks in random,
rather than sequential, order.
RANDOM will show on
the display. Press RDM again
to turn off random play.
RDM is reset to off when the disc is ejected.
NEXT (3): Press this button or the right SEEK arrow to
go
to the next track. If you hold the button or press it
more than once, the player will continue moving
forward through the disc. The sound will mute
while seeking.
REV (4): Press and hold this button to quickly reverse
within
a track. Release it to play the passage. You can
use the counter reading on the display to locate a
passage more easily.
FWD (6): Press and hold this button to advance quickly
within a track. Release it to resume playing. You can
use the counter reading on the display to locate a
passage easily.
RECALL: Press this button to see which track is
playing. Press it again within five seconds to see how
long it has been playing (elapsed time). The track
number also appears when you change the volume or
when a new track starts to play.
AM-FM: Press this button to play the radio when a disc
is in the player. The letters
CD will go off the display.
CD AUX: Press this button to change to the disc
function when the radio
is on. A CD icon will appear on
the display when the disc is in the player, whether it
is
active or not.
E JECR Press this button to remove the disc. The radio
will play. The disc will start at the first track when
you
reinsert it.
If you turn
off the ignition or radio with a disc in the
player, it will stay in the player. When you turn on the
ignition
or system, the disc will start playing where it
was stopped.
If you press EJECT but don’t remove the
disc, the player will pull the disc back in to protect it
after about one minute.
3-19
Page 160 of 404
Downloaded from www.Manualslib.com manuals search engine Theft-Deterrent Feature
THEFTLOCK" is designed to discourage theft of your
radio. It works by using
a secret code to disable all radio
functions whenever battery power is removed.
The THEFTLOCK feature for the radio may be used or
ignored. If ignored, the system plays normally and the
radio
is not protected by the feature. If THEFTLOCK is
activated, your radio will not operate if stolen.
When THEFTLOCK is activated, the radio will display
LOC to indicate a locked condition anytime battery
power is removed. If your battery loses power for any
reason,
you must unlock the radio with the secret code
before it will operate.
Activating the Theft-Deterrent Feature
The instructions which follow, explain how to enter your
secret code to activate the THEFTLOCK system. It is
recommended that
you read through all nine steps
before starting the procedure.
NOTE:
If you allow more than 15 seconds to elapse
between any steps, the radio automatically reverts to
time and
you must start the procedure over at Step 4.
1. Write down any three or four-digit number from
000 to 1999 and keep it in a safe place separate from
the vehicle.
2. Turn the ignition to ACCESSORY or RUN.
3. Turn the radio off.
4. Press the 1 and 4 buttons together. Hold them down
until --- shows on the display. Next you will use the
secret code number which you have written down.
5. Press MN and 000 will appear on the display.
6. Press MN again to make the last two digits agree
7. Press HR to make the first one or two digits agree
8. Press AM-FM after you have confirmed that the
with
your code.
with your code.
code matches the secret code
you have written down.
The display will show REP to let you know that
you
need to repeat Steps 5 through 7 to confirm your
secret code.
9. Press AM-FM and this time the display will show
SEC to
let you know that your radio is secure. The
indicator by the volume control will begin flashing
when the ignition is turned
off.
3-20
Page 161 of 404
Downloaded from www.Manualslib.com manuals search engine Unlocking the Theft-Deterrent Feature After a
Power
Loss
Enter your secret code as follows; pause no more than
15 seconds between steps:
1. LOC appears when the ignition is on.
2. Press MN and 000 will appear on the display.
3. Press MN again to make the last two digits agree
with your code.
4. Press HR to make the first one or two digits agree
with your code.
5. Press AM-FM after you have confirmed that the
code matches the secret code you have written down.
The display will show SEC, indicating the radio is
now operable and secure.
If you enter the wrong code eight times, INOP will
appear
on the display. You will have to wait an hour
with the ignition on before
you can try again. When you
try again,
you will only have three chances to enter the
correct code before INOP appears.
If
you lose or forget your code, contact your dealer.
Disabling the Theft-Deterrent Feature
Enter your secret code as follows; pause no more than
15 seconds between steps: 1.
2.
3.
4.
5.
6.
7.
Turn the ignition
to ACCESSORY or RUN.
Turn the radio off.
Press the 1 and
4 buttons together. Hold them down
until SEC shows
on the display.
Press MN and
000 will appear on the display.
Press MN again to make the last two digits agree
with your code.
Press
HR to make the first one or two digits agree
with your code.
Press AM-FM after you have confirmed that the
code matches the secret code you have written down.
The display will show
---, indicating that the radio is
no longer secured.
If the code entered is incorrect, SEC will appear on the
display. The radio will remain secured until the correct
code
is entered.
When battery power is removed and later applied to a
secured radio, the radio won’t turn on and
LOC will
appear on
the display.
To unlock a secured radio, see “Unlocking the
Theft-Deterrent Feature After a Power
Loss” earlier in
this section.
3-21
Page 162 of 404
Downloaded from www.Manualslib.com manuals search engine Understanding Radio Reception
FM Stereo
FM stereo will give you the best sound. But FM signals
will reach only about
10 to 40 miles (16 to 65 km). Tall
buildings or hills can interfere with
FM signals, causing
the sound to come and go.
AM
The range for most AM stations is greater than for FM,
especially at night. The longer range, however, can
cause stations to interfere with each other.
AM can pick
up noise from things like storms and power lines. Try
reducing the treble
to reduce this noise if you ever get it.
Tips About Your Audio System
Hearing damage from loud noise is almost undetectable
until
it is too late. Your hearing can adapt to higher
volumes of sound. Sound that seems normal can be loud
and harmful to your hearing. Take precautions by
adjusting the volume control on your radio to a safe
sound level before your hearing adapts to it.
To help avoid hearing loss or damage:
Adjust the volume control to the lowest setting.
Increase volume slowly until you hear comfortably
and clearly.
NOTICE:
Before you add any sound equipment to your
vehicle
-- like a tape player, CB radio, mobile
telephone or two-way radio
-- be sure you can
add what you want.
If you can, it’s very
important to do it properly. Added sound
equipment may interfere with the operation
of
your vehicle’s engine, Delco radio or other
systems, and even damage them. Your vehicle’s
systems may interfere with the operation of
sound equipment that has been added
improperly.
So, before adding sound equipment, check with
your dealer and be sure to check Federal rules
covering mobile radio and telephone units.
3-22
Page 163 of 404
Downloaded from www.Manualslib.com manuals search engine Care of Your Cassette Tape Player
A tape player that is not cleaned regularly can cause
reduced sound quality, ruined cassettes or a damaged
mechanism. Cassette tapes should be stored in their
cases away from contaminants, direct sunlight and
extreme heat. If they aren’t, they may not operate
properly or may cause failure of the tape player.
Your tape player should be cleaned regularly after every
50 hours of use. Your radio may display CLN to indicate
that you have used your tape player for
50 hours without
resetting the tape clean timer.
If this message appears on
the display, your cassette tape player needs to be
cleaned. It will still play tapes, but you should clean it as
soon as possible
to prevent damage to your tapes and
player. If you notice a reduction
in sound quality, try a
known good cassette to see if
it is the tape or the tape
player at fault. If this other cassette has
no improvement
in sound quality, clean the tape player. Cleaning
may be done with a scrubbing action,
non-abrasive cleaning cassette with pads which scrub
the tape head as the hubs
of the cleaner cassette turn. It
is normal for the cassette to eject while cleaning. Insert
the cassette at least three times to ensure thorough
cleaning.
A scrubbing action cleaning cassette is
available through your Chevrolet dealership.
You may also choose a non-scrubbing action, wet-type
cleaner which
uses a cassette with a fabric belt to clean
the tape head. This type
of cleaning cassette will not
eject and, it may
not clean as thoroughly as the
scrubbing type cleaner.
After you clean the player, press and hold
EJECT for
five seconds to reset the
CLN indicator. The radio will
display
--- to show the indicator was reset.
Cassettes are subject to wear and the sound quality may
degrade over time. Always make sure the cassette tape
is in good condition before you have your tape
player serviced.
3-23
Page 208 of 404
Downloaded from www.Manualslib.com manuals search engine NOTICE:
Ignoring these steps could result in costly damage
to your vehicle that wouldn’t be covered by
your warranty.
Trying to start your Chevrolet by pushing
or
pulling it could damage your vehicle, even if you
have a manual transmission. And if you have an
automatic transmission,
it won’t start that way.
1. Check the other vehicle. It must have a 12-volt
battery with a negative ground system.
NOTICE:
If the other system isn’t a 12-volt system with a
negative ground, both vehicles can be damaged.
2.
3.
Get the vehicles close enough so the jumper cables
can reach, but be sure the vehicles aren’t touching
each
other. If they are, it could cause a ground
connection you don’t want.
You wouldn’t be able to
start
your Chevrolet, and the bad grounding could
damage the electrical systems.
Turn off the ignition
on both vehicles. Turn off all
lights that aren’t needed, and radios. This will avoid
sparks and help save both batteries. And it could
save your radio!
I NOTICE:
If you leave your radio on, it could be badly
damaged. The repairs wouldn’t be covered by
your warranty.
4. Open the hoods and locate the batteries.
Find
the positive (+) and negative (-) terminals on
each battery.
5-4
Page 315 of 404
Downloaded from www.Manualslib.com manuals search engine Headlamps Fuses and Circuit Breakers
The headlamp wiring is protected by a circuit breaker.
An electrical overload will cause the lamps to go on and
off, or in some cases to remain off.
If this happens, have
your headlamp wiring checked right away.
Windshield Wipers
The windshield wiper motor is protected by a circuit
breaker and a
fuse. If the motor overheats due to heavy
snow, etc., the wiper will stop until the motor cools.
If
the overload is caused by some electrical problem and
not snow, etc.,
be sure to get it fixed.
Power Windows and Other Power Options
Circuit breakers protect the power windows and other
power accessories. When the current load is too heavy,
the circuit breaker opens and closes, protecting the
circuit until the problem is fixed or goes away. The
wiring circuits in your vehicle are protected from
short circuits by a combination of fuses, circuit breakers,
and fusible thermal links in the wiring itself. This
greatly reduces the chance of fires caused by
electrical problems.
Look at the silver-colored band inside the fuse.
If the
band is broken or melted, replace the
fuse. Be sure you
replace a bad fuse with a new one of the correct size.
If you ever have a problem on the road and don’t have a
spare fuse, you can “borrow”
one of the correct value.
Just pick some feature of your vehicle that you can get
along without
-- like the radio or cigarette lighter -- and
use its fuse, if it is the size you need. Replace it as soon
as you can.
6-69
Page 316 of 404
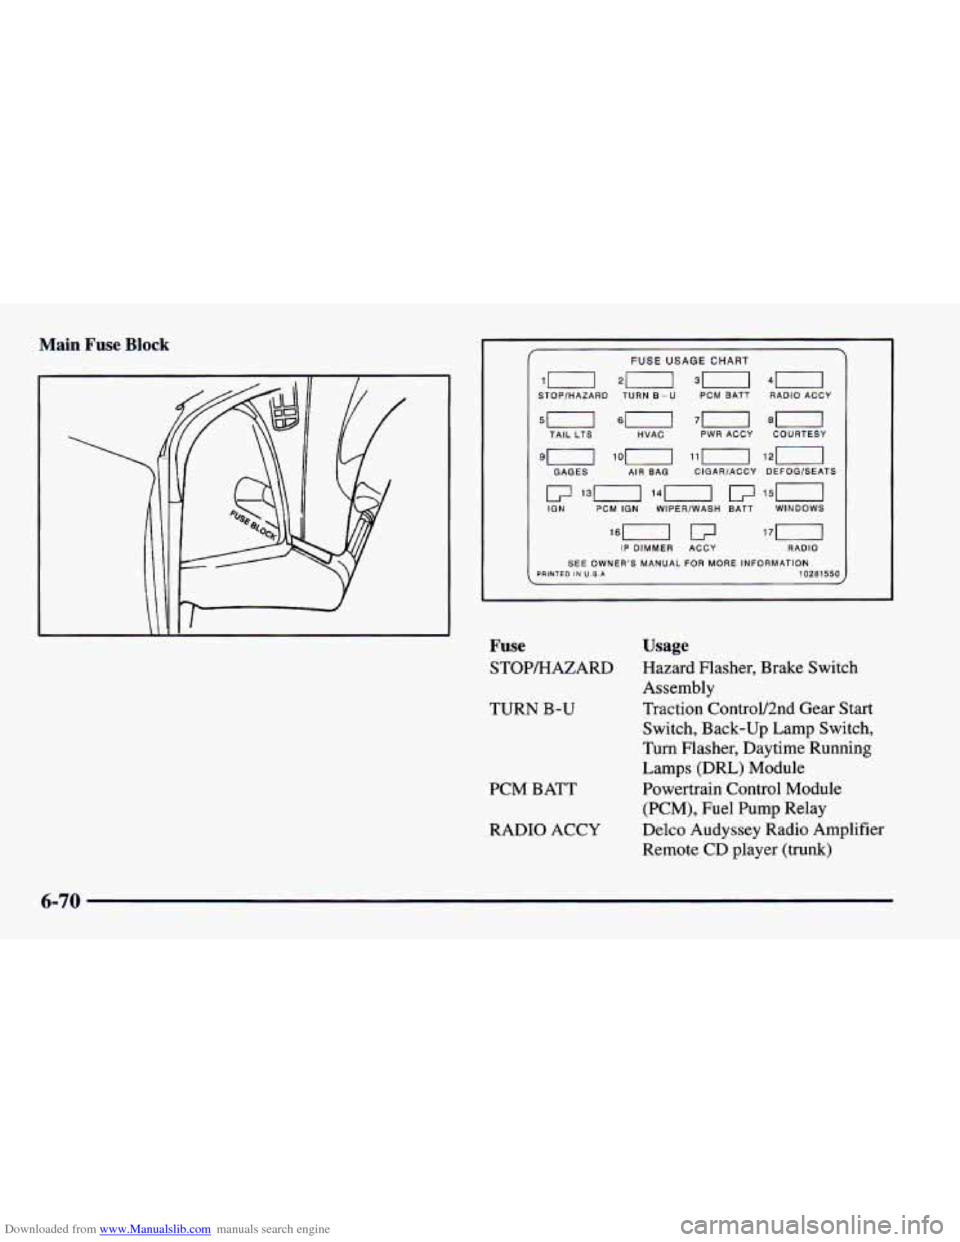
Downloaded from www.Manualslib.com manuals search engine Main Fuse Block ~
FUSE USAGE CHART
10 20 30 40 STOPlHAZARD TURN 6-U PCM BATT RADIO ACCY 1
TAIL LTS HVAC 70 80 1 PWR ACCY COURTESY
9n lin 121]
LFI 130 140 ~-l 150
GAGES AIR BAG CIGAR/ACCY DEFOGEEATS
IGN PCM IGN WlPERlWASH BATT WINDOWS
IP DIMMER ACCY RADIO
SEE OWNER'S MANUAL FOR MORE INFORMATION PRINTED IN U.S.A 10281550 I
Fuse
STOPMAZARD
TURN
B-U
PCM BATT
RADIO ACCY
Usage
Hazard Flasher, Brake Switch
Assembly
Traction ControV2nd Gear Start
Switch, Back-up
Lamp Switch,
Turn Flasher, Daytime Running
Lamps (DRL) Module
Powertrain Control Module
(PCM), Fuel Pump Relay
Delco Audyssey Radio Amplifier
Remote CD player (trunk)
6-70
Page 317 of 404
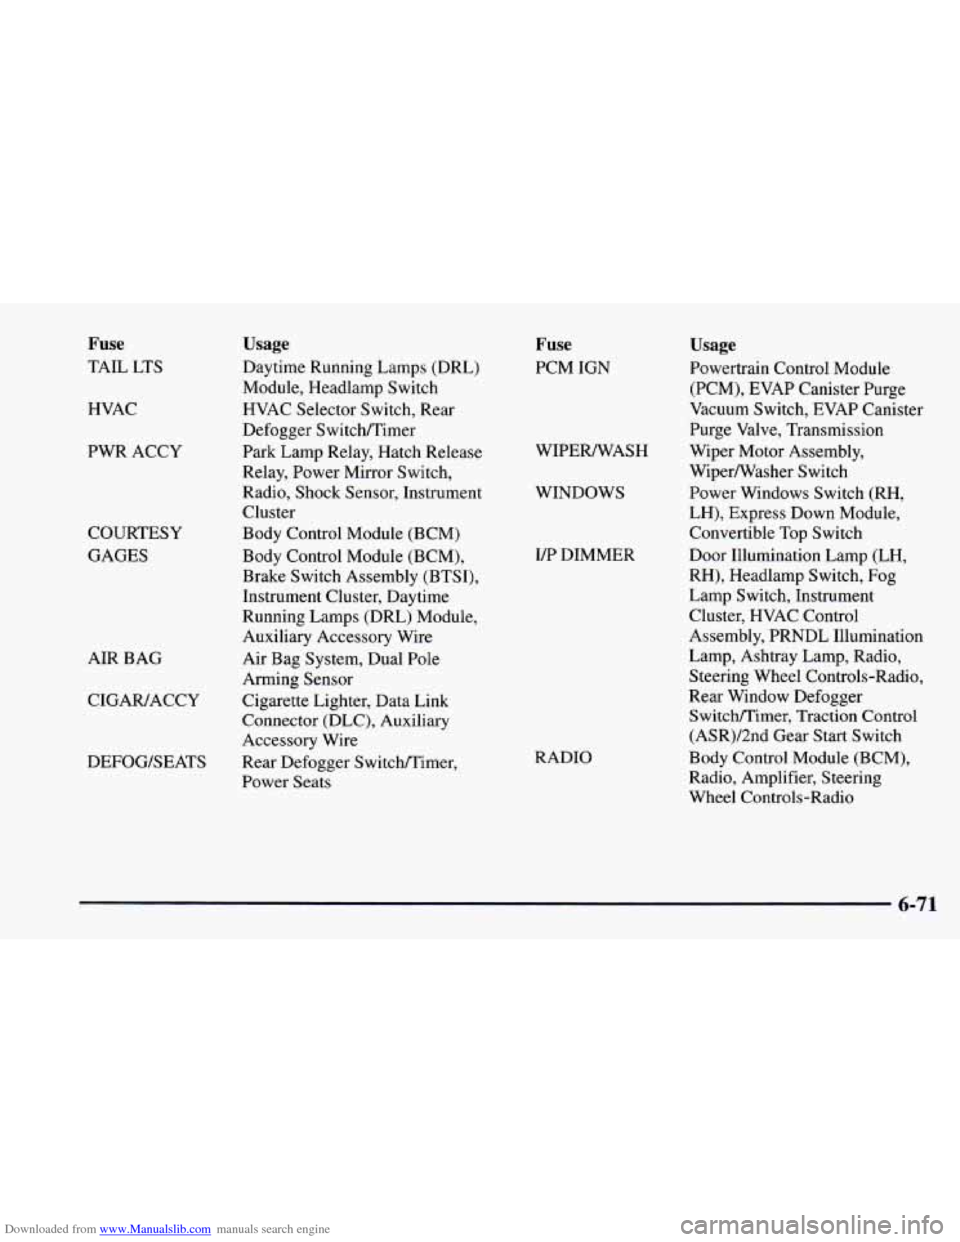
Downloaded from www.Manualslib.com manuals search engine Fuse
TAIL LTS
HVAC
PWR ACCY
COURTESY
GAGES
AIR BAG
CIGAWACCY
DEFOG/SEATS
Usage
Daytime Running Lamps (DRL)
Module, Headlamp Switch
HVAC Selector Switch, Rear
Defogger Switchmimer
Park Lamp Relay, Hatch Release
Relay, Power Mirror Switch,
Radio, Shock Sensor, Instrument Cluster
Body Control Module (BCM)
Body Control Module (BCM),
Brake Switch Assembly (BTSI),
Instrument Cluster, Daytime
Running Lamps (DRL) Module,
Auxiliary Accessory Wire
Air Bag System, Dual Pole
Arming Sensor
Cigarette Lighter, Data Link
Connector (DLC), Auxiliary
Accessory Wire
Rear Defogger Switchmimer,
Power Seats
Fuse
PCM IGN
WIPERNASH
WINDOWS
UP DIMMER
RADIO
Usage
Powertrain Control Module (PCM), EVAP Canister Purge
Vacuum Switch, EVAP Canister
Purge Valve, Transmission
Wiper Motor Assembly,
WiperNasher Switch
Power Windows Switch (RH,
LH), Express Down Module,
Convertible Top Switch
Door Illumination Lamp (LH,
RH), Headlamp Switch,
Fog
Lamp Switch, Instrument
Cluster, HVAC Control
Assembly, PRNDL Illumination
Lamp, Ashtray Lamp, Radio, Steering Wheel Controls-Radio,
Rear Window Defogger SwitcldTimer, Traction Control
(ASR)/2nd Gear Start Switch
Body Control Module (BCM),
Radio, Amplifier, Steering
Wheel Controls-Radio
6-71
Page 391 of 404
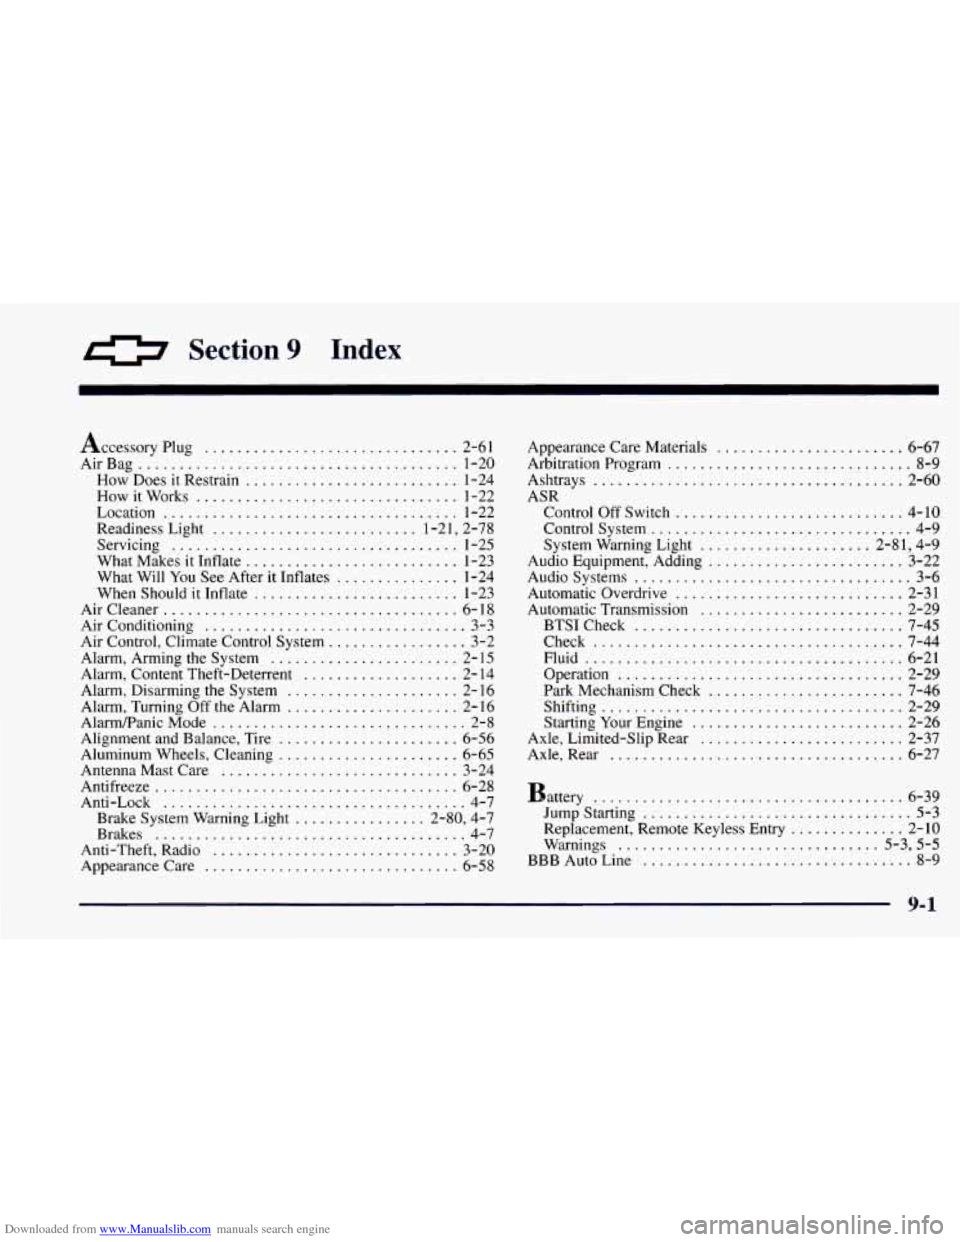
Downloaded from www.Manualslib.com manuals search engine 0 Section 9 Index
Accessory Plug ............................... 2-61
AirBag
....................................... 1-20
How Does it Restrain
.......................... 1-24
How it Works
................................ 1-22
Location
.................................... 1-22
Readiness Light
......................... 1.21. 2.78
Servicing
................................... 1-25
What Makes
it Inflate .......................... 1-23
What Will You See After
it Inflates ............... 1-24
When Should
it Inflate ......................... 1-23
Aircleaner
.................................... 6-18
Air Conditioning
................................ 3-3
Air Control. Climate Control System
................. 3-2
Alarm. Arming the System
....................... 2- 15
Alarm. Content Theft-Deterrent
................... 2- 14
Alarm. Disarming
the System ..................... 2- 16
Alarm. Turning
Off the Alarm ..................... 2- 16
Alarm/PanicMode
............................... 2-8
Alignment and Balance. Tire
...................... 6-56
Aluminum Wheels. Cleaning ...................... 6-65
Antenna Mast Care
............................. 3-24
Antifreeze
..................................... 6-28
Anti-Lock
..................................... 4-7
Brake System Warning Light
................ 2-80. 4-7
Brakes
...................................... 4-7
Anti.Theft. Radio
.............................. 3-20
Appearancecare
............................... 6-58 Appearance Care Materials
....................... 6-67
Arbitration Program
.............................. 8-9
Ashtrays
...................................... 2-60
ASR Control Off Switch
............................ 4-10
Control System
................................ 4-9
System Warning Light
..................... 2-81. 4-9
Audio Equipment. Adding
........................ 3-22
Audio Systems
.................................. 3-6
Automatic Overdrive
............................ 2-31
Automatic Transmission
......................... 2-29
BTSICheck
................................. 7-45
Check
...................................... 7-44
Fluid
....................................... 6-21
Operation
................................... 2-29
Park Mechanism Check
........................ 7-46
Shifting
..................................... 2-29
Starting Your Engine
.......................... 2-26
Axle. Limited-Slip Rear
......................... 2-37
Axle. Rear
.................................... 6-27
Battery
...................................... 6-39
Jump Starting
................................. 5-3
Warnings ................................ 5-3. 5-5
BBB Auto Line ................................. 8-9
Replacement. Remote Keyless Entry .............. 2-10
9-1