CHEVROLET COLORADO 2017 2.G Owners Manual
Manufacturer: CHEVROLET, Model Year: 2017, Model line: COLORADO, Model: CHEVROLET COLORADO 2017 2.GPages: 419, PDF Size: 7.38 MB
Page 301 of 419
Chevrolet Colorado Owner Manual (GMNA-Localizing-U.S./Canada/Mexico-10122675) - 2017 - crc - 8/22/16
300 Vehicle Care
There are only two reasons why thebrake fluid level in the reservoir maygo down:
.Normal brake lining wear. Whennew linings are installed, thefluid level goes back up.
.Afluidleakinthebrake/clutchhydraulic system. Have thebrake/clutch hydraulic systemfixed. With a leak, the brakes willnot work well.
Always clean the brake fluidreservoir cap and the area aroundthe cap before removing it.
Do not top off the brake/clutch fluid.Adding fluid does not correct a leak.If fluid is added when the linings areworn, there will be too much fluidwhen new brake linings areinstalled. Add or remove fluid, asnecessary, only when work is doneon the brake/clutch hydraulicsystem.
{Warning
If too much brake fluid is added, it
can spill on the engine and burn,
if the engine is hot enough. You
or others could be burned, and
the vehicle could be damaged.
Add brake fluid only when work is
done on the brake/clutch
hydraulic system.
When the brake/clutch fluid falls to alow level, the brake warning lightcomes on. SeeBrake SystemWarning Light0120.
Brake fluid absorbs water over timewhich degrades the effectiveness ofthe brake fluid. Replace brake fluidat the specified intervals to preventincreased stopping distance. SeeMaintenance Schedule0366.
What to Add
Use only GM approved DOT 3brake fluid from a clean, sealedcontainer. SeeRecommendedFluids and Lubricants0375.
{Warning
The wrong or contaminated brake
fluid could result in damage to the
brake system. This could result in
the loss of braking leading to a
possible injury. Always use the
proper GM approved brake fluid.
Caution
If brake fluid is spilled on the
vehicle's painted surfaces, the
paint finish can be damaged.
Immediately wash off any painted
surface.
Battery - North America
For diesel engine vehicles, see“Battery”in the Duramax dieselsupplement.
The original equipment battery ismaintenance free. Do not removethe cap and do not add fluid.
Page 302 of 419
Chevrolet Colorado Owner Manual (GMNA-Localizing-U.S./Canada/Mexico-10122675) - 2017 - crc - 8/22/16
Vehicle Care 301
Refer to the replacement numbershown on the original battery labelwhen a new battery is needed. SeeEngine Compartment Overview0283for battery location.
{Warning
WA R N I N G :Battery posts,
terminals, and related
accessories contain lead and lead
compounds, chemicals known to
the State of California to cause
cancer and birth defects or other
reproductive harm. Batteries also
contain other chemicals known to
the State of California to cause
cancer.WASH HANDS AFTER
HANDLING.
SeeCalifornia Proposition
65 Warning0280.
Vehicle Storage
{Warning
Batteries have acid that can burn
you and gas that can explode.
Yo u c a n b e b a d l y h u r t i f y o u a r e
not careful. SeeJump Starting -
North America0348for tips on
working around a battery without
getting hurt.
Infrequent Usage: Remove theblack, negative (✓)cablefromthebattery to keep the battery fromrunning down.
Extended Storage: Remove theblack, negative (✓)cablefromthebattery or use a battery tricklecharger.
Four-Wheel Drive
Transfer Case
When to Check Lubricant
Refer toMaintenance Schedule0366to determine when to checkthe lubricant.
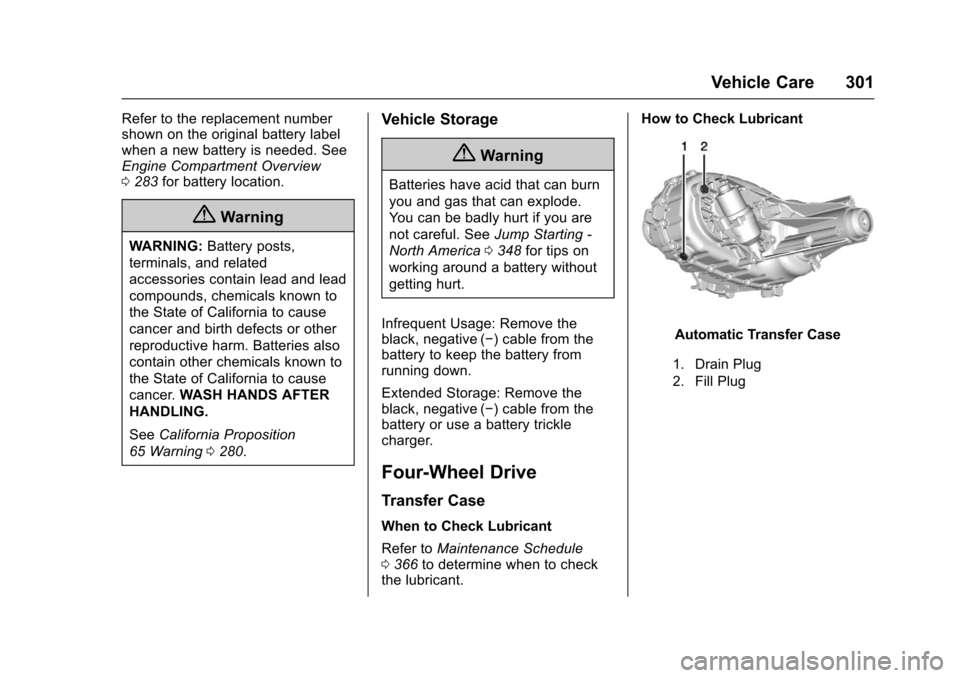
How to Check Lubricant
Automatic Transfer Case
1. Drain Plug
2. Fill Plug
Page 303 of 419
Chevrolet Colorado Owner Manual (GMNA-Localizing-U.S./Canada/Mexico-10122675) - 2017 - crc - 8/22/16
302 Vehicle Care
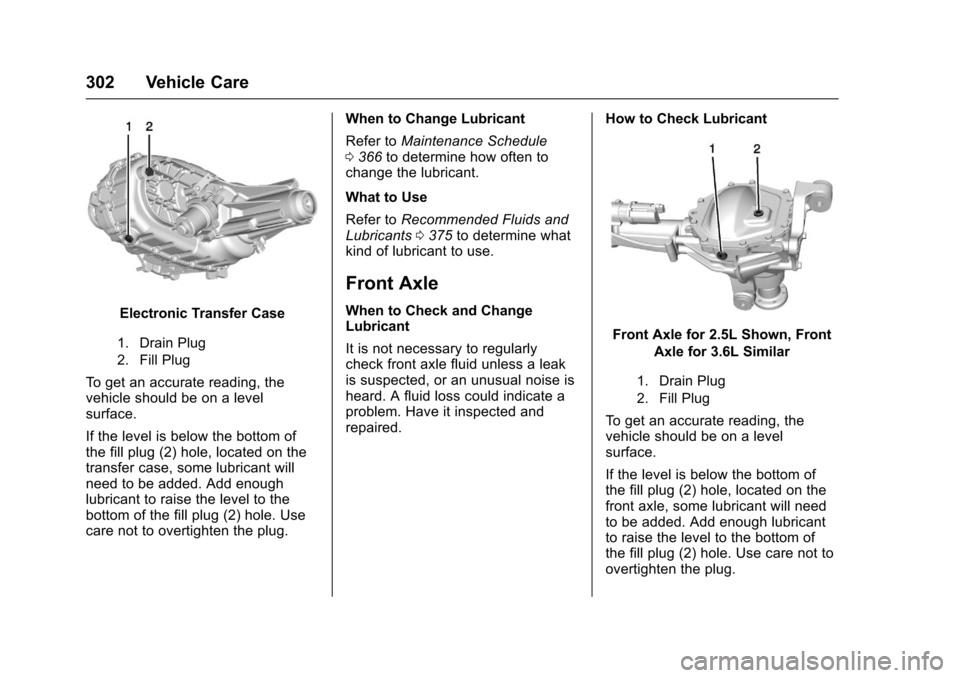
Electronic Transfer Case
1. Drain Plug
2. Fill Plug
To g e t a n a c c u r a t e r e a d i n g , t h evehicle should be on a levelsurface.
If the level is below the bottom ofthe fill plug (2) hole, located on thetransfer case, some lubricant willneed to be added. Add enoughlubricant to raise the level to thebottom of the fill plug (2) hole. Usecare not to overtighten the plug.
When to Change Lubricant
Refer toMaintenance Schedule0366to determine how often tochange the lubricant.
What to Use
Refer toRecommended Fluids andLubricants0375to determine whatkind of lubricant to use.
Front Axle
When to Check and ChangeLubricant
It is not necessary to regularlycheck front axle fluid unless a leakis suspected, or an unusual noise isheard. A fluid loss could indicate aproblem. Have it inspected andrepaired.
How to Check Lubricant
Front Axle for 2.5L Shown, Front
Axle for 3.6L Similar
1. Drain Plug
2. Fill Plug
To g e t a n a c c u r a t e r e a d i n g , t h evehicle should be on a levelsurface.
If the level is below the bottom ofthe fill plug (2) hole, located on thefront axle, some lubricant will needto be added. Add enough lubricantto raise the level to the bottom ofthe fill plug (2) hole. Use care not toovertighten the plug.
Page 304 of 419
Chevrolet Colorado Owner Manual (GMNA-Localizing-U.S./Canada/Mexico-10122675) - 2017 - crc - 8/22/16
Vehicle Care 303
What to Use
Refer toRecommended Fluids andLubricants0375to determine whatkind of lubricant to use.
Rear Axle
When to Check and ChangeLubricant
It is not necessary to regularlycheck rear axle fluid unless a leak issuspected, or an unusual noise isheard. A fluid loss could indicate aproblem. Have it inspected andrepaired.
All axle assemblies are filled byvolume of fluid during production.They are not filled to reach a certainlevel. When checking the fluid levelon any axle, variations in thereadings can be caused by factoryfill differences between the minimumand the maximum fluid volume.Also, if a vehicle has just beendriven before checking the fluidlevel, it may appear lower thannormal because fluid has traveledout along the axle tubes and hasnot drained back to the sump area.Therefore, a reading taken
five minutes after the vehicle hasbeen driven will appear to have alower fluid level than a vehicle thathas been stationary for an hour ortwo. The rear axle assembly mustbe supported on a flat, level surfaceto get a true reading.
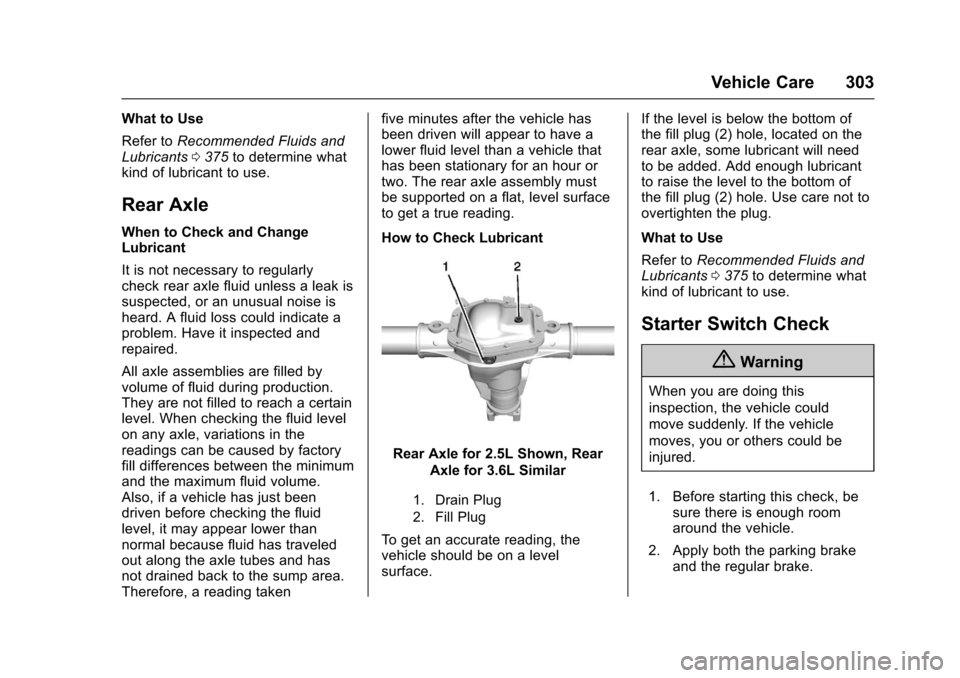
How to Check Lubricant
Rear Axle for 2.5L Shown, Rear
Axle for 3.6L Similar
1. Drain Plug
2. Fill Plug
To g e t a n a c c u r a t e r e a d i n g , t h evehicle should be on a levelsurface.
If the level is below the bottom ofthe fill plug (2) hole, located on therear axle, some lubricant will needto be added. Add enough lubricantto raise the level to the bottom ofthe fill plug (2) hole. Use care not toovertighten the plug.
What to Use
Refer toRecommended Fluids andLubricants0375to determine whatkind of lubricant to use.
Starter Switch Check
{Warning
When you are doing this
inspection, the vehicle could
move suddenly. If the vehicle
moves, you or others could be
injured.
1. Before starting this check, besure there is enough roomaround the vehicle.
2. Apply both the parking brakeand the regular brake.
Page 305 of 419
Chevrolet Colorado Owner Manual (GMNA-Localizing-U.S./Canada/Mexico-10122675) - 2017 - crc - 8/22/16
304 Vehicle Care
Do not use the acceleratorpedal, and be ready to turn offthe engine immediately if itstarts.
3. For automatic transmissionvehicles, try to start the enginein each gear. The vehicleshould start only in P (Park) orN(Neutral). If the vehicle startsin any other position, contactyour dealer for service.
For manual transmissionvehicles, put the shift lever inNeutral, push the clutch pedaldown halfway, and try to startthe engine. The vehicle shouldstart only when the clutchpedal is pushed down all theway to the floor. If the vehiclestarts when the clutch pedal isnot pushed all the way down,contact your dealer for service.
Automatic Transmission
Shift Lock Control
Function Check
{Warning
When you are doing this
inspection, the vehicle could
move suddenly. If the vehicle
moves, you or others could be
injured.
1. Before starting this check, besure there is enough roomaround the vehicle. It should beparked on a level surface.
2. Apply the parking brake. Beready to apply the regularbrake immediately if the vehiclebegins to move.
3. With the engine off, turn theignition on, but do not start theengine. Without applying theregular brake, try to move theshift lever out of P (Park) withnormal effort. If the shift levermoves out of P (Park), contactyour dealer for service.
Ignition Transmission
Lock Check
While parked, and with the parkingbrake set, try to turn the ignition toLOCK/OFF in each shift leverposition.
.For automatic transmissionvehicles, the ignition should turnto LOCK/OFF only when theshift lever is in P (Park).
.For manual transmissionvehicles, the ignition should turnto LOCK/OFF only when youpress the key release button.
On all vehicles, the ignition keyshould come out only in LOCK/OFF.
Contact your dealer if service isrequired.
Page 306 of 419
Chevrolet Colorado Owner Manual (GMNA-Localizing-U.S./Canada/Mexico-10122675) - 2017 - crc - 8/22/16
Vehicle Care 305
Park Brake and P (Park)
Mechanism Check
{Warning
When you are doing this check,
the vehicle could begin to move.
Yo u o r o t h e r s c o u l d b e i n j u r e d
and property could be damaged.
Make sure there is room in front
of the vehicle in case it begins to
roll. Be ready to apply the regular
brake at once should the vehicle
begin to move.
Park on a fairly steep hill, with thevehicle facing downhill. Keepingyour foot on the regular brake, setthe parking brake.
.To c h e c k t h e p a r k i n g b r a k e ' sholding ability: With the enginerunning and the transmission inN(Neutral), slowly remove footpressure from the regular brakepedal. Do this until the vehicle isheld by the parking brake only.
.To c h e c k t h e P ( P a r k )mechanism's holding ability:With the engine running, shift toP(Park). Then release theparking brake followed by theregular brake.
Contact your dealer if service isrequired.
Wiper Blade Replacement
Windshield wiper blades should beinspected for wear or cracking.
Replacement blades come indifferent types and are removed indifferent ways. For properwindshield wiper blade length andtype, seeMaintenanceReplacement Parts0377.
Caution
Allowing the wiper arm to touch
the windshield when no wiper
blade is installed could damage
the windshield. Any damage that
occurs would not be covered by
(Continued)
Caution (Continued)
the vehicle warranty. Do not allow
the wiper arm to touch the
windshield.
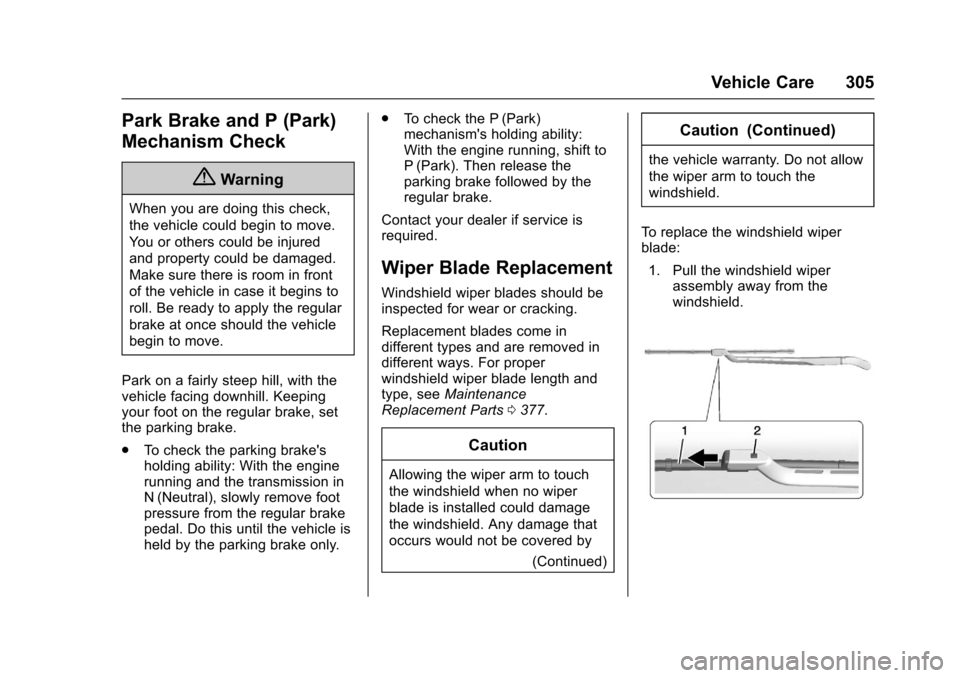
To r e p l a c e t h e w i n d s h i e l d w i p e rblade:
1. Pull the windshield wiperassembly away from thewindshield.
Page 307 of 419
Chevrolet Colorado Owner Manual (GMNA-Localizing-U.S./Canada/Mexico-10122675) - 2017 - crc - 8/22/16
306 Vehicle Care
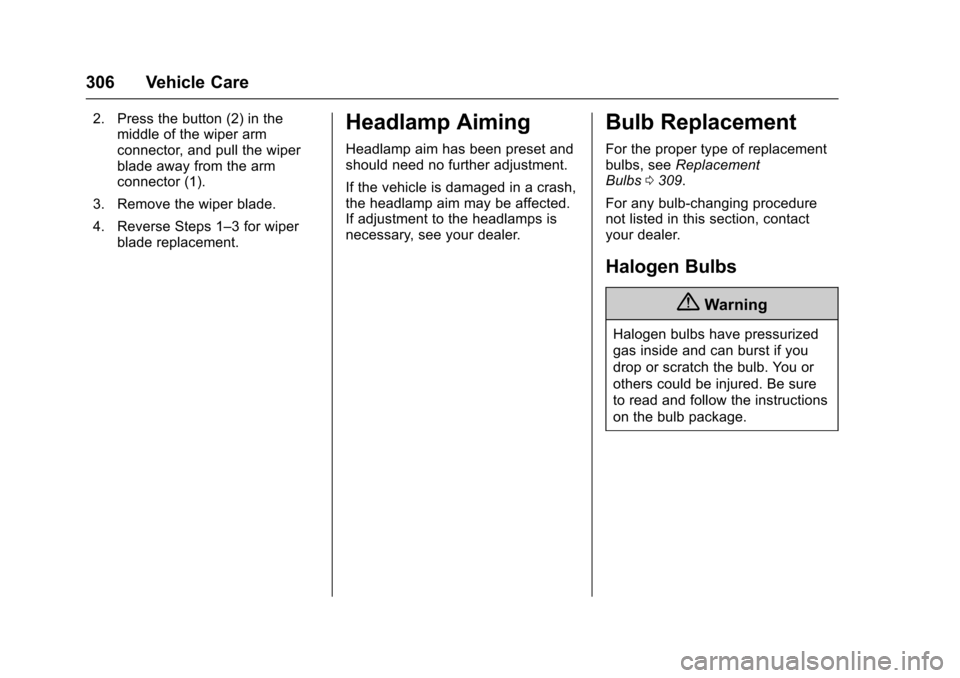
2. Press the button (2) in themiddle of the wiper armconnector, and pull the wiperblade away from the armconnector (1).
3. Remove the wiper blade.
4. Reverse Steps 1–3forwiperblade replacement.
Headlamp Aiming
Headlamp aim has been preset andshould need no further adjustment.
If the vehicle is damaged in a crash,the headlamp aim may be affected.If adjustment to the headlamps isnecessary, see your dealer.
Bulb Replacement
For the proper type of replacementbulbs, seeReplacementBulbs0309.
For any bulb-changing procedurenot listed in this section, contactyour dealer.
Halogen Bulbs
{Warning
Halogen bulbs have pressurized
gas inside and can burst if you
drop or scratch the bulb. You or
others could be injured. Be sure
to read and follow the instructions
on the bulb package.
Page 308 of 419
Chevrolet Colorado Owner Manual (GMNA-Localizing-U.S./Canada/Mexico-10122675) - 2017 - crc - 8/22/16
Vehicle Care 307
Headlamps, Front Turn
Signal, Sidemarker, and
Parking Lamps
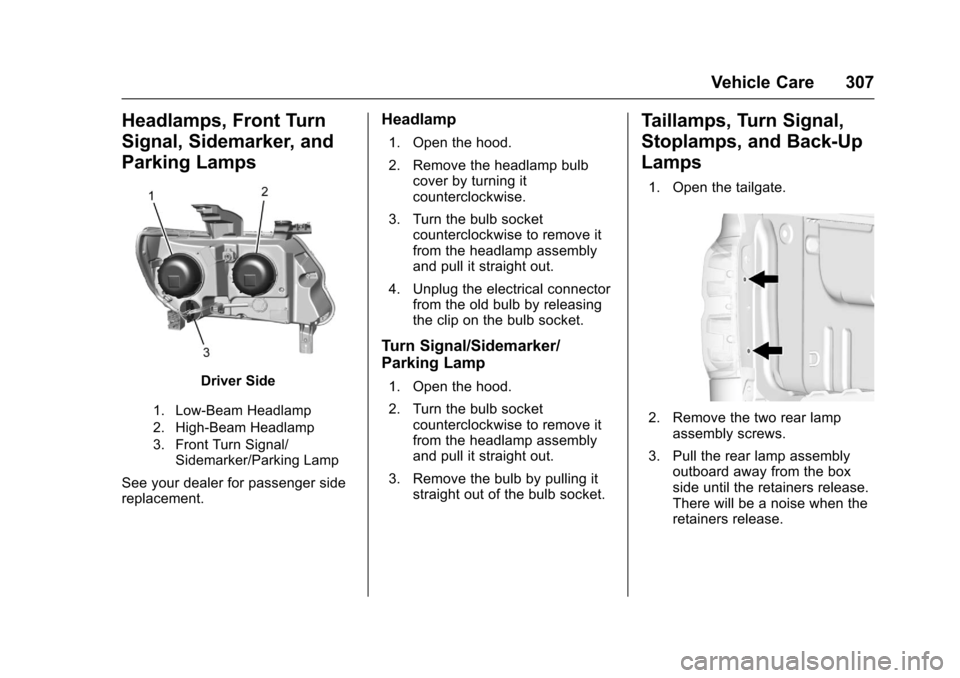
Driver Side
1. Low-Beam Headlamp
2. High-Beam Headlamp
3. Front Turn Signal/Sidemarker/Parking Lamp
See your dealer for passenger sidereplacement.
Headlamp
1. Open the hood.
2. Remove the headlamp bulbcover by turning itcounterclockwise.
3. Turn the bulb socketcounterclockwise to remove itfrom the headlamp assemblyand pull it straight out.
4. Unplug the electrical connectorfrom the old bulb by releasingthe clip on the bulb socket.
Turn Signal/Sidemarker/
Parking Lamp
1. Open the hood.
2. Turn the bulb socketcounterclockwise to remove itfrom the headlamp assemblyand pull it straight out.
3. Remove the bulb by pulling itstraight out of the bulb socket.
Taillamps, Turn Signal,
Stoplamps, and Back-Up
Lamps
1. Open the tailgate.
2. Remove the two rear lampassembly screws.
3. Pull the rear lamp assemblyoutboard away from the boxside until the retainers release.There will be a noise when theretainers release.
Page 309 of 419
Chevrolet Colorado Owner Manual (GMNA-Localizing-U.S./Canada/Mexico-10122675) - 2017 - crc - 8/22/16
308 Vehicle Care
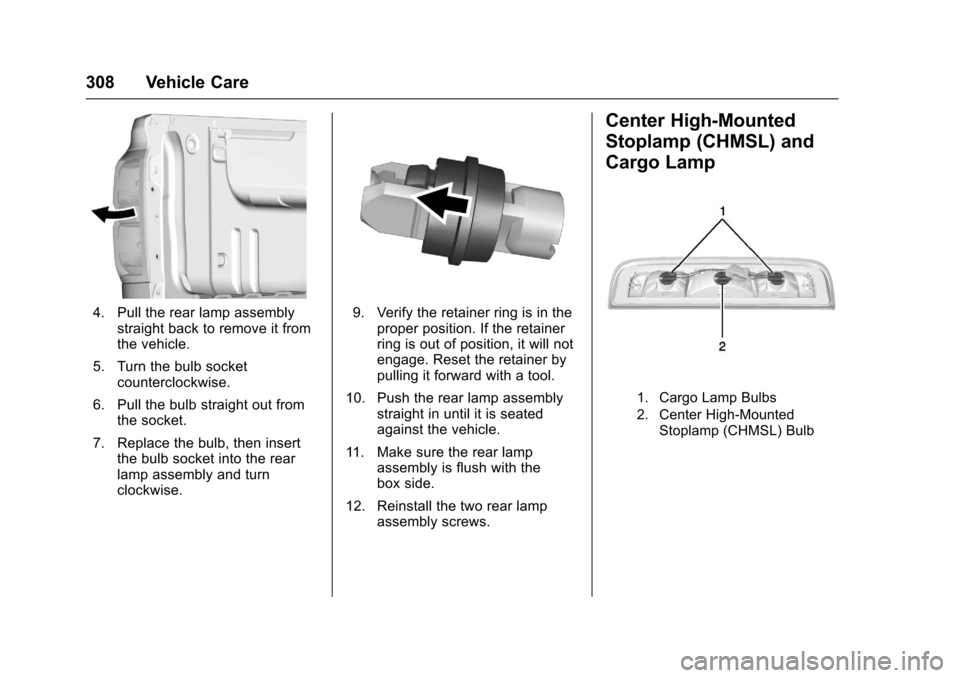
4. Pull the rear lamp assemblystraight back to remove it fromthe vehicle.
5. Turn the bulb socketcounterclockwise.
6. Pull the bulb straight out fromthe socket.
7. Replace the bulb, then insertthe bulb socket into the rearlamp assembly and turnclockwise.
9. Verify the retainer ring is in theproper position. If the retainerring is out of position, it will notengage. Reset the retainer bypulling it forward with a tool.
10. Push the rear lamp assemblystraight in until it is seatedagainst the vehicle.
11 . M a k e s u r e t h e r e a r l a m passembly is flush with thebox side.
12. Reinstall the two rear lampassembly screws.
Center High-Mounted
Stoplamp (CHMSL) and
Cargo Lamp
1. Cargo Lamp Bulbs
2. Center High-MountedStoplamp (CHMSL) Bulb
Page 310 of 419
Chevrolet Colorado Owner Manual (GMNA-Localizing-U.S./Canada/Mexico-10122675) - 2017 - crc - 8/22/16
Vehicle Care 309
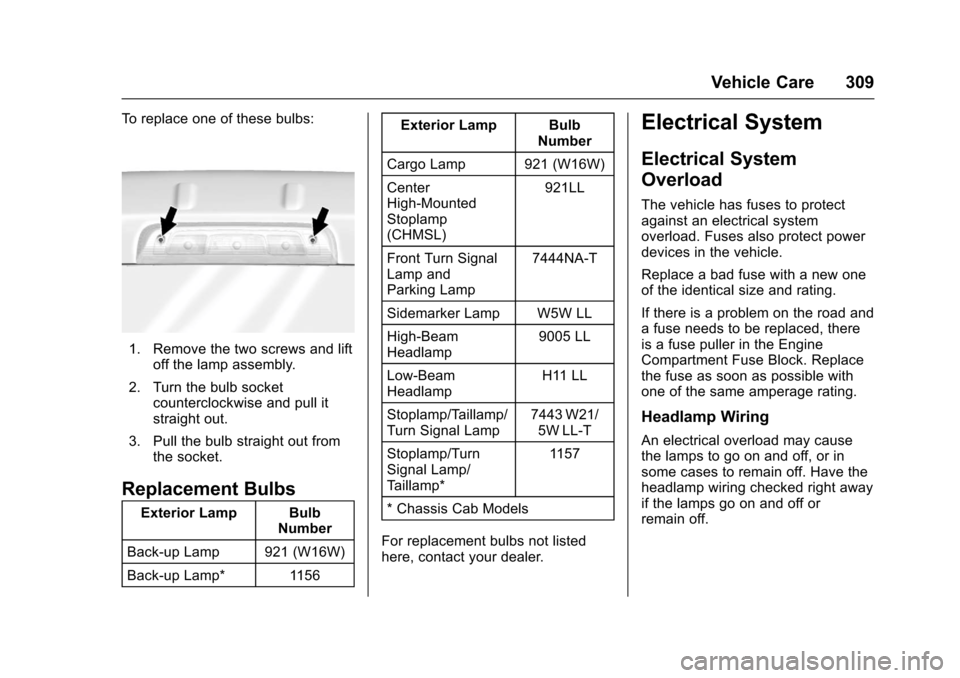
To r e p l a c e o n e o f t h e s e b u l b s :
1. Remove the two screws and liftoff the lamp assembly.
2. Turn the bulb socketcounterclockwise and pull itstraight out.
3. Pull the bulb straight out fromthe socket.
Replacement Bulbs
Exterior Lamp BulbNumber
Back-up Lamp 921 (W16W)
Back-up Lamp* 1156
Exterior Lamp BulbNumber
Cargo Lamp 921 (W16W)
CenterHigh-MountedStoplamp(CHMSL)
921LL
Front Turn SignalLamp andParking Lamp
7444NA-T
Sidemarker Lamp W5W LL
High-BeamHeadlamp9005 LL
Low-BeamHeadlampH11 LL
Stoplamp/Taillamp/Turn Signal Lamp7443 W21/5W LL-T
Stoplamp/TurnSignal Lamp/Ta i l l a m p *
11 5 7
*ChassisCabModels
For replacement bulbs not listedhere, contact your dealer.
Electrical System
Electrical System
Overload
The vehicle has fuses to protectagainst an electrical systemoverload. Fuses also protect powerdevices in the vehicle.
Replace a bad fuse with a new oneof the identical size and rating.
If there is a problem on the road andafuseneedstobereplaced,thereis a fuse puller in the EngineCompartment Fuse Block. Replacethe fuse as soon as possible withone of the same amperage rating.
Headlamp Wiring
An electrical overload may causethe lamps to go on and off, or insome cases to remain off. Have theheadlamp wiring checked right awayif the lamps go on and off orremain off.