ECU CHEVROLET COLORADO 2018 Service Manual
[x] Cancel search | Manufacturer: CHEVROLET, Model Year: 2018, Model line: COLORADO, Model: CHEVROLET COLORADO 2018Pages: 421, PDF Size: 5.58 MB
Page 136 of 421
 - 2018 - crc - 10/12/17
Instruments and Controls 135
Vehicle Messages
Messages displayed on the DIC
indicate the status o")
Chevrolet Colorado Owner Manual (GMNA-Localizing-U.S./Canada/Mexico-
11349743) - 2018 - crc - 10/12/17
Instruments and Controls 135
Vehicle Messages
Messages displayed on the DIC
indicate the status of the vehicle or
some action that may be needed to
correct a condition. Multiple
messages may appear one after
another.
The messages that do not require
immediate action can be
acknowledged and cleared by
pressing
V. The messages that
require immediate action cannot be
cleared until that action is
performed.
All messages should be taken
seriously; clearing the message
does not correct the problem.
If a SERVICE message appears,
see your dealer.
Follow the instructions given in the
messages. The system displays
messages regarding the following
topics:
. Service Messages
. Fluid Levels
. Vehicle Security .
Brakes
. Ride Control Systems
. Driver Assistance Systems
. Cruise Control
. Lighting and Bulb Replacement
. Wiper/Washer Systems
. Doors and Windows
. Seat Belts
. Airbag Systems
. Engine and Transmission
. Tire Pressure
. Battery
Engine Power Messages
ENGINE POWER IS REDUCED
This message displays when the
vehicle's propulsion power is
reduced. Reduced propulsion power
can affect the vehicle's ability to
accelerate. If this message is on,
but there is no observed reduction
in performance, proceed to your
destination. The performance may
be reduced the next time the vehicle is driven. The vehicle may be driven
while this message is on, but
maximum acceleration and speed
may be reduced. Anytime this
message stays on, or displays
repeatedly, the vehicle should be
taken to your dealer for service as
soon as possible.
Vehicle Speed Messages
SPEED LIMITED TO
XXX KM/H (MPH)
This message shows that the
vehicle speed has been limited to
the speed displayed. The limited
speed is a protection for various
propulsion and vehicle systems,
such as lubrication, thermal,
suspension, Teen Driver if
equipped, or tires.
If equipped with a diesel engine,
see the Duramax Diesel
supplement.
Page 155 of 421
 - 2018 - crc - 10/12/17
154 Infotainment System
To manually check for updates,
touch SETTINGS on the Home
Page, followed")
Chevrolet Colorado Owner Manual (GMNA-Localizing-U.S./Canada/Mexico-
11349743) - 2018 - crc - 10/12/17
154 Infotainment System
To manually check for updates,
touch SETTINGS on the Home
Page, followed by Software
Information, and then System
Update. Follow the on-screen
prompts. The steps to check for,
download and install updates may
vary by vehicle.
Downloading Over-the-Air vehicle
software updates requires Internet
connectivity, which can be accessed
through the vehicle’s built-in OnStar
4G LTE connection, if equipped and
active. If required, data plans are
provided by a third party. Optionally,
a secure Wi-Fi hotspot such as a
compatible mobile device hotspot,
home hotspot, or public hotspot can
be used. Applicable data rates may
apply.
To connect the infotainment system
to a secured mobile device hotspot,
home hotspot, or public hotspot,
touch SETTINGS on the Home
Page, followed by Wi-Fi, and then
Manage Wi-Fi Networks. Select the
appropriate Wi-Fi network, and
follow the on-screen prompts.
Download speeds may vary. On most compatible mobile devices,
activation of the Wi-Fi hotspot is in
the Settings menu under Mobile
Network Sharing, Personal Hotspot,
Mobile Hotspot, or similar.
Availability of Over-the-Air vehicle
software updates varies by vehicle
and country. For more information
on this feature, see
www.my.chevrolet.com/learn.Radio
AM-FM Radio
Playing the Radio
Audio Source Menu
{:
Press to go to the Home Page.
O:Press to turn on, mute,
or unmute the system. Press and
hold to turn off the system.
Selecting a Band
Press{, then touch AUDIO,
Source, then select AM, FM,
or SXM (if equipped). The last
station that was playing starts
playing again.
System Settings
Auto Volume
This feature automatically adjusts
the radio volume to compensate for
road and wind noise.
The level of volume compensation
can be selected, or the feature can
be turned off.
Page 180 of 421
 - 2018 - crc - 10/12/17
Infotainment System 179
.Up to 10 cell phones can be
paired to the Bluetooth system.
. The pairin")
Chevrolet Colorado Owner Manual (GMNA-Localizing-U.S./Canada/Mexico-
11349743) - 2018 - crc - 10/12/17
Infotainment System 179
.Up to 10 cell phones can be
paired to the Bluetooth system.
. The pairing process is disabled
when the vehicle is moving.
. Pairing only needs to be
completed once, unless the
pairing information on the cell
phone changes or the cell phone
is deleted from the system.
. Only one paired cell phone can
be connected to the Bluetooth
system at a time.
. If multiple paired cell phones are
within range of the system, the
system connects to the first
available paired cell phone in the
order that they were first paired
to the system.
When the Bluetooth device and
infotainment system are
successfully paired, the phone book
is downloaded automatically. This is
dependent on the type of the phone
paired. If the automatic download
does not occur, proceed with the
phone book download on the
phone. Pairing a Phone - SSP and No
Paired Device
When there is no paired device on
the infotainment system and Simple
Secure Pairing (SSP) is supported:
1. Press
{.
2. Touch PHONE, press
#on the
center stack, or press
gon the
steering wheel without OnStar.
3. Touch Search Device.
4. Touch the desired device to pair on the searched list
screen.
5. Touch Yes on the pop-up screen of the Bluetooth device
and infotainment system.
6. When the Bluetooth device and infotainment system are
successfully paired, the phone
screen is displayed on the
infotainment system. Pairing a Phone - SSP and Paired
Device
When a paired device is on the
infotainment system and SSP is
supported:
1. Press
{.
2. Touch Settings.
3. Touch Bluetooth, then Device Management.
4. Touch the desired device to pair. When the Bluetooth
device and infotainment system
are successfully paired,
Z/5
is displayed on the pair device
screen. If no desired device is
available go to Step 5.
5. Touch Search Device to search for the desired device.
6. Touch the desired device to pair on the searched list
screen.
Page 181 of 421
 - 2018 - crc - 10/12/17
180 Infotainment System
7. Touch Yes on the pop-upscreen of the Bluetooth device
and infotainment")
Chevrolet Colorado Owner Manual (GMNA-Localizing-U.S./Canada/Mexico-
11349743) - 2018 - crc - 10/12/17
180 Infotainment System
7. Touch Yes on the pop-upscreen of the Bluetooth device
and infotainment system.
. The connected phone is
highlighted by
5.
.
Z/5indicates the hands-free
and phone music functions are
enabled.
.
5indicates only the hands-free
function is enabled.
.
Zindicates only Bluetooth
music is enabled.
Pairing a Phone - No SSP and No
Paired Device
When there is no paired device on
the infotainment system and SSP is
not supported:
1. Press
{.
2. Touch PHONE, press
#on the
center stack, or press
gon the
steering wheel without OnStar.
3. Touch Search Device. 4. Touch the desired device to
pair on the searched list
screen.
5. Input the Personal Identification Number (PIN)
code (default: 1234) to the
Bluetooth device. When the
Bluetooth device and
infotainment system are
successfully paired, the
PHONE screen is displayed on
the infotainment system.
When the connection fails, a failure
message is displayed on the
infotainment system.
If a Bluetooth device was previously
connected, the infotainment system
executes the auto connection.
However, if the Bluetooth setting on
the Bluetooth device is turned off, a
failure message is displayed on the
infotainment system. Pairing a Phone - No SSP and
Paired Device
When a paired device is on the
infotainment system and SSP is not
supported:
1. Press
{.
2. Touch Settings.
3. Touch Bluetooth, then Device Management.
4. Touch the desired device to pair. When the Bluetooth
device and infotainment system
are successfully paired,
Z/5
is displayed on the pair device
screen. If no desired device is
available go to Step 5.
5. Touch Search Device to search for the desired device.
6. Touch the desired device to pair on the searched list
screen.
7. Input the Personal Identification Number (PIN)
code (default: 1234) to the
Bluetooth device. When the
Bluetooth device and
Page 203 of 421
 - 2018 - crc - 10/12/17
202 Driving and Operating
Before Driving Off-Road
.Have all necessary maintenance
and service wor")
Chevrolet Colorado Owner Manual (GMNA-Localizing-U.S./Canada/Mexico-
11349743) - 2018 - crc - 10/12/17
202 Driving and Operating
Before Driving Off-Road
.Have all necessary maintenance
and service work completed.
. Fuel the vehicle, fill fluid levels,
and check inflation pressure in
all tires, including the spare,
if equipped.
. Read all the information about
four-wheel-drive vehicles in this
manual.
. Remove any underbody air
deflector, if equipped. Re-attach
the air deflector after off-road
driving.
. Know the local laws that apply to
off-road driving.
To gain more ground clearance if
needed, it may be necessary to
remove the front fascia lower air
dam, if equipped. However, driving
without the air dam reduces fuel
economy.Caution
Operating the vehicle for
extended periods without the front
fascia lower air dam installed can
cause improper airflow to the
engine. Reattach the front fascia
air dam after off-road driving.
Loading the Vehicle for
Off-Road Driving
{Warning
. Unsecured cargo on the
load floor can be tossed
about when driving over
rough terrain. You or your
passengers can be struck
by flying objects. Secure the
cargo properly.
. Keep cargo in the cargo
area as far forward and as
low as possible. The
(Continued)
Warning (Continued)
heaviest things should be
on the floor, forward of the
rear axle.
. Heavy loads on the roof
raise the vehicle's center of
gravity, making it more likely
to roll over. You can be
seriously or fatally injured if
the vehicle rolls over. Put
heavy loads inside the
cargo area, not on the roof.
For more information about loading
the vehicle, see Vehicle Load Limits
0 210 andTires 0312.
Environmental Concerns
.
Always use established trails,
roads, and areas that have been
set aside for public off-road
recreational driving and obey all
posted regulations.
. Do not damage shrubs, flowers,
trees, or grasses or disturb
wildlife.
Page 214 of 421
Chevrolet Colorado Owner Manual (GMNA-Localizing-U.S./Canada/Mexico-
11349743) - 2018 - crc - 10/12/17
Driving and Operating 213
of the driver, passengers, and
cargo should never exceed the
vehicle's capacity weight.
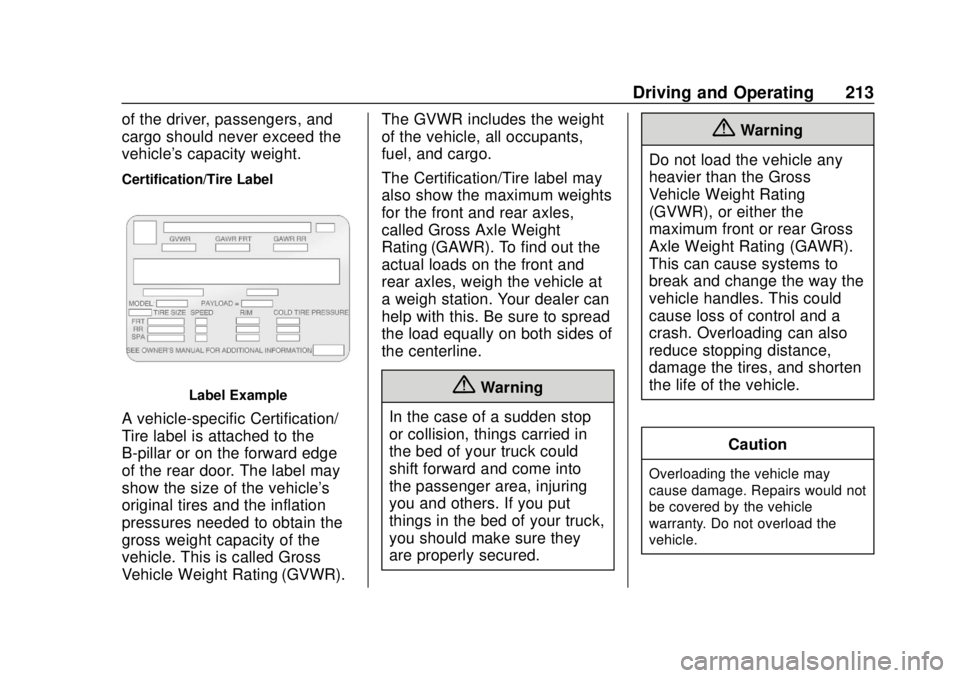
Certification/Tire Label
Label Example
A vehicle-specific Certification/
Tire label is attached to the
B-pillar or on the forward edge
of the rear door. The label may
show the size of the vehicle's
original tires and the inflation
pressures needed to obtain the
gross weight capacity of the
vehicle. This is called Gross
Vehicle Weight Rating (GVWR).The GVWR includes the weight
of the vehicle, all occupants,
fuel, and cargo.
The Certification/Tire label may
also show the maximum weights
for the front and rear axles,
called Gross Axle Weight
Rating (GAWR). To find out the
actual loads on the front and
rear axles, weigh the vehicle at
a weigh station. Your dealer can
help with this. Be sure to spread
the load equally on both sides of
the centerline.
{Warning
In the case of a sudden stop
or collision, things carried in
the bed of your truck could
shift forward and come into
the passenger area, injuring
you and others. If you put
things in the bed of your truck,
you should make sure they
are properly secured.
{Warning
Do not load the vehicle any
heavier than the Gross
Vehicle Weight Rating
(GVWR), or either the
maximum front or rear Gross
Axle Weight Rating (GAWR).
This can cause systems to
break and change the way the
vehicle handles. This could
cause loss of control and a
crash. Overloading can also
reduce stopping distance,
damage the tires, and shorten
the life of the vehicle.
Caution
Overloading the vehicle may
cause damage. Repairs would not
be covered by the vehicle
warranty. Do not overload the
vehicle.
Page 215 of 421
 - 2018 - crc - 10/12/17
214 Driving and Operating
Using heavier suspension
components to get added
durability might not c")
Chevrolet Colorado Owner Manual (GMNA-Localizing-U.S./Canada/Mexico-
11349743) - 2018 - crc - 10/12/17
214 Driving and Operating
Using heavier suspension
components to get added
durability might not change the
weight ratings. Ask your dealer
to help load the vehicle the
right way.
{Warning
Things you put inside the
vehicle can strike and injure
people in a sudden stop or
turn, or in a crash.
.Put things in the cargo
area of the vehicle. Try to
spread the weight evenly.
.Never stack heavier
things, like suitcases,
inside the vehicle so that
some of them are above
the tops of the seats.
.Do not leave an
unsecured child restraint
in the vehicle.
(Continued)
Warning (Continued)
.When you carry
something inside the
vehicle, secure it
whenever you can.
.Do not leave a seat
folded down unless you
need to.
There is also important loading
information for off-road driving in
this manual. See “Loading the
Vehicle for Off-Road Driving“
under Off-Road Driving 0201.
Two-Tiered Loading
Depending on the model of the
pickup, an upper load platform
can be created by positioning
three or four 5 cm (2 in) by
15 cm (6 in) wooden planks
across the width of the pickup
box. The planks must be
inserted in the pickup box
depressions. When using this upper load
platform, be sure the load is
securely tied down to prevent it
from shifting. The load's center
of gravity should be positioned
in a zone over the rear axle. The
zone is located in the area
between the front of each wheel
well and the rear of each wheel
well. The center of gravity height
must not extend above the top
of the pickup box flareboard.
Any load that extends beyond
the vehicle's taillamp area must
be properly marked according to
local laws and regulations.
Remember not to exceed the
Gross Axle Weight
Rating (GAWR) of the front or
rear axle.
Add-On Equipment
When carrying removable items,
a limit on how many people
carried inside the vehicle may
Page 220 of 421
 - 2018 - crc - 10/12/17
Driving and Operating 219
Caution (Continued)
immediately after cranking has
ended, can overheat")
Chevrolet Colorado Owner Manual (GMNA-Localizing-U.S./Canada/Mexico-
11349743) - 2018 - crc - 10/12/17
Driving and Operating 219
Caution (Continued)
immediately after cranking has
ended, can overheat and damage
the cranking motor, and drain the
battery. Wait at least 15 seconds
between each try, to let the
cranking motor cool down.
2. If the engine does not start after five to 10 seconds,
especially in very cold weather
(below −18 °C or 0 °F), it could
be flooded with too much
gasoline. Try pushing the
accelerator pedal all the way to
the floor and holding it there
while holding the key in START
for up to 15 seconds. Wait at
least 15 seconds between each
try, to allow the cranking motor
to cool down. When the engine
starts, let go of the key and
accelerator. If the vehicle starts
briefly but then stops again, do
the same thing. This clears the
extra gasoline from the engine.
Do not race the engine
immediately after starting it. Operate the engine and
transmission gently until the oil
warms up and lubricates all
moving parts.
Engine Heater
If the vehicle has a diesel engine,
see the Duramax diesel
supplement.
{Warning
Do not plug in the engine block
heater while the vehicle is parked
in a garage or under a carport.
Property damage or personal
injury may result. Always park the
vehicle in a clear open area away
from buildings or structures.
If equipped, the engine heater can
provide easier starting and better
fuel economy during engine
warm-up in cold weather conditions
at or below −18 °C (0 °F). Vehicles
with an engine heater should be
plugged in at least four hours before
starting. An internal thermostat in the plug-end of the cord may exist,
which will prevent engine heater
operation at temperatures above
−18 °C (0 °F).
Heater Cord Near Engine Air
Cleaner, 2.5L L4 Engine Shown,
3.6L V6 Engine Similar
To Use the Engine Heater
1. Turn off the engine.
2. Open the hood and unwrap theelectrical cord. The cord is
secured near the coolant surge
tank or to the engine air
cleaner. Carefully remove
the cord.
Page 221 of 421
 - 2018 - crc - 10/12/17
220 Driving and Operating
Check the heater cord for
damage. If it is damaged, do
not use it. See")
Chevrolet Colorado Owner Manual (GMNA-Localizing-U.S./Canada/Mexico-
11349743) - 2018 - crc - 10/12/17
220 Driving and Operating
Check the heater cord for
damage. If it is damaged, do
not use it. See your dealer for
a replacement. Inspect the
cord for damage yearly.
3. Plug the cord into a normal, grounded 110-volt AC outlet.
{Warning
Improper use of the heater cord
or an extension cord can damage
the cord and may result in
overheating and fire.
. Plug the cord into a
three-prong electrical utility
receptacle that is protected
by a ground fault detection
function. An ungrounded
outlet could cause an
electric shock.
. Use a weatherproof,
heavy-duty, 15 amp-rated
extension cord if needed.
Failure to use the
recommended extension
cord in good operating
(Continued)
Warning (Continued)
condition, or using a
damaged heater or
extension cord, could make
it overheat and cause a fire,
property damage, electric
shock, and injury.
. Do not operate the vehicle
with the heater cord
permanently attached to the
vehicle. Possible heater
cord and thermostat
damage could occur.
. While in use, do not let the
heater cord touch vehicle
parts or sharp edges. Never
close the hood on the
heater cord.
. Before starting the vehicle,
unplug the cord, reattach
the cover to the plug, and
securely fasten the cord.
Keep the cord away from
any moving parts. 4. Before starting the engine, be
sure to unplug and store the
cord as it was before to keep it
away from moving engine
parts. If you do not, it could be
damaged.
The length of time the heater should
remain plugged in depends on
several factors. Ask a dealer in the
area where you will be parking the
vehicle for the best advice on this.
Retained Accessory
Power (RAP)
Some vehicle accessories may be
used after the ignition is turned off.
The power windows and sunroof,
if equipped, will continue to work for
up to 10 minutes or until any door is
opened.
The infotainment system will
continue to work for 10 minutes,
until the driver door is opened,
or until the ignition is turned on or
placed in ACC/ACCESSORY.
Page 261 of 421
 - 2018 - crc - 10/12/17
260 Driving and Operating
tires, and mirrors. If the trailer has
electric brakes, start the
combi")
Chevrolet Colorado Owner Manual (GMNA-Localizing-U.S./Canada/Mexico-
11349743) - 2018 - crc - 10/12/17
260 Driving and Operating
tires, and mirrors. If the trailer has
electric brakes, start the
combination moving and then apply
the trailer brake controller by hand
to be sure the brakes work.
During the trip, check occasionally
to be sure that the load is secure
and the lamps and any trailer
brakes still work.
Following Distance
Stay at least twice as far behind the
vehicle ahead as you would when
driving the vehicle without a trailer.
This can help to avoid heavy
braking and sudden turns.
Passing
More passing distance is needed
when towing a trailer. The
combination will not accelerate as
quickly and is longer so it is
necessary to go much farther
beyond the passed vehicle before
returning to the lane.
Backing Up
Hold the bottom of the steering
wheel with one hand. To move the
trailer to the left, move that hand to
the left. To move the trailer to the
right, move your hand to the right.
Always back up slowly and,
if possible, have someone
guide you.
Making TurnsCaution
Making very sharp turns while
trailering could cause the trailer to
come in contact with the vehicle.
The vehicle could be damaged.
Avoid making very sharp turns
while trailering.
When turning with a trailer, make
wider turns than normal. Do this so
the trailer will not strike soft
shoulders, curbs, road signs, trees,
or other objects. Avoid jerky or
sudden maneuvers. Signal well in
advance. If the trailer turn signal bulbs burn
out, the arrows on the instrument
cluster will still flash for turns. It is
important to check occasionally to
be sure the trailer bulbs are still
working.
Driving on Grades
Reduce speed and shift to a lower
gear
before starting down a long or
steep downgrade. If the
transmission is not shifted down, the
brakes might get hot and no longer
work well.
Vehicles can tow in D (Drive). Shift
the transmission to a lower gear if
the transmission shifts too often
under heavy loads and/or hilly
conditions.
The Tow/Haul Mode may be used if
the transmission shifts too often.
See Tow/Haul Mode 0229.
When towing at high altitude on
steep uphill grades, consider the
following: Engine coolant will boil at
a lower temperature than at normal
altitudes. If the engine is turned off
immediately after towing at high
altitude on steep uphill grades, the