CHEVROLET COLORADO 2021 Get To Know Guide
Manufacturer: CHEVROLET, Model Year: 2021, Model line: COLORADO, Model: CHEVROLET COLORADO 2021Pages: 16, PDF Size: 2.15 MB
Page 1 of 16
1
2021
COLORADO
GETTING TO KNOW YOUR
chevrolet.com
Review this Quick Reference Guide for an overview of some important feat\
ures in your Chevrolet Colorado. Some optional equipment described in this guide may \
not be included in your vehicle. More information can be found in your Owner’s Manual and at \
my.chevrolet.com. For easy reference, keep this guide with your Owner’s Manual in your \
glove box.
Certain restrictions, precautions, and safety procedures apply to your v\
ehicle. Please read your Owner’s Manual for complete instructions.
Page 2 of 16
2
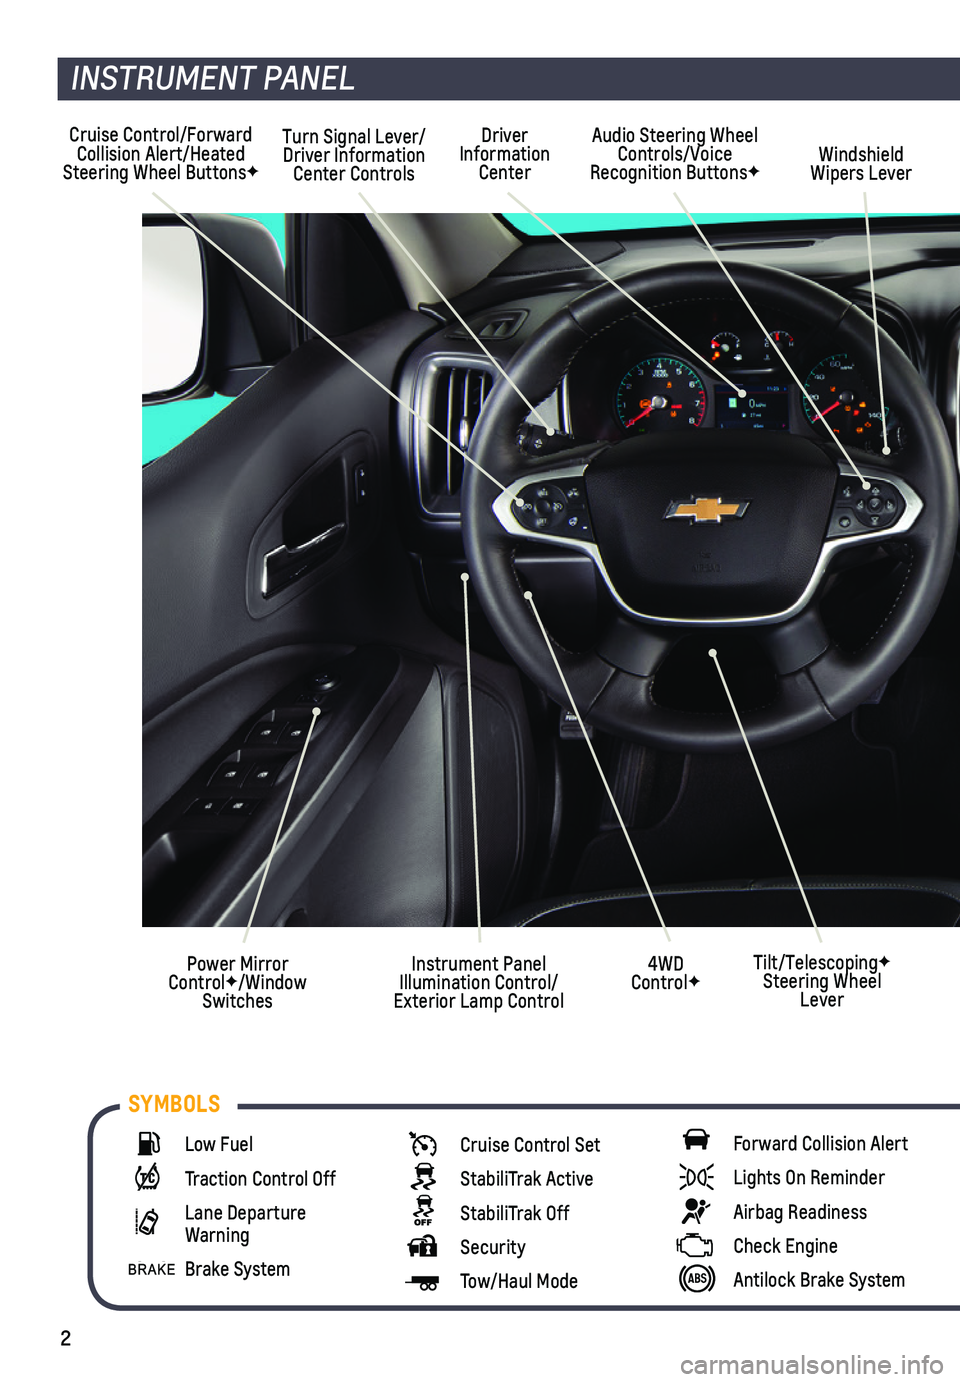
Cruise Control/Forward Collision Alert/Heated Steering Wheel ButtonsF
Turn Signal Lever/Driver Information Center Controls
Audio Steering Wheel Controls/Voice Recognition ButtonsFWindshield Wipers Lever
4WD ControlF
Driver Information Center
Instrument Panel Illumination Control/ Exterior Lamp Control
Power Mirror ControlF/Window Switches
INSTRUMENT PANEL
Tilt/TelescopingF Steering Wheel Lever
Low Fuel
Traction Control Off
Lane Departure Warning
Brake System
Cruise Control Set
StabiliTrak Active
StabiliTrak Off
Security
Tow/Haul Mode
Forward Collision Alert
Lights On Reminder
Airbag Readiness
Check Engine
Antilock Brake System
SYMBOLS
Page 3 of 16
3
See Introduction in your Owner’s Manual.
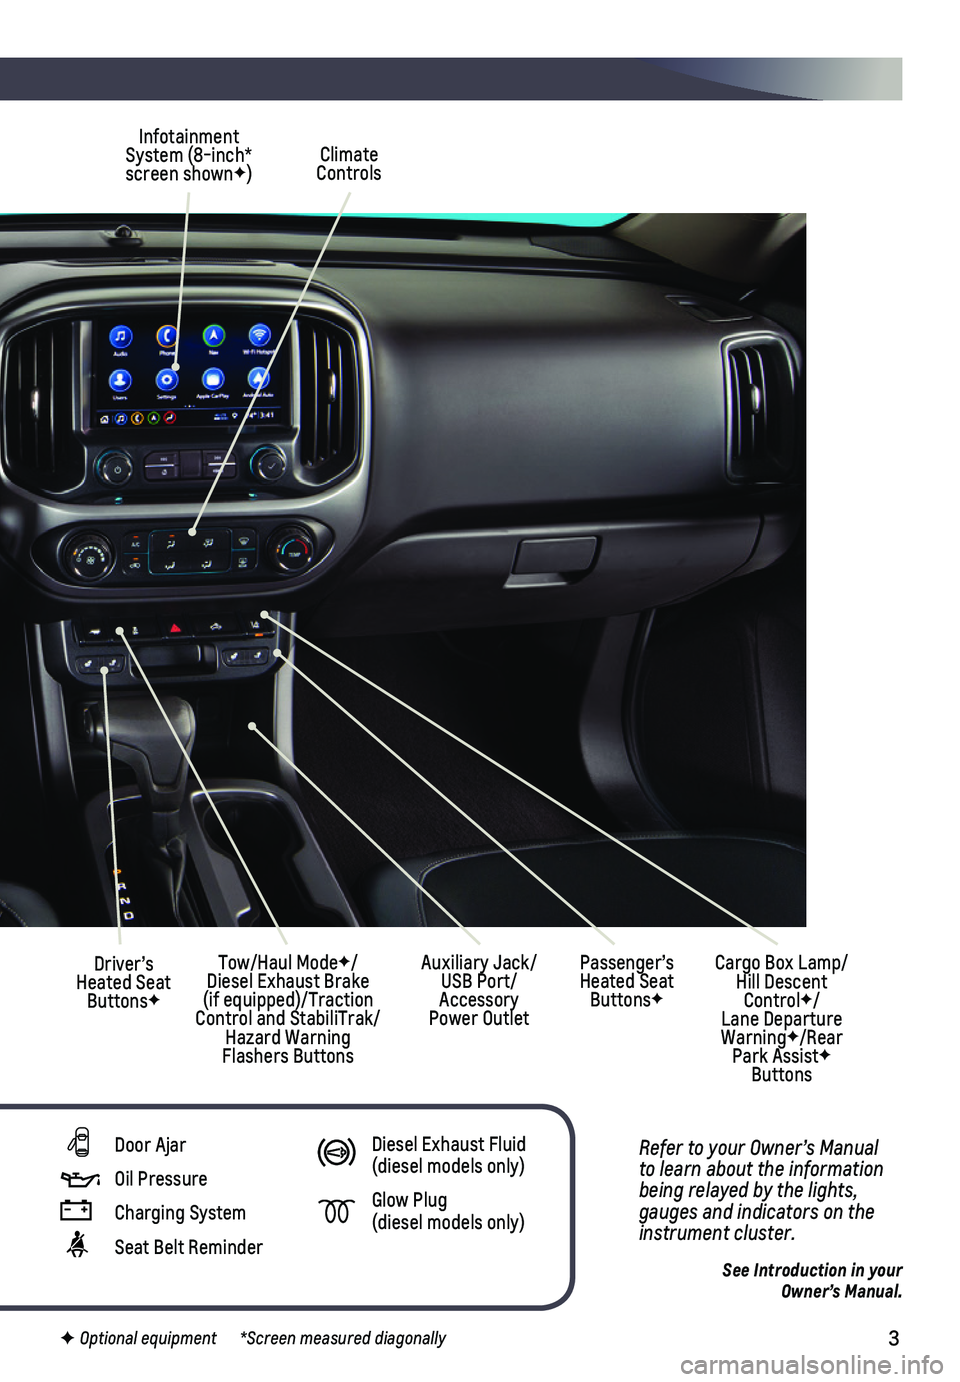
Climate Controls
Infotainment System (8-inch* screen shownF)
Cargo Box Lamp/Hill Descent ControlF/Lane Departure WarningF/Rear Park AssistF Buttons
Driver’s Heated Seat ButtonsF
Tow/Haul ModeF/ Diesel Exhaust Brake (if equipped)/Traction Control and StabiliTrak/Hazard Warning Flashers Buttons
Auxiliary Jack/USB Port/Accessory Power Outlet
Passenger’s Heated Seat ButtonsF
Refer to your Owner’s Manual to learn about the information being relayed by the lights, gauges and indicators on the instrument cluster.
F Optional equipment *Screen measured diagonally
Door Ajar
Oil Pressure
Charging System
Seat Belt Reminder
Diesel Exhaust Fluid (diesel models only)
Glow Plug (diesel models only)
Page 4 of 16
4
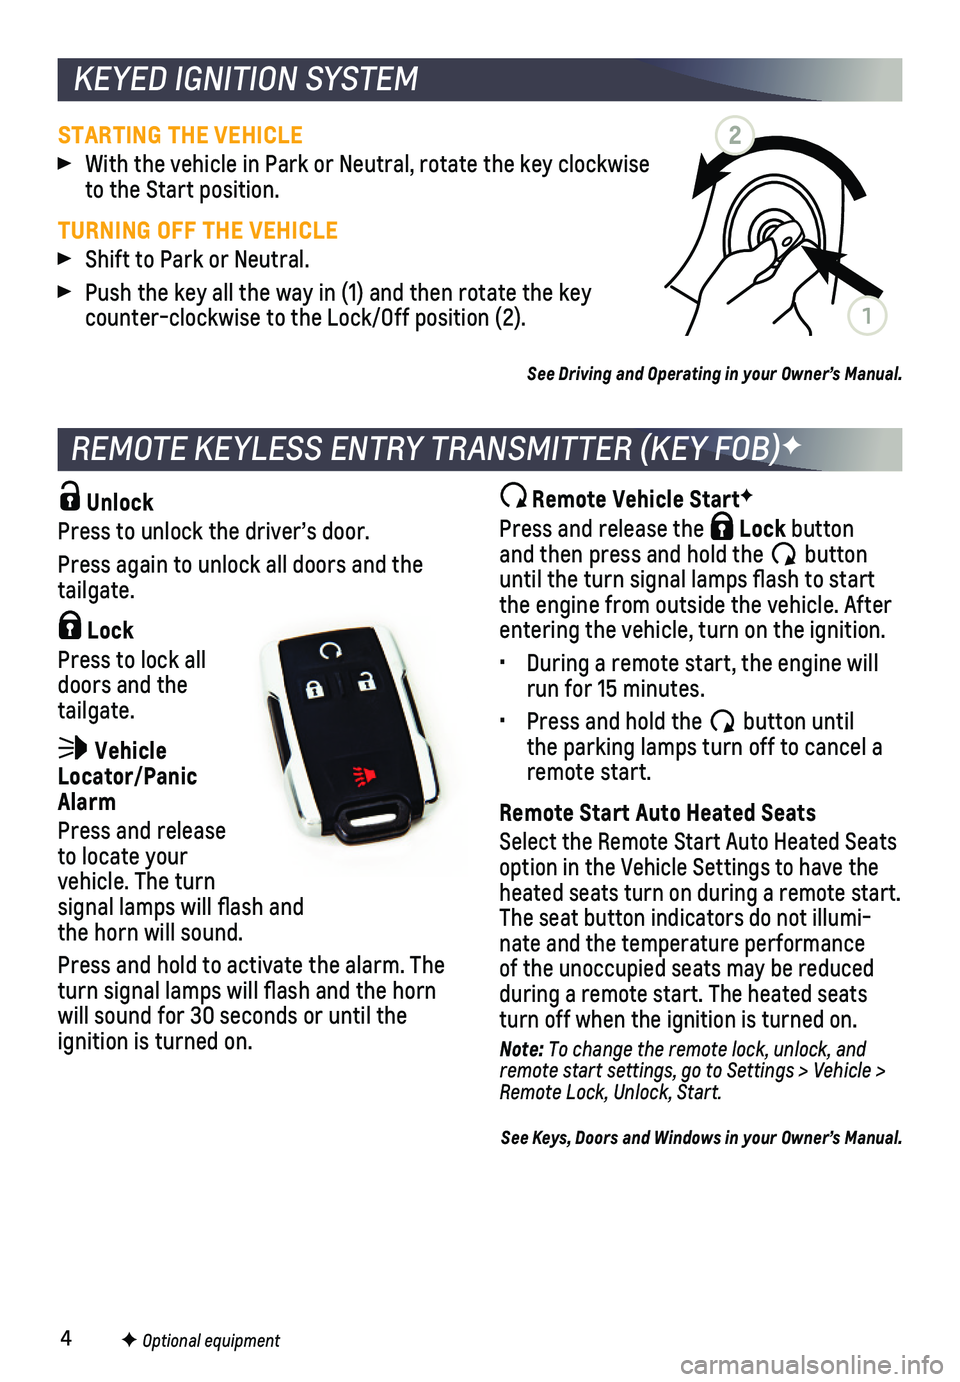
Unlock
Press to unlock the driver’s door.
Press again to unlock all doors and the tailgate.
Lock
Press to lock all doors and the tailgate.
Vehicle Locator/Panic Alarm
Press and release to locate your vehicle. The turn signal lamps will flash and the horn will sound.
Press and hold to activate the alarm. The turn signal lamps will flash and the horn will sound for 30 seconds or until the
ignition is turned on.
Remote Vehicle StartF
Press and release the Lock button and then press and hold the button until the turn signal lamps flash to start the engine from outside the vehicle. After entering the vehicle, turn on the ignition.
• During a remote start, the engine will run for 15 minutes.
• Press and hold the button until the parking lamps turn off to cancel a remote start.
Remote Start Auto Heated Seats
Select the Remote Start Auto Heated Seats option in the Vehicle Settings to have the heated seats turn on during a remote start. The seat button indicators do not illumi-nate and the temperature performance of the unoccupied seats may be reduced
during a remote start. The heated seats turn off when the ignition is turned on.
Note: To change the remote lock, unlock, and remote start settings, go to Settings > Vehicle > Remote Lock, Unlock, Start.
See Keys, Doors and Windows in your Owner’s Manual.
REMOTE KEYLESS ENTRY TRANSMITTER (KEY FOB)F
F Optional equipment
KEYED IGNITION SYSTEM
STARTING THE VEHICLE
With the vehicle in Park or Neutral, rotate the key clockwise to the Start position.
TURNING OFF THE VEHICLE
Shift to Park or Neutral.
Push the key all the way in (1) and then rotate the key counter-clockwise to the Lock/Off position (2).
See Driving and Operating in your Owner’s Manual.
2
1
Page 5 of 16
5
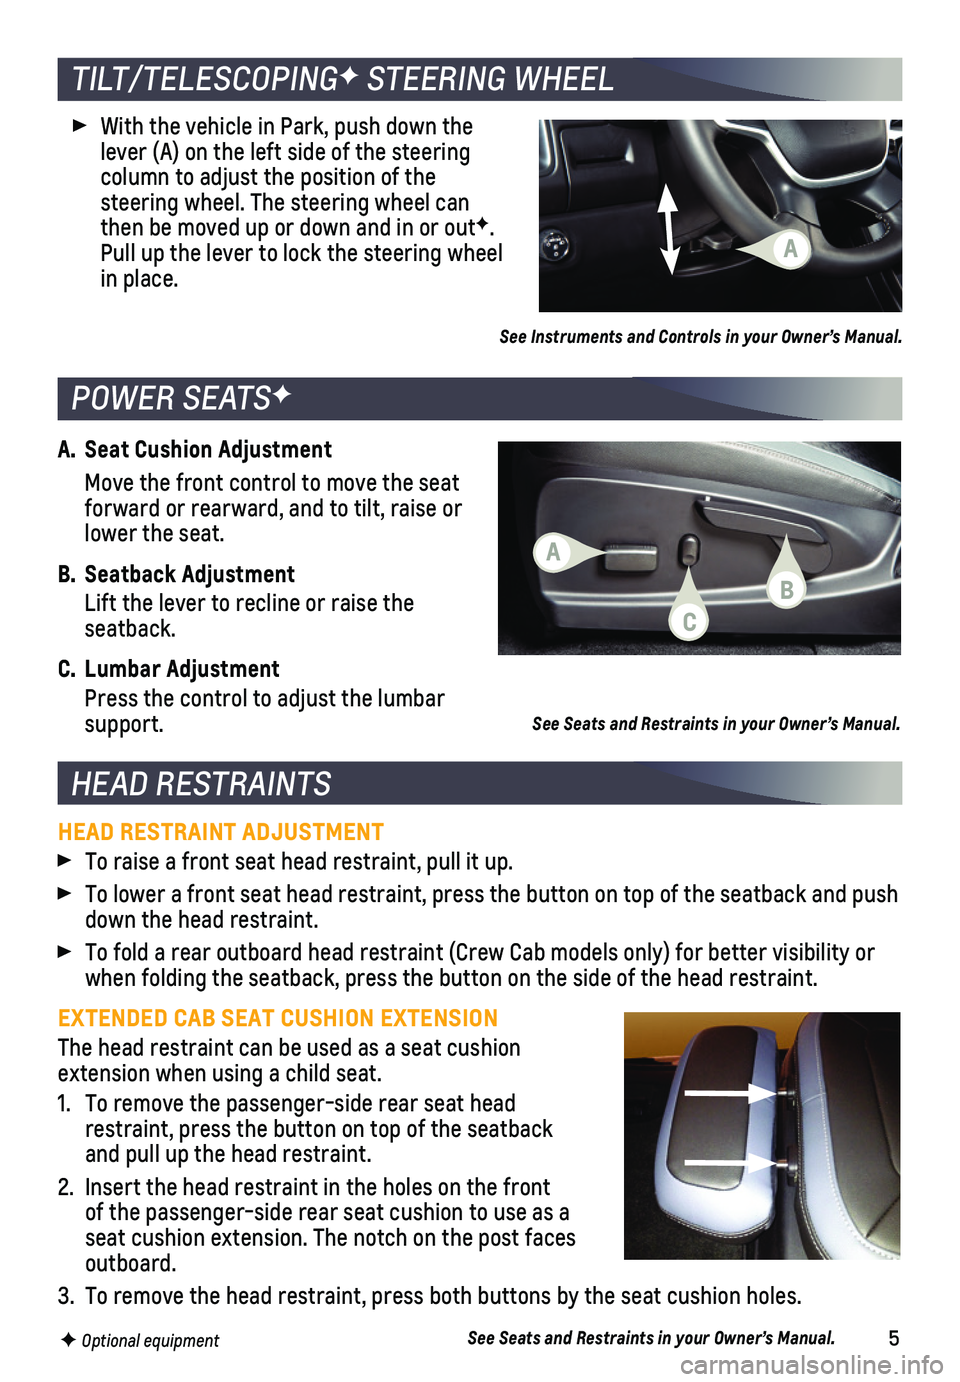
A. Seat Cushion Adjustment
Move the front control to move the seat forward or rearward, and to tilt, raise or lower the seat.
B. Seatback Adjustment
Lift the lever to recline or raise the seatback.
C. Lumbar Adjustment
Press the control to adjust the lumbar support.
TILT/TELESCOPINGF STEERING WHEEL
HEAD RESTRAINTS
With the vehicle in Park, push down the lever (A) on the left side of the steering
column to adjust the position of the
steering wheel. The steering wheel can then be moved up or down and in or outF. Pull up the lever to lock the steering wheel in place.
POWER SEATSF
See Seats and Restraints in your Owner’s Manual.
HEAD RESTRAINT ADJUSTMENT
To raise a front seat head restraint, pull it up.
To lower a front seat head restraint, press the button on top of the sea\
tback and push down the head restraint.
To fold a rear outboard head restraint (Crew Cab models only) for bett\
er visibility or when folding the seatback, press the button on the side of the head rest\
raint.
EXTENDED CAB SEAT CUSHION EXTENSION
The head restraint can be used as a seat cushion extension when using a child seat.
1. To remove the passenger-side rear seat head restraint, press the button on top of the seatback and pull up the head restraint.
2. Insert the head restraint in the holes on the front of the passenger-side rear seat cushion to use as a seat cushion extension. The notch on the post faces outboard.
3. To remove the head restraint, press both buttons by the seat cushion holes.
See Seats and Restraints in your Owner’s Manual.F Optional equipment
See Instruments and Controls in your Owner’s Manual.
A
A
C
B
Page 6 of 16
6
WINDSHIELD WIPERS
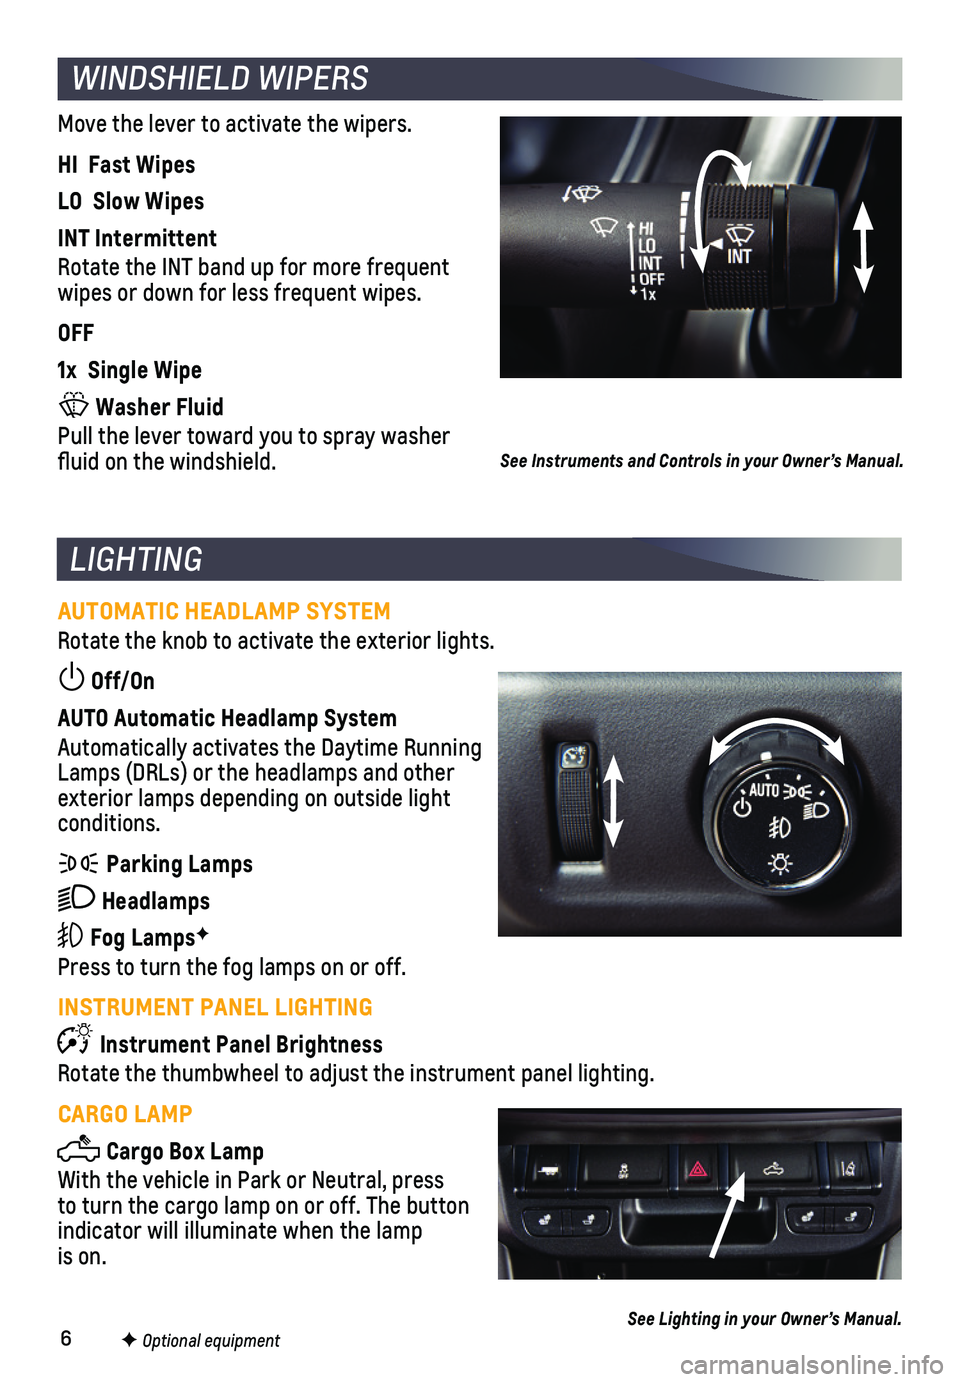
Move the lever to activate the wipers.
HI Fast Wipes
LO Slow Wipes
INT Intermittent
Rotate the INT band up for more frequent wipes or down for less frequent wipes.
OFF
1x Single Wipe
Washer Fluid
Pull the lever toward you to spray washer fluid on the windshield.
F Optional equipment
See Instruments and Controls in your Owner’s Manual.
AUTOMATIC HEADLAMP SYSTEM
Rotate the knob to activate the exterior lights.
Off/On
AUTO Automatic Headlamp System
Automatically activates the Daytime Running Lamps (DRLs) or the headlamps and other exterior lamps depending on outside light conditions.
Parking Lamps
Headlamps
Fog LampsF
Press to turn the fog lamps on or off.
INSTRUMENT PANEL LIGHTING
Instrument Panel Brightness
Rotate the thumbwheel to adjust the instrument panel lighting.
CARGO LAMP
Cargo Box Lamp
With the vehicle in Park or Neutral, press to turn the cargo lamp on or off. The button indicator will illuminate when the lamp is on.
LIGHTING
See Lighting in your Owner’s Manual.
Page 7 of 16
7
DRIVER INFORMATION CENTER
F Optional equipment
The Driver Information Center (DIC) on the instrument cluster displays\
a variety of
vehicle system information and warning messages.
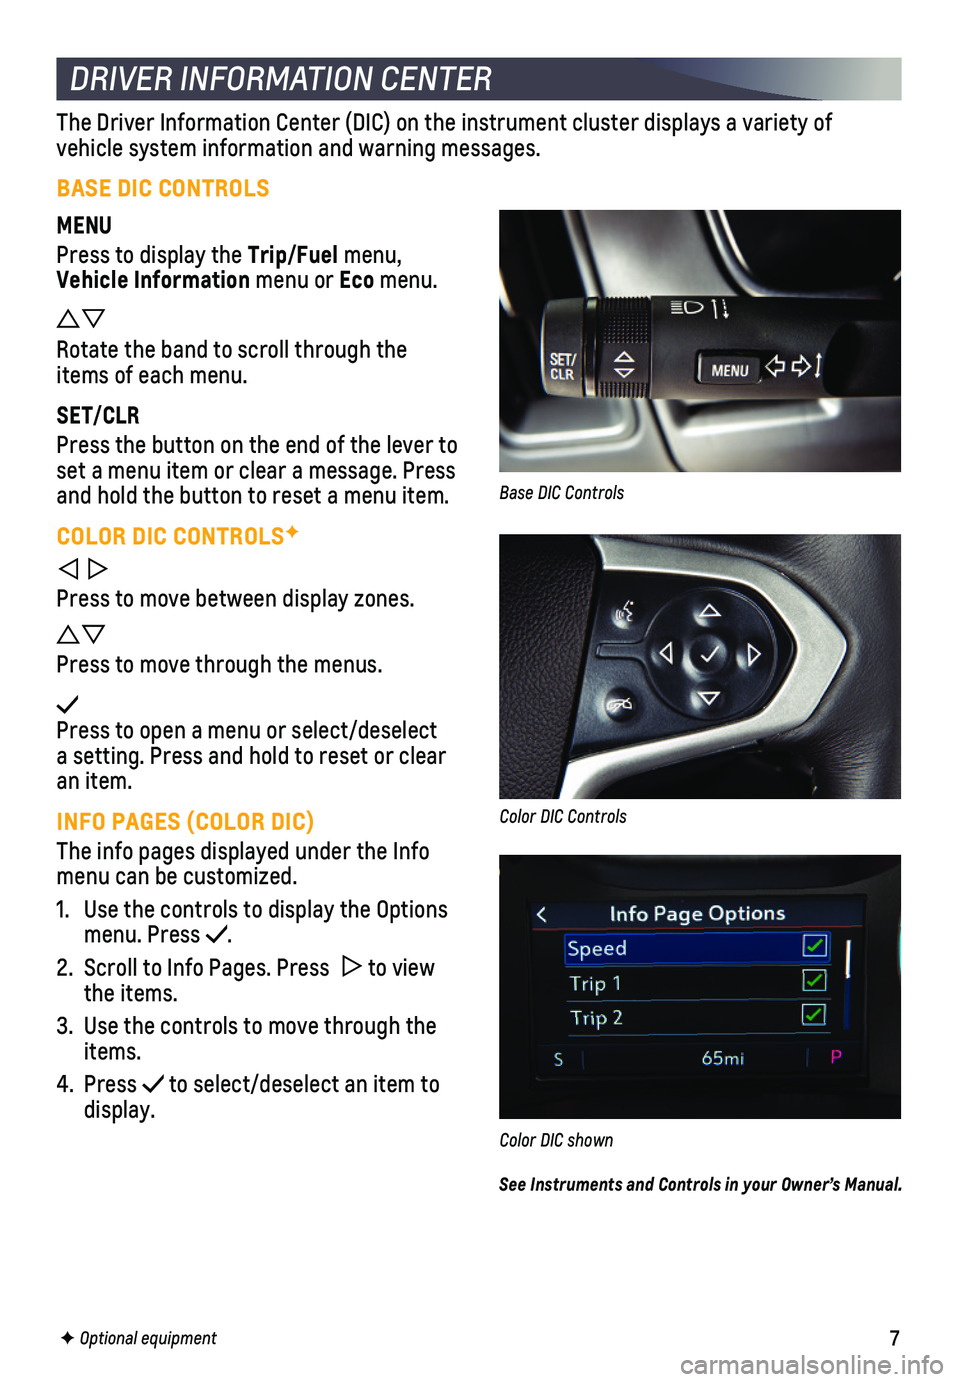
BASE DIC CONTROLS
MENU
Press to display the Trip/Fuel menu, Vehicle Information menu or Eco menu.
Rotate the band to scroll through the items of each menu.
SET/CLR
Press the button on the end of the lever to set a menu item or clear a message. Press and hold the button to reset a menu item.
COLOR DIC CONTROLSF
Press to move between display zones.
Press to move through the menus.
Press to open a menu or select/deselect a setting. Press and hold to reset or clear an item.
INFO PAGES (COLOR DIC)
The info pages displayed under the Info menu can be customized.
1. Use the controls to display the Options menu. Press .
2. Scroll to Info Pages. Press to view the items.
3. Use the controls to move through the items.
4. Press to select/deselect an item to display.
Color DIC shown
Base DIC Controls
Color DIC Controls
See Instruments and Controls in your Owner’s Manual.
Page 8 of 16
8
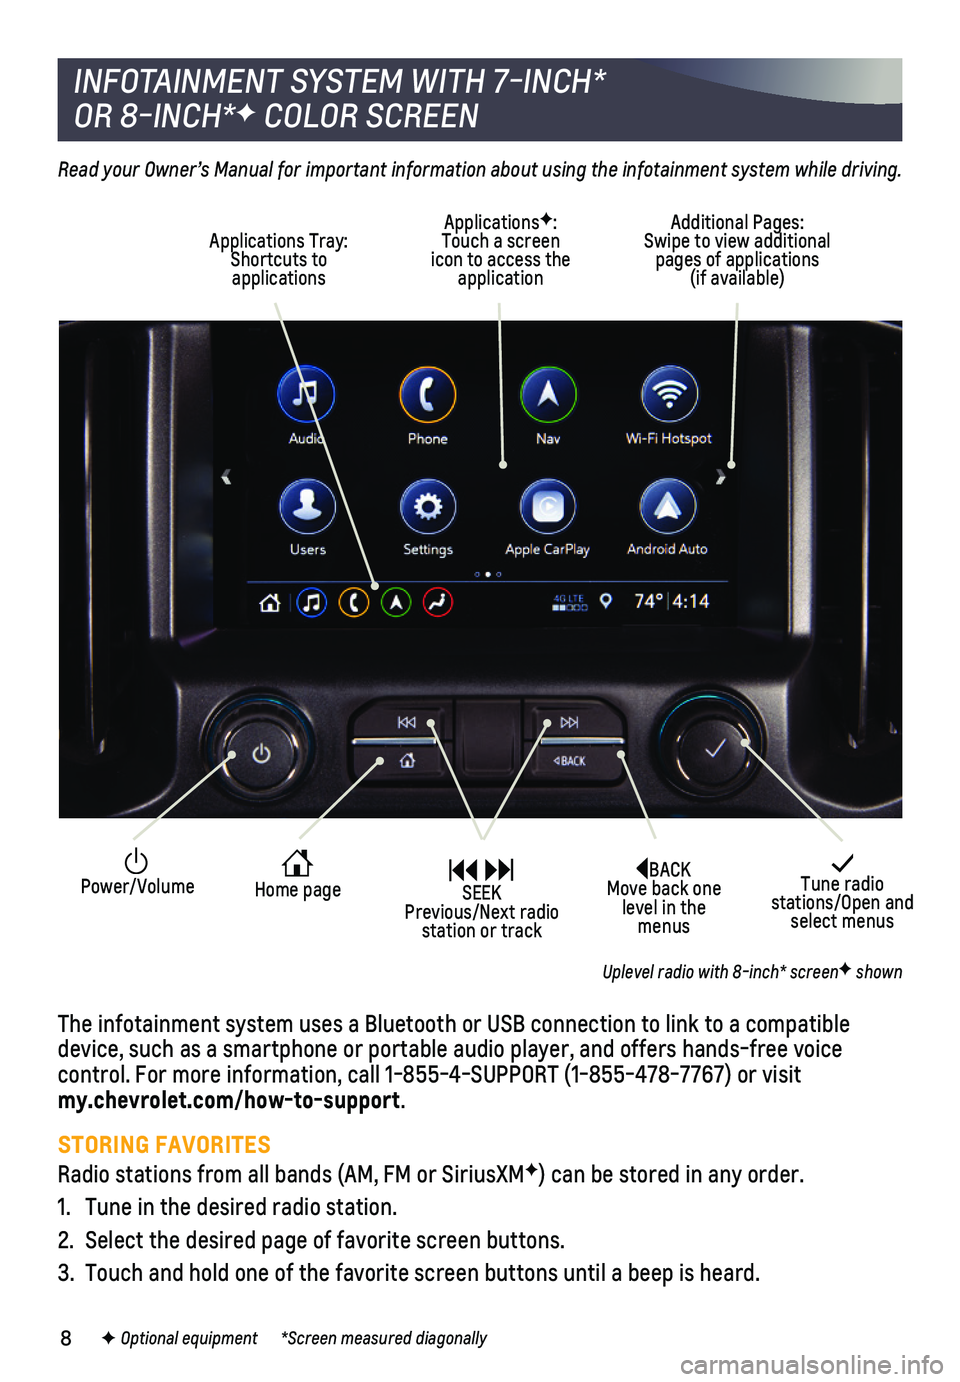
BACK Move back one level in the menus
Tune radio stations/Open and select menus
Home page
ApplicationsF: Touch a screen icon to access the application
Applications Tray: Shortcuts to applications
Additional Pages: Swipe to view additional pages of applications (if available)
Power/Volume SEEK Previous/Next radio station or track
Read your Owner’s Manual for important information about using the infotainment system while driving.
The infotainment system uses a Bluetooth or USB connection to link to a \
compatible device, such as a smartphone or portable audio player, and offers hands-\
free voice
control. For more information, call 1-855-4-SUPPORT (1-855-478-7767) o\
r visit my.chevrolet.com/how-to-support.
STORING FAVORITES
Radio stations from all bands (AM, FM or SiriusXMF) can be stored in any order.
1. Tune in the desired radio station.
2. Select the desired page of favorite screen buttons.
3. Touch and hold one of the favorite screen buttons until a beep is heard.\
INFOTAINMENT SYSTEM WITH 7-INCH*
OR 8-INCH*F COLOR SCREEN
F Optional equipment *Screen measured diagonally
Uplevel radio with 8-inch* screenF shown
Page 9 of 16
9
NATURAL VOICE RECOGNITION
Control the music source and make phone calls hands-free (after pairing\
your Bluetooth-enabled phone) using the natural voice recognition system.
1. Press the Press to Talk button on the steering wheel.
2. The radio will play a prompt followed by a beep.
3. After the beep, say what you want it to do using natural speech. Example\
s: “Call Dave” or “Tune to 99.5 FM.” Say “Help” for assistance.
APPS
In-vehicle apps — connecting to music, news, weather, travel informat\
ion, sports, enter-tainment and more — are available for download to the infotainment sy\
stem through the Apps icon on the Home page. Downloading and using the apps requires inte\
rnet connec-tivity, and may require a data plan, accessed through the vehicle’s 4\
G LTE Wi-Fi hotspot, if active, or a mobile device hotspot.
APPLE CARPLAY
Apple CarPlay capability is available through a compatible smartphone us\
ing the Apple CarPlay icon on the Home page of the infotainment system. No app is requ\
ired.
1. Connect your compatible phone by plugging the Lightning cable into a USB\
data port. Use your device’s factory-provided Lightning cable. Aftermarket cable\
s may not work.
2. The Apple CarPlay icon will illuminate. Touch the icon to have your apps\
displayed.
Press the Home button to exit Apple CarPlay. To return to the last page viewed in Apple CarPlay, press and hold the Home button.
ANDROID AUTO
Android Auto capability is available through a compatible smartphone usi\
ng the Android Auto icon on the Home page of the infotainment system.
1. Download the Android Auto app to your phone from the Google Play Store.
2. Connect your compatible phone by plugging the phone USB cable into a USB\
data port. Use your device’s factory-provided USB cable. Aftermarket cables may \
not work.
3. The Android Auto icon will illuminate. Touch the icon to have your apps \
displayed.
Press the Home button to exit Android Auto. To return to the last page viewed in Android Auto, press and hold the Home button.
PORTABLE AUDIO DEVICES
USB ports are located in several locations in the vehicle to connect por\
table audio devices.
An iPod®, iPhone®, MP3 Player, a USB flash drive or a USB mass storage device can be connected to the USB port. Search for music on-screen or by voice comman\
ds.
Touch Audio and then touch More, if necessary, to select a portable devi\
ce as the audio source.
See Infotainment System in your Owner’s Manual.
INFOTAINMENT SYSTEM WITH 7-INCH*
OR 8-INCH*F COLOR SCREEN
F Optional equipment *Screen measured diagonally
Page 10 of 16
10
The Wireless Charging system for smartphones is located at the front of \
the center
console. To check device compatibility, visit my.chevrolet.com/how-to-support. See your phone retailer for details on required phone accessories.
1. The vehicle must be On, or Retained Accessory Power must be active.
2. Remove all objects from the charging pad.
3. Place the smartphone, face up, on the pad.
4. The charging symbol will appear on the infotainment screen when charging. If\
not charging, remove the smartphone for 3 seconds and rotate it 180 degrees.\
See Instruments and Controls in your Owner’s Manual.
WIRELESS CHARGINGF
Read your Owner’s Manual for important information about using the Bluetooth system while driving.
Before using a Bluetooth-enabled device in the vehicle, it must be paire\
d with the in-vehicle Bluetooth system. The pairing process is disabled when the ve\
hicle is moving. Not all devices will support all functions. For more information, visit my.chevrolet.com/how-to-support.
PAIR A PHONE
1. To use voice recognition, press the Press to Talk button; after the beep, say “Pair phone,” or
Use the knob or the infotainment screen to select the Phone icon > Connect Phone\
> Add Phone.
2. Start the pairing process on the phone. From your phone’s Bluetooth s\
ettings, select the name shown on the infotainment screen.
3. Follow the pairing instructions.
4. When pairing is complete, the phone screen is displayed.
STREAMING AUDIO With a paired device connected via Bluetooth, touch Audio and then touch\
More, if necessary, to select Bluetooth as the audio source.
See Infotainment System in your Owner’s Manual.
BLUETOOTH® SYSTEM
With the vehicle’s available 4G LTE Wi-Fi hotspot, up to 7 devices (\
smartphones, tablets and laptops) can be connected to high-speed internet.
To retrieve the name and password for the hotspot, select the Wi-Fi Hots\
pot icon or go to Settings > System > Wi-Fi Hotspot.
Note: For more information on use and system limitations, visit my.chevrolet.com/how-to-support.
See Infotainment System in your Owner’s Manual.
4G LTE WI-FI® HOTSPOTF
F Optional equipment