CHEVROLET COLORADO 2021 Get To Know Guide ZR2
Manufacturer: CHEVROLET, Model Year: 2021, Model line: COLORADO, Model: CHEVROLET COLORADO 2021Pages: 8, PDF Size: 1.39 MB
Page 1 of 8
1
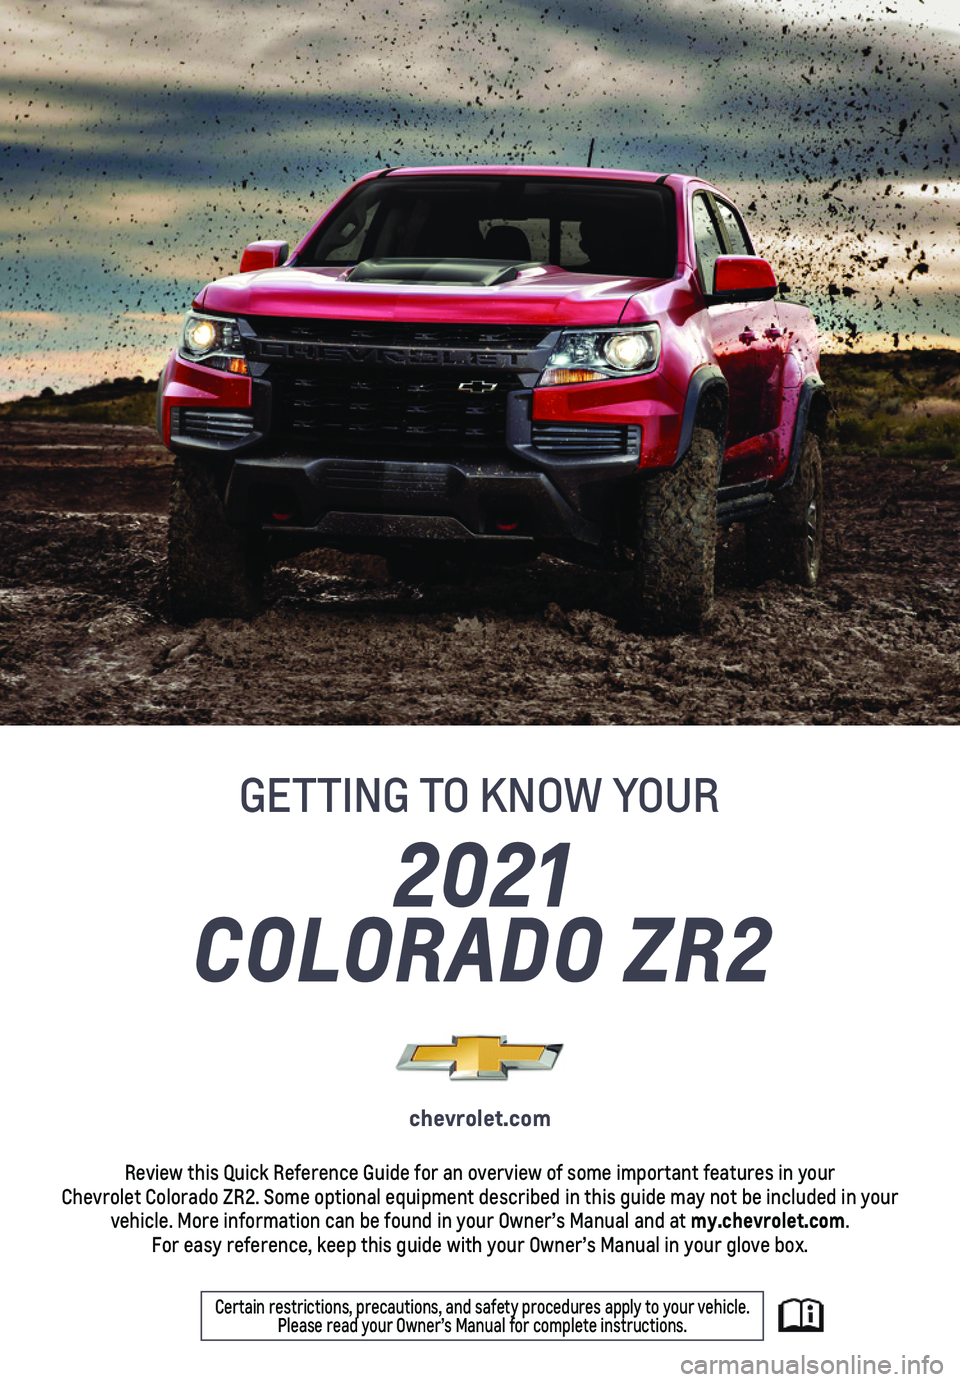
2021
COLORADO ZR2
GETTING TO KNOW YOUR
chevrolet.com
Review this Quick Reference Guide for an overview of some important feat\
ures in your Chevrolet Colorado ZR2. Some optional equipment described in this guide \
may not be included in your vehicle. More information can be found in your Owner’s Manual and at \
my.chevrolet.com. For easy reference, keep this guide with your Owner’s Manual in your \
glove box.
Certain restrictions, precautions, and safety procedures apply to your v\
ehicle. Please read your Owner’s Manual for complete instructions.
Page 2 of 8
2
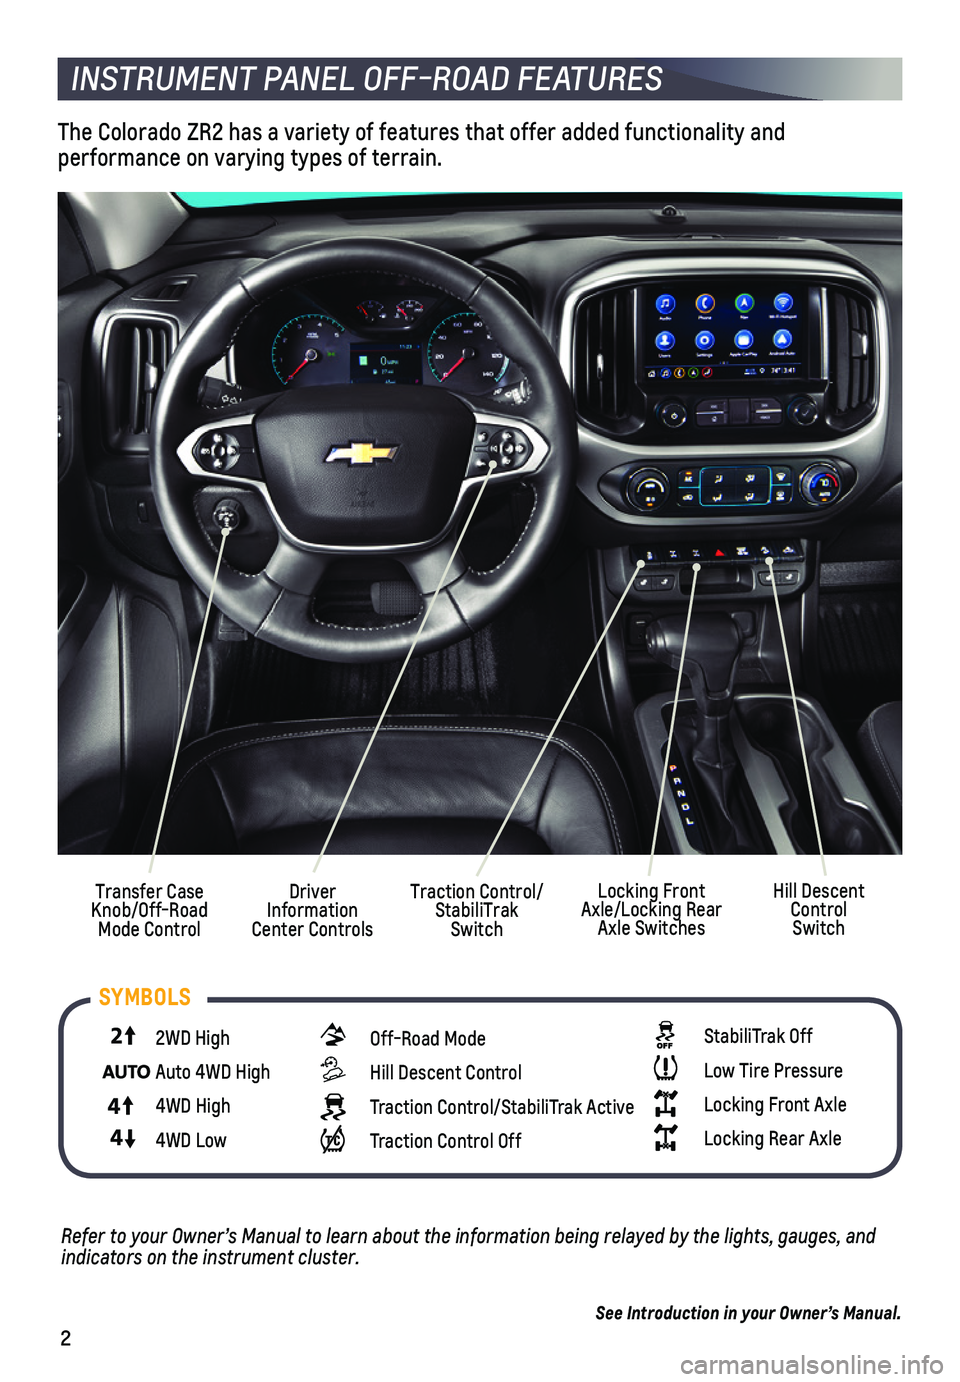
Traction Control/ StabiliTrak Switch
Driver Information Center Controls
Transfer Case Knob/Off-Road Mode Control
INSTRUMENT PANEL OFF-ROAD FEATURES
Hill Descent Control Switch
Locking Front Axle/Locking Rear Axle Switches
44
2
2WD High
44
2
Auto 4WD High
4
4
2
4WD High
44
2
4WD Low
Off-Road Mode
Hill Descent Control
Traction Control/StabiliTrak Active
Traction Control Off
SYMBOLS
See Introduction in your Owner’s Manual.
Refer to your Owner’s Manual to learn about the information being relayed by the lights, gauges, and indicators on the instrument cluster.
StabiliTrak Off
Low Tire Pressure
Locking Front Axle
Locking Rear Axle
The Colorado ZR2 has a variety of features that offer added functionalit\
y and
performance on varying types of terrain.
Page 3 of 8
3
OFF-ROAD MODE
Off-Road Mode changes the antilock brake, traction control, and stabilit\
y control
calibrations for different conditions. It also alters throttle progressi\
on and transmis-sion shifts.
In Off-Road Mode:
• The locking rear axle does not have a speed limitation. The rear axle wi\
ll remain locked up to the maximum vehicle speed.
• The StabiliTrak electronic stability control system is adjusted for off-\
road performance.
• Powertrain calibrations are optimized for off-road use.
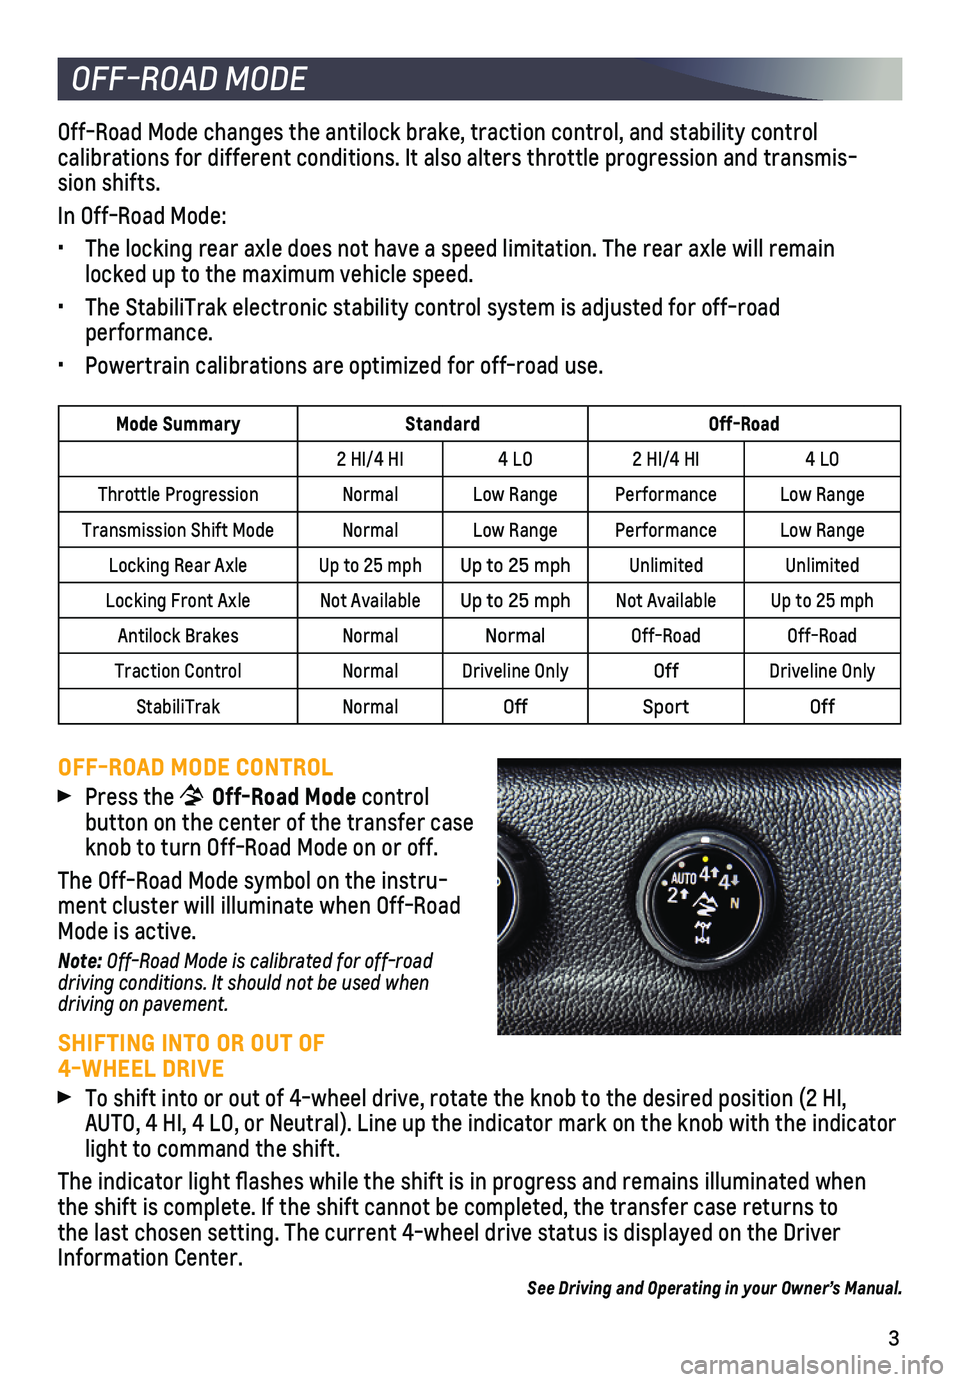
OFF-ROAD MODE CONTROL
Press the Off-Road Mode control
button on the center of the transfer case knob to turn Off-Road Mode on or off.
The Off-Road Mode symbol on the instru-ment cluster will illuminate when Off-Road Mode is active.
Note: Off-Road Mode is calibrated for off-road driving conditions. It should not be used when driving on pavement.
SHIFTING INTO OR OUT OF 4-WHEEL DRIVE
To shift into or out of 4-wheel drive, rotate the knob to the desired po\
sition (2 HI, AUTO, 4 HI, 4 LO, or Neutral). Line up the indicator mark on the knob w\
ith the indicator light to command the shift.
The indicator light flashes while the shift is in progress and remains\
illuminated when the shift is complete. If the shift cannot be completed, the transfer ca\
se returns to the last chosen setting. The current 4-wheel drive status is displayed o\
n the Driver Information Center.
See Driving and Operating in your Owner’s Manual.
Mode SummaryStandardOff-Road
2 HI/4 HI4 LO2 HI/4 HI4 LO
Throttle ProgressionNormalLow RangePerformanceLow Range
Transmission Shift ModeNormalLow RangePerformanceLow Range
Locking Rear AxleUp to 25 mphUp to 25 mphUnlimitedUnlimited
Locking Front AxleNot AvailableUp to 25 mphNot AvailableUp to 25 mph
Antilock BrakesNormalNormalOff-RoadOff-Road
Traction ControlNormalDriveline OnlyOffDriveline Only
StabiliTrakNormalOffSportOff
Page 4 of 8
4
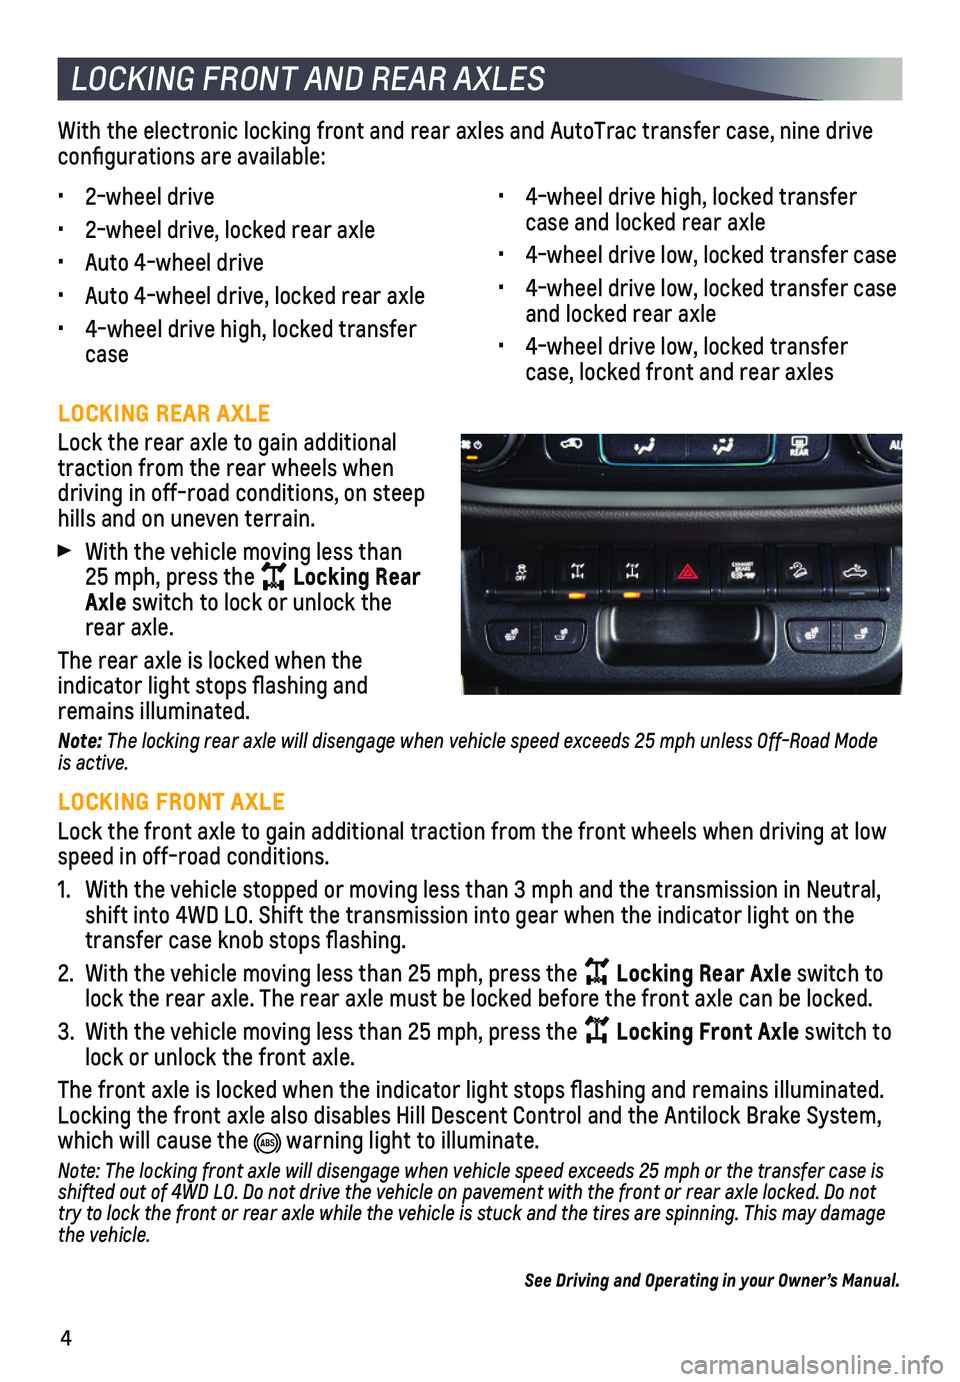
LOCKING REAR AXLE
Lock the rear axle to gain additional
traction from the rear wheels when
driving in off-road conditions, on steep hills and on uneven terrain.
With the vehicle moving less than 25 mph, press the Locking Rear Axle switch to lock or unlock the rear axle.
The rear axle is locked when the
indicator light stops flashing and remains illuminated.
Note: The locking rear axle will disengage when vehicle speed exceeds 25 mph unless Off-Road Mode is active.
LOCKING FRONT AXLE
Lock the front axle to gain additional traction from the front wheels wh\
en driving at low speed in off-road conditions.
1. With the vehicle stopped or moving less than 3 mph and the transmission \
in Neutral, shift into 4WD LO. Shift the transmission into gear when the indicator l\
ight on the transfer case knob stops flashing.
2. With the vehicle moving less than 25 mph, press the Locking Rear Axle switch to lock the rear axle. The rear axle must be locked before the front axle c\
an be locked.
3. With the vehicle moving less than 25 mph, press the Locking Front Axle switch to lock or unlock the front axle.
The front axle is locked when the indicator light stops flashing and r\
emains illuminated. Locking the front axle also disables Hill Descent Control and the Antilo\
ck Brake System, which will cause the warning light to illuminate.
Note: The locking front axle will disengage when vehicle speed exceeds 25 mph or the transfer case is shifted out of 4WD LO. Do not drive the vehicle on pavement with the front or rear axle locked. Do not try to lock the front or rear axle while the vehicle is stuck and the tires are spinning. This may damage the vehicle.
See Driving and Operating in your Owner’s Manual.
With the electronic locking front and rear axles and AutoTrac transfer c\
ase, nine drive
configurations are available:
LOCKING FRONT AND REAR AXLES
• 4-wheel drive high, locked transfer case and locked rear axle
• 4-wheel drive low, locked transfer case
• 4-wheel drive low, locked transfer case and locked rear axle
• 4-wheel drive low, locked transfer case, locked front and rear axles
• 2-wheel drive
• 2-wheel drive, locked rear axle
• Auto 4-wheel drive
• Auto 4-wheel drive, locked rear axle
• 4-wheel drive high, locked transfer case
Page 5 of 8
5
HILL DESCENT CONTROL
TRACTION CONTROL AND STABILITRAK SYSTEMS
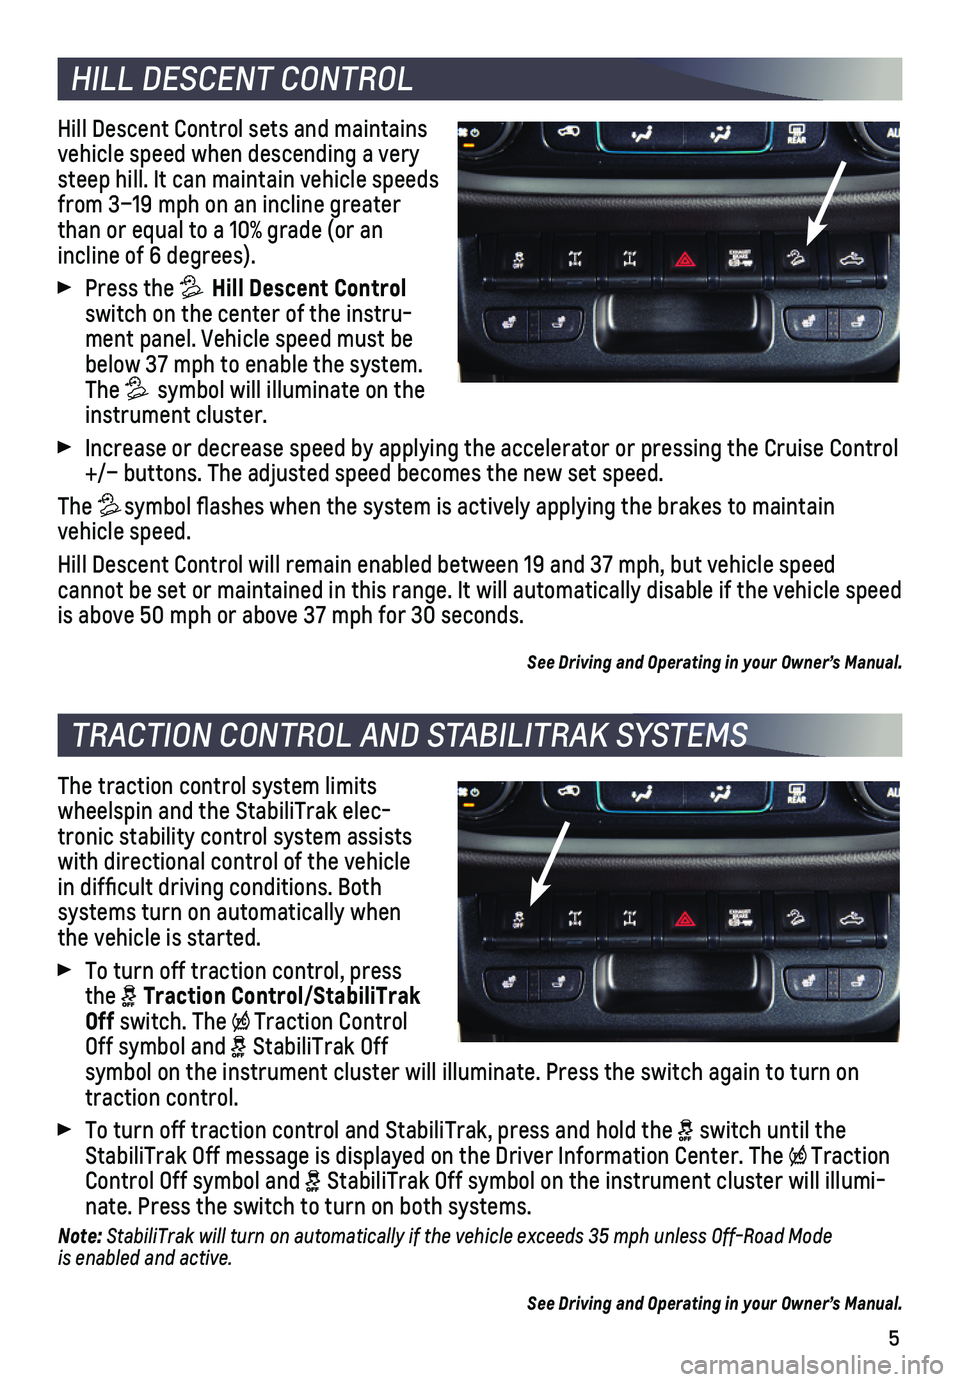
Hill Descent Control sets and maintains vehicle speed when descending a very steep hill. It can maintain vehicle speeds from 3–19 mph on an incline greater than or equal to a 10% grade (or an incline of 6 degrees).
Press the Hill Descent Control switch on the center of the instru-ment panel. Vehicle speed must be below 37 mph to enable the system. The symbol will illuminate on the instrument cluster.
Increase or decrease speed by applying the accelerator or pressing the C\
ruise Control +/– buttons. The adjusted speed becomes the new set speed.
The symbol flashes when the system is actively applying the brakes to main\
tain vehicle speed.
Hill Descent Control will remain enabled between 19 and 37 mph, but vehi\
cle speed
cannot be set or maintained in this range. It will automatically disable\
if the vehicle speed is above 50 mph or above 37 mph for 30 seconds.
See Driving and Operating in your Owner’s Manual.
The traction control system limits
wheelspin and the StabiliTrak elec-tronic stability control system assists with directional control of the vehicle in difficult driving conditions. Both
systems turn on automatically when the vehicle is started.
To turn off traction control, press the Traction Control/StabiliTrak Off switch. The Traction Control Off symbol and StabiliTrak Off symbol on the instrument cluster will illuminate. Press the switch again\
to turn on traction control.
To turn off traction control and StabiliTrak, press and hold the switch until the StabiliTrak Off message is displayed on the Driver Information Center. T\
he Traction Control Off symbol and StabiliTrak Off symbol on the instrument cluster will illumi-nate. Press the switch to turn on both systems.
Note: StabiliTrak will turn on automatically if the vehicle exceeds 35 mph unless Off-Road Mode is enabled and active.
See Driving and Operating in your Owner’s Manual.
Page 6 of 8
6
OFF-ROAD INFORMATION
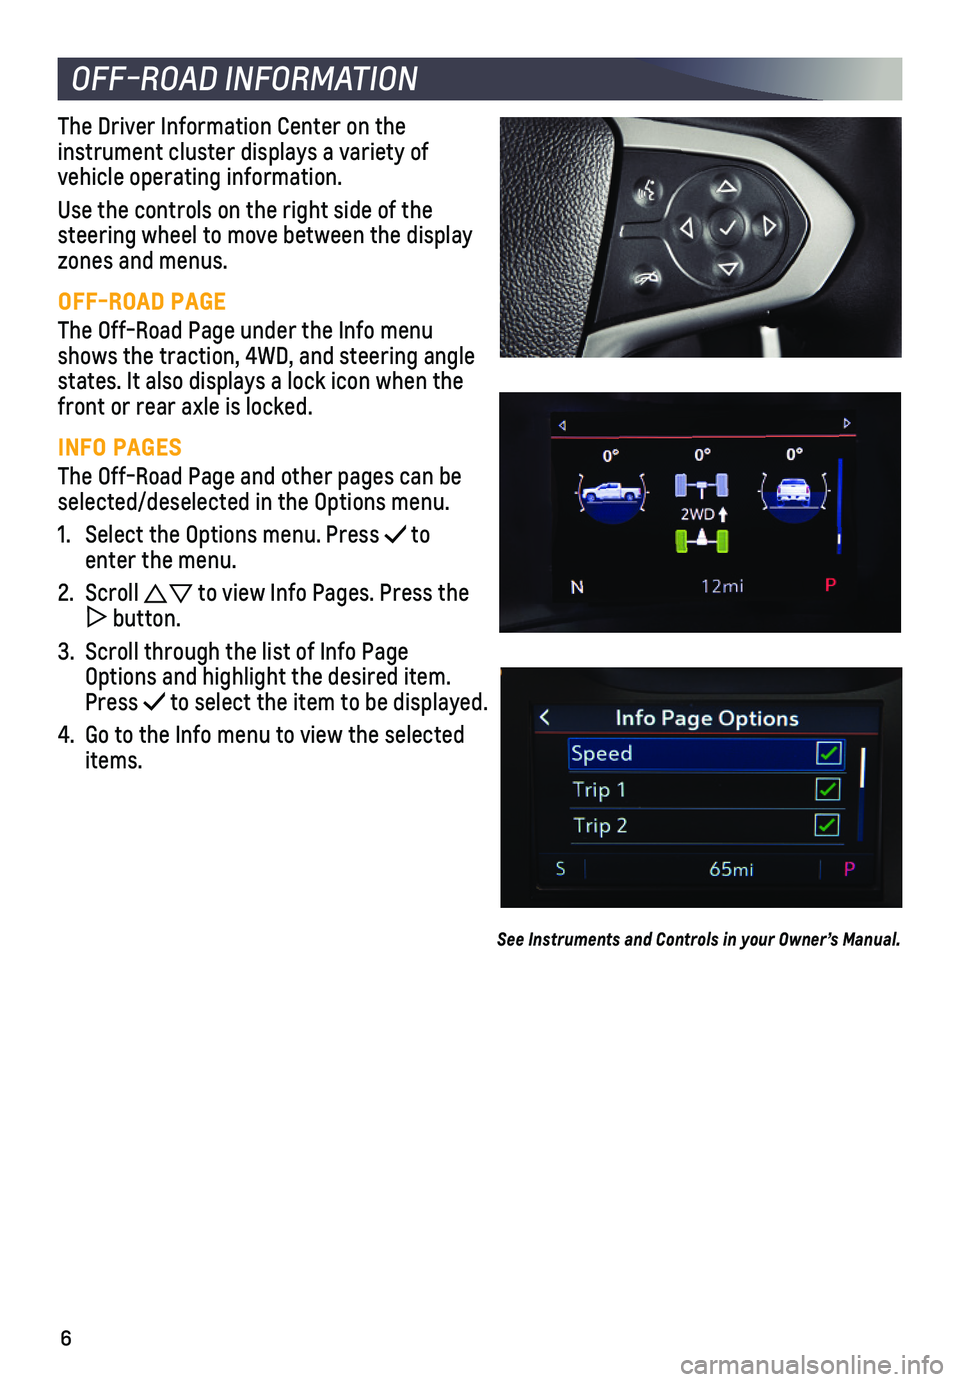
The Driver Information Center on the
instrument cluster displays a variety of vehicle operating information.
Use the controls on the right side of the steering wheel to move between the display zones and menus.
OFF-ROAD PAGE
The Off-Road Page under the Info menu shows the traction, 4WD, and steering angle states. It also displays a lock icon when the front or rear axle is locked.
INFO PAGES
The Off-Road Page and other pages can be selected/deselected in the Options menu.
1. Select the Options menu. Press to enter the menu.
2. Scroll to view Info Pages. Press the button.
3. Scroll through the list of Info Page Options and highlight the desired item. Press to select the item to be displayed.
4. Go to the Info menu to view the selected items.
See Instruments and Controls in your Owner’s Manual.
Page 7 of 8
7
OFF-ROAD DRIVING BASICS
BEFORE YOU GO
• Keep the vehicle in good condition by completing all necessary maintenan\
ce and service work.
• Fuel the vehicle, fill fluids, and check inflation pressure in all\
tires, including the spare tire. Inflate or deflate tires, if necessary, to the appropriate pre\
ssure.
• Make sure all cargo is securely stored in the vehicle. Secure cargo in t\
he truck bed as far forward as possible.
• Always use established trails and roads. Know and comply with the local \
laws where you will be off-roading.
• Do not use the AUTO (Automatic 4WD) mode for off-roading — which se\
nds power to the front and rear wheels automatically, based on driving conditions \
— if traction
conditions are constantly changing. This may damage the transfer case cl\
utch.
DRIVING ON HILLS
Before driving on a hill, assess the steepness, traction, and obstructio\
ns. Turn on the
headlamps to make the vehicle more visible in all conditions.
When driving, use a low gear and maintain a slow speed. When possible, d\
rive straight up or down the hill. Slow down when approaching the top of the hill.
DRIVING IN MUD, SAND OR SNOW
Use a low gear when driving in mud. Keep the vehicle moving to avoid get\
ting stuck.
On loose sand, traction changes can occur and the tires may sink into th\
e sand, affecting steering, acceleration, and braking. Drive at a reduced speed \
and avoid abrupt maneuvers.
On hard-packed snow and ice, traction is reduced and vehicle speed shoul\
d be lowered accordingly.
DRIVING THROUGH WATER
If the standing water is not too deep, drive slowly through it. At faste\
r speeds, splashing water may cause the vehicle to stall. After driving through water, the b\
rakes will be wet and it may take longer to stop.
AFTER OFF-ROAD DRIVING
Remove any debris that has collected on the underbody or chassis. After \
operating in mud or sand, check and clean the brake linings. Also check under the veh\
icle and the wheels/tires for any damage.
See Driving and Operating in your Owner’s Manual.
Page 8 of 8
8
The Colorado ZR2 features specially designed off-road tires for added tr\
action.
TIRE PRESSURE MONITORING SYSTEM
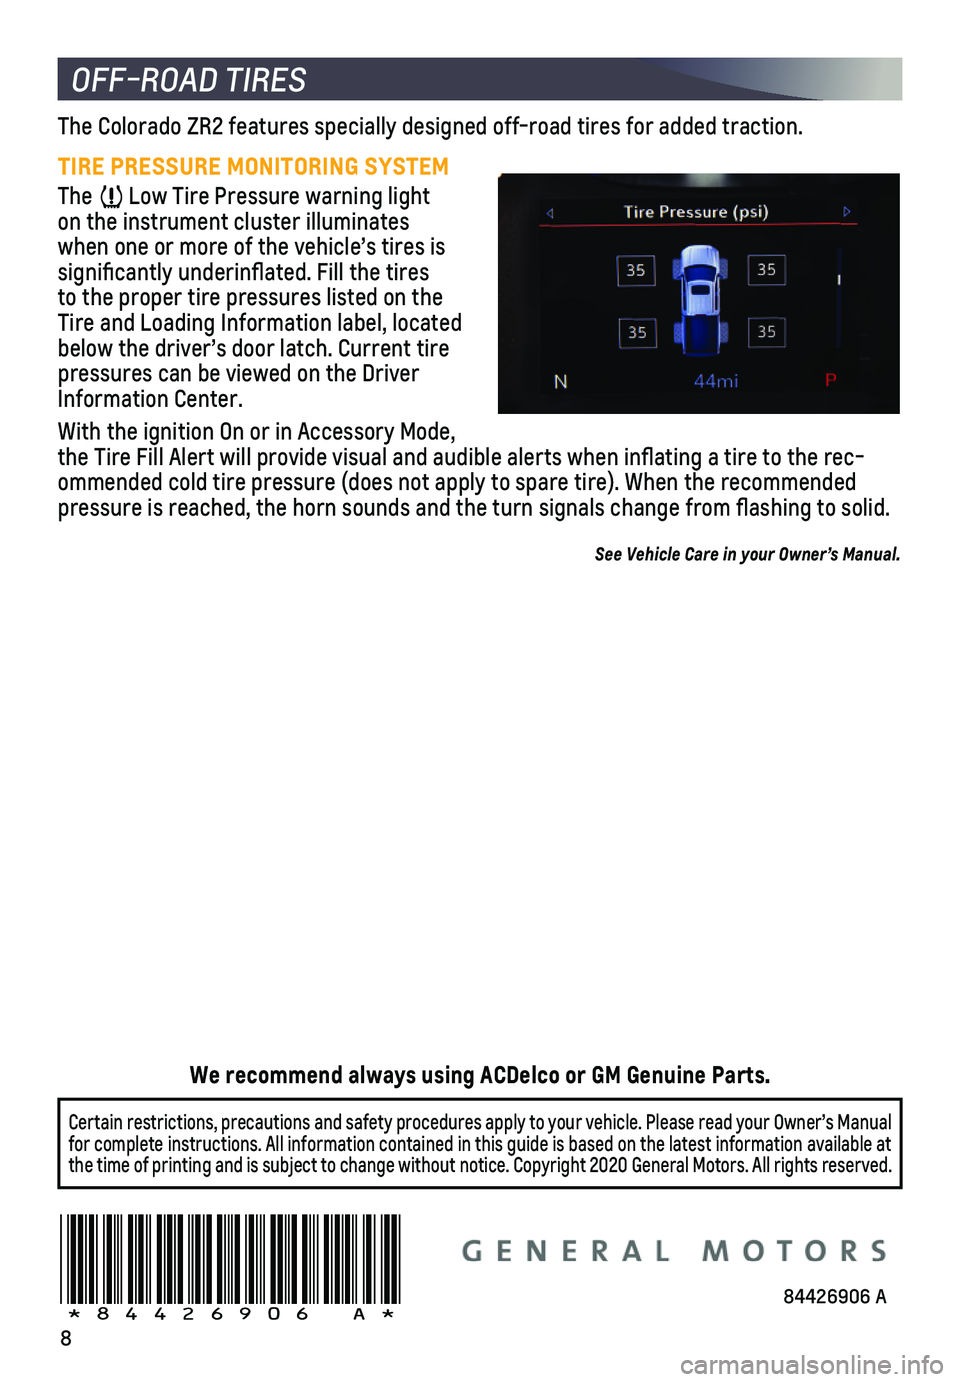
The Low Tire Pressure warning light on the instrument cluster illuminates when one or more of the vehicle’s tires is significantly underinflated. Fill the tires to the proper tire pressures listed on the Tire and Loading Information label, located below the driver’s door latch. Current tire pressures can be viewed on the Driver Information Center.
With the ignition On or in Accessory Mode, the Tire Fill Alert will provide visual and audible alerts when inflat\
ing a tire to the rec-ommended cold tire pressure (does not apply to spare tire). When the r\
ecommended
pressure is reached, the horn sounds and the turn signals change from fl\
ashing to solid.
See Vehicle Care in your Owner’s Manual.
OFF-ROAD TIRES
84426906 A!84426906=A!
Certain restrictions, precautions and safety procedures apply to your ve\
hicle. Please read your Owner’s Manual for complete instructions. All information contained in this guide is ba\
sed on the latest information available at the time of printing and is subject to change without notice. Copyright 2020 General Motors. All rights reserved.
We recommend always using ACDelco or GM Genuine Parts.