CHEVROLET CORVETTE 2010 6.G Owners Manual
Manufacturer: CHEVROLET, Model Year: 2010, Model line: CORVETTE, Model: CHEVROLET CORVETTE 2010 6.GPages: 472, PDF Size: 11.44 MB
Page 101 of 472
Keyless Access System
SeeRadio Frequency Statementon page 8‑20for information regarding Part 15 of the Federal
Communications Commission (FCC) Rules and
RSS-210/211 of Industry Canada.
Changes or modifications to this system by other than
an authorized service facility could void authorization to
use this equipment.
If there is a decrease in the RKE operating range,
try this:
.Check the distance. The transmitter may be too
far from the vehicle. Stand closer during rainy or
snowy weather.
.Check the location. Other vehicles or objects may
be blocking the signal. Take a few steps to the left
or right, hold the transmitter higher, and try again.
.Check the transmitter's battery. See “Battery
Replacement” later in this section.
.If the transmitter is still not working correctly, see
your dealer/retailer or a qualified technician for
service.
Keyless Access System Operation
The Keyless Access System transmitter functions work
up to 30 m (100 feet) away from the vehicle.
Keyless Unlocking
Press the door handle sensor to unlock and open the
doors if the keyless access transmitter is within range.
See Door Locks
on page 3‑10and“Passive Door
Unlock” underDIC Vehicle Personalizationon
page 4‑71for additional information.
Keyless Locking
The doors lock after several seconds if all doors are
closed and at least one keyless access transmitter
has been removed from the interior of the vehicle.
To customize whether the doors automatically lock
when exiting the vehicle, see “Passive Door Locking”
under DIC Vehicle Personalization
on page 4‑71for
additional information.
3-5
Page 102 of 472
Keyless Trunk Opening
Press the hatch/trunk release button located on the rear
of the hatch/trunk lid above the license plate to open the
trunk if the keyless access transmitter is within range.
See Hatch
on page 3‑14for additional information.
There are other conditions that can affect the
performance of the transmitter. See Keyless Access
System
on page 3‑5Keyless Access System.
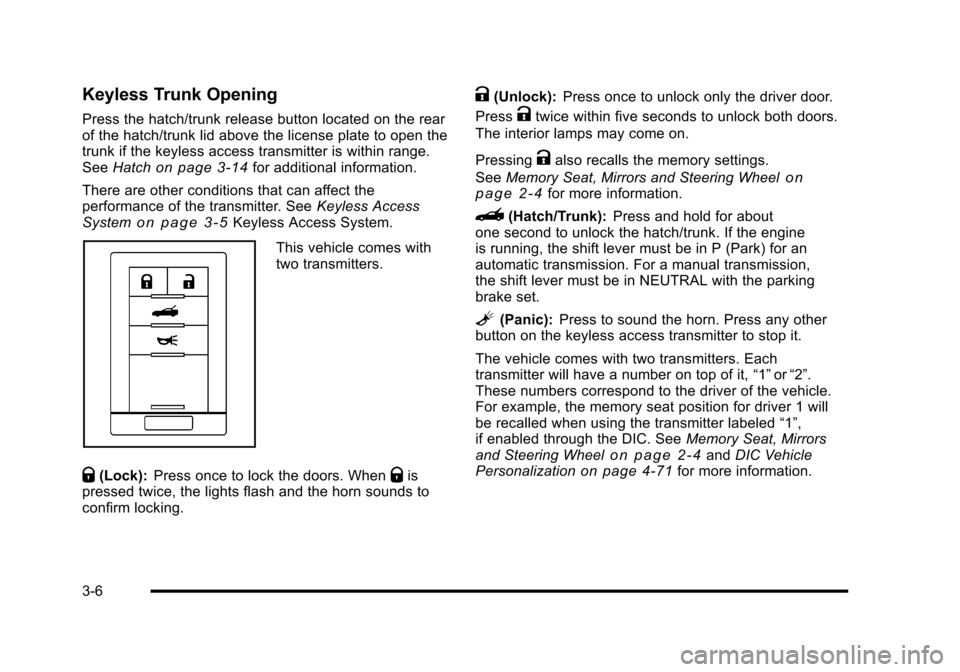
This vehicle comes with
two transmitters.
Q(Lock): Press once to lock the doors. WhenQis
pressed twice, the lights flash and the horn sounds to
confirm locking.
K(Unlock): Press once to unlock only the driver door.
Press
Ktwice within five seconds to unlock both doors.
The interior lamps may come on.
Pressing
Kalso recalls the memory settings.
See Memory Seat, Mirrors and Steering Wheel
on
page 2‑4for more information.
}(Hatch/Trunk): Press and hold for about
one second to unlock the hatch/trunk. If the engine
is running, the shift lever must be in P (Park) for an
automatic transmission. For a manual transmission,
the shift lever must be in NEUTRAL with the parking
brake set.
L(Panic): Press to sound the horn. Press any other
button on the keyless access transmitter to stop it.
The vehicle comes with two transmitters. Each
transmitter will have a number on top of it, “1”or“2”.
These numbers correspond to the driver of the vehicle.
For example, the memory seat position for driver 1 will
be recalled when using the transmitter labeled “1”,
if enabled through the DIC. See Memory Seat, Mirrors
and Steering Wheel
on page 2‑4and DIC Vehicle
Personalizationon page 4‑71for more information.
3-6
Page 103 of 472
Programming Transmitters to the
Vehicle
Only keyless access transmitters programmed to
this vehicle will work. If a transmitter is lost or stolen,
a replacement can be purchased and programmed
through your dealer/retailer. The vehicle can be
reprogrammed so that lost or stolen transmitters
no longer work. Each vehicle can have up to
four transmitters programmed to it.
Programming with a Recognized
Transmitter
A new transmitter can be programmed to the vehicle
when there is one recognized transmitter. For vehicles
sold in Canada, two recognized transmitters are
required to program a new transmitter. 1. The vehicle must be off.
2. Both the recognized and new transmitters must be with you.
3. Insert the vehicle key into the key cylinder located above the license plate.
4. Open the hatch/trunk.
5. Turn the key five times within five seconds.
6. The DIC displays READY FOR FOB #2, 3 or 4.
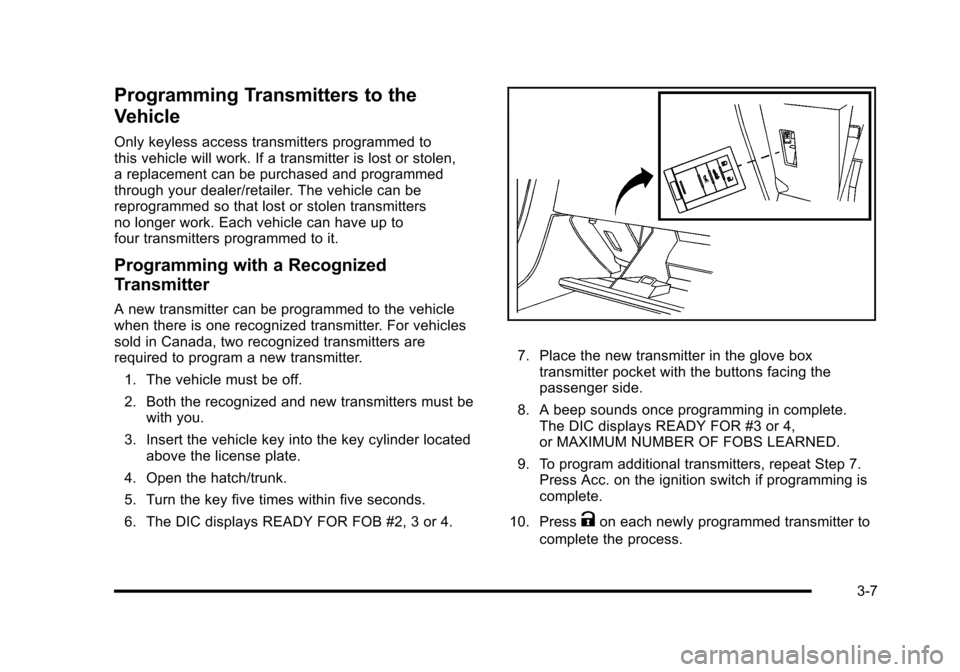
7. Place the new transmitter in the glove box transmitter pocket with the buttons facing the
passenger side.
8. A beep sounds once programming in complete. The DIC displays READY FOR #3 or 4,
or MAXIMUM NUMBER OF FOBS LEARNED.
9. To program additional transmitters, repeat Step 7. Press Acc. on the ignition switch if programming is
complete.
10. Press
Kon each newly programmed transmitter to
complete the process.
3-7
Page 104 of 472
Programming without a Recognized
Transmitter
This procedure requires three ten minutes cycles to
complete the programming process. United States
owners are permitted to program a new transmitter
to their vehicle when a recognized transmitter is not
available. The Canadian immobilizer standard requires
that Canadian owners see their dealer/retailer for
programming new transmitters when two recognized
transmitters are not available. 1. The vehicle must be off.
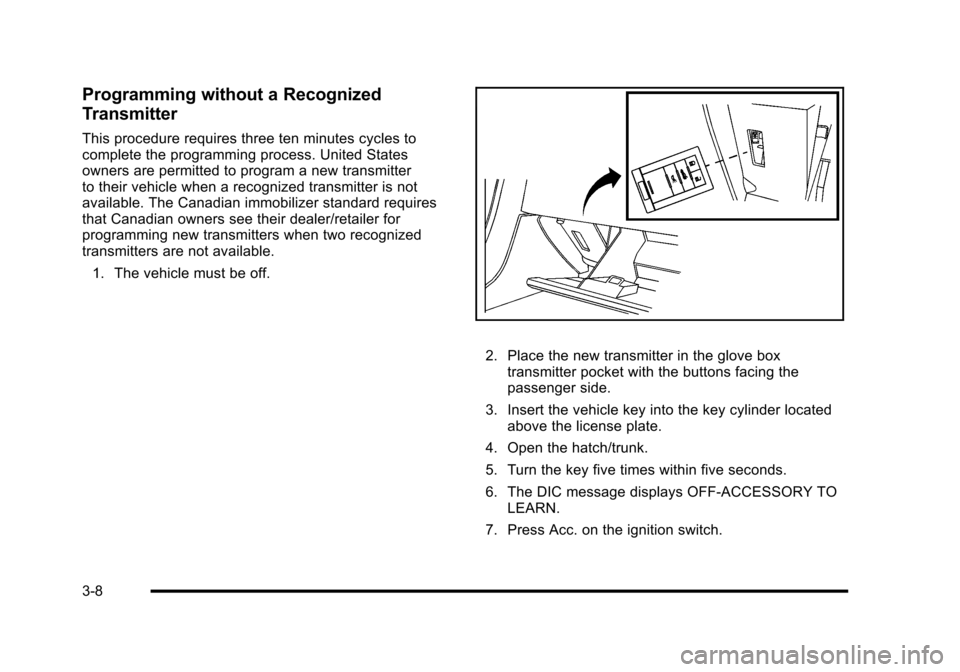
2. Place the new transmitter in the glove box transmitter pocket with the buttons facing the
passenger side.
3. Insert the vehicle key into the key cylinder located above the license plate.
4. Open the hatch/trunk.
5. Turn the key five times within five seconds.
6. The DIC message displays OFF-ACCESSORY TO LEARN.
7. Press Acc. on the ignition switch.
3-8
Page 105 of 472
8. The DIC reads WAIT 10 MINUTES and counts down to zero.
9. The DIC displays OFF-ACCESSORY TO LEARN again.
10. Press Acc. on the ignition switch. 11. Steps 8, 9 and 10 will be repeated two more times.
12. A beep sounds and the DIC reads READY FOR FOB #1. All previously known transmitter
programming has been erased.
13. A beep sounds once programming in complete. The DIC displays READY FOR FOB #2.
To program additional transmitters, take transmitter
1 out of the transmitter pocket and place
transmitter 2 in the pocket. Up to four transmitters
can be programmed. The DIC then displays
MAXIMUM NUMBER OF FOBS LEARNED
and exits the programming mode.
Press Acc. on the ignition switch to complete the
process. 14. Press Acc. on the ignition switch if programming is
complete.
15. Press
Kon each newly programmed transmitter to
complete the process.
Starting the Vehicle with a Low
Transmitter Battery
If the transmitter battery is weak, the DIC may display
NO FOBS DETECTED when trying to start the vehicle.
To start the vehicle, place the transmitter in the glove
box transmitter pocket with the buttons facing the
passenger side. Then, with the vehicle in P (Park)
for an automatic transmission, press the brake pedal
and
/. If the vehicle has a manual transmission, press
the clutch and
/. Replace the transmitter battery as
soon as possible. Change the transmitter battery if the
DIC displays FOB BATTERY LOW.
3-9
Page 106 of 472
Battery Replacement
Notice:When replacing the battery, do not touch
any of the circuitry on the transmitter. Static from
your body could damage the transmitter.
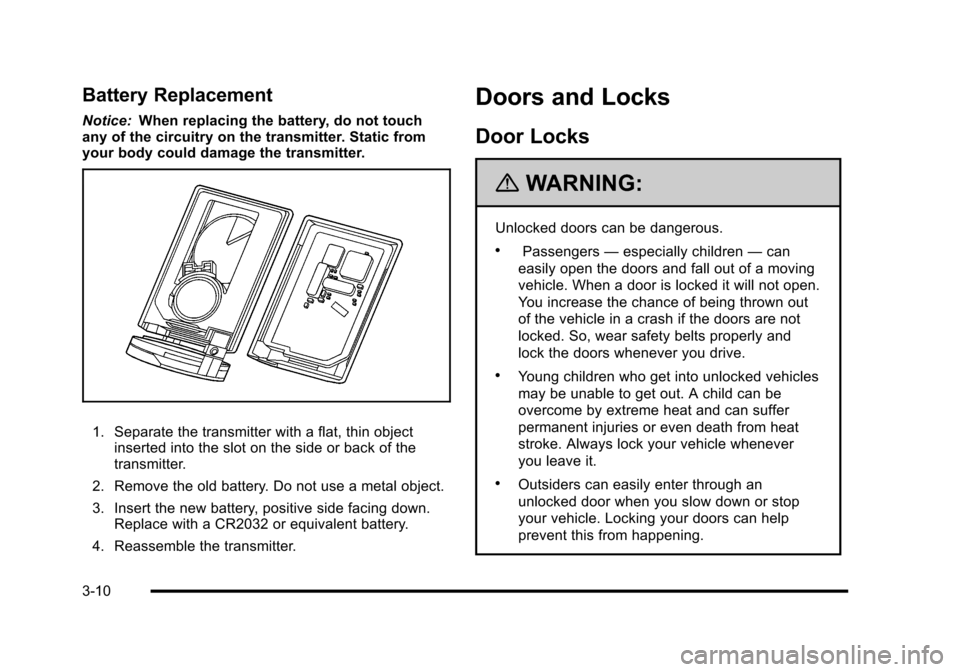
1. Separate the transmitter with a flat, thin object inserted into the slot on the side or back of the
transmitter.
2. Remove the old battery. Do not use a metal object.
3. Insert the new battery, positive side facing down. Replace with a CR2032 or equivalent battery.
4. Reassemble the transmitter.
Doors and Locks
Door Locks
{WARNING:
Unlocked doors can be dangerous.
.Passengers —especially children —can
easily open the doors and fall out of a moving
vehicle. When a door is locked it will not open.
You increase the chance of being thrown out
of the vehicle in a crash if the doors are not
locked. So, wear safety belts properly and
lock the doors whenever you drive.
.Young children who get into unlocked vehicles
may be unable to get out. A child can be
overcome by extreme heat and can suffer
permanent injuries or even death from heat
stroke. Always lock your vehicle whenever
you leave it.
.Outsiders can easily enter through an
unlocked door when you slow down or stop
your vehicle. Locking your doors can help
prevent this from happening.
3-10
Page 107 of 472
There are several ways to lock and unlock your vehicle.
From the outside, press the lock or unlock button on the
keyless access transmitter.
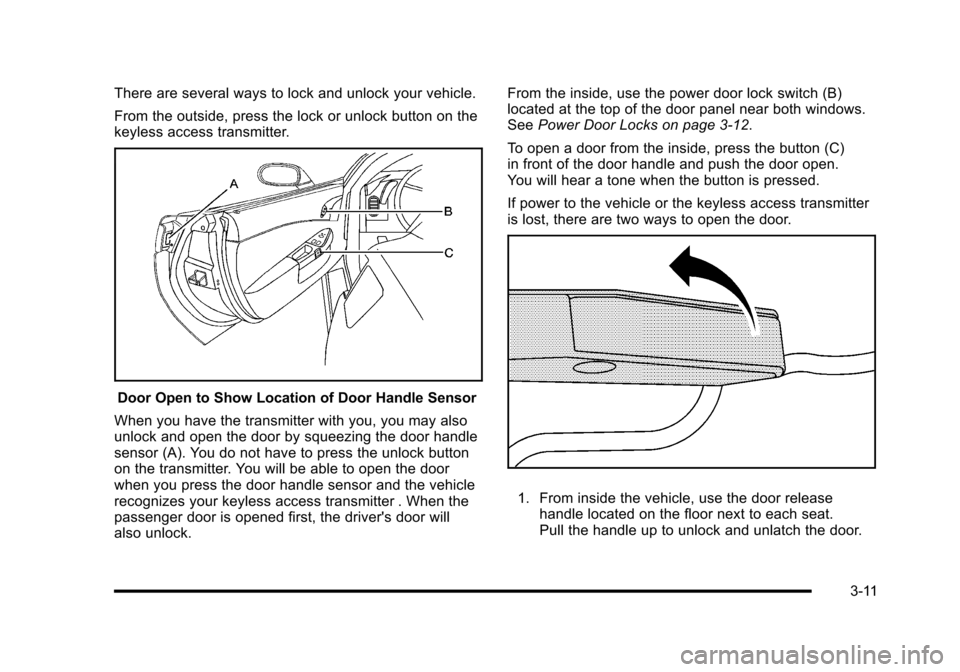
Door Open to Show Location of Door Handle Sensor
When you have the transmitter with you, you may also
unlock and open the door by squeezing the door handle
sensor (A). You do not have to press the unlock button
on the transmitter. You will be able to open the door
when you press the door handle sensor and the vehicle
recognizes your keyless access transmitter . When the
passenger door is opened first, the driver's door will
also unlock. From the inside, use the power door lock switch (B)
located at the top of the door panel near both windows.
See
Power Door Locks on page 3‑12.
To open a door from the inside, press the button (C)
in front of the door handle and push the door open.
You will hear a tone when the button is pressed.
If power to the vehicle or the keyless access transmitter
is lost, there are two ways to open the door.
1. From inside the vehicle, use the door release handle located on the floor next to each seat.
Pull the handle up to unlock and unlatch the door.
3-11
Page 108 of 472
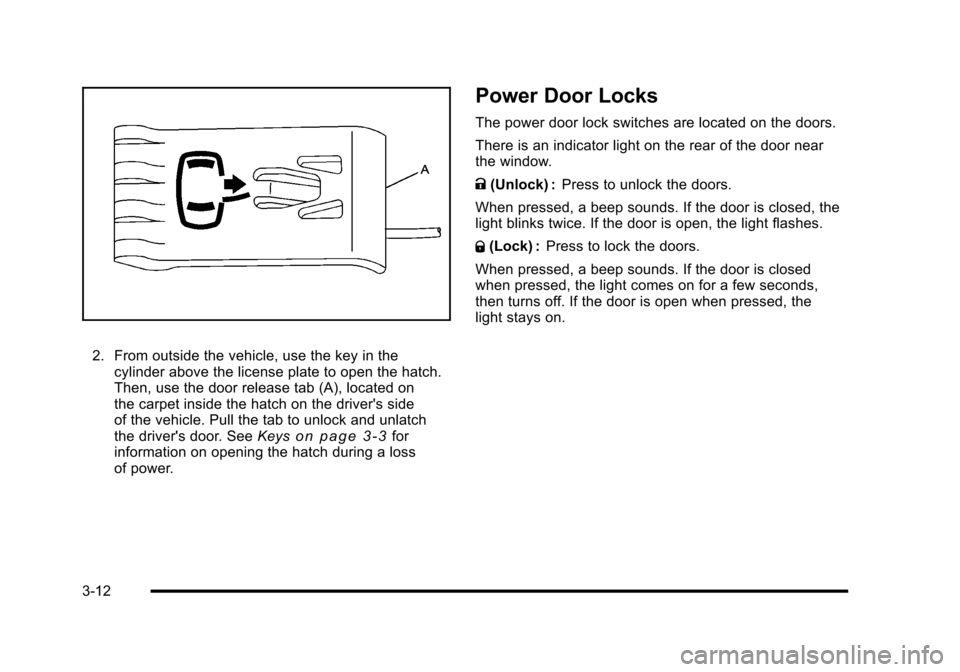
2. From outside the vehicle, use the key in the cylinder above the license plate to open the hatch.
Then, use the door release tab (A), located on
the carpet inside the hatch on the driver's side
of the vehicle. Pull the tab to unlock and unlatch
the driver's door. See Keys
on page 3‑3for
information on opening the hatch during a loss
of power.
Power Door Locks
The power door lock switches are located on the doors.
There is an indicator light on the rear of the door near
the window.
K (Unlock) : Press to unlock the doors.
When pressed, a beep sounds. If the door is closed, the
light blinks twice. If the door is open, the light flashes.
Q (Lock) : Press to lock the doors.
When pressed, a beep sounds. If the door is closed
when pressed, the light comes on for a few seconds,
then turns off. If the door is open when pressed, the
light stays on.
3-12
Page 109 of 472
Automatic Door Lock
The vehicle is programmed so that, when the doors are
closed, the ignition is on and the shift lever is moved
out of P (Park)for automatic transmissions, or when
vehicle speed becomes faster than 8 mph (13 km/h)
for manual transmissions, both doors will lock.
Use the power door unlock switch to unlock the door
when the vehicle is not in P (Park). When the door is
closed again, the doors will lock either when your foot is
removed from the brake or the vehicle speed becomes
faster than 8 mph (13 km/h).
Programmable Automatic Door
Unlock
The vehicle is programmed so that when the shift lever
is moved into P (Park) for automatic transmission
vehicles or when the ignition is turned OFF or is
in Retained Accessory Power (RAP) for manual
transmission vehicles, both doors will unlock. With the vehicle stopped and the engine running, door
unlocking can be programmed through the Driver
Information Center (DIC). This allows the driver to
choose various unlock settings. For programming
information, see
DIC Vehicle Personalization
on
page 4‑71.
Lockout Protection
Your vehicle can be programmed to sound the horn
three times and unlock the driver door when both doors
are closed and there is a keyless access transmitter
inside the vehicle. When the driver door is opened, a
reminder chime will sound continuously. The vehicle will
remain locked only when at least one transmitter has
been removed from the vehicle and both doors are
closed. See DIC Vehicle Personalization on page 4‑71.
3-13
Page 110 of 472
Hatch
{WARNING:
Exhaust gases can enter the vehicle if it is driven
with the liftgate, trunk/hatch open, or with any
objects that pass through the seal between the
body and the trunk/hatch or liftgate. Engine
exhaust contains Carbon Monoxide (CO) which
cannot be seen or smelled. It can cause
unconsciousness and even death.
If the vehicle must be driven with the liftgate,
or trunk/hatch open:
.Close all of the windows.
.Fully open the air outlets on or under the
instrument panel. (Continued)
WARNING: (Continued)
.Adjust the Climate Control system to a setting
that brings in only outside air and set the fan
speed to the highest setting. See Climate
Control System in the Index.
.If the vehicle is equipped with a power liftgate,
disable the power liftgate function.
For more information about carbon monoxide, see
Engine Exhaust on page 3‑37.
Notice: Closing the hatch/trunk lid forcefully or
from the sides can cause damage to the glass, the
defogger or the weather stripping. Be sure objects
will fit in the hatch/trunk area before closing the
hatch/trunk lid. When closing the hatch/trunk lid,
gently pull down from the center.
Notice: Do not store heavy or sharp objects in
the rear storage compartments located in the
hatch/trunk area. The objects could damage the
underbody.
3-14