automatic CHEVROLET CORVETTE 2012 6.G Owners Manual
[x] Cancel search | Manufacturer: CHEVROLET, Model Year: 2012, Model line: CORVETTE, Model: CHEVROLET CORVETTE 2012 6.GPages: 434, PDF Size: 6.96 MB
Page 315 of 434
Black plate (41,1)Chevrolet Corvette Owner Manual - 2012
Vehicle Care 10-41
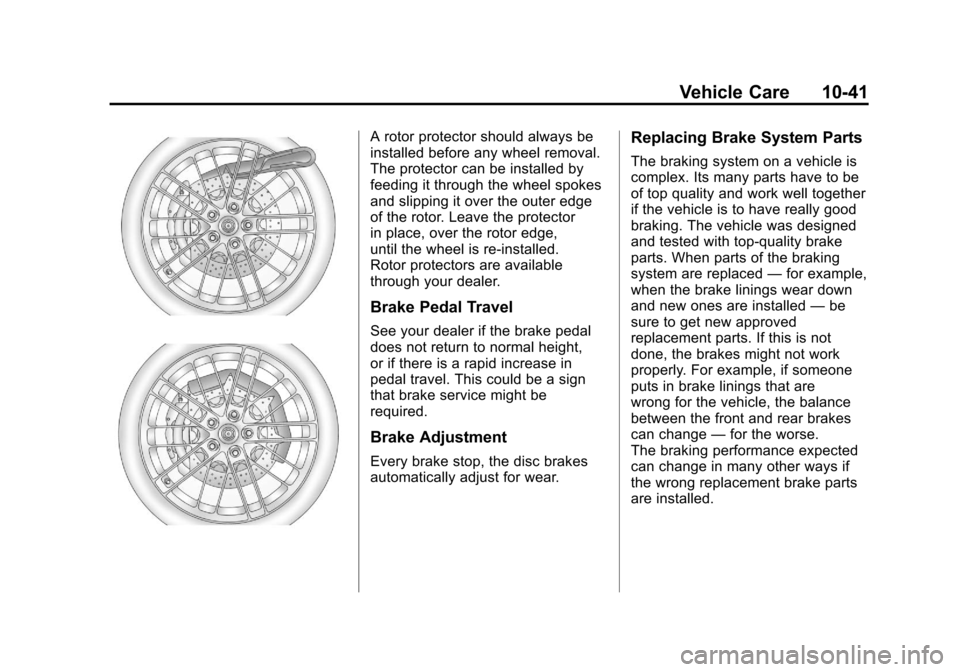
A rotor protector should always be
installed before any wheel removal.
The protector can be installed by
feeding it through the wheel spokes
and slipping it over the outer edge
of the rotor. Leave the protector
in place, over the rotor edge,
until the wheel is re‐installed.
Rotor protectors are available
through your dealer.
Brake Pedal Travel
See your dealer if the brake pedal
does not return to normal height,
or if there is a rapid increase in
pedal travel. This could be a sign
that brake service might be
required.
Brake Adjustment
Every brake stop, the disc brakes
automatically adjust for wear.
Replacing Brake System Parts
The braking system on a vehicle is
complex. Its many parts have to be
of top quality and work well together
if the vehicle is to have really good
braking. The vehicle was designed
and tested with top-quality brake
parts. When parts of the braking
system are replaced—for example,
when the brake linings wear down
and new ones are installed —be
sure to get new approved
replacement parts. If this is not
done, the brakes might not work
properly. For example, if someone
puts in brake linings that are
wrong for the vehicle, the balance
between the front and rear brakes
can change —for the worse.
The braking performance expected
can change in many other ways if
the wrong replacement brake parts
are installed.
Page 319 of 434
Black plate (45,1)Chevrolet Corvette Owner Manual - 2012
Vehicle Care 10-45
If the level is below the bottom of
the fill plug hole, some lubricant will
need to be added. Add enough
lubricant to raise the level to the
bottom of the fill plug hole.
What to Use
To add lubricant when the level is
low or to completely refill after
draining, seeRecommended Fluids
and Lubricants on page 11‑12.
Then fill to the bottom of the fill plug
hole with the required lubricant.
Starter Switch Check
{WARNING
When you are doing this
inspection, the vehicle could
move suddenly. If the vehicle
moves, you or others could be
injured.
1. Before starting this check, be sure there is enough room
around the vehicle.
2. Firmly apply both the parking brake and the regular brake.
See Parking Brake on
page 9‑36.
Do not use the accelerator
pedal, and be ready to turn off
the engine immediately if it
starts. 3. For automatic transmission
vehicles, try to start the engine
in each gear. The vehicle
should start only in P (Park) or
N (Neutral). If the vehicle starts
in any other position, contact
your dealer for service.
For manual transmission
vehicles, put the shift lever in
Neutral, push the clutch pedal
down halfway, and try to start
the engine. The vehicle should
start only when the clutch pedal
is pushed down all the way to
the floor. If the vehicle starts
when the clutch pedal is not
pushed all the way down,
contact your dealer for service.
Page 320 of 434
Black plate (46,1)Chevrolet Corvette Owner Manual - 2012
10-46 Vehicle Care
Automatic Transmission
Shift Lock Control
Function Check
{WARNING
When you are doing this
inspection, the vehicle could
move suddenly. If the vehicle
moves, you or others could be
injured.
1. Before starting this check, be sure there is enough room
around the vehicle. It should be
parked on a level surface.
2. Firmly apply the parking brake. See Parking Brake on
page 9‑36.
Be ready to apply the regular
brake immediately if the vehicle
begins to move. 3. With the engine off, turn the
ignition on, but do not start the
engine. Without applying the
regular brake, try to move the
shift lever out of P (Park) with
normal effort. If the shift lever
moves out of P (Park), contact
your dealer for service.
Park Brake and P (Park)
Mechanism Check
{WARNING
When you are doing this check,
the vehicle could begin to move.
You or others could be injured
and property could be damaged.
Make sure there is room in front
of the vehicle in case it begins to
roll. Be ready to apply the regular
brake at once should the vehicle
begin to move. Park on a fairly steep hill, with the
vehicle facing downhill. Keeping
your foot on the regular brake,
set the parking brake.
.To check the parking brake's
holding ability: With the engine
running and the transmission in
N (Neutral), slowly remove foot
pressure from the regular brake
pedal. Do this until the vehicle is
held by the parking brake only.
.To check the P (Park)
mechanism's holding ability:
With the engine running, shift to
P (Park). Then release the
parking brake followed by the
regular brake.
Contact your dealer if service is
required.
Page 330 of 434
Black plate (56,1)Chevrolet Corvette Owner Manual - 2012
10-56 Vehicle Care
FusesUsage
BTSI
SOL/STR
WHL LCK Brake
Transmission
Shift Interlock,
Steering Wheel
Column Lock
CLSTR/HUD Cluster,
Heads‐Up
Display
CRUISE
SWTCH Cruise Control
Switch
CTSY/LAMP Courtesy Lamp
DR LCK Door Locks
DRIV DR
SWITCH Driver Door
Switch
ECM Engine Control
Module (ECM)
EXH MDL Exhaust Module
(Z06 & ZR1),
Spare (Coupe
and Convertible)
GM LAN
RUN/CRNK GM LAN Devices Fuses
Usage
HTD SEAT/
WPR RLY Heated Seat,
Wiper Relays
HVAC/
PWR SND Heating
Ventilation/Air
Conditioning,
Power Sounder
IGN SWTCH/
INTR SNSR Ignition Switch,
Intrusion Sensor
ISRVM/HVAC Electric Inside
Rearview
Mirror, Heating,
Ventilation, Air
Conditioning
ONSTAR OnStar
(if equipped)
RDO/S‐BAND Radio, S‐Band
REAR FOG/
ALDL/TOP
SWTCH Rear Fog Lamp,
Assembly Line
Diagnostic Link
Connector,
Convertible Top
Switch Fuses
Usage
REVERSE
LAMPS Reverse Lamps
RUN CRNK Run/Crank Relay
SDM/AOS
SWTCH
AIRBAG Sensing and
Diagnostic
Module,
Automatic
Occupant
Sensing Module,
Airbag
SPARE Spare
SPARE Spare
SPARE Spare
SPARE Spare
STOP LAMP Stop Lamp
SWC DM Steering Wheel
Dimming
Page 337 of 434
Black plate (63,1)Chevrolet Corvette Owner Manual - 2012
Vehicle Care 10-63
Tire Designations
Tire Size
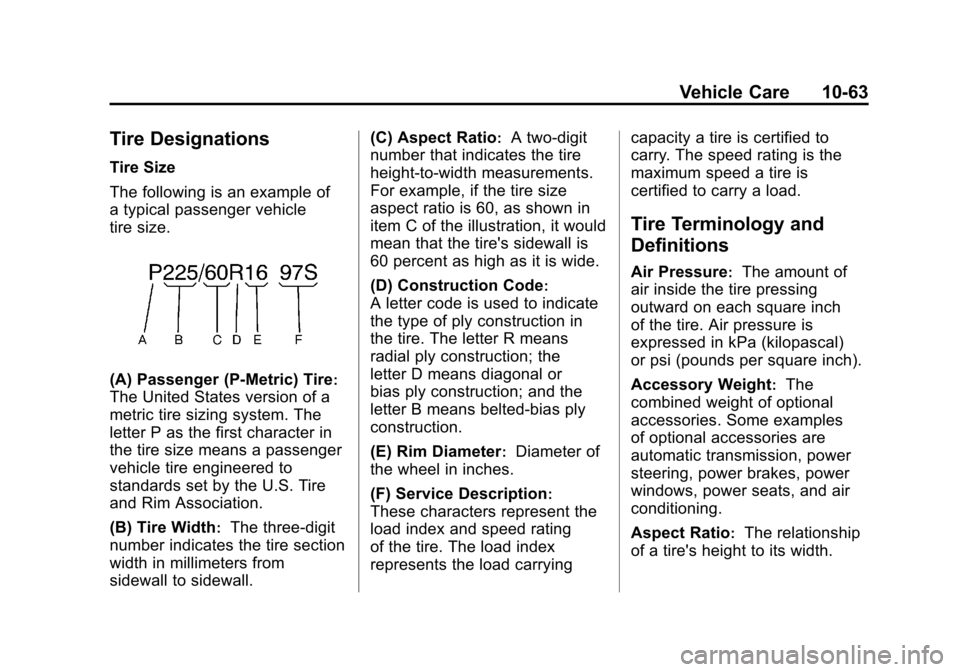
The following is an example of
a typical passenger vehicle
tire size.
(A) Passenger (P‐Metric) Tire:
The United States version of a
metric tire sizing system. The
letter P as the first character in
the tire size means a passenger
vehicle tire engineered to
standards set by the U.S. Tire
and Rim Association.
(B) Tire Width
:The three‐digit
number indicates the tire section
width in millimeters from
sidewall to sidewall. (C) Aspect Ratio
:A two‐digit
number that indicates the tire
height‐to‐width measurements.
For example, if the tire size
aspect ratio is 60, as shown in
item C of the illustration, it would
mean that the tire's sidewall is
60 percent as high as it is wide.
(D) Construction Code
:
A letter code is used to indicate
the type of ply construction in
the tire. The letter R means
radial ply construction; the
letter D means diagonal or
bias ply construction; and the
letter B means belted‐bias ply
construction.
(E) Rim Diameter
:Diameter of
the wheel in inches.
(F) Service Description
:
These characters represent the
load index and speed rating
of the tire. The load index
represents the load carrying capacity a tire is certified to
carry. The speed rating is the
maximum speed a tire is
certified to carry a load.
Tire Terminology and
Definitions
Air Pressure:The amount of
air inside the tire pressing
outward on each square inch
of the tire. Air pressure is
expressed in kPa (kilopascal)
or psi (pounds per square inch).
Accessory Weight
:The
combined weight of optional
accessories. Some examples
of optional accessories are
automatic transmission, power
steering, power brakes, power
windows, power seats, and air
conditioning.
Aspect Ratio
:The relationship
of a tire's height to its width.
Page 356 of 434
Black plate (82,1)Chevrolet Corvette Owner Manual - 2012
10-82 Vehicle Care
Jump Starting
For more information about the
vehicle battery, seeBattery on
page 10‑43.
If your battery has run down, you
may want to use another vehicle
and some jumper cables to start
your vehicle. Be sure to use the
following steps to do it safely.
{WARNING
Batteries can hurt you. They can
be dangerous because:
.They contain acid that can
burn you.
.They contain gas that can
explode or ignite.
.They contain enough
electricity to burn you.
If you do not follow these steps
exactly, some or all of these
things can hurt you. Notice:
If you try to start your
vehicle by pushing or pulling it,
you could damage your vehicle.
Do not push or pull your vehicle
to start it; instead, use the jump
starting procedure in this manual
to start your vehicle when the
battery has run down.
1. Check the other vehicle. It must
have a 12-volt battery with a
negative ground system.
Notice: Only use a vehicle that
has a 12-volt system with a
negative ground for jump
starting. If the other vehicle does
not have a 12-volt system with a
negative ground, both vehicles
can be damaged.
2. Get the vehicles close enough so the jumper cables can reach,
but be sure the vehicles are not
touching each other. If they are,
it could cause a ground
connection you do not want.
You would not be able to start
your vehicle, and the bad
grounding could damage the
electrical systems. To avoid the possibility of the
vehicles rolling, set the parking
brake firmly on both vehicles
involved in the jump start
procedure. Put an automatic
transmission in P (Park) or a
manual transmission in Neutral
before setting the parking
brakes.
Notice: If the radio or other
accessories are left on during the
jump starting procedure, they
could be damaged. The repairs
would not be covered by the
warranty. Always turn off the
radio and other accessories when
jump starting the vehicle.
3. Turn off the ignition on both vehicles. Unplug unnecessary
accessories plugged into the
cigarette lighter or the accessory
power outlet. Turn off the radio
and all lamps that are not
needed. This will avoid sparks
and help save both batteries.
And it could save the radio!
Page 361 of 434

Black plate (87,1)Chevrolet Corvette Owner Manual - 2012
Vehicle Care 10-87
Notice:Avoid using high
pressure washes closer than
30 cm (12 in) to the surface of the
vehicle. Use of power washers
exceeding 8,274 kPa (1,200 psi)
can result in damage or removal
of paint and decals.
Rinse the vehicle well, before
washing and after, to remove all
cleaning agents completely. If they
are allowed to dry on the surface,
they could stain.
Dry the finish with a soft, clean
chamois or an all-cotton towel to
avoid surface scratches and water
spotting.
Finish Care
Occasional hand waxing or mild
polishing of the vehicle should be
done to remove residue from the
paint finish. See your dealer for
approved cleaning products. Notice:
Machine compounding or
aggressive polishing on a
basecoat/clearcoat paint finish
may damage it. Use only
non-abrasive waxes and polishes
that are made for a basecoat/
clearcoat paint finish on the
vehicle.
Foreign materials such as calcium
chloride and other salts, ice melting
agents, road oil and tar, tree sap,
bird droppings, chemicals from
industrial chimneys, etc., can
damage the vehicle's finish if
they remain on painted surfaces.
Wash the vehicle as soon as
possible. If necessary, use
non-abrasive cleaners that are
marked safe for painted surfaces
to remove foreign matter.
To keep the paint finish looking
new, keep the vehicle garaged or
covered whenever possible. Protecting Exterior Bright
Metal Parts
Regularly clean bright metal parts
with water or chrome polish on
chrome or stainless steel trim,
if necessary.
For aluminum, never use auto or
chrome polish, steam, or caustic
soap to clean. A coating of wax,
rubbed to high polish, is
recommended for all bright metal
parts.
Convertible Top Care
Frequently hand wash convertible
tops with mild car wash soap.
Never use a stiff brush, steam,
bleach, or aggressive cleaners.
If necessary, a soft brush can be
used to remove dirt. When finished
cleaning, thoroughly rinse the fabric.
Avoid automatic car washes with
overhead brushes or very high
pressure sprays as they can cause
damage and leaking.
Page 363 of 434
Black plate (89,1)Chevrolet Corvette Owner Manual - 2012
Vehicle Care 10-89
Keep the wheels clean using a soft,
clean cloth with mild soap and
water. Rinse with clean water.
After rinsing thoroughly, dry with a
soft, clean towel. A wax may then
be applied.
Notice:Chrome wheels and other
chrome trim may be damaged if
the vehicle is not washed after
driving on roads that have been
sprayed with magnesium,
calcium, or sodium chloride.
These chlorides are used on
roads for conditions such as ice
and dust. Always wash the
chrome with soap and water after
exposure.
Notice: To avoid surface damage,
do not use strong soaps,
chemicals, abrasive polishes,
cleaners, brushes, or cleaners
that contain acid on aluminum or
chrome-plated wheels. Use only
approved cleaners. Also, never
drive a vehicle with aluminum or
chrome-plated wheels through an automatic car wash that uses
silicone carbide tire cleaning
brushes. Damage could occur
and the repairs would not be
covered by the vehicle warranty.
Steering, Suspension, and
Chassis Components
Visually inspect front and rear
suspension and steering system for
damaged, loose, or missing parts or
signs of wear. Inspect power
steering lines and hoses for proper
hook-up, binding, leaks, cracks,
chafing, etc. Visually check constant
velocity joints, rubber boots, and
axle seals for leaks.
Body Component Lubrication
Lubricate all key lock cylinders,
hood hinges, liftgate hinges, and
steel fuel door hinge unless the
components are plastic. Applying
silicone grease on weatherstrips
with a clean cloth will make them
last longer, seal better, and not stick
or squeak.
Underbody Maintenance
Use plain water to flush dirt and
debris from the vehicle's underbody.
Your dealer or an underbody car
washing system can do this. If not
removed, rust and corrosion can
develop.
Fiberglass Springs
(Composite Springs)
Notice:
Do not use acidic or
corrosive cleaning products,
engine degreasers, or aluminum
cleaning agents on fiberglass
springs as it may cause damage.
The repairs would not be
covered by the vehicle's warranty.
Use only approved cleaners.
Sheet Metal Damage
If the vehicle is damaged and
requires sheet metal repair or
replacement, make sure the body
repair shop applies anti-corrosion
material to parts repaired or
replaced to restore corrosion
protection.
Page 372 of 434
Black plate (4,1)Chevrolet Corvette Owner Manual - 2012
11-4 Service and Maintenance
.Check tire inflation pressures.
SeeTire Pressure on
page 10‑66.
.Inspect tire wear. See Tire
Inspection on page 10‑72.
.Visually check for fluid leaks.
.Inspect engine air cleaner filter.
See Engine Air Cleaner/Filter on
page 10‑25.
.Inspect brake system.
.Visually inspect steering,
suspension, and chassis
components for damaged, loose,
or missing parts or signs of
wear. See Exterior Care on
page 10‑86.
.Check restraint system
components. See Safety System
Check on page 3‑14.
.Visually inspect fuel system for
damage or leaks.
.Visually inspect exhaust system
and nearby heat shields for
loose or damaged parts.
.Lubricate body components. See
Exterior Care on page 10‑86.
.Check starter switch. See Starter
Switch Check on page 10‑45.
.Check automatic transmission
shift lock control function. See
Automatic Transmission Shift
Lock Control Function Check on
page 10‑46.
.Check parking brake and
automatic transmission park
mechanism. See Park Brake and
P (Park) Mechanism Check on
page 10‑46.
.Check accelerator pedal for
damage, high effort, or binding.
Replace if needed.
.Visually inspect gas strut for
signs of wear, cracks, or other
damage. Check the hold open
ability of the strut. See your
dealer if service is required.
Page 381 of 434
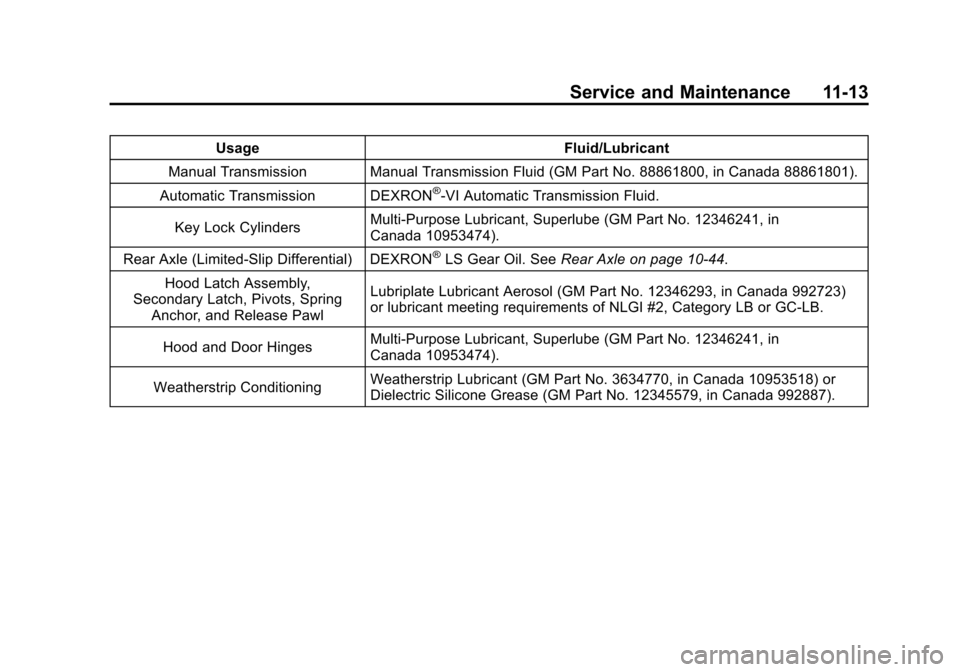
Black plate (13,1)Chevrolet Corvette Owner Manual - 2012
Service and Maintenance 11-13
UsageFluid/Lubricant
Manual Transmission Manual Transmission Fluid (GM Part No. 88861800, in Canada 88861801).
Automatic Transmission DEXRON
®-VI Automatic Transmission Fluid.
Key Lock Cylinders Multi-Purpose Lubricant, Superlube (GM Part No. 12346241, in
Canada 10953474).
Rear Axle (Limited-Slip Differential) DEXRON
®LS Gear Oil. See Rear Axle on page 10‑44.
Hood Latch Assembly,
Secondary Latch, Pivots, Spring Anchor, and Release Pawl Lubriplate Lubricant Aerosol (GM Part No. 12346293, in Canada 992723)
or lubricant meeting requirements of NLGI #2, Category LB or GC-LB.
Hood and Door Hinges Multi-Purpose Lubricant, Superlube (GM Part No. 12346241, in
Canada 10953474).
Weatherstrip Conditioning Weatherstrip Lubricant (GM Part No. 3634770, in Canada 10953518) or
Dielectric Silicone Grease (GM Part No. 12345579, in Canada 992887).