air CHEVROLET CORVETTE 2015 7.G Owners Manual
[x] Cancel search | Manufacturer: CHEVROLET, Model Year: 2015, Model line: CORVETTE, Model: CHEVROLET CORVETTE 2015 7.GPages: 393, PDF Size: 5.4 MB
Page 313 of 393
Black plate (74,1)Chevrolet Corvette Owner Manual (GMNA-Localizing-U.S./Canada/Mexico-
7576293) - 2015 - crc - 10/31/14
10-74 Vehicle Care
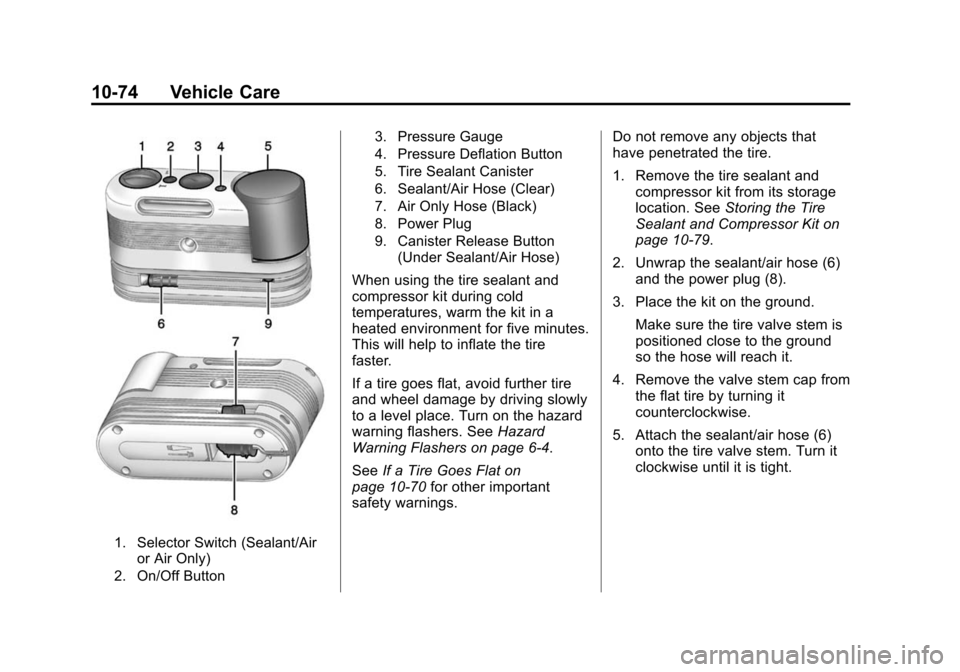
1. Selector Switch (Sealant/Airor Air Only)
2. On/Off Button 3. Pressure Gauge
4. Pressure Deflation Button
5. Tire Sealant Canister
6. Sealant/Air Hose (Clear)
7. Air Only Hose (Black)
8. Power Plug
9. Canister Release Button
(Under Sealant/Air Hose)
When using the tire sealant and
compressor kit during cold
temperatures, warm the kit in a
heated environment for five minutes.
This will help to inflate the tire
faster.
If a tire goes flat, avoid further tire
and wheel damage by driving slowly
to a level place. Turn on the hazard
warning flashers. See Hazard
Warning Flashers on page 6-4.
See If a Tire Goes Flat on
page 10-70 for other important
safety warnings. Do not remove any objects that
have penetrated the tire.
1. Remove the tire sealant and
compressor kit from its storage
location. See Storing the Tire
Sealant and Compressor Kit on
page 10-79.
2. Unwrap the sealant/air hose (6) and the power plug (8).
3. Place the kit on the ground. Make sure the tire valve stem is
positioned close to the ground
so the hose will reach it.
4. Remove the valve stem cap from the flat tire by turning it
counterclockwise.
5. Attach the sealant/air hose (6) onto the tire valve stem. Turn it
clockwise until it is tight.
Page 314 of 393

Black plate (75,1)Chevrolet Corvette Owner Manual (GMNA-Localizing-U.S./Canada/Mexico-
7576293) - 2015 - crc - 10/31/14
Vehicle Care 10-75
6. Plug the power plug (8) into theaccessory power outlet in the
vehicle. Unplug all items from
other accessory power outlets.
See Power Outlets on page 5-4.
If the vehicle has an accessory
power outlet, do not use the
cigarette lighter.
If the vehicle only has a cigarette
lighter, use the cigarette lighter.
Do not pinch the power plug
cord in the door or window.
7. Start the vehicle. The vehicle must be running while using the
air compressor.
8. Press and turn the selector switch (1) counterclockwise to
the Sealant + Air position. 9. Press the on/off button (2) to
turn the tire sealant and
compressor kit on.
The compressor will inject
sealant and air into the tire.
The pressure gauge (3) will
initially show a high pressure
while the compressor pushes the
sealant into the tire. Once the
sealant is completely dispersed
into the tire, the pressure will
quickly drop and start to rise
again as the tire inflates with
air only.
10. Inflate the tire to the recommended inflation
pressure using the pressure
gauge (3). The recommended
inflation pressure can be found
on the Tire and Loading
Information label. See Tire
Pressure on page 10-57. The pressure gauge (3) may
read higher than the actual tire
pressure while the compressor
is on. Turn the compressor off
to get an accurate reading. The
compressor may be turned on/
off until the correct pressure is
reached.
{Caution
If the recommended pressure
cannot be reached after
approximately 25 minutes, the
vehicle should not be driven
farther. The tire is too severely
damaged and the tire sealant and
compressor kit cannot inflate the
tire. Remove the power plug from
the accessory power outlet and
unscrew the inflating hose from
the tire valve. See
Roadside
Assistance Program on
page 13-5.
Page 315 of 393

Black plate (76,1)Chevrolet Corvette Owner Manual (GMNA-Localizing-U.S./Canada/Mexico-
7576293) - 2015 - crc - 10/31/14
10-76 Vehicle Care
11. Press the on/off button (2) toturn the tire sealant and
compressor kit off.
The tire is not sealed and will
continue to leak air until the
vehicle is driven and the
sealant is distributed in the tire,
therefore, Steps 12–18 must be
done immediately after
Step 11.
Be careful while handling the
tire sealant and compressor kit
as it could be warm after
usage.
12. Unplug the power plug (8) from the accessory power outlet in
the vehicle.
13. Turn the sealant/air hose (6) counterclockwise to remove it
from the tire valve stem.
14. Replace the tire valve stem cap.
15. Replace the sealant/air hose (6), and the power plug (8)
back in their original location.
16. If the flat tire was able to inflate
to the recommended inflation
pressure, remove the
maximum speed label from the
sealant canister (5) and place it
in a highly visible location. Do
not exceed the speed on this
label until the damaged tire is
repaired or replaced.
17. Return the equipment to its original storage location in the
vehicle.
18. Immediately drive the vehicle 8 km (5 mi) to distribute the
sealant in the tire. 19. Stop at a safe location and
check the tire pressure. Refer
to Steps 1–11 under “Using the
Tire Sealant and Compressor
Kit without Sealant to Inflate a
Tire (Not Punctured).”
If the tire pressure has fallen
more than 68 kPa (10 psi)
below the recommended
inflation pressure, stop driving
the vehicle. The tire is too
severely damaged and the tire
sealant cannot seal the tire.
See Roadside Assistance
Program on page 13-5.
If the tire pressure has not
dropped more than 68 kPa
(10 psi) from the recommended
inflation pressure, inflate the
tire to the recommended
inflation pressure.
20. Wipe off any sealant from the wheel, tire, and vehicle.
Page 316 of 393
Black plate (77,1)Chevrolet Corvette Owner Manual (GMNA-Localizing-U.S./Canada/Mexico-
7576293) - 2015 - crc - 10/31/14
Vehicle Care 10-77
21. Dispose of the used sealantcanister (5) and sealant/air
hose (6) assembly at a local
dealer or in accordance with
local state codes and practices.
22. Replace with a new canister assembly available from your
dealer.
23. After temporarily sealing the tire using the tire sealant and
compressor kit, take the
vehicle to an authorized dealer
within 161 km (100 mi) of
driving to have the tire repaired
or replaced.Using the Tire Sealant and
Compressor Kit without
Sealant to Inflate a Tire (Not
Punctured)
To use the air compressor to inflate
a tire with air only and not sealant:
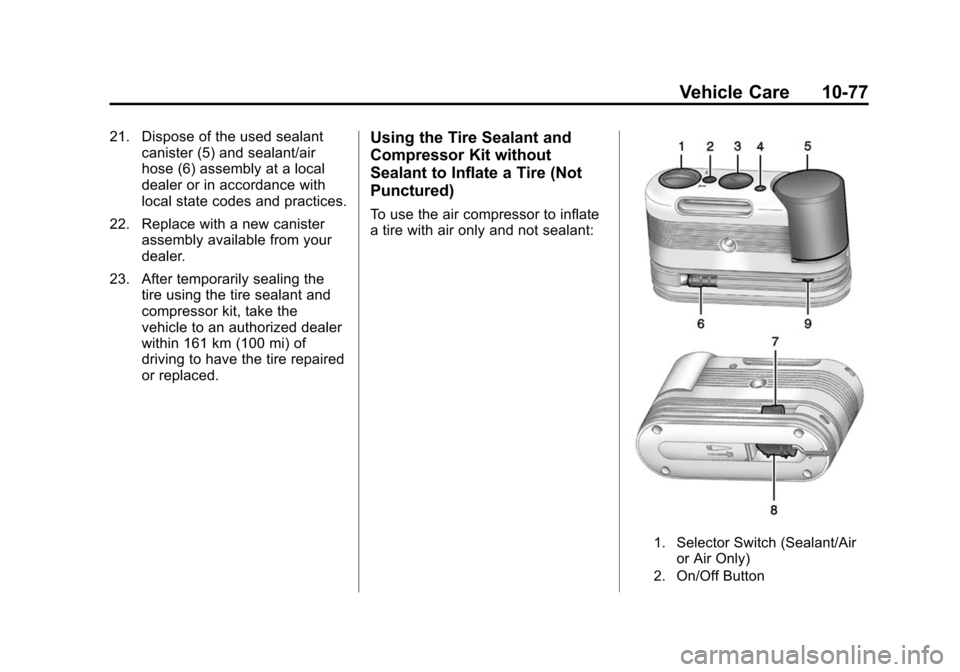
1. Selector Switch (Sealant/Air
or Air Only)
2. On/Off Button
Page 317 of 393
Black plate (78,1)Chevrolet Corvette Owner Manual (GMNA-Localizing-U.S./Canada/Mexico-
7576293) - 2015 - crc - 10/31/14
10-78 Vehicle Care
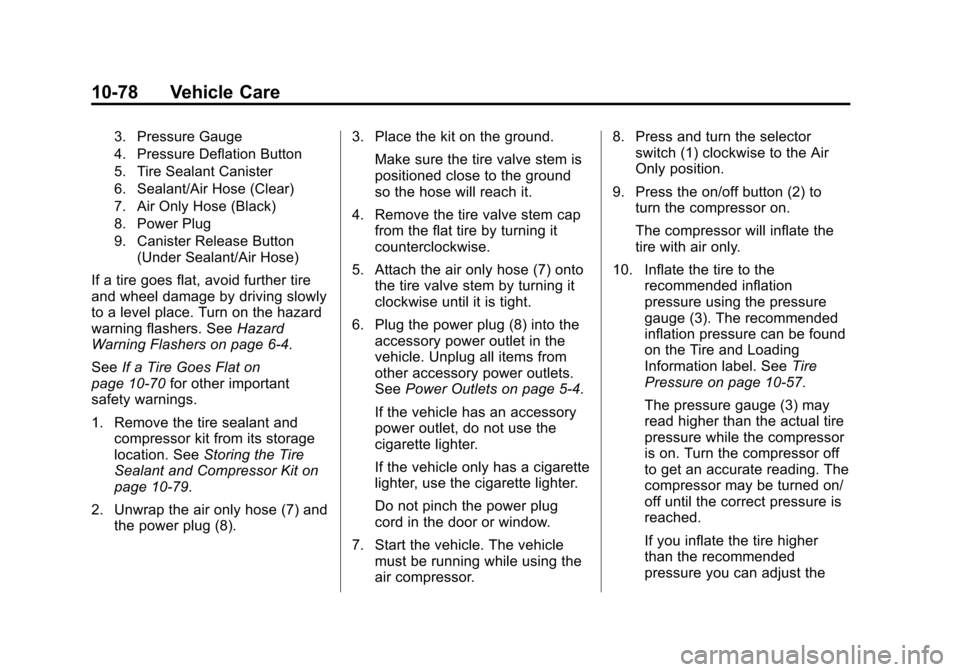
3. Pressure Gauge
4. Pressure Deflation Button
5. Tire Sealant Canister
6. Sealant/Air Hose (Clear)
7. Air Only Hose (Black)
8. Power Plug
9. Canister Release Button(Under Sealant/Air Hose)
If a tire goes flat, avoid further tire
and wheel damage by driving slowly
to a level place. Turn on the hazard
warning flashers. See Hazard
Warning Flashers on page 6-4.
See If a Tire Goes Flat on
page 10-70 for other important
safety warnings.
1. Remove the tire sealant and
compressor kit from its storage
location. See Storing the Tire
Sealant and Compressor Kit on
page 10-79.
2. Unwrap the air only hose (7) and the power plug (8). 3. Place the kit on the ground.
Make sure the tire valve stem is
positioned close to the ground
so the hose will reach it.
4. Remove the tire valve stem cap from the flat tire by turning it
counterclockwise.
5. Attach the air only hose (7) onto the tire valve stem by turning it
clockwise until it is tight.
6. Plug the power plug (8) into the accessory power outlet in the
vehicle. Unplug all items from
other accessory power outlets.
See Power Outlets on page 5-4.
If the vehicle has an accessory
power outlet, do not use the
cigarette lighter.
If the vehicle only has a cigarette
lighter, use the cigarette lighter.
Do not pinch the power plug
cord in the door or window.
7. Start the vehicle. The vehicle must be running while using the
air compressor. 8. Press and turn the selector
switch (1) clockwise to the Air
Only position.
9. Press the on/off button (2) to turn the compressor on.
The compressor will inflate the
tire with air only.
10. Inflate the tire to the recommended inflation
pressure using the pressure
gauge (3). The recommended
inflation pressure can be found
on the Tire and Loading
Information label. See Tire
Pressure on page 10-57.
The pressure gauge (3) may
read higher than the actual tire
pressure while the compressor
is on. Turn the compressor off
to get an accurate reading. The
compressor may be turned on/
off until the correct pressure is
reached.
If you inflate the tire higher
than the recommended
pressure you can adjust the
Page 318 of 393
Black plate (79,1)Chevrolet Corvette Owner Manual (GMNA-Localizing-U.S./Canada/Mexico-
7576293) - 2015 - crc - 10/31/14
Vehicle Care 10-79
excess pressure by pressing
the pressure deflation
button (4) until the proper
pressure reading is reached.
This option is only functional
when using the air only
hose (7).
11. Press the on/off button (2) to turn the tire sealant and
compressor kit off.
Be careful while handling the
tire sealant and compressor kit
as it could be warm after
usage.
12. Unplug the power plug (8) from the accessory power outlet in
the vehicle.
13. Disconnect the air only hose (7) from the tire valve stem, by
turning it counterclockwise, and
replace the tire valve stem cap.
14. Replace the air only hose (7) and the power plug (8) and
cord back in its original
location. 15. Place the equipment in the
original storage location in the
vehicle.
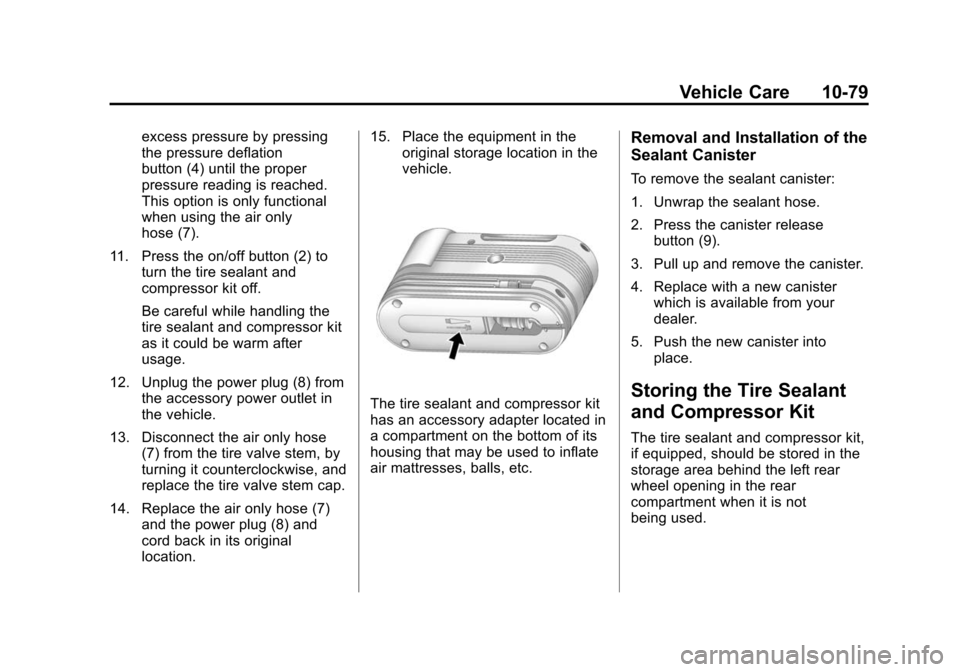
The tire sealant and compressor kit
has an accessory adapter located in
a compartment on the bottom of its
housing that may be used to inflate
air mattresses, balls, etc.
Removal and Installation of the
Sealant Canister
To remove the sealant canister:
1. Unwrap the sealant hose.
2. Press the canister releasebutton (9).
3. Pull up and remove the canister.
4. Replace with a new canister which is available from your
dealer.
5. Push the new canister into place.
Storing the Tire Sealant
and Compressor Kit
The tire sealant and compressor kit,
if equipped, should be stored in the
storage area behind the left rear
wheel opening in the rear
compartment when it is not
being used.
Page 320 of 393
Black plate (81,1)Chevrolet Corvette Owner Manual (GMNA-Localizing-U.S./Canada/Mexico-
7576293) - 2015 - crc - 10/31/14
Vehicle Care 10-81
The battery is under a battery cover
in the hatch/trunk area on the
passenger side under the carpet.
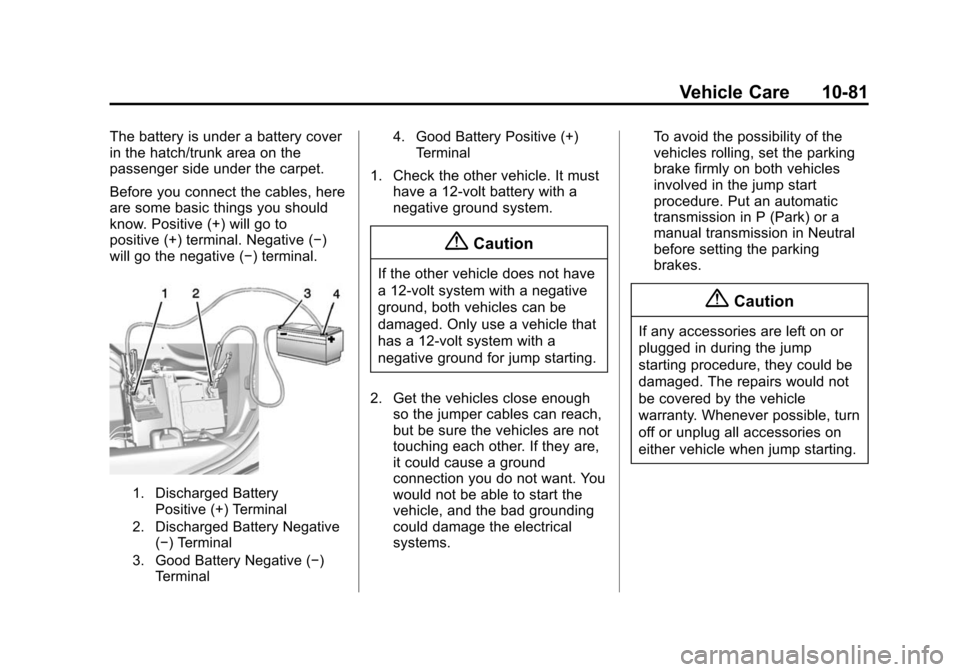
Before you connect the cables, here
are some basic things you should
know. Positive (+) will go to
positive (+) terminal. Negative (−)
will go the negative (−) terminal.
1. Discharged BatteryPositive (+) Terminal
2. Discharged Battery Negative (−) Terminal
3. Good Battery Negative (−) Terminal 4. Good Battery Positive (+)
Terminal
1. Check the other vehicle. It musthave a 12-volt battery with a
negative ground system.
{Caution
If the other vehicle does not have
a 12-volt system with a negative
ground, both vehicles can be
damaged. Only use a vehicle that
has a 12-volt system with a
negative ground for jump starting.
2. Get the vehicles close enough so the jumper cables can reach,
but be sure the vehicles are not
touching each other. If they are,
it could cause a ground
connection you do not want. You
would not be able to start the
vehicle, and the bad grounding
could damage the electrical
systems. To avoid the possibility of the
vehicles rolling, set the parking
brake firmly on both vehicles
involved in the jump start
procedure. Put an automatic
transmission in P (Park) or a
manual transmission in Neutral
before setting the parking
brakes.
{Caution
If any accessories are left on or
plugged in during the jump
starting procedure, they could be
damaged. The repairs would not
be covered by the vehicle
warranty. Whenever possible, turn
off or unplug all accessories on
either vehicle when jump starting.
Page 322 of 393
Black plate (83,1)Chevrolet Corvette Owner Manual (GMNA-Localizing-U.S./Canada/Mexico-
7576293) - 2015 - crc - 10/31/14
Vehicle Care 10-83
{Caution
If the jumper cables are
connected or removed in the
wrong order, electrical shorting
may occur and damage the
vehicle. The repairs would not be
covered by the vehicle warranty.
Always connect and remove the
jumper cables in the correct order,
making sure that the cables do
not touch each other or other
metal.
Jumper Cable Removal
Reverse the sequence exactly when
removing the jumper cables.
The power windows may need to be
initialized. See “Window Indexing”
under Power Windows on
page 2-22.
Towing the Vehicle
{Caution
Incorrectly towing a disabled
vehicle may cause damage. The
damage would not be covered by
the vehicle warranty. Do not lash
or hook to any suspension
components —including the
control arms, stabilizer bars, and
links —during towing and
recovery of a disabled vehicle,
or when securing the vehicle to a
flatbed car carrier. For towing and
recovery of a disabled vehicle,
use the proper hooks in the
correct locations on the front and
rear sub-frames. Use the proper
nylon strap harnesses around the
tires to secure them to the flatbed
car carrier.
Have the vehicle towed on a flatbed
car carrier. A wheel lift tow truck
could damage the vehicle. Consult your dealer or a
professional towing service if the
disabled vehicle must be towed.
To tow the vehicle behind another
vehicle for recreational purposes,
such as behind a motor home, see
“Recreational Vehicle Towing”
following.
Recreational Vehicle
Towing
{Caution
Dolly towing or dinghy towing the
vehicle may cause damage
because of reduced ground
clearance. Always put the vehicle
on a flatbed truck or trailer.
The vehicle was neither designed
nor intended to be towed with any of
its wheels on the ground. If the
vehicle must be towed, see Towing
the Vehicle on page 10-83.
Page 323 of 393
Black plate (84,1)Chevrolet Corvette Owner Manual (GMNA-Localizing-U.S./Canada/Mexico-
7576293) - 2015 - crc - 10/31/14
10-84 Vehicle Care
Appearance Care
Exterior Care
Locks
Locks are lubricated at the factory.
Use a de-icing agent only when
absolutely necessary, and have the
locks greased after using. See
Recommended Fluids and
Lubricants on page 11-12.
Washing the Vehicle
To preserve the vehicle's finish,
wash it often and out of direct
sunlight.
{Caution
Do not use petroleum-based,
acidic, or abrasive cleaning
agents as they can damage the
vehicle's paint, metal, or plastic
parts. If damage occurs, it would
not be covered by the vehicle
warranty. Approved cleaning(Continued)
Caution (Continued)
products can be obtained from
your dealer. Follow all
manufacturer directions regarding
correct product usage, necessary
safety precautions, and
appropriate disposal of any
vehicle care product.
{Caution
Avoid using high-pressure
washes closer than 30 cm (12 in)
to the surface of the vehicle. Use
of power washers exceeding
8,274 kPa (1,200 psi) can result
in damage or removal of paint
and decals.
The
esymbol is on any
underhood compartment electrical
center that should not be power washed. This could cause damage
that would not be covered by the
vehicle warranty.
If using an automatic car wash,
comply with the car wash
instructions. The windshield wiper
must be off. Remove any
accessories that may be damaged
or interfere with the car wash
equipment.
Rinse the vehicle well, before
washing and after, to remove all
cleaning agents completely. If they
are allowed to dry on the surface,
they could stain.
Dry the finish with a soft, clean
chamois or an all-cotton towel to
avoid surface scratches and water
spotting.
Finish Care
Application of aftermarket clearcoat
sealant/wax materials is not
recommended. If painted surfaces
are damaged, see your dealer to
have the damage assessed and
repaired. Foreign materials such as
Page 325 of 393
Black plate (86,1)Chevrolet Corvette Owner Manual (GMNA-Localizing-U.S./Canada/Mexico-
7576293) - 2015 - crc - 10/31/14
10-86 Vehicle Care
Convertible Top Care
Frequently hand wash convertible
tops with mild car wash soap. Never
use a stiff brush, steam, bleach,
or aggressive cleaners.
If necessary, a soft brush can be
used to remove dirt. When finished
cleaning, thoroughly rinse the fabric.
Avoid automatic car washes with
overhead brushes or very
high-pressure sprays as they can
cause damage and leaking.
Only lower the top when it is
completely dry and avoid leaving
the top lowered for extended
periods of time to prevent excessive
interior weathering.
Avoid leaving large amounts of
snow on the top for extended
periods of time as damage may also
occur.
Carbon Fiber Care
Carbon fiber parts can be washed
and waxed like any other parts. Use
a clear or black pigmented wax. See
Carbon Fiber on page 9-20.
Cleaning Exterior Lamps/
Lenses, Emblems, Decals and
Stripes
Use only lukewarm or cold water, a
soft cloth, and a car washing soap
to clean exterior lamps, lenses,
emblems, decals and stripes. Follow
instructions under "Washing the
Vehicle" previously in this section.
Lamp covers are made of plastic,
and some have a UV protective
coating. Do not clean or wipe them
while they are dry.
Do not use any of the following on
lamp covers:
.Abrasive or caustic agents.
.Washer fluids and other cleaning
agents in higher concentrations
than suggested by the
manufacturer.
.Solvents, alcohols, fuels,
or other harsh cleaners.
.Ice scrapers or other hard items.
.Aftermarket appearance caps or
covers while the lamps are
illuminated, due to excessive
heat generated.
{Caution
Failure to clean lamps properly
can cause damage to the lamp
cover that would not be covered
by the vehicle warranty.
{Caution
Using wax on low gloss black
finish stripes can increase the
gloss level and create a
non-uniform finish. Clean low
gloss stripes with soap and
water only.
Air Intakes
Clear debris from the air intakes,
between the hood and windshield,
when washing the vehicle.