air CHEVROLET CORVETTE 2015 7.G Manual PDF
[x] Cancel search | Manufacturer: CHEVROLET, Model Year: 2015, Model line: CORVETTE, Model: CHEVROLET CORVETTE 2015 7.GPages: 393, PDF Size: 5.4 MB
Page 251 of 393
Black plate (12,1)Chevrolet Corvette Owner Manual (GMNA-Localizing-U.S./Canada/Mexico-
7576293) - 2015 - crc - 10/31/14
10-12 Vehicle Care
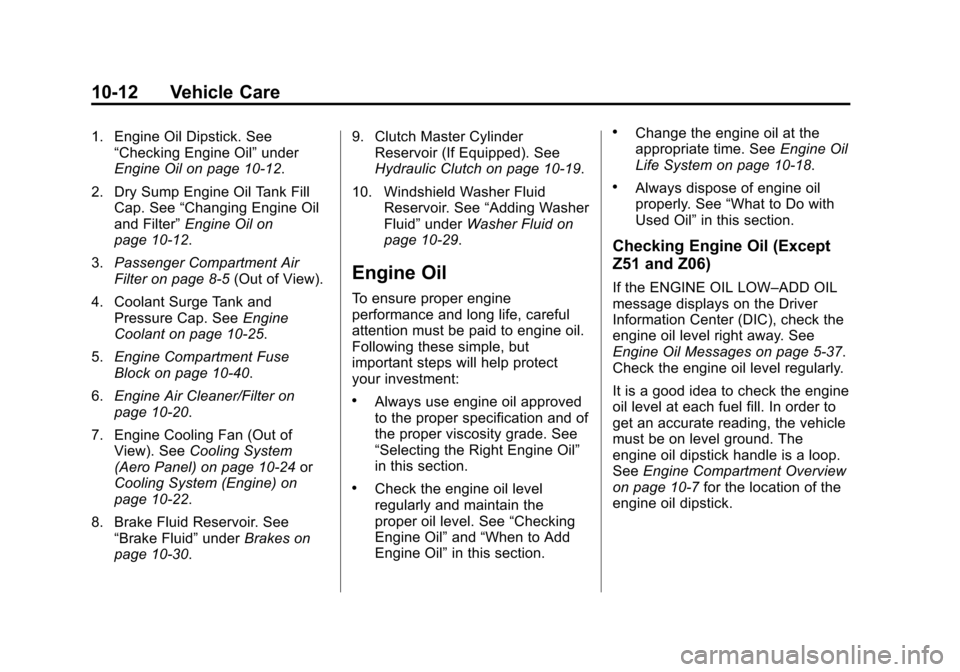
1. Engine Oil Dipstick. See“Checking Engine Oil” under
Engine Oil on page 10-12.
2. Dry Sump Engine Oil Tank Fill Cap. See “Changing Engine Oil
and Filter” Engine Oil on
page 10-12.
3. Passenger Compartment Air
Filter on page 8-5 (Out of View).
4. Coolant Surge Tank and Pressure Cap. See Engine
Coolant on page 10-25.
5. Engine Compartment Fuse
Block on page 10-40.
6. Engine Air Cleaner/Filter on
page 10-20.
7. Engine Cooling Fan (Out of View). See Cooling System
(Aero Panel) on page 10-24 or
Cooling System (Engine) on
page 10-22.
8. Brake Fluid Reservoir. See “Brake Fluid” underBrakes on
page 10-30. 9. Clutch Master Cylinder
Reservoir (If Equipped). See
Hydraulic Clutch on page 10-19.
10. Windshield Washer Fluid Reservoir. See “Adding Washer
Fluid” under Washer Fluid on
page 10-29.
Engine Oil
To ensure proper engine
performance and long life, careful
attention must be paid to engine oil.
Following these simple, but
important steps will help protect
your investment:
.Always use engine oil approved
to the proper specification and of
the proper viscosity grade. See
“Selecting the Right Engine Oil”
in this section.
.Check the engine oil level
regularly and maintain the
proper oil level. See “Checking
Engine Oil” and“When to Add
Engine Oil” in this section.
.Change the engine oil at the
appropriate time. See Engine Oil
Life System on page 10-18.
.Always dispose of engine oil
properly. See “What to Do with
Used Oil” in this section.
Checking Engine Oil (Except
Z51 and Z06)
If the ENGINE OIL LOW–ADD OIL
message displays on the Driver
Information Center (DIC), check the
engine oil level right away. See
Engine Oil Messages on page 5-37.
Check the engine oil level regularly.
It is a good idea to check the engine
oil level at each fuel fill. In order to
get an accurate reading, the vehicle
must be on level ground. The
engine oil dipstick handle is a loop.
SeeEngine Compartment Overview
on page 10-7 for the location of the
engine oil dipstick.
Page 258 of 393
Black plate (19,1)Chevrolet Corvette Owner Manual (GMNA-Localizing-U.S./Canada/Mexico-
7576293) - 2015 - crc - 10/31/14
Vehicle Care 10-19
If the CHANGE ENGINE OIL SOON
message comes back on when the
vehicle is started, the engine oil life
system has not reset. Repeat the
procedure.
Automatic Transmission
Fluid
How to Check Automatic
Transmission Fluid
It is not necessary to check the
transmission fluid level.
A transmission fluid leak is the only
reason for fluid loss. If a leak
occurs, take the vehicle to the
dealer and have it repaired as soon
as possible.
The vehicle is not equipped with a
transmission fluid level dipstick.
There is a special procedure for
checking and changing the
transmission fluid. Because this
procedure is difficult, this should be
done at the dealer. Contact the
dealer for additional information or
the procedure can be found in theservice manual. To purchase a
service manual, see
Service
Publications Ordering Information
on page 13-11.
{Caution
Use of the incorrect automatic
transmission fluid may damage
the vehicle, and the damage may
not be covered by the vehicle
warranty. Always use the
automatic transmission fluid listed
in Recommended Fluids and
Lubricants on page 11-12.
Change the fluid and filter at the
intervals listed in Maintenance
Schedule on page 11-2, and be sure
to use the fluid listed in
Recommended Fluids and
Lubricants on page 11-12.
Manual Transmission
Fluid
It is not necessary to check the
manual transmission fluid level.
A transmission fluid leak is the only
reason for fluid loss. If a leak
occurs, take the vehicle to the
dealer and have it repaired as soon
as possible. See Recommended
Fluids and Lubricants on page 11-12
for the proper fluid to use.
Hydraulic Clutch
It is not necessary to regularly
check clutch fluid unless you
suspect there is a leak in the
system. Adding fluid will not correct
a leak. A fluid loss in this system
could indicate a problem. Have the
system inspected and repaired.
The fluid will darken over time. See
Maintenance Schedule on
page 11-2 for when to replace the
fluid.
Page 259 of 393
Black plate (20,1)Chevrolet Corvette Owner Manual (GMNA-Localizing-U.S./Canada/Mexico-
7576293) - 2015 - crc - 10/31/14
10-20 Vehicle Care
When to Check and What
to Use
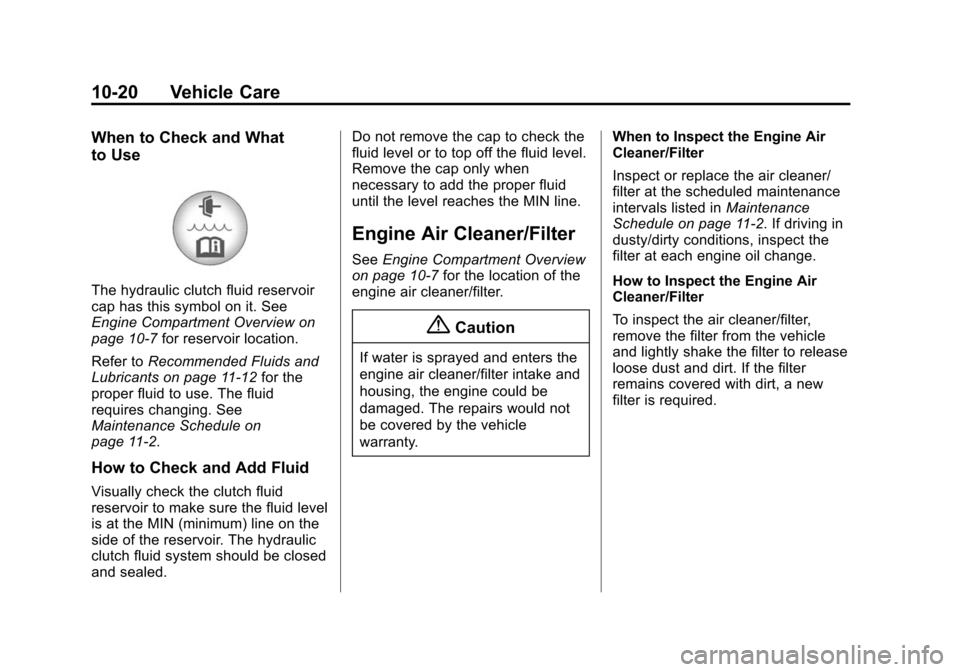
The hydraulic clutch fluid reservoir
cap has this symbol on it. See
Engine Compartment Overview on
page 10-7for reservoir location.
Refer to Recommended Fluids and
Lubricants on page 11-12 for the
proper fluid to use. The fluid
requires changing. See
Maintenance Schedule on
page 11-2.
How to Check and Add Fluid
Visually check the clutch fluid
reservoir to make sure the fluid level
is at the MIN (minimum) line on the
side of the reservoir. The hydraulic
clutch fluid system should be closed
and sealed. Do not remove the cap to check the
fluid level or to top off the fluid level.
Remove the cap only when
necessary to add the proper fluid
until the level reaches the MIN line.
Engine Air Cleaner/Filter
See
Engine Compartment Overview
on page 10-7 for the location of the
engine air cleaner/filter.
{Caution
If water is sprayed and enters the
engine air cleaner/filter intake and
housing, the engine could be
damaged. The repairs would not
be covered by the vehicle
warranty. When to Inspect the Engine Air
Cleaner/Filter
Inspect or replace the air cleaner/
filter at the scheduled maintenance
intervals listed in
Maintenance
Schedule on page 11-2. If driving in
dusty/dirty conditions, inspect the
filter at each engine oil change.
How to Inspect the Engine Air
Cleaner/Filter
To inspect the air cleaner/filter,
remove the filter from the vehicle
and lightly shake the filter to release
loose dust and dirt. If the filter
remains covered with dirt, a new
filter is required.
Page 260 of 393
Black plate (21,1)Chevrolet Corvette Owner Manual (GMNA-Localizing-U.S./Canada/Mexico-
7576293) - 2015 - crc - 10/31/14
Vehicle Care 10-21
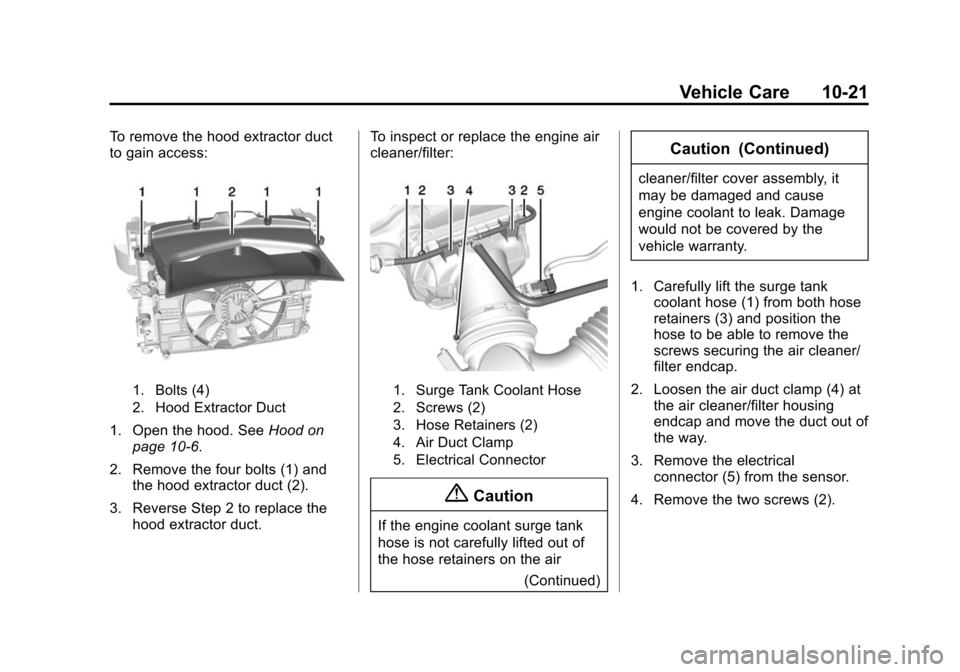
To remove the hood extractor duct
to gain access:
1. Bolts (4)
2. Hood Extractor Duct
1. Open the hood. SeeHood on
page 10-6.
2. Remove the four bolts (1) and the hood extractor duct (2).
3. Reverse Step 2 to replace the hood extractor duct. To inspect or replace the engine air
cleaner/filter:
1. Surge Tank Coolant Hose
2. Screws (2)
3. Hose Retainers (2)
4. Air Duct Clamp
5. Electrical Connector
{Caution
If the engine coolant surge tank
hose is not carefully lifted out of
the hose retainers on the air
(Continued)
Caution (Continued)
cleaner/filter cover assembly, it
may be damaged and cause
engine coolant to leak. Damage
would not be covered by the
vehicle warranty.
1. Carefully lift the surge tank coolant hose (1) from both hose
retainers (3) and position the
hose to be able to remove the
screws securing the air cleaner/
filter endcap.
2. Loosen the air duct clamp (4) at the air cleaner/filter housing
endcap and move the duct out of
the way.
3. Remove the electrical connector (5) from the sensor.
4. Remove the two screws (2).
Page 261 of 393
Black plate (22,1)Chevrolet Corvette Owner Manual (GMNA-Localizing-U.S./Canada/Mexico-
7576293) - 2015 - crc - 10/31/14
10-22 Vehicle Care
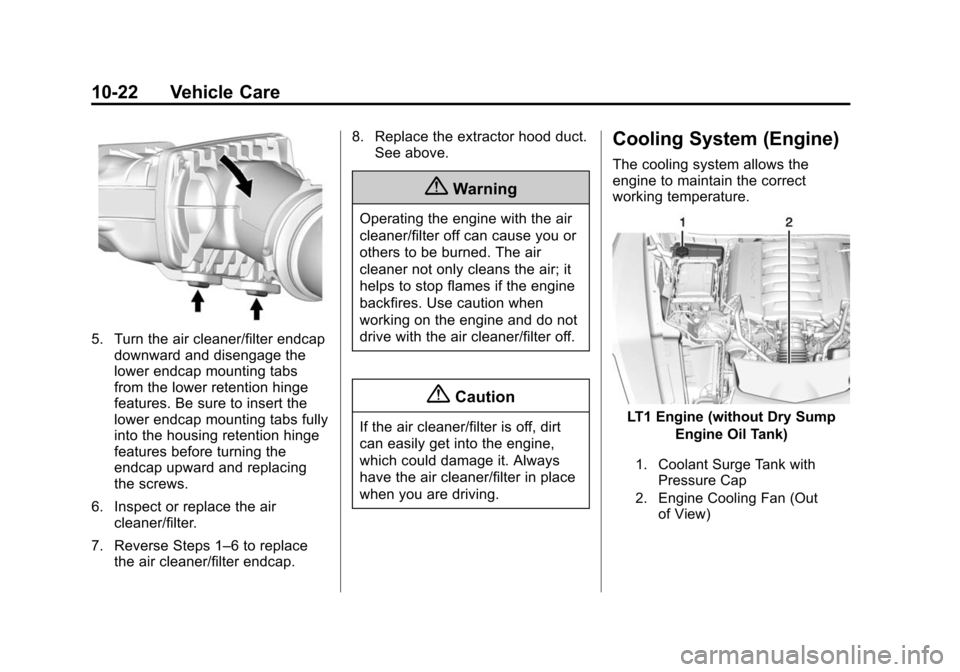
5. Turn the air cleaner/filter endcapdownward and disengage the
lower endcap mounting tabs
from the lower retention hinge
features. Be sure to insert the
lower endcap mounting tabs fully
into the housing retention hinge
features before turning the
endcap upward and replacing
the screws.
6. Inspect or replace the air cleaner/filter.
7. Reverse Steps 1–6 to replace the air cleaner/filter endcap. 8. Replace the extractor hood duct.
See above.
{Warning
Operating the engine with the air
cleaner/filter off can cause you or
others to be burned. The air
cleaner not only cleans the air; it
helps to stop flames if the engine
backfires. Use caution when
working on the engine and do not
drive with the air cleaner/filter off.
{Caution
If the air cleaner/filter is off, dirt
can easily get into the engine,
which could damage it. Always
have the air cleaner/filter in place
when you are driving.
Cooling System (Engine)
The cooling system allows the
engine to maintain the correct
working temperature.
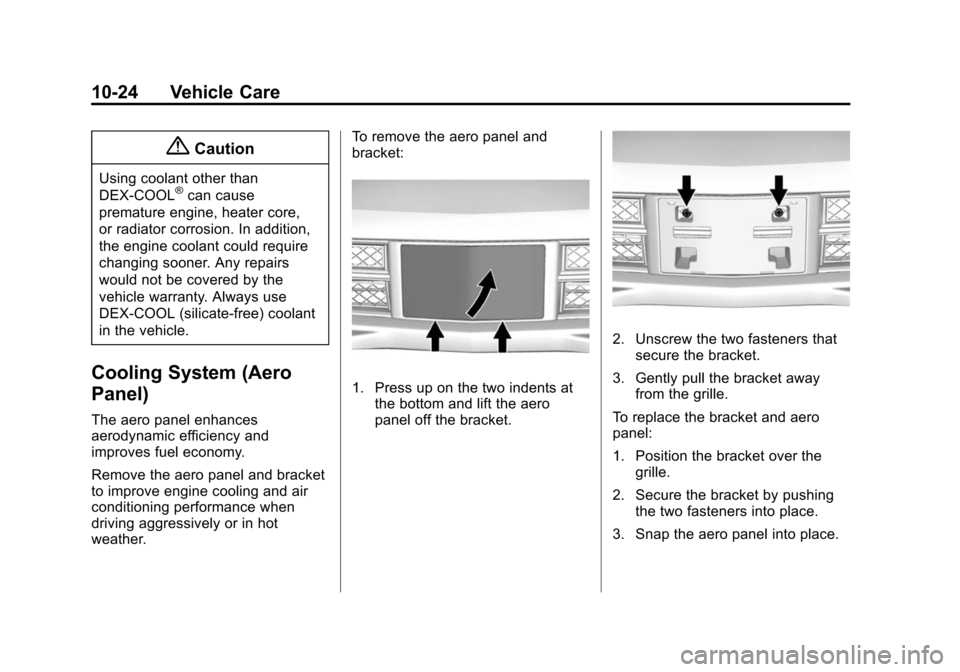
LT1 Engine (without Dry Sump
Engine Oil Tank)
1. Coolant Surge Tank withPressure Cap
2. Engine Cooling Fan (Out of View)
Page 263 of 393
Black plate (24,1)Chevrolet Corvette Owner Manual (GMNA-Localizing-U.S./Canada/Mexico-
7576293) - 2015 - crc - 10/31/14
10-24 Vehicle Care
{Caution
Using coolant other than
DEX-COOL®can cause
premature engine, heater core,
or radiator corrosion. In addition,
the engine coolant could require
changing sooner. Any repairs
would not be covered by the
vehicle warranty. Always use
DEX-COOL (silicate-free) coolant
in the vehicle.
Cooling System (Aero
Panel)
The aero panel enhances
aerodynamic efficiency and
improves fuel economy.
Remove the aero panel and bracket
to improve engine cooling and air
conditioning performance when
driving aggressively or in hot
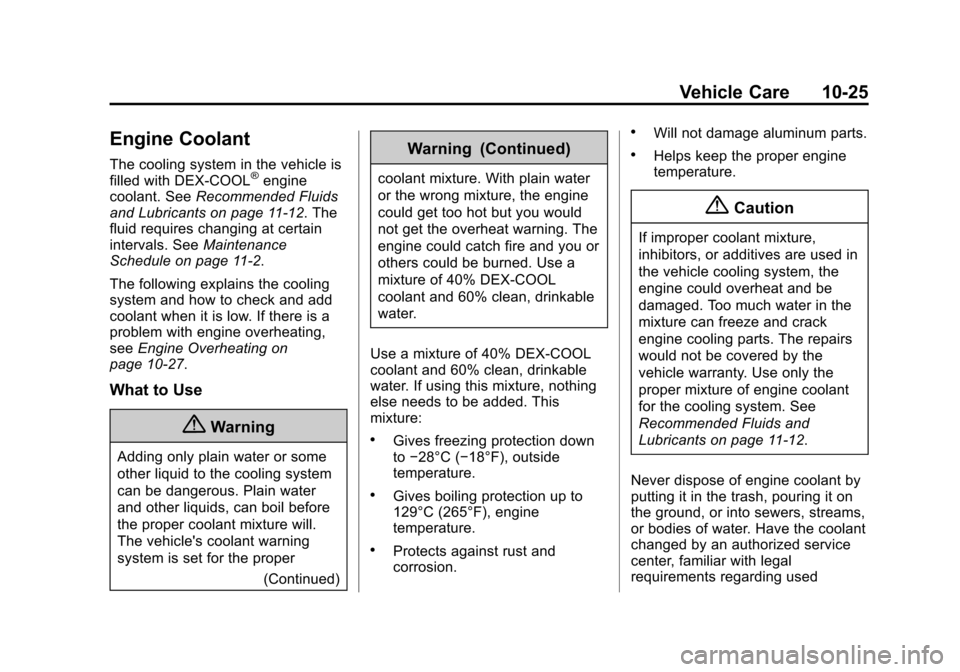
weather. To remove the aero panel and
bracket:
1. Press up on the two indents at
the bottom and lift the aero
panel off the bracket.
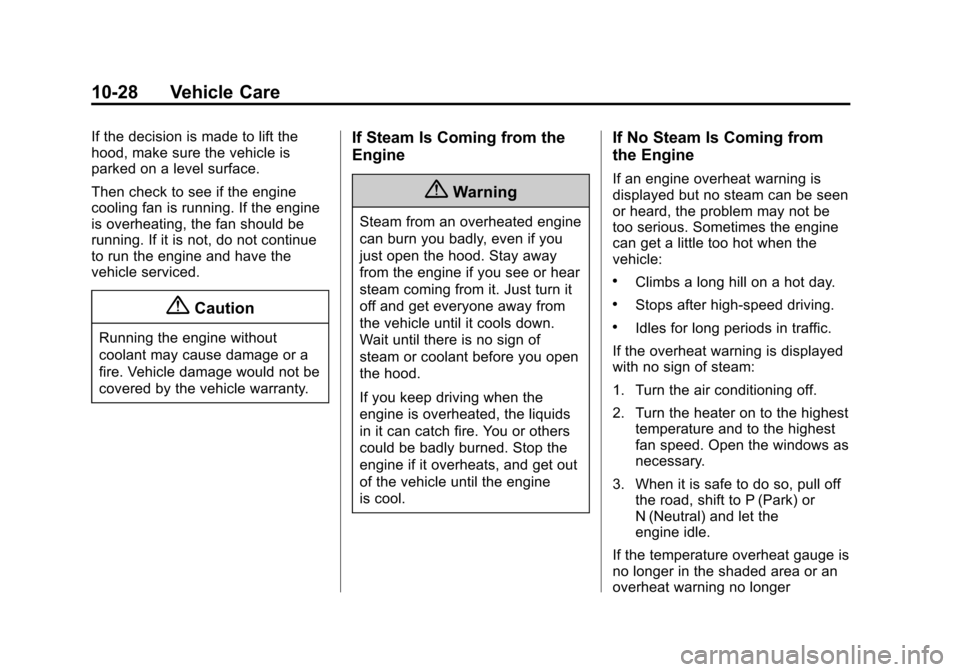
2. Unscrew the two fasteners that
secure the bracket.
3. Gently pull the bracket away from the grille.
To replace the bracket and aero
panel:
1. Position the bracket over the grille.
2. Secure the bracket by pushing the two fasteners into place.
3. Snap the aero panel into place.
Page 264 of 393
Black plate (25,1)Chevrolet Corvette Owner Manual (GMNA-Localizing-U.S./Canada/Mexico-
7576293) - 2015 - crc - 10/31/14
Vehicle Care 10-25
Engine Coolant
The cooling system in the vehicle is
filled with DEX-COOL®engine
coolant. See Recommended Fluids
and Lubricants on page 11-12. The
fluid requires changing at certain
intervals. See Maintenance
Schedule on page 11-2.
The following explains the cooling
system and how to check and add
coolant when it is low. If there is a
problem with engine overheating,
see Engine Overheating on
page 10-27.
What to Use
{Warning
Adding only plain water or some
other liquid to the cooling system
can be dangerous. Plain water
and other liquids, can boil before
the proper coolant mixture will.
The vehicle's coolant warning
system is set for the proper
(Continued)
Warning (Continued)
coolant mixture. With plain water
or the wrong mixture, the engine
could get too hot but you would
not get the overheat warning. The
engine could catch fire and you or
others could be burned. Use a
mixture of 40% DEX-COOL
coolant and 60% clean, drinkable
water.
Use a mixture of 40% DEX-COOL
coolant and 60% clean, drinkable
water. If using this mixture, nothing
else needs to be added. This
mixture:
.Gives freezing protection down
to −28°C (−18°F), outside
temperature.
.Gives boiling protection up to
129°C (265°F), engine
temperature.
.Protects against rust and
corrosion.
.Will not damage aluminum parts.
.Helps keep the proper engine
temperature.
{Caution
If improper coolant mixture,
inhibitors, or additives are used in
the vehicle cooling system, the
engine could overheat and be
damaged. Too much water in the
mixture can freeze and crack
engine cooling parts. The repairs
would not be covered by the
vehicle warranty. Use only the
proper mixture of engine coolant
for the cooling system. See
Recommended Fluids and
Lubricants on page 11-12.
Never dispose of engine coolant by
putting it in the trash, pouring it on
the ground, or into sewers, streams,
or bodies of water. Have the coolant
changed by an authorized service
center, familiar with legal
requirements regarding used
Page 267 of 393
Black plate (28,1)Chevrolet Corvette Owner Manual (GMNA-Localizing-U.S./Canada/Mexico-
7576293) - 2015 - crc - 10/31/14
10-28 Vehicle Care
If the decision is made to lift the
hood, make sure the vehicle is
parked on a level surface.
Then check to see if the engine
cooling fan is running. If the engine
is overheating, the fan should be
running. If it is not, do not continue
to run the engine and have the
vehicle serviced.
{Caution
Running the engine without
coolant may cause damage or a
fire. Vehicle damage would not be
covered by the vehicle warranty.
If Steam Is Coming from the
Engine
{Warning
Steam from an overheated engine
can burn you badly, even if you
just open the hood. Stay away
from the engine if you see or hear
steam coming from it. Just turn it
off and get everyone away from
the vehicle until it cools down.
Wait until there is no sign of
steam or coolant before you open
the hood.
If you keep driving when the
engine is overheated, the liquids
in it can catch fire. You or others
could be badly burned. Stop the
engine if it overheats, and get out
of the vehicle until the engine
is cool.
If No Steam Is Coming from
the Engine
If an engine overheat warning is
displayed but no steam can be seen
or heard, the problem may not be
too serious. Sometimes the engine
can get a little too hot when the
vehicle:
.Climbs a long hill on a hot day.
.Stops after high-speed driving.
.Idles for long periods in traffic.
If the overheat warning is displayed
with no sign of steam:
1. Turn the air conditioning off.
2. Turn the heater on to the highest temperature and to the highest
fan speed. Open the windows as
necessary.
3. When it is safe to do so, pull off the road, shift to P (Park) or
N (Neutral) and let the
engine idle.
If the temperature overheat gauge is
no longer in the shaded area or an
overheat warning no longer
Page 269 of 393
Black plate (30,1)Chevrolet Corvette Owner Manual (GMNA-Localizing-U.S./Canada/Mexico-
7576293) - 2015 - crc - 10/31/14
10-30 Vehicle Care
Brakes
Visually inspect outer brake pads
through the wheel. Replace brake
pads when they are worn to 2 mm
of pad thickness. New pads are
10 mm (0.4 in) thick.
Brake Wear (Except Z06 Model
with Z07 Package)
Disc brake pads have built-in wear
indicators that make a high-pitched
warning sound when the brake pads
are worn and new pads are needed.
The sound can come and go or be
heard all the time the vehicle is
moving, except when applying the
brake pedal firmly.
{Warning
The brake wear warning sound
means that soon the brakes will
not work well. That could lead to
a crash. When the brake wear
warning sound is heard, have the
vehicle serviced.
{Caution
Continuing to drive with worn-out
brake pads could result in costly
brake repair.
Under certain weather or operating
conditions, occasional brake noise
might be heard with the vehicle's
performance braking system. This
brake system is designed for
superior fade resistance and
consistent operation using high
performance brake pads. Brake
squeal is normal and does not affect
system performance.
Brake dust is normal on the
performance braking system. This
does not indicate a problem with the
brake system.
Brake linings should always be
replaced as complete axle sets.
Brake Wear (Z06 Model with
Z07 Package)
This vehicle does not have built-in
brake pad wear indicators. Visually
inspect the brake pads periodically
and any time the tires are removed.
{Caution
Continuing to drive with worn-out
brake pads could result in costly
brake repair.
Make sure that the brakes have
been given sufficient time to cool
and then set the parking brake.
Page 274 of 393
Black plate (35,1)Chevrolet Corvette Owner Manual (GMNA-Localizing-U.S./Canada/Mexico-
7576293) - 2015 - crc - 10/31/14
Vehicle Care 10-35
For vehicles without a battery
maintainer, see the following
information:
Infrequent Usage: Remove the
black, negative (−) cable from the
battery to keep the battery from
running down.
See“Window Indexing” under
Power Windows on page 2-22.
Extended Storage: It is
recommended that the battery
maintainer package be used.
However, if not, remove the black,
negative (−) cable from the battery.
All vehicle memory settings will
need to be reset when battery
power is restored.
Rear Axle
When to Check Lubricant
It is not necessary to regularly
check rear axle fluid unless a leak is
suspected or an unusual noise is
heard. A fluid loss could indicate a
problem. Have it inspected and
repaired.
How to Check Lubricant
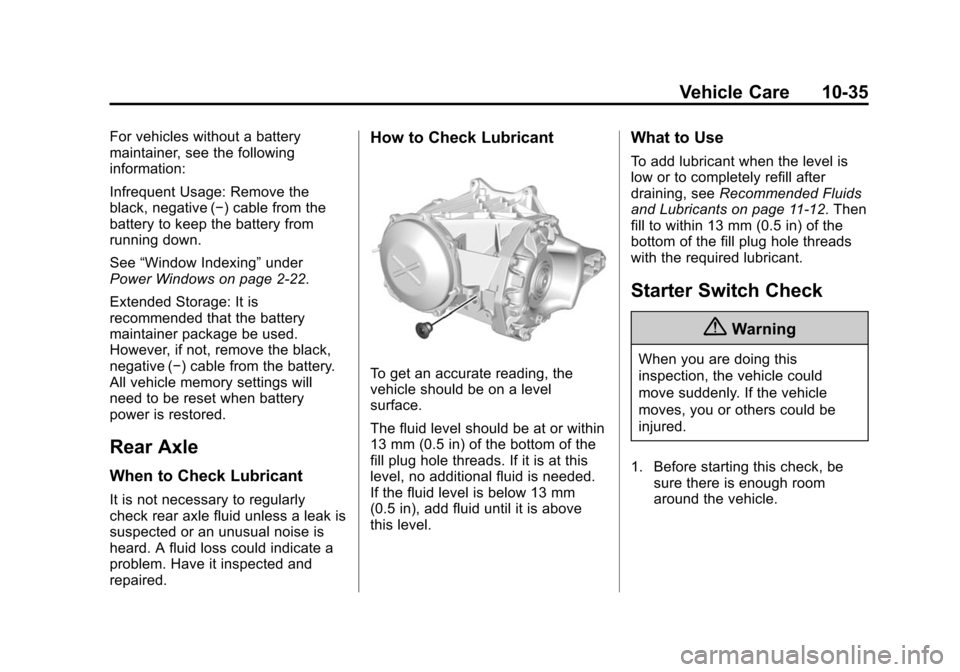
To get an accurate reading, the
vehicle should be on a level
surface.
The fluid level should be at or within
13 mm (0.5 in) of the bottom of the
fill plug hole threads. If it is at this
level, no additional fluid is needed.
If the fluid level is below 13 mm
(0.5 in), add fluid until it is above
this level.
What to Use
To add lubricant when the level is
low or to completely refill after
draining, see Recommended Fluids
and Lubricants on page 11-12. Then
fill to within 13 mm (0.5 in) of the
bottom of the fill plug hole threads
with the required lubricant.
Starter Switch Check
{Warning
When you are doing this
inspection, the vehicle could
move suddenly. If the vehicle
moves, you or others could be
injured.
1. Before starting this check, be sure there is enough room
around the vehicle.