check CHEVROLET CORVETTE 2017 7.G Service Manual
[x] Cancel search | Manufacturer: CHEVROLET, Model Year: 2017, Model line: CORVETTE, Model: CHEVROLET CORVETTE 2017 7.GPages: 360, PDF Size: 6.3 MB
Page 215 of 360

Chevrolet Corvette Owner Manual (GMNA-Localizing-U.S./Canada/Mexico-
9956103) - 2017 - crc - 4/28/16
214 Driving and Operating
recommended for best performance
and fuel economy. Unleaded
gasoline with an octane rated as low
as 87 can be used. Using unleaded
gasoline rated below 93 octane,
however, will lead to reduced
acceleration and fuel economy.
If knocking occurs, use a gasoline
rated at 93 octane as soon as
possible, otherwise, the engine
could be damaged. If heavy
knocking is heard when using
gasoline with a 93 octane rating, the
engine needs service.
For the LT4 6.2L supercharged
engine, use premium unleaded
gasoline meeting ASTM
specification D4814 with a posted
octane rating of 93. If unavailable,
unleaded gasoline with a posted
octane rating of 91 may be used,
but with reduced performance and
fuel economy. If the octane is less
than 91, the engine could be
damaged and the repairs would not
be covered by the vehicle warranty.
If heavy knocking is heard when
using gasoline rated at 93 octane,
the engine needs service.Prohibited Fuels
Caution
Do not use fuels with any of the
following conditions; doing so
may damage the vehicle and void
its warranty:
. For vehicles which are not
FlexFuel, fuel labeled
greater than 15% ethanol by
volume, such as mid-level
ethanol blends (16 –50%
ethanol), E85, or FlexFuel.
. Fuel with any amount of
methanol, methylal, and
aniline. These fuels can
corrode metal fuel system
parts or damage plastic and
rubber parts.
. Fuel containing metals such
as methylcyclopentadienyl
manganese tricarbonyl
(MMT), which can damage
the emissions control
system and spark plugs.
(Continued)
Caution (Continued)
.Fuel with a posted octane
rating of less than the
recommended fuel. Using
this fuel will lower fuel
economy and performance,
and may decrease the life of
the emissions catalyst.
California Fuel
Requirements
If the vehicle is certified to meet
California Emissions Standards, it is
designed to operate on fuels that
meet California specifications. See
the underhood emission control
label. If this fuel is not available in
states adopting California Emissions
Standards, the vehicle will operate
satisfactorily on fuels meeting
federal specifications, but emission
control system performance may be
affected. The malfunction indicator
lamp could turn on and the vehicle
may not pass a smog-check test.
See Malfunction Indicator Lamp
(Check Engine Light) 0108. If this
Page 218 of 360
Chevrolet Corvette Owner Manual (GMNA-Localizing-U.S./Canada/Mexico-
9956103) - 2017 - crc - 4/28/16
Driving and Operating 217
Warning (Continued)
means. You or others could be
badly burned and the vehicle
could be damaged. Always:. Use approved fuel
containers.
. Remove the container from
the vehicle, trunk, or pickup
bed before filling.
. Place the container on the
ground.
. Place the nozzle inside the
fill opening of the container
before dispensing fuel, and
keep it in contact with the fill
opening until filling is
complete.
. Fill the container no more
than 95% full to allow for
expansion.
. Do not smoke, light
matches, or use lighters
while pumping fuel.
. Avoid using cell phones or
other electronic devices.
Trailer Towing
General Towing
Information
The vehicle is neither designed nor
intended to tow a trailer.
Conversions and
Add-Ons
Add-On Electrical
Equipment
{Warning
The Data Link Connector (DLC) is
used for vehicle service and
Emission Inspection/Maintenance
testing. See Malfunction Indicator
Lamp (Check Engine Light)
0 108. A device connected to the
DLC —such as an aftermarket
fleet or driver-behavior tracking
device —may interfere with
vehicle systems. This could affect
vehicle operation and cause a
crash. Such devices may also
access information stored in the
vehicle’s systems.
Page 219 of 360
Chevrolet Corvette Owner Manual (GMNA-Localizing-U.S./Canada/Mexico-
9956103) - 2017 - crc - 4/28/16
218 Driving and Operating
Caution
Some electrical equipment can
damage the vehicle or cause
components to not work and
would not be covered by the
vehicle warranty. Always check
with your dealer before adding
electrical equipment.
Add-on equipment can drain the
vehicle's 12-volt battery, even if the
vehicle is not operating.
The vehicle has an airbag system.
Before attempting to add anything
electrical to the vehicle, see
Servicing the Airbag-Equipped
Vehicle 078 and Adding Equipment
to the Airbag-Equipped
Vehicle 078.
Page 220 of 360
Chevrolet Corvette Owner Manual (GMNA-Localizing-U.S./Canada/Mexico-
9956103) - 2017 - crc - 4/28/16
Vehicle Care 219
Vehicle Care
General Information
General Information . . . . . . . . . . 220
California Proposition65 Warning . . . . . . . . . . . . . . . . . 220
California Perchlorate Materials Requirements . . . . . 220
Accessories and Modifications . . . . . . . . . . . . . . . . 220
Lifting the Vehicle . . . . . . . . . . . . 221
Vehicle Checks
Doing Your Own Service Work . . . . . . . . . . . . . . . 223
Hood . . . . . . . . . . . . . . . . . . . . . . . . . 224
Engine Compartment Overview . . . . . . . . . . . . . . . . . . . . 225
Engine Oil . . . . . . . . . . . . . . . . . . . . 230
Engine Oil Life System . . . . . . . 235
Automatic Transmission Fluid . . . . . . . . . . . . . . . . . . . . . . . . 236
Manual Transmission Fluid . . . 237
Hydraulic Clutch . . . . . . . . . . . . . . 237
Engine Air Cleaner/Filter . . . . . . 237
Cooling System (Engine) . . . . . 239
Cooling System (Aero Panel) . . . . . . . . . . . . . . . . . . . . . . . 241
Engine Coolant . . . . . . . . . . . . . . . 242
Engine Overheating . . . . . . . . . . 244 Washer Fluid . . . . . . . . . . . . . . . . . 246
Brakes . . . . . . . . . . . . . . . . . . . . . . . 246
Brake Fluid . . . . . . . . . . . . . . . . . . . 247
Battery - North America . . . . . . 248
Rear Axle . . . . . . . . . . . . . . . . . . . . 250
Starter Switch Check . . . . . . . . . 250
Automatic Transmission Shift
Lock Control Function
Check . . . . . . . . . . . . . . . . . . . . . . . 251
Park Brake and P (Park) Mechanism Check . . . . . . . . . . 251
Wiper Blade Replacement . . . . 251
Windshield Replacement . . . . . 252Headlamp Aiming
Headlamp Aiming . . . . . . . . . . . . 252
Bulb Replacement
Bulb Replacement . . . . . . . . . . . . 253
High Intensity Discharge (HID) Lighting . . . . . . . . . . . . . . . . . . . . . 253
LED Lighting . . . . . . . . . . . . . . . . . 253
License Plate Lamp . . . . . . . . . . 253
Replacement Bulbs . . . . . . . . . . . 254
Electrical System
Electrical System Overload . . . 254
Fuses . . . . . . . . . . . . . . . . . . . . . . . . 254
Engine Compartment Fuse Block . . . . . . . . . . . . . . . . . . . . . . . . 255
Rear Compartment Fuse Block . . . . . . . . . . . . . . . . . . . . . . . . 259
Wheels and Tires
Tires . . . . . . . . . . . . . . . . . . . . . . . . . . 262
Winter Tires . . . . . . . . . . . . . . . . . . 263
Run-Flat Tires . . . . . . . . . . . . . . . . 263
Low-Profile Tires . . . . . . . . . . . . . 264
Competition Oriented Tires . . . 265
Summer Tires . . . . . . . . . . . . . . . . 265
Tire Sidewall Labeling . . . . . . . . 266
Tire Designations . . . . . . . . . . . . . 267
Tire Terminology andDefinitions . . . . . . . . . . . . . . . . . . 268
Tire Pressure . . . . . . . . . . . . . . . . . 270
Tire Pressure for High-Speed Operation . . . . . . . . . . . . . . . . . . . 272
Tire Pressure Monitor System . . . . . . . . . . . . . . . . . . . . . . 273
Tire Pressure Monitor Operation . . . . . . . . . . . . . . . . . . . 274
Tire Inspection . . . . . . . . . . . . . . . . 275
Tire Rotation . . . . . . . . . . . . . . . . . 276
When It Is Time for New Tires . . . . . . . . . . . . . . . . . . . . . . . . 277
Buying New Tires . . . . . . . . . . . . . 278
Different Size Tires and Wheels . . . . . . . . . . . . . . . . . . . . . . 279
Uniform Tire Quality Grading . . . . . . . . . . . . . . . . . . . . . 279
Wheel Alignment and Tire Balance . . . . . . . . . . . . . . . . . . . . . 281
Wheel Replacement . . . . . . . . . . 281
Tire Chains . . . . . . . . . . . . . . . . . . . 283
Page 224 of 360
Chevrolet Corvette Owner Manual (GMNA-Localizing-U.S./Canada/Mexico-
9956103) - 2017 - crc - 4/28/16
Vehicle Care 223
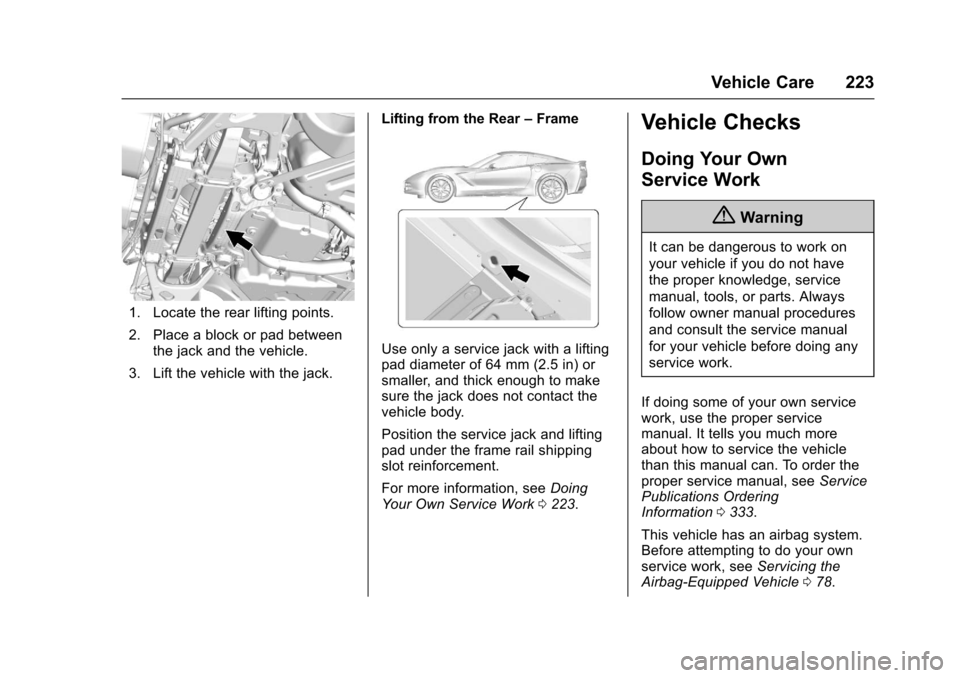
1. Locate the rear lifting points.
2. Place a block or pad betweenthe jack and the vehicle.
3. Lift the vehicle with the jack. Lifting from the Rear
–Frame
Use only a service jack with a lifting
pad diameter of 64 mm (2.5 in) or
smaller, and thick enough to make
sure the jack does not contact the
vehicle body.
Position the service jack and lifting
pad under the frame rail shipping
slot reinforcement.
For more information, see Doing
Your Own Service Work 0223.
Vehicle Checks
Doing Your Own
Service Work
{Warning
It can be dangerous to work on
your vehicle if you do not have
the proper knowledge, service
manual, tools, or parts. Always
follow owner manual procedures
and consult the service manual
for your vehicle before doing any
service work.
If doing some of your own service
work, use the proper service
manual. It tells you much more
about how to service the vehicle
than this manual can. To order the
proper service manual, see Service
Publications Ordering
Information 0333.
This vehicle has an airbag system.
Before attempting to do your own
service work, see Servicing the
Airbag-Equipped Vehicle 078.
Page 227 of 360
Chevrolet Corvette Owner Manual (GMNA-Localizing-U.S./Canada/Mexico-
9956103) - 2017 - crc - 4/28/16
226 Vehicle Care
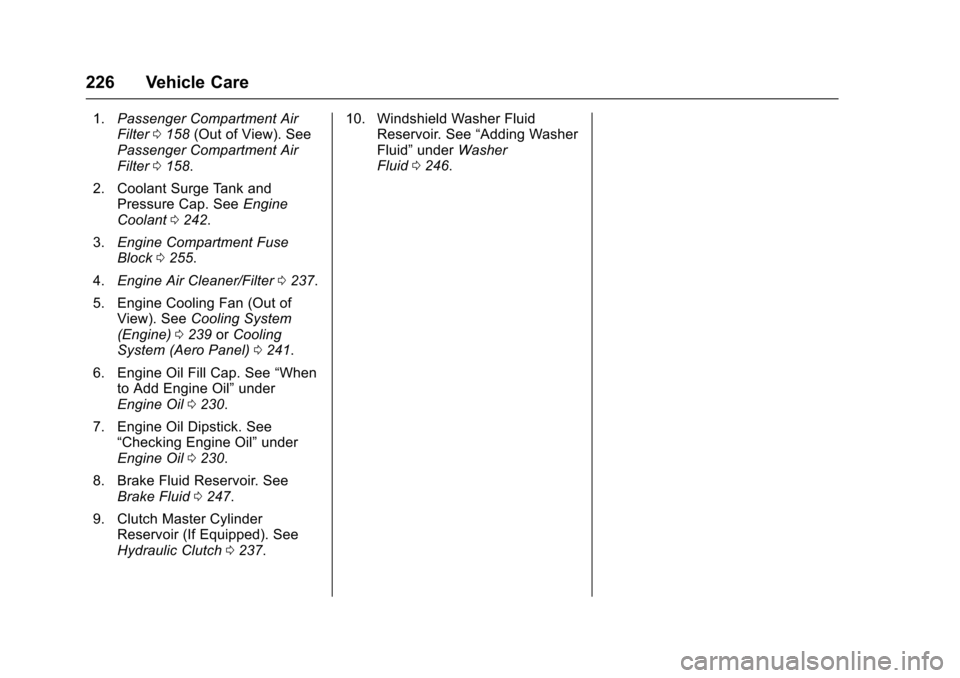
1.Passenger Compartment Air
Filter 0158 (Out of View). See
Passenger Compartment Air
Filter 0158.
2. Coolant Surge Tank and Pressure Cap. See Engine
Coolant 0242.
3. Engine Compartment Fuse
Block 0255.
4. Engine Air Cleaner/Filter 0237.
5. Engine Cooling Fan (Out of View). See Cooling System
(Engine) 0239 orCooling
System (Aero Panel) 0241.
6. Engine Oil Fill Cap. See “When
to Add Engine Oil” under
Engine Oil 0230.
7. Engine Oil Dipstick. See “Checking Engine Oil” under
Engine Oil 0230.
8. Brake Fluid Reservoir. See Brake Fluid 0247.
9. Clutch Master Cylinder Reservoir (If Equipped). See
Hydraulic Clutch 0237. 10. Windshield Washer Fluid
Reservoir. See “Adding Washer
Fluid” under Washer
Fluid 0246.
Page 229 of 360
Chevrolet Corvette Owner Manual (GMNA-Localizing-U.S./Canada/Mexico-
9956103) - 2017 - crc - 4/28/16
228 Vehicle Care
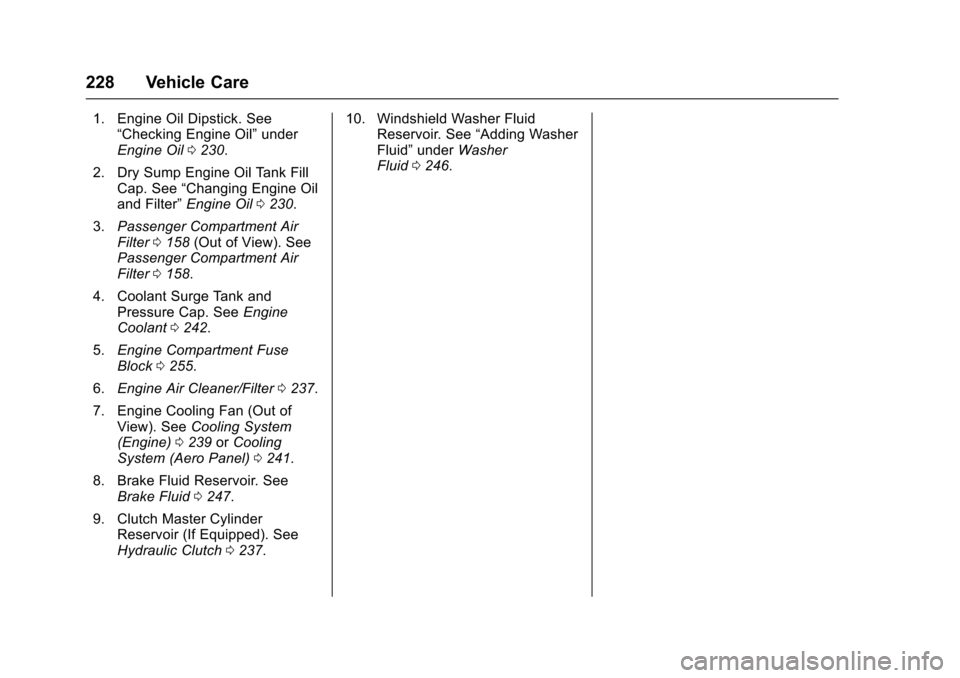
1. Engine Oil Dipstick. See“Checking Engine Oil” under
Engine Oil 0230.
2. Dry Sump Engine Oil Tank Fill Cap. See “Changing Engine Oil
and Filter” Engine Oil 0230.
3. Passenger Compartment Air
Filter 0158 (Out of View). See
Passenger Compartment Air
Filter 0158.
4. Coolant Surge Tank and Pressure Cap. See Engine
Coolant 0242.
5. Engine Compartment Fuse
Block 0255.
6. Engine Air Cleaner/Filter 0237.
7. Engine Cooling Fan (Out of View). See Cooling System
(Engine) 0239 orCooling
System (Aero Panel) 0241.
8. Brake Fluid Reservoir. See Brake Fluid 0247.
9. Clutch Master Cylinder Reservoir (If Equipped). See
Hydraulic Clutch 0237. 10. Windshield Washer Fluid
Reservoir. See “Adding Washer
Fluid” under Washer
Fluid 0246.
Page 231 of 360
Chevrolet Corvette Owner Manual (GMNA-Localizing-U.S./Canada/Mexico-
9956103) - 2017 - crc - 4/28/16
230 Vehicle Care
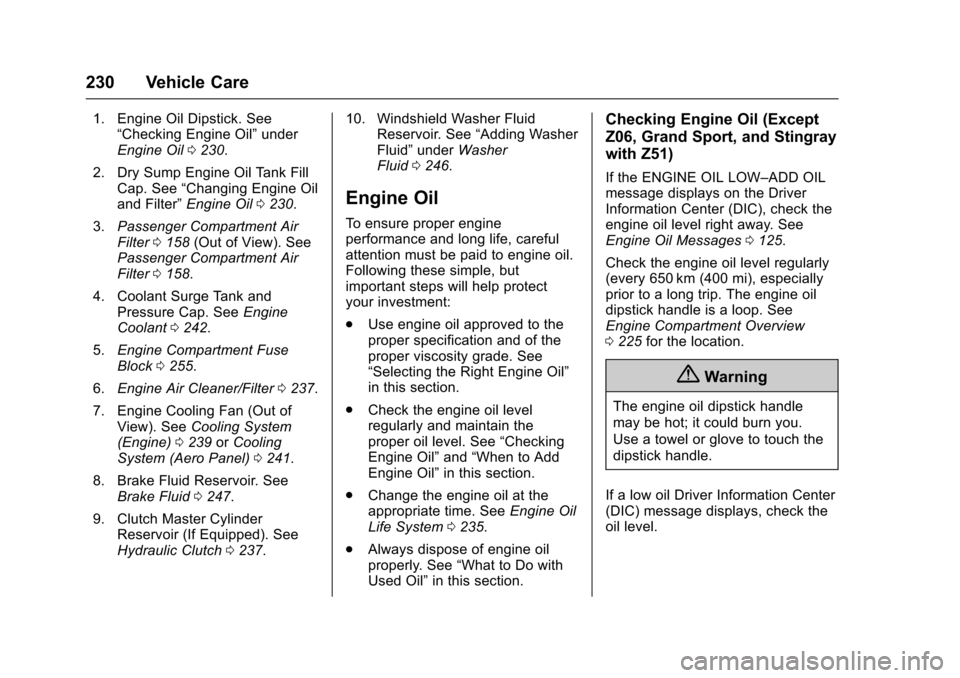
1. Engine Oil Dipstick. See“Checking Engine Oil” under
Engine Oil 0230.
2. Dry Sump Engine Oil Tank Fill Cap. See “Changing Engine Oil
and Filter” Engine Oil 0230.
3. Passenger Compartment Air
Filter 0158 (Out of View). See
Passenger Compartment Air
Filter 0158.
4. Coolant Surge Tank and Pressure Cap. See Engine
Coolant 0242.
5. Engine Compartment Fuse
Block 0255.
6. Engine Air Cleaner/Filter 0237.
7. Engine Cooling Fan (Out of View). See Cooling System
(Engine) 0239 orCooling
System (Aero Panel) 0241.
8. Brake Fluid Reservoir. See Brake Fluid 0247.
9. Clutch Master Cylinder Reservoir (If Equipped). See
Hydraulic Clutch 0237. 10. Windshield Washer Fluid
Reservoir. See “Adding Washer
Fluid” under Washer
Fluid 0246.
Engine Oil
To ensure proper engine
performance and long life, careful
attention must be paid to engine oil.
Following these simple, but
important steps will help protect
your investment:
.
Use engine oil approved to the
proper specification and of the
proper viscosity grade. See
“Selecting the Right Engine Oil”
in this section.
. Check the engine oil level
regularly and maintain the
proper oil level. See “Checking
Engine Oil” and“When to Add
Engine Oil” in this section.
. Change the engine oil at the
appropriate time. See Engine Oil
Life System 0235.
. Always dispose of engine oil
properly. See “What to Do with
Used Oil” in this section.
Checking Engine Oil (Except
Z06, Grand Sport, and Stingray
with Z51)
If the ENGINE OIL LOW–ADD OIL
message displays on the Driver
Information Center (DIC), check the
engine oil level right away. See
Engine Oil Messages 0125.
Check the engine oil level regularly
(every 650 km (400 mi), especially
prior to a long trip. The engine oil
dipstick handle is a loop. See
Engine Compartment Overview
0 225 for the location.
{Warning
The engine oil dipstick handle
may be hot; it could burn you.
Use a towel or glove to touch the
dipstick handle.
If a low oil Driver Information Center
(DIC) message displays, check the
oil level.
Page 232 of 360
Chevrolet Corvette Owner Manual (GMNA-Localizing-U.S./Canada/Mexico-
9956103) - 2017 - crc - 4/28/16
Vehicle Care 231
Follow these guidelines:
.To get an accurate reading, park
the vehicle on level ground.
Check the engine oil level after
the engine has been off for at
least two hours. Checking the
engine oil level on steep grades
or too soon after engine shutoff
can result in incorrect readings.
Accuracy improves when
checking a cold engine prior to
starting. Remove the dipstick
and check the level.
. If unable to wait two hours, the
engine must be off for at least
15 minutes if the engine is
warm, or at least 30 minutes if
the engine is not warm. Pull out
the dipstick, wipe it with a clean
paper towel or cloth, then push it
back in all the way. Remove it
again, keeping the tip down, and
check the level.When to Add Engine Oil
(Except Z06, Grand Sport, and
Stingray with Z51)
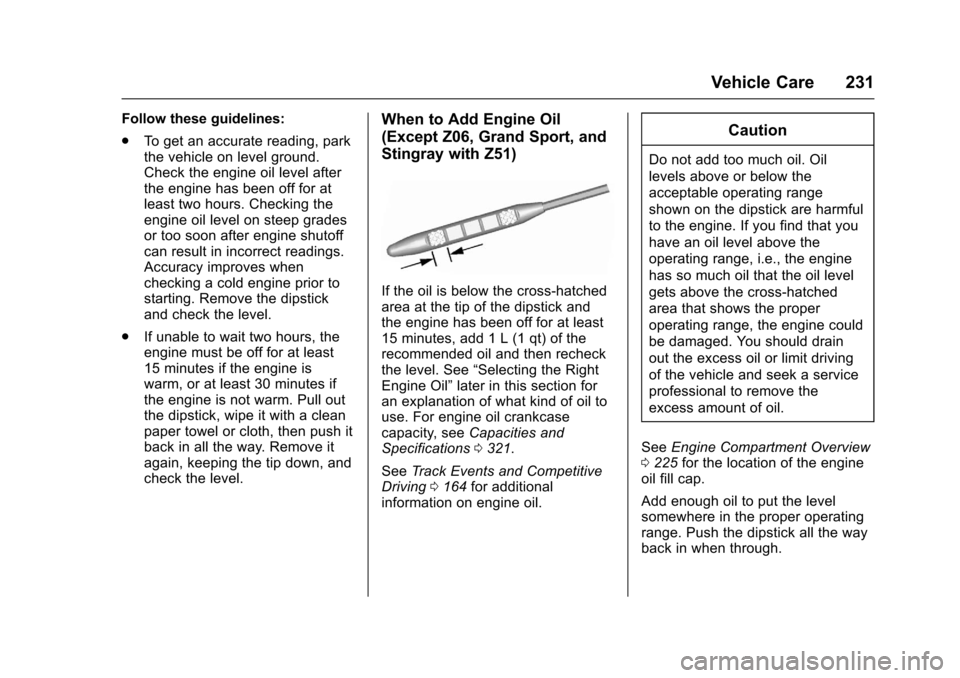
If the oil is below the cross-hatched
area at the tip of the dipstick and
the engine has been off for at least
15 minutes, add 1 L (1 qt) of the
recommended oil and then recheck
the level. See “Selecting the Right
Engine Oil” later in this section for
an explanation of what kind of oil to
use. For engine oil crankcase
capacity, see Capacities and
Specifications 0321.
See Track Events and Competitive
Driving 0164 for additional
information on engine oil.
Caution
Do not add too much oil. Oil
levels above or below the
acceptable operating range
shown on the dipstick are harmful
to the engine. If you find that you
have an oil level above the
operating range, i.e., the engine
has so much oil that the oil level
gets above the cross-hatched
area that shows the proper
operating range, the engine could
be damaged. You should drain
out the excess oil or limit driving
of the vehicle and seek a service
professional to remove the
excess amount of oil.
See Engine Compartment Overview
0 225 for the location of the engine
oil fill cap.
Add enough oil to put the level
somewhere in the proper operating
range. Push the dipstick all the way
back in when through.
Page 233 of 360
Chevrolet Corvette Owner Manual (GMNA-Localizing-U.S./Canada/Mexico-
9956103) - 2017 - crc - 4/28/16
232 Vehicle Care
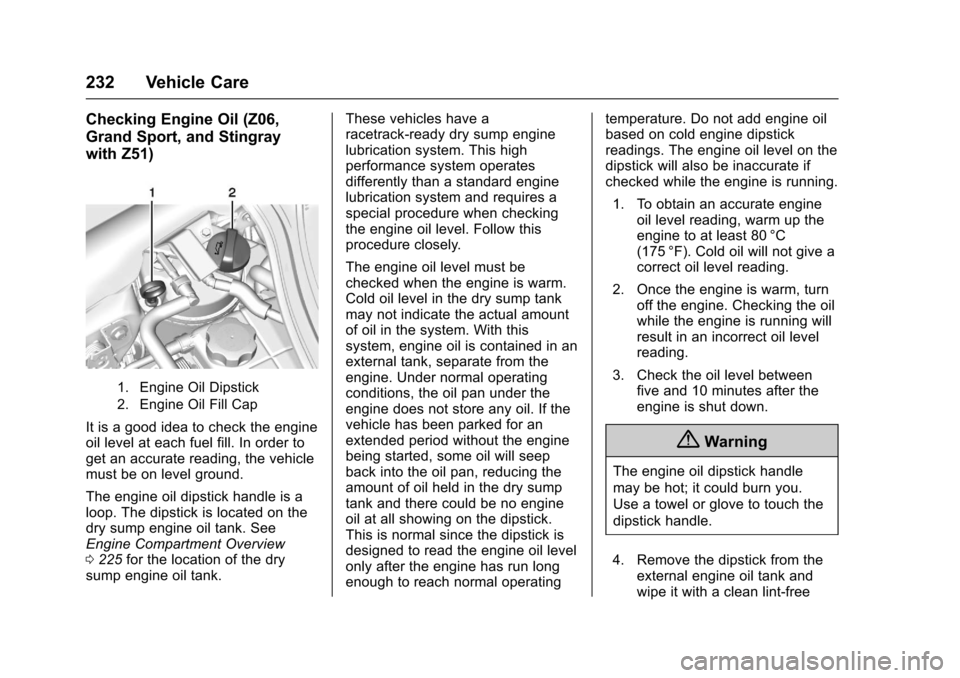
Checking Engine Oil (Z06,
Grand Sport, and Stingray
with Z51)
1. Engine Oil Dipstick
2. Engine Oil Fill Cap
It is a good idea to check the engine
oil level at each fuel fill. In order to
get an accurate reading, the vehicle
must be on level ground.
The engine oil dipstick handle is a
loop. The dipstick is located on the
dry sump engine oil tank. See
Engine Compartment Overview
0225 for the location of the dry
sump engine oil tank. These vehicles have a
racetrack-ready dry sump engine
lubrication system. This high
performance system operates
differently than a standard engine
lubrication system and requires a
special procedure when checking
the engine oil level. Follow this
procedure closely.
The engine oil level must be
checked when the engine is warm.
Cold oil level in the dry sump tank
may not indicate the actual amount
of oil in the system. With this
system, engine oil is contained in an
external tank, separate from the
engine. Under normal operating
conditions, the oil pan under the
engine does not store any oil. If the
vehicle has been parked for an
extended period without the engine
being started, some oil will seep
back into the oil pan, reducing the
amount of oil held in the dry sump
tank and there could be no engine
oil at all showing on the dipstick.
This is normal since the dipstick is
designed to read the engine oil level
only after the engine has run long
enough to reach normal operatingtemperature. Do not add engine oil
based on cold engine dipstick
readings. The engine oil level on the
dipstick will also be inaccurate if
checked while the engine is running.
1. To obtain an accurate engine oil level reading, warm up the
engine to at least 80 °C
(175 °F). Cold oil will not give a
correct oil level reading.
2. Once the engine is warm, turn off the engine. Checking the oil
while the engine is running will
result in an incorrect oil level
reading.
3. Check the oil level between five and 10 minutes after the
engine is shut down.
{Warning
The engine oil dipstick handle
may be hot; it could burn you.
Use a towel or glove to touch the
dipstick handle.
4. Remove the dipstick from the external engine oil tank and
wipe it with a clean lint-free