check CHEVROLET CORVETTE 2017 7.G Manual PDF
[x] Cancel search | Manufacturer: CHEVROLET, Model Year: 2017, Model line: CORVETTE, Model: CHEVROLET CORVETTE 2017 7.GPages: 360, PDF Size: 6.3 MB
Page 282 of 360
Chevrolet Corvette Owner Manual (GMNA-Localizing-U.S./Canada/Mexico-
9956103) - 2017 - crc - 4/28/16
Vehicle Care 281
to the generation of heat and its
ability to dissipate heat when
tested under controlled
conditions on a specified indoor
laboratory test wheel. Sustained
high temperature can cause the
material of the tire to degenerate
and reduce tire life, and
excessive temperature can lead
to sudden tire failure. The grade
C corresponds to a level of
performance which all
passenger car tires must meet
under the Federal Motor Safety
Standard No. 109. Grades B and
A represent higher levels of
performance on the laboratory
test wheel than the minimum
required by law. Warning: The
temperature grade for this tire is
established for a tire that is
properly inflated and not
overloaded. Excessive speed,
underinflation, or excessive
loading, either separately or in
combination, can cause heat
buildup and possible tire failure.Wheel Alignment and Tire
Balance
The tires and wheels were aligned
and balanced at the factory to
provide the longest tire life and best
overall performance. Adjustments to
wheel alignment and tire balancing
are not necessary on a regular
basis. Consider an alignment check
if there is unusual tire wear. If the
vehicle is vibrating when driving on
a smooth road, the tires and wheels
may need to be rebalanced. See
your dealer for proper diagnosis.
Road Imperfections/Crown Effects
The vehicle's precise steering and
handling make it very responsive to
road surface feedback. A slight pull
may be felt in the steering
depending on the crown of the road
and/or other road surface variations
such as troughs or ruts. This is
normal and the vehicle does not
require service.Tire Chatter/Hop
When driving at slow speeds and in
very tight turns, the vehicle may
have tire chatter/hop. This is normal
and the vehicle does not require
service.
Wheel Replacement
Replace any wheel that is bent,
cracked, or badly rusted or
corroded. If wheel nuts keep coming
loose, the wheel, wheel bolts, and
wheel nuts should be replaced.
If the wheel leaks air, replace it.
Some aluminum wheels can be
repaired. See your dealer if any of
these conditions exist.
Your dealer will know the kind of
wheel that is needed.
Each new wheel should have the
same load-carrying capacity,
diameter, width, offset, and be
mounted the same way as the one it
replaces.
Replace wheels, wheel bolts,
or wheel nuts with new GM original
equipment parts.
Page 287 of 360

Chevrolet Corvette Owner Manual (GMNA-Localizing-U.S./Canada/Mexico-
9956103) - 2017 - crc - 4/28/16
286 Vehicle Care
5. Tire Sealant Canister
6. Sealant/Air Hose (Clear)
7. Air Only Hose (Black)
8. Power Plug
9. Canister Release Button(Under Sealant/Air Hose)
Tire Sealant
Read and follow the safe handling
instructions on the label adhered to
the sealant canister.
Check the tire sealant expiration
date on the sealant canister. The
sealant canister should be replaced
before its expiration date.
Replacement sealant canisters are
available at your local dealer. See
“Removal and Installation of the
Sealant Canister” later in this
section.
There is only enough sealant to seal
one tire. After usage, the sealant
canister and sealant/air hose
assembly must be replaced. See
“Removal and Installation of the
Sealant Canister” later in this
section.
Using the Tire Sealant and
Compressor Kit to Temporarily
Seal and Inflate a
Punctured Tire
Follow the directions closely for
correct sealant usage.
1. Selector Switch (Sealant/Air
or Air Only)
2. On/Off Button
3. Pressure Gauge
4. Pressure Deflation Button
Page 289 of 360

Chevrolet Corvette Owner Manual (GMNA-Localizing-U.S./Canada/Mexico-
9956103) - 2017 - crc - 4/28/16
288 Vehicle Care
is on. Turn the compressor off
to get an accurate reading. The
compressor may be turned on/
off until the correct pressure is
reached.
Caution
If the recommended pressure
cannot be reached after
approximately 25 minutes, the
vehicle should not be driven
farther. The tire is too severely
damaged and the tire sealant and
compressor kit cannot inflate the
tire. Remove the power plug from
the accessory power outlet and
unscrew the inflating hose from
the tire valve. SeeRoadside
Assistance Program 0328.
11. Press the on/off button (2) to turn the tire sealant and
compressor kit off.
The tire is not sealed and will
continue to leak air until the
vehicle is driven and the
sealant is distributed in the tire, therefore, Steps 12–18 must be
done immediately after
Step 11.
Be careful while handling the
tire sealant and compressor kit
as it could be warm after
usage.
12. Unplug the power plug (8) from the accessory power outlet in
the vehicle.
13. Turn the sealant/air hose (6) counterclockwise to remove it
from the tire valve stem.
14. Replace the tire valve stem cap.
15. Replace the sealant/air hose (6), and the power plug (8)
back in their original location.
16. If the flat tire was able to inflate
to the recommended inflation
pressure, remove the maximum speed label from the
sealant canister (5) and place it
in a highly visible location. Do
not exceed the speed on this
label until the damaged tire is
repaired or replaced.
17. Return the equipment to its original storage location in the
vehicle.
18. Immediately drive the vehicle 8 km (5 mi) to distribute the
sealant in the tire.
19. Stop at a safe location and check the tire pressure. Refer
to Steps 1–11 under “Using the
Tire Sealant and Compressor
Kit without Sealant to Inflate a
Tire (Not Punctured).”
If the tire pressure has fallen
more than 68 kPa (10 psi)
below the recommended
inflation pressure, stop driving
the vehicle. The tire is too
severely damaged and the tire
sealant cannot seal the tire.
See Roadside Assistance
Program 0328.
Page 294 of 360
Chevrolet Corvette Owner Manual (GMNA-Localizing-U.S./Canada/Mexico-
9956103) - 2017 - crc - 4/28/16
Vehicle Care 293
Caution
Ignoring these steps could result
in costly damage to the vehicle
that would not be covered by the
vehicle warranty. Trying to start
the vehicle by pushing or pulling it
will not work, and it could damage
the vehicle.
The battery is under a battery cover
in the hatch/trunk area on the
passenger side under the carpet.
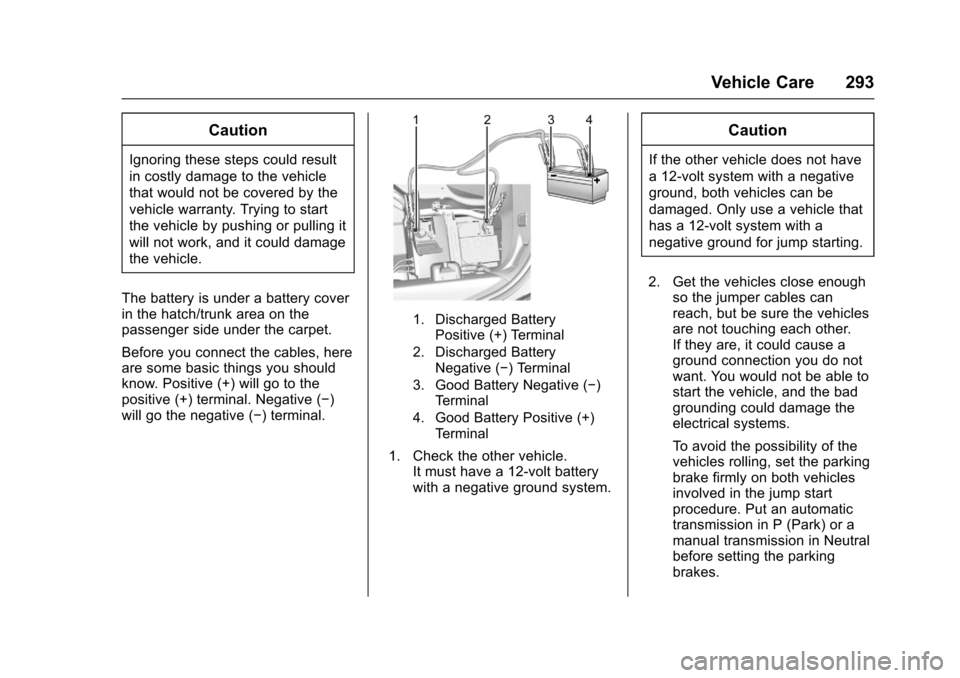
Before you connect the cables, here
are some basic things you should
know. Positive (+) will go to the
positive (+) terminal. Negative (−)
will go the negative (−) terminal.
1. Discharged Battery Positive (+) Terminal
2. Discharged Battery Negative (−) Terminal
3. Good Battery Negative (−) Terminal
4. Good Battery Positive (+) Terminal
1. Check the other vehicle. It must have a 12-volt battery
with a negative ground system.
Caution
If the other vehicle does not have
a 12-volt system with a negative
ground, both vehicles can be
damaged. Only use a vehicle that
has a 12-volt system with a
negative ground for jump starting.
2. Get the vehicles close enough so the jumper cables can
reach, but be sure the vehicles
are not touching each other.
If they are, it could cause a
ground connection you do not
want. You would not be able to
start the vehicle, and the bad
grounding could damage the
electrical systems.
To avoid the possibility of the
vehicles rolling, set the parking
brake firmly on both vehicles
involved in the jump start
procedure. Put an automatic
transmission in P (Park) or a
manual transmission in Neutral
before setting the parking
brakes.
Page 295 of 360
Chevrolet Corvette Owner Manual (GMNA-Localizing-U.S./Canada/Mexico-
9956103) - 2017 - crc - 4/28/16
294 Vehicle Care
Caution
If any accessories are left on or
plugged in during the jump
starting procedure, they could be
damaged. The repairs would not
be covered by the vehicle
warranty. Whenever possible, turn
off or unplug all accessories on
either vehicle when jump starting.
3. Turn off the ignition on both vehicles. Unplug unnecessary
accessories plugged into the
cigarette lighter or the
accessory power outlet. Turn
off the radio and all lamps that
are not needed. This will avoid
sparks and help save both
batteries. And it could save the
radio!
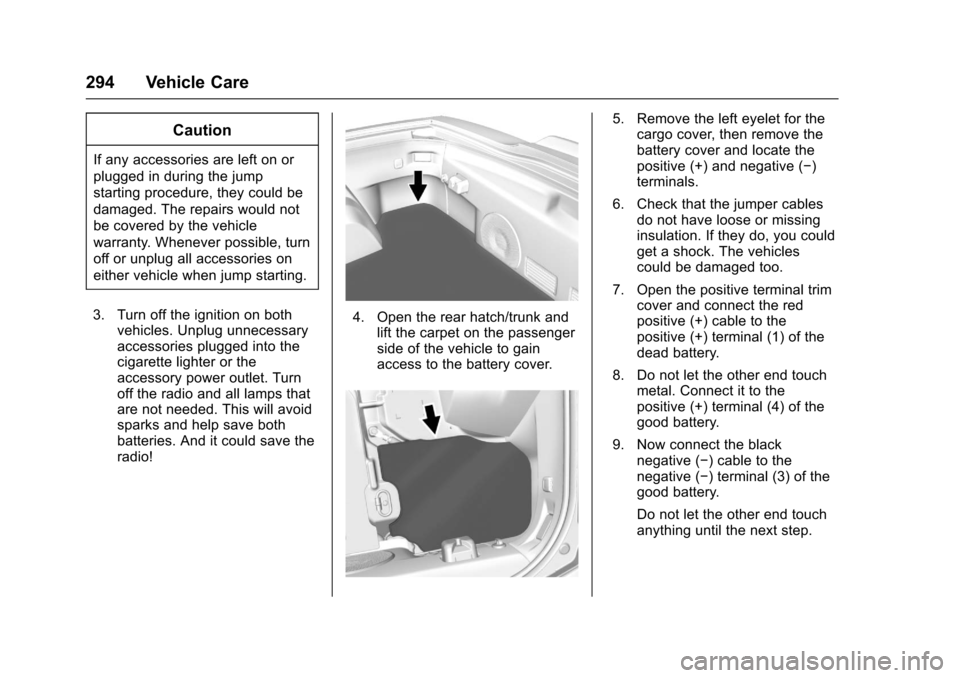
4. Open the rear hatch/trunk andlift the carpet on the passenger
side of the vehicle to gain
access to the battery cover.
5. Remove the left eyelet for thecargo cover, then remove the
battery cover and locate the
positive (+) and negative (−)
terminals.
6. Check that the jumper cables do not have loose or missing
insulation. If they do, you could
get a shock. The vehicles
could be damaged too.
7. Open the positive terminal trim cover and connect the red
positive (+) cable to the
positive (+) terminal (1) of the
dead battery.
8. Do not let the other end touch metal. Connect it to the
positive (+) terminal (4) of the
good battery.
9. Now connect the black negative (−) cable to the
negative (−) terminal (3) of the
good battery.
Do not let the other end touch
anything until the next step.
Page 301 of 360

Chevrolet Corvette Owner Manual (GMNA-Localizing-U.S./Canada/Mexico-
9956103) - 2017 - crc - 4/28/16
300 Vehicle Care
Caution
Chrome wheels and other chrome
trim may be damaged if the
vehicle is not washed after driving
on roads that have been sprayed
with magnesium, calcium,
or sodium chloride. These
chlorides are used on roads for
conditions such as ice and dust.
Always wash the chrome with
soap and water after exposure.
Caution
To avoid surface damage, do not
use strong soaps, chemicals,
abrasive polishes, cleaners,
brushes, or cleaners that contain
acid on aluminum or
chrome-plated wheels. Use only
approved cleaners. Also, never
drive a vehicle with aluminum or
chrome-plated wheels through an
automatic car wash that uses
silicone carbide tire cleaning(Continued)
Caution (Continued)
brushes. Damage could occur
and the repairs would not be
covered by the vehicle warranty.
Brake System
Visually inspect brake lines and
hoses for proper hook-up, binding,
leaks, cracks, chafing, etc. Inspect
disc brake pads for wear and rotors
for surface condition. Inspect drum
brake linings/shoes for wear or
cracks. Inspect other brake parts,
including drums, wheel cylinders,
calipers, parking brake, master
cylinder, brake fluid reservoir,
vacuum pipes, electric vacuum
pump including bracket and vent
hose, if equipped.
Steering, Suspension, and
Chassis Components
Visually inspect steering,
suspension, and chassis
components for damaged, loose,
or missing parts or signs of wear at
least once a year. Inspect power steering for proper
hook-up, binding, leaks, cracks,
chafing, etc.
Visually check constant velocity joint
boots and axle seals for leaks.
Body Component Lubrication
Lubricate all key lock cylinders,
hood hinges, and liftgate hinges,
unless the components are plastic.
Applying silicone grease on
weatherstrips with a clean cloth will
make them last longer, seal better,
and not stick or squeak.
Underbody Maintenance
At least twice a year, spring and fall,
use plain water to flush any
corrosive materials from the
underbody. Take care to thoroughly
clean any areas where mud and
other debris can collect.
Do not directly power wash the
transfer case and/or front/rear axle
output seals. High pressure water
can overcome the seals and
contaminate the fluid. Contaminated
fluid will decrease the life of the
transfer case and/or axles and
should be replaced.
Page 305 of 360

Chevrolet Corvette Owner Manual (GMNA-Localizing-U.S./Canada/Mexico-
9956103) - 2017 - crc - 4/28/16
304 Vehicle Care
Caution (Continued)
the vehicle, blot immediately and
clean with a soft cloth dampened
with a mild soap solution.
Damage caused by air fresheners
would not be covered by the
vehicle warranty.
Cargo Cover and
Convenience Net
Wash with warm water and mild
detergent. Do not use chlorine
bleach. Rinse with cold water, and
then dry completely.
Care of Safety Belts
Keep belts clean and dry.
{Warning
Do not bleach or dye safety belt
webbing. It may severely weaken
the webbing. In a crash, they
might not be able to provide
adequate protection. Clean and(Continued)
Warning (Continued)
rinse safety belt webbing only
with mild soap and lukewarm
water. Allow the webbing to dry.
Floor Mats
{Warning
If a floor mat is the wrong size or
is not properly installed, it can
interfere with the pedals.
Interference with the pedals can
cause unintended acceleration
and/or increased stopping
distance which can cause a crash
and injury. Make sure the floor
mat does not interfere with the
pedals.
Use the following guidelines for
proper floor mat usage:
. The original equipment floor
mats were designed for your
vehicle. If the floor mats need
replacing, it is recommended
that GM certified floor mats be purchased. Non-GM floor mats
may not fit properly and may
interfere with the accelerator or
brake pedal. Always check that
the floor mats do not interfere
with the pedals.
. Do not use a floor mat if the
vehicle is not equipped with a
floor mat retainer on the driver
side floor.
. Use the floor mat with the
correct side up. Do not turn
it over.
. Do not place anything on top of
the driver side floor mat.
. Use only a single floor mat on
the driver side.
. Do not place one floor mat on
top of another.
Page 307 of 360
Chevrolet Corvette Owner Manual (GMNA-Localizing-U.S./Canada/Mexico-
9956103) - 2017 - crc - 4/28/16
306 Service and Maintenance
Service and
Maintenance
General Information
General Information . . . . . . . . . . 306
Maintenance Schedule
Maintenance Schedule . . . . . . . 307
Special Application Services
Special ApplicationServices . . . . . . . . . . . . . . . . . . . . 312
Additional Maintenance
and Care
Additional Maintenanceand Care . . . . . . . . . . . . . . . . . . . . 313
Recommended Fluids,
Lubricants, and Parts
Recommended Fluids andLubricants . . . . . . . . . . . . . . . . . . . 316
Maintenance Replacement Parts . . . . . . . . . . . . . . . . . . . . . . . . 317
Maintenance Records
Maintenance Records . . . . . . . . 319
General Information
Your vehicle is an important
investment. This section describes
the required maintenance for the
vehicle. Follow this schedule to help
protect against major repair
expenses resulting from neglect or
inadequate maintenance. It may
also help to maintain the value of
the vehicle if it is sold. It is the
responsibility of the owner to have
all required maintenance performed.
Your dealer has trained technicians
who can perform required
maintenance using genuine
replacement parts. They have
up-to-date tools and equipment for
fast and accurate diagnostics. Many
dealers have extended evening and
Saturday hours, courtesy
transportation, and online
scheduling to assist with service
needs.
Your dealer recognizes the
importance of providing
competitively priced maintenance
and repair services. With trained
technicians, the dealer is the place
for routine maintenance such as oil changes and tire rotations and
additional maintenance items like
tires, brakes, batteries, and wiper
blades.
Caution
Damage caused by improper
maintenance can lead to costly
repairs and may not be covered
by the vehicle warranty.
Maintenance intervals, checks,
inspections, recommended fluids,
and lubricants are important to
keep the vehicle in good working
condition.
The Required Services are the
responsibility of the vehicle owner.
It is recommended to have your
dealer perform these services every
12 000 km/7,500 mi. Proper vehicle
maintenance helps to keep the
vehicle in good working condition,
improves fuel economy, and
reduces vehicle emissions.
Because of the way people use
vehicles, maintenance needs vary.
There may need to be more
Page 308 of 360

Chevrolet Corvette Owner Manual (GMNA-Localizing-U.S./Canada/Mexico-
9956103) - 2017 - crc - 4/28/16
Service and Maintenance 307
frequent checks and services. The
Additional Required Services -
Normal are for vehicles that:
.Carry passengers and cargo
within recommended limits on
the Tire and Loading Information
label. See Vehicle Load
Limits 0177.
. Are driven on reasonable road
surfaces within legal driving
limits.
. Use the recommended fuel. See
Fuel 0213.
Refer to the information in the
Maintenance Schedule Additional
Required Services - Normal chart.
The Additional Required Services -
Severe are for vehicles that are:
. Mainly driven in heavy city traffic
in hot weather.
. Mainly driven in hilly or
mountainous terrain.
. Frequently towing a trailer.
. Used for high speed or
competitive driving. .
Used for taxi, police, or delivery
service.
Refer to the information in the
Maintenance Schedule Additional
Required Services - Severe chart.
{Warning
Performing maintenance work can
be dangerous and can cause
serious injury. Perform
maintenance work only if the
required information, proper tools,
and equipment are available.
If they are not, see your dealer to
have a trained technician do the
work. See Doing Your Own
Service Work 0223.
Maintenance
Schedule
Owner Checks and Services
At Each Fuel Stop
.
Check the engine oil level. See
Engine Oil 0230.
Once a Month
. Check the tire inflation
pressures. See Tire
Pressure 0270.
. Inspect the tires for wear. See
Tire Inspection 0275.
. Check the windshield washer
fluid level. See Washer
Fluid 0246.
Engine Oil Change
When the CHANGE ENGINE OIL
SOON message displays, have the
engine oil and filter changed within
the next 1 000 km/600 mi. If driven
under the best conditions, the
engine oil life system may not
indicate the need for vehicle service
for up to a year. The engine oil and
filter must be changed at least once
Page 309 of 360

Chevrolet Corvette Owner Manual (GMNA-Localizing-U.S./Canada/Mexico-
9956103) - 2017 - crc - 4/28/16
308 Service and Maintenance
a year and the oil life system must
be reset. Your trained dealer
technician can perform this work.
If the engine oil life system is reset
accidentally, service the vehicle
within 5 000 km/3,000 mi since the
last service. Reset the oil life
system when the oil is changed.
SeeEngine Oil Life System 0235.
Dry Sump Engine Break-In Oil
Change
If equipped with a dry sump engine,
the initial oil and filter change must
be performed at 800 km/500 mi.
Follow the engine oil life system for
every oil change thereafter.
Required Services Every
12 000 km/7,500 mi
. Check engine oil level and oil
life percentage. If needed,
change engine oil and filter, and
reset oil life system. See Engine
Oil 0230 andEngine Oil Life
System 0235.
. Check engine coolant level. See
Engine Coolant 0242.
. Check windshield washer fluid
level. See Washer Fluid 0246. .
Visually inspect windshield wiper
blades for wear, cracking,
or contamination. See Exterior
Care 0296. Replace worn or
damaged wiper blades. See
Wiper Blade
Replacement 0251.
. Check tire inflation pressures.
See Tire Pressure 0270.
. Inspect tire wear. See Tire
Inspection 0275.
. Visually check for fluid leaks.
. Inspect engine air cleaner filter.
See Engine Air Cleaner/
Filter 0237.
. Inspect brake system. See
Exterior Care 0296.
. Visually inspect steering,
suspension, and chassis
components for damaged, loose,
or missing parts or signs of
wear. See Exterior Care 0296.
. Check restraint system
components. See Safety System
Check 067.
. Visually inspect fuel system for
damage or leaks. .
Visually inspect exhaust system
and nearby heat shields for
loose or damaged parts.
. Lubricate body components. See
Exterior Care 0296.
. Check starter switch. See Starter
Switch Check 0250.
. Check automatic transmission
shift lock control function. See
Automatic Transmission Shift
Lock Control Function
Check 0251.
. Check parking brake and
automatic transmission park
mechanism. See Park Brake and
P (Park) Mechanism
Check 0251.
. Check accelerator pedal for
damage, high effort, or binding.
Replace if needed.
. Visually inspect gas strut for
signs of wear, cracks, or other
damage. Check the hold open
ability of the strut. See your
dealer if service is required.