tires CHEVROLET CORVETTE 2021 User Guide
[x] Cancel search | Manufacturer: CHEVROLET, Model Year: 2021, Model line: CORVETTE, Model: CHEVROLET CORVETTE 2021Pages: 338, PDF Size: 6.56 MB
Page 188 of 338
Chevrolet Corvette Owner Manual (GMNA-Localizing-U.S./Canada/Mexico-
14622938) - 2021 - CRC - 2/10/21
Driving and Operating 187
Warning (Continued)
vehicle occupants could drown. Do not
ignore police warnings and be very
cautious about trying to drive through
flowing water.
Caution
Driving through deep puddles or standing
water can cause water to come in
through the engine air intake and
damage the engine. If deep puddles or
standing water cannot be avoided,
proceed with caution and do not exceed
8 km/h (5 mph). Do not drive through
water that may come close to or cover
the vehicle’s underbody.
Hydroplaning
Hydroplaning is dangerous. Water can build
up under the vehicle's tires so they actually
ride on the water. This can happen if the
road is wet enough and you are going fast
enough. When the vehicle is hydroplaning, it
has little or no contact with the road.There is no hard and fast rule about
hydroplaning. The best advice is to slow
down when the road is wet.
Other Rainy Weather Tips
Besides slowing down, other wet weather
driving tips include:
.Allow extra following distance.
.Pass with caution.
.Keep windshield wiping equipment in
good shape.
.Keep the windshield washer fluid reservoir
filled.
.Have good tires with proper tread depth.
See
Tires 0261.
.Turn off cruise control.
Hill and Mountain Roads
Driving on steep hills or through mountains
is different than driving on flat or rolling
terrain. Tips include:
.When driving downhill in D (Drive), the
vehicle may automatically downshift to
assist with speed control.
.A lower gear may also be selected to
provide further speed control.
{Warning
Using the brakes to slow the vehicle on a
long downhill slope can cause brake
overheating, can reduce brake
performance, and could result in a loss of
braking. Shift the transmission to a lower
gear to let the engine assist the brakes
on a steep downhill slope.
{Warning
Coasting downhill in N (Neutral) or with
the ignition off is dangerous. This can
cause overheating of the brakes and loss
of steering assist. Always have the engine
running and the vehicle in gear.
.Drive at speeds that keep the vehicle in
its own lane. Do not swing wide or cross
the center line.
.Be alert on top of hills; something could
be in your lane (e.g., stalled car, crash).
.Pay attention to special road signs (e.g.,
falling rocks area, winding roads, long
grades, passing or no-passing zones) and
take appropriate action.
Page 189 of 338
Chevrolet Corvette Owner Manual (GMNA-Localizing-U.S./Canada/Mexico-
14622938) - 2021 - CRC - 2/10/21
188 Driving and Operating
Winter Driving
Driving on Snow or Ice
Snow or ice between the tires and the road
creates less traction or grip, so drive
carefully. Wet ice can occur at about 0 °C
(32 °F) when freezing rain begins to fall.
Avoid driving on wet ice or in freezing rain
until roads can be treated.
For Slippery Road Driving:
.Accelerate gently. Accelerating too quickly
causes the wheels to spin and makes the
surface under the tires slick.
.Turn on Traction Control. SeeTraction
Control/Electronic Stability Control 0206.
.The Antilock Brake System (ABS) improves
vehicle stability during hard stops, but
the brakes should be applied sooner than
when on dry pavement. See Antilock
Brake System (ABS) 0204.
.Allow greater following distance and
watch for slippery spots. Icy patches can
occur on otherwise clear roads in shaded
areas. The surface of a curve or an
overpass can remain icy when the
surrounding roads are clear. Avoid sudden
steering maneuvers and braking while
on ice.
.Turn off cruise control.
.Turn on Weather Mode. See Driver Mode
Control 0208.
Blizzard Conditions
Stop the vehicle in a safe place and signal
for help. Stay with the vehicle unless there
is help nearby. If possible, use Roadside
Assistance. See Roadside Assistance Program
0 311. To get help and keep everyone in the
vehicle safe:
.Turn on the hazard warning flashers.
.Tie a red cloth to an outside mirror.
{Warning
Snow can trap engine exhaust under the
vehicle. This may cause exhaust gases to
get inside. Engine exhaust contains
carbon monoxide (CO), which cannot be
seen or smelled. It can cause
unconsciousness and even death.
If the vehicle is stuck in snow:
.Clear snow from the base of the
vehicle, especially any blocking the
exhaust pipe.
(Continued)
Warning (Continued)
.Open a window about 5 cm (2 in) on
the vehicle side that is away from the
wind, to bring in fresh air.
.Fully open the air outlets on or under
the instrument panel.
.Adjust the climate control system to
circulate the air inside the vehicle and
set the fan speed to the highest
setting. See“Climate Control Systems.”
For more information about CO, see
Engine Exhaust 0197.
To save fuel, run the engine for short
periods to warm the vehicle and then shut
the engine off and partially close the
window. Moving about to keep warm also
helps.
If it takes time for help to arrive, when
running the engine, push the accelerator
pedal slightly so the engine runs faster than
the idle speed. This keeps the battery
charged to restart the vehicle and to signal
for help with the headlamps. Do this as
little as possible, to save fuel.
Page 190 of 338
Chevrolet Corvette Owner Manual (GMNA-Localizing-U.S./Canada/Mexico-
14622938) - 2021 - CRC - 2/10/21
Driving and Operating 189
If the Vehicle Is Stuck
Slowly and cautiously spin the wheels to
free the vehicle when stuck in sand, mud,
ice, or snow.
If stuck too severely for the traction system
to free the vehicle, turn the traction system
off and use the rocking method. See
Traction Control/Electronic Stability Control
0206.
{Warning
If the vehicle's tires spin at high speed,
they can explode, and you or others
could be injured. The vehicle can
overheat, causing an engine compartment
fire or other damage. Spin the wheels as
little as possible and avoid going above
56 km/h (35 mph).
Rocking the Vehicle to Get it Out
Turn the steering wheel left and right to
clear the area around the front wheels. Turn
off any traction system. Shift back and forth
between R (Reverse) and a low forward gear,
spinning the wheels as little as possible. To
prevent transmission wear, wait until the
wheels stop spinning before shifting gears.
Release the accelerator pedal while shifting, and press lightly on the accelerator pedal
when the transmission is in gear. Slowly
spinning the wheels in the forward and
reverse directions causes a rocking motion
that could free the vehicle. If that does not
get the vehicle out after a few tries, it may
need to be towed out. If the vehicle does
need to be towed out, see
Towing the
Vehicle 0281.
Vehicle Load Limits
It is very important to know how much
weight the vehicle can carry. This
weight is called the vehicle capacity
weight and includes the weight of all
occupants, cargo, and all
nonfactory-installed options. Two labels
on the vehicle may show how much
weight it may properly carry: the Tire
and Loading Information label and the
Certification label.
{Warning
Do not load the vehicle any heavier
than the Gross Vehicle Weight Rating
(GVWR), or either the maximum
front or rear Gross Axle Weight
(Continued)
Warning (Continued)
Rating (GAWR). This can cause
systems to break and change the
way the vehicle handles. This could
cause loss of control and a crash.
Overloading can also reduce stopping
performance, damage the tires, and
shorten the life of the vehicle.
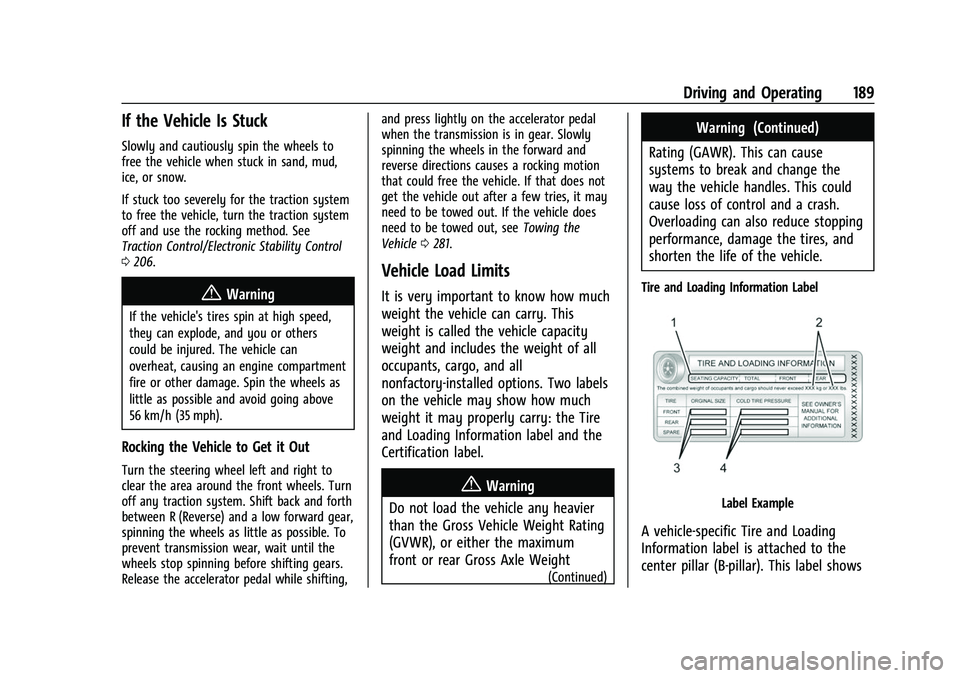
Tire and Loading Information Label
Label Example
A vehicle-specific Tire and Loading
Information label is attached to the
center pillar (B-pillar). This label shows
Page 191 of 338
Chevrolet Corvette Owner Manual (GMNA-Localizing-U.S./Canada/Mexico-
14622938) - 2021 - CRC - 2/10/21
190 Driving and Operating
the number of occupant seating
positions (1), and the maximum vehicle
capacity weight (2) in kilograms and
pounds.
The Tire and Loading Information label
also shows the size of the original
equipment tires (3) and the
recommended cold tire inflation
pressures (4). For more information on
tires and inflation seeTires0261 and
Tire Pressure 0267.
There is also important loading
information on the vehicle Certification
label. It may show the Gross Vehicle
Weight Rating (GVWR) and the Gross
Axle Weight Rating (GAWR) for the
front and rear axle. See “Certification
Label” later in this section.
Steps for Determining Correct Load Limit–
1.
Locate the statement "The combined
weight of occupants and cargo
should never exceed XXX kg or
XXX lbs." on your vehicle’s placard.
2.Determine the combined weight of
the driver and passengers that will
be riding in your vehicle.
3.Subtract the combined weight of the
driver and passengers from XXX kg
or XXX lbs.
4.The resulting figure equals the
available amount of cargo and
luggage load capacity. For example,
if the "XXX" amount equals 1400 lbs.
and there will be five 150 lb
passengers in your vehicle, the
amount of available cargo and
luggage load capacity is 650 lbs.
(1400-750 (5 x 150) = 650 lbs.)
5.Determine the combined weight of
luggage and cargo being loaded on
the vehicle. That weight may not
safely exceed the available cargo and
luggage load capacity calculated in
Step 4.
6.If your vehicle will be towing a
trailer, load from your trailer will be
transferred to your vehicle. Consult
this manual to determine how this
reduces the available cargo and
luggage load capacity of your
vehicle.” This vehicle is neither designed nor
intended to tow a trailer.
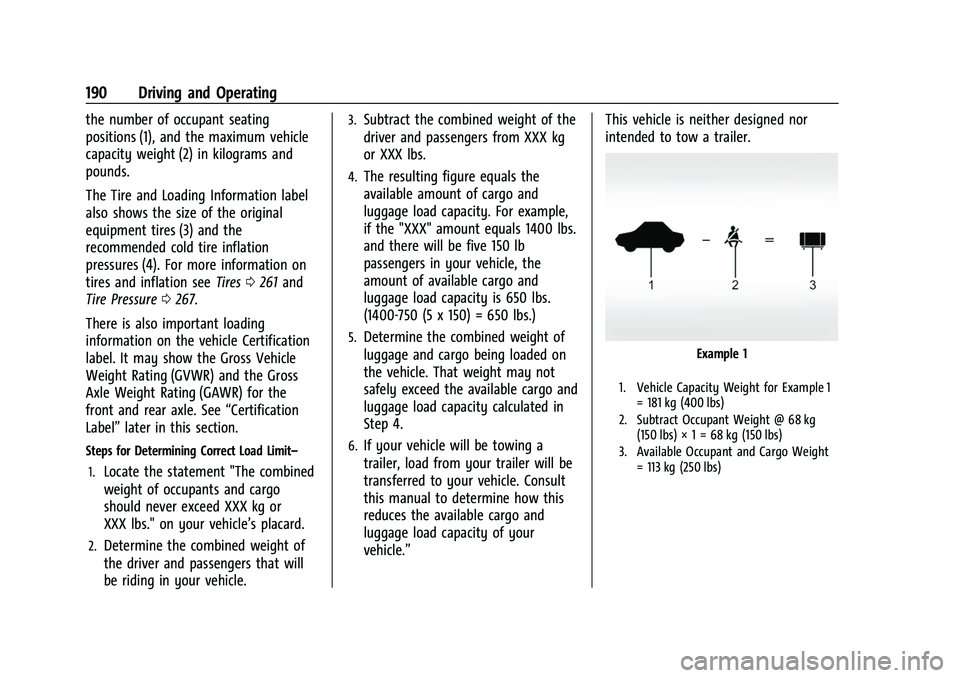
Example 1
1. Vehicle Capacity Weight for Example 1
= 181 kg (400 lbs)
2. Subtract Occupant Weight @ 68 kg (150 lbs) × 1 = 68 kg (150 lbs)
3. Available Occupant and Cargo Weight = 113 kg (250 lbs)
Page 193 of 338
Chevrolet Corvette Owner Manual (GMNA-Localizing-U.S./Canada/Mexico-
14622938) - 2021 - CRC - 2/10/21
192 Driving and Operating
{Warning
Things you put inside your vehicle
can strike and injure people in a
sudden stop or turn, or in a crash.
.Put things in the rear area of your
vehicle. Try to spread the weight
evenly.
.Never stack heavier things, like
suitcases, inside the vehicle so
that some of them are above the
tops of the seats.
.Do not leave an unsecured child
restraint in your vehicle.
.When you carry something inside
the vehicle, secure it whenever
you can.
Starting and Operating
New Vehicle Break-In
Follow these recommended guidelines
during the first 2 414 km (1,500 mi) of driving
this vehicle. Parts have a break-in period and
performance will be better in the long run. During the first 800 km (500 mi), engine
torque will be limited in low gears.
For the first 322 km (200 mi):
.To break in new tires, drive at moderate
speeds and avoid hard cornering.
.New brake linings also need a break-in
period. Avoid making hard stops. This is
recommended every time brake linings
are replaced.
For the first 800 km (500 mi):
.Avoid full throttle starts and abrupt stops.
.Do not exceed 4000 rpm.
.Avoid driving at any one constant speed,
fast or slow, including the use of cruise
control.
.Avoid downshifting to brake or slow the
vehicle when the engine speed will
exceed 4000 rpm.
.Do not let the engine labor. Never lug the
engine. This rule applies at all times, not
just during the break-in period.
For the first 2 414 km (1,500 mi):
.Do not participate in track events, sport
driving schools, or similar activities.
.Check engine oil with every refueling and
add if necessary. Oil and fuel
consumption may be higher than normal.
Front Air Dam (and Splitter)
If equipped, the front air dam and splitter
have minimal ground clearance.
Under normal operation, the components
will occasionally contact some road surfaces
(speed bumps, driveway ramps, etc.). This
can be heard inside the vehicle as a scraping
noise. This is normal and does not indicate a
problem.
Use care when approaching bumps or
objects on road surfaces and avoid them
when possible.
If equipped, the Front Lift System may be
used to increase front air dam or splitter
clearance. See Front Lift System 0214.
Composite Materials
This vehicle may be equipped with parts
containing carbon fiber, sheet-molding
compound, or other composite materials.
Dealer-installed accessories may also contain
composite materials. These parts and
accessories may include the splitter or rocker
extensions.
Page 202 of 338
Chevrolet Corvette Owner Manual (GMNA-Localizing-U.S./Canada/Mexico-
14622938) - 2021 - CRC - 2/10/21
Driving and Operating 201
Caution
Spinning the tires or holding the vehicle
in one place on a hill using only the
accelerator pedal may damage the
transmission. The repair will not be
covered by the vehicle warranty. If the
vehicle is stuck, do not spin the tires.
When stopping on a hill, use the brakes
to hold the vehicle in place.
Manual Mode
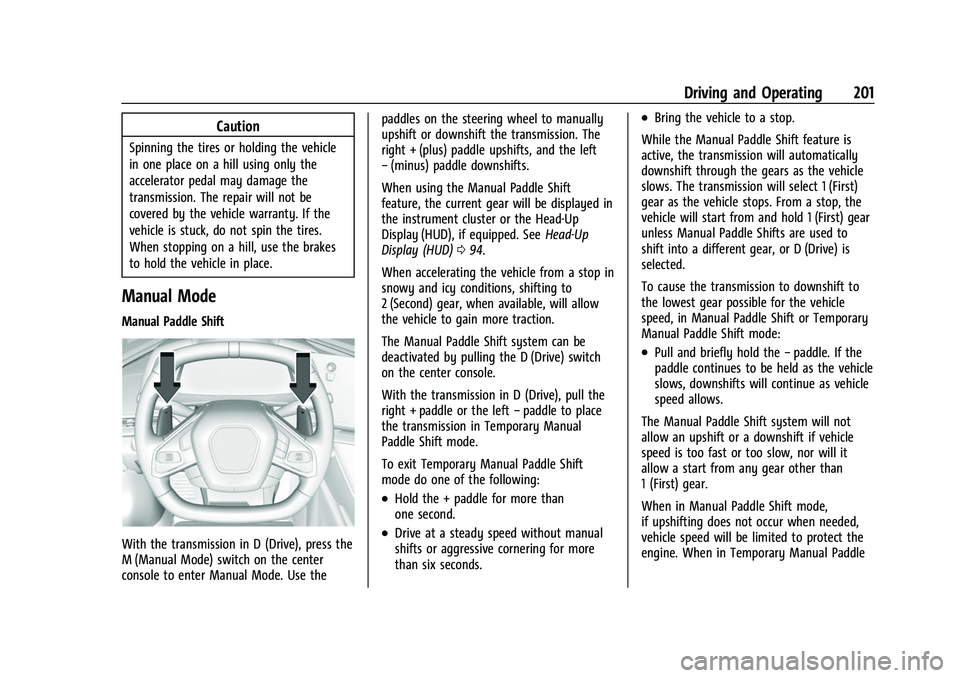
Manual Paddle Shift
With the transmission in D (Drive), press the
M (Manual Mode) switch on the center
console to enter Manual Mode. Use thepaddles on the steering wheel to manually
upshift or downshift the transmission. The
right + (plus) paddle upshifts, and the left
−
(minus) paddle downshifts.
When using the Manual Paddle Shift
feature, the current gear will be displayed in
the instrument cluster or the Head-Up
Display (HUD), if equipped. See Head-Up
Display (HUD) 094.
When accelerating the vehicle from a stop in
snowy and icy conditions, shifting to
2 (Second) gear, when available, will allow
the vehicle to gain more traction.
The Manual Paddle Shift system can be
deactivated by pulling the D (Drive) switch
on the center console.
With the transmission in D (Drive), pull the
right + paddle or the left −paddle to place
the transmission in Temporary Manual
Paddle Shift mode.
To exit Temporary Manual Paddle Shift
mode do one of the following:
.Hold the + paddle for more than
one second.
.Drive at a steady speed without manual
shifts or aggressive cornering for more
than six seconds.
.Bring the vehicle to a stop.
While the Manual Paddle Shift feature is
active, the transmission will automatically
downshift through the gears as the vehicle
slows. The transmission will select 1 (First)
gear as the vehicle stops. From a stop, the
vehicle will start from and hold 1 (First) gear
unless Manual Paddle Shifts are used to
shift into a different gear, or D (Drive) is
selected.
To cause the transmission to downshift to
the lowest gear possible for the vehicle
speed, in Manual Paddle Shift or Temporary
Manual Paddle Shift mode:
.Pull and briefly hold the −paddle. If the
paddle continues to be held as the vehicle
slows, downshifts will continue as vehicle
speed allows.
The Manual Paddle Shift system will not
allow an upshift or a downshift if vehicle
speed is too fast or too slow, nor will it
allow a start from any gear other than
1 (First) gear.
When in Manual Paddle Shift mode,
if upshifting does not occur when needed,
vehicle speed will be limited to protect the
engine. When in Temporary Manual Paddle
Page 231 of 338

Chevrolet Corvette Owner Manual (GMNA-Localizing-U.S./Canada/Mexico-
14622938) - 2021 - CRC - 2/10/21
230 Vehicle Care
Vehicle Care
General Information
General Information . . . . . . . . . . . . . . . . . . . 231
California Proposition 65 Warning . . . . . 231
California Perchlorate MaterialsRequirements . . . . . . . . . . . . . . . . . . . . . . . . 231
Accessories and Modifications . . . . . . . . . 231
Lifting the Vehicle . . . . . . . . . . . . . . . . . . . . . 232
Vehicle Checks
Doing Your Own Service Work . . . . . . . . . 233
Underhood Compartment Overview . . . 234
Engine Compartment Overview . . . . . . . . 235
Engine Oil . . . . . . . . . . . . . . . . . . . . . . . . . . . . . 237
Engine Oil Life System . . . . . . . . . . . . . . . . . 241
Dual Clutch Transmission Fluid . . . . . . . . 241
Dual Clutch Transmission Fluid Life System . . . . . . . . . . . . . . . . . . . . . . . . . . . . . . 242
Engine Air Filter Life System . . . . . . . . . . 242
Engine Air Cleaner/Filter . . . . . . . . . . . . . . . 243
Cooling System . . . . . . . . . . . . . . . . . . . . . . . . 245
Engine Overheating . . . . . . . . . . . . . . . . . . . 248
Washer Fluid . . . . . . . . . . . . . . . . . . . . . . . . . . 249
Brakes . . . . . . . . . . . . . . . . . . . . . . . . . . . . . . . . 249
Brake Fluid . . . . . . . . . . . . . . . . . . . . . . . . . . . . . 251
Battery - North America . . . . . . . . . . . . . . . 251
Park Brake and P (Park) Mechanism Check . . . . . . . . . . . . . . . . . . . . . . . . . . . . . . . . 252
Wiper Blade Replacement . . . . . . . . . . . . . 253 Windshield Replacement . . . . . . . . . . . . . . . 253
Gas Strut(s) . . . . . . . . . . . . . . . . . . . . . . . . . . . 254
Headlamp Aiming
Front Headlamp Aiming . . . . . . . . . . . . . . . 254
Bulb Replacement
LED Lighting . . . . . . . . . . . . . . . . . . . . . . . . . . . 255
Electrical System
Electrical System Overload . . . . . . . . . . . . . 255
Fuses and Circuit Breakers . . . . . . . . . . . . . 255
Instrument Panel Fuse Block . . . . . . . . . . 256
Rear Compartment Fuse Block . . . . . . . . . 258
Wheels and Tires
Tires . . . . . . . . . . . . . . . . . . . . . . . . . . . . . . . . . . . 261
All-Season Tires . . . . . . . . . . . . . . . . . . . . . . . 262
Winter Tires . . . . . . . . . . . . . . . . . . . . . . . . . . . 262
Run-Flat Tires . . . . . . . . . . . . . . . . . . . . . . . . . . 262
Low-Profile Tires . . . . . . . . . . . . . . . . . . . . . . . 263
Summer Tires . . . . . . . . . . . . . . . . . . . . . . . . . 263
Tire Sidewall Labeling . . . . . . . . . . . . . . . . . 263
Tire Designations . . . . . . . . . . . . . . . . . . . . . . 264
Tire Terminology and Definitions . . . . . . 265
Tire Pressure . . . . . . . . . . . . . . . . . . . . . . . . . . 267
Tire Pressure for High-Speed
Operation . . . . . . . . . . . . . . . . . . . . . . . . . . . 268
Tire Pressure Monitor System . . . . . . . . . 269
Tire Pressure Monitor Operation . . . . . . 270
Tire Inspection . . . . . . . . . . . . . . . . . . . . . . . . . 272
Tire Rotation . . . . . . . . . . . . . . . . . . . . . . . . . . 272 When It Is Time for New Tires . . . . . . . . 273
Buying New Tires . . . . . . . . . . . . . . . . . . . . . 274
Different Size Tires and Wheels . . . . . . . . 275
Uniform Tire Quality Grading . . . . . . . . . . 275
Wheel Alignment and Tire Balance . . . . 277
Wheel Replacement . . . . . . . . . . . . . . . . . . . 277
Tire Chains . . . . . . . . . . . . . . . . . . . . . . . . . . . . 278
If a Tire Goes Flat . . . . . . . . . . . . . . . . . . . . . 278
Jump Starting
Jump Starting - North America . . . . . . . . 278
Towing the Vehicle
Towing the Vehicle . . . . . . . . . . . . . . . . . . . . 281
Recreational Vehicle Towing . . . . . . . . . . . 283
Appearance Care
Exterior Care . . . . . . . . . . . . . . . . . . . . . . . . . . 283
Interior Care . . . . . . . . . . . . . . . . . . . . . . . . . . 288
Floor Mats . . . . . . . . . . . . . . . . . . . . . . . . . . . . 290
Page 251 of 338
Chevrolet Corvette Owner Manual (GMNA-Localizing-U.S./Canada/Mexico-
14622938) - 2021 - CRC - 2/10/21
250 Vehicle Care
Caution
Continuing to drive with worn-out brake
linings could result in costly brake
repairs.
Properly torqued wheel nuts are necessary
to help prevent brake pulsation. When tires
are rotated, inspect brake linings for wear
and evenly tighten wheel nuts in the proper
sequence to torque specifications. See
Capacities and Specifications 0305.
Brake linings should be replaced as complete
axle sets.
Brake Squeal and Brake Dust
Some driving conditions or climates can
cause a brake squeal when the brakes are
first applied, clearing up following several
applies. This does not mean something is
wrong with the brakes.
Vehicles equipped with high performance
brake systems provide superior fade
resistance but will produce increased brake
squeal and brake dust on the wheels and
calipers as compared to standard brake
linings. This is normal. To help reduce squeal, the brake pads are
treated with an anti-squeal paste that may
need to be reapplied periodically as part of
normal vehicle maintenance. The anti-squeal
paste will dissipate over time. Also, the use
of wheel cleaners or power washers directly
on the brake calipers may remove the
anti-squeal paste from the brake pads.
It may be necessary to reapply the
anti-squeal paste if it is removed during
cleaning.
If brake squeal is excessive, the anti-squeal
paste should be reapplied. The anti-squeal
paste should always be reapplied whenever
the brake pads are removed or replaced. See
your dealer for service.Brake Pedal Travel
See your dealer if the brake pedal does not
return to normal height, or if there is a
rapid increase in pedal travel. This could be
a sign that brake service may be required.
Replacing Brake System Parts
Always replace brake system parts with
new, approved replacement parts. If this is
not done, the brakes may not work
properly. The braking performance canchange in many ways if the wrong brake
parts are installed or if parts are improperly
installed.
The Brake Fade Warning Assist system is
designed for use with the factory-installed
brake pads or GM-approved replacement
pads. If the brake pads on the vehicle need
to be replaced, use GM-approved brake pads.
If this is not done, the brake fade warning
system may not function properly.
High Performance Brake Lining Cold
Weather Performance
If equipped with high performance brake
components, binding or clunking may be
noticeable when first moving the vehicle
after parking in cold weather when the
brakes have been wet, such as when driving
in the rain or after a car wash. This is
normal for brakes with high friction linings
and does not affect the operation of the
brakes. Apply the brakes several times until
the binding or clunking stops. If the vehicle
is washed before long term storage, drive it
and apply the brakes several times to
thoroughly dry the brakes before storing.
Page 262 of 338
Chevrolet Corvette Owner Manual (GMNA-Localizing-U.S./Canada/Mexico-
14622938) - 2021 - CRC - 2/10/21
Vehicle Care 261
FusesUsage
55 Automatic leveling control
56 –
57 Rear window defogger
58 –
59 Left/right window
60 Passenger power seat 61 Driver power seat
Relays Usage
1 –
2 Powertrain relay
3 Run/crank relay
4 Rear defogger relay 5 Air conditioning clutch relay
6 –
7 –
8 –
9 –
10 – Relays
Usage
11 –
12 –
13 –
14 Starter solenoid relay 15 –
Wheels and Tires
Tires
Every new GM vehicle has high-quality
tires made by a leading tire
manufacturer. See the warranty manual
for information regarding the tire
warranty and where to get service. For
additional information refer to the tire
manufacturer.
{Warning
.Poorly maintained and improperly
used tires are dangerous.
(Continued)
Warning (Continued)
.Overloading the tires can cause
overheating as a result of too
much flexing. There could be a
blowout and a serious crash. See
Vehicle Load Limits 0189.
.Underinflated tires pose the same
danger as overloaded tires. The
resulting crash could cause serious
injury. Check all tires frequently to
maintain the recommended
pressure. Tire pressure should be
checked when the tires are cold.
.Overinflated tires are more likely
to be cut, punctured, or broken by
a sudden impact —such as when
hitting a pothole. Keep tires at the
recommended pressure.
.Worn or old tires can cause a
crash. If the tread is badly worn,
replace them.
.Replace any tires that have been
damaged by impacts with
potholes, curbs, etc.
(Continued)
Page 263 of 338
Chevrolet Corvette Owner Manual (GMNA-Localizing-U.S./Canada/Mexico-
14622938) - 2021 - CRC - 2/10/21
262 Vehicle Care
Warning (Continued)
.Improperly repaired tires can cause
a crash. Only your dealer or an
authorized tire service center
should repair, replace, dismount,
and mount the tires.
.Do not spin the tires in excess of
56 km/h (35 mph) on slippery
surfaces such as snow, mud, ice,
etc. Excessive spinning may cause
the tires to explode.
See Tire Pressure for High-Speed
Operation 0268 for inflation pressure
adjustment for high-speed driving.
All-Season Tires
This vehicle may come with all-season tires.
These tires are designed to provide good
overall performance on most road surfaces
and weather conditions. Original equipment
tires designed to GM's specific tire
performance criteria have a TPC specification
code molded onto the sidewall. Original
equipment all-season tires can be identified
by the last two characters of this TPC code,
which will be “MS.” Consider installing winter tires on the
vehicle if frequent driving on snow or
ice-covered roads is expected. All-season tires
provide adequate performance for most
winter driving conditions, but they may not
offer the same level of traction or
performance as winter tires on snow or
ice-covered roads. See
Winter Tires0262.
Winter Tires
This vehicle was not originally equipped
with winter tires. Winter tires are designed
for increased traction on snow and
ice-covered roads. Consider installing winter
tires on the vehicle if frequent driving on ice
or snow covered roads is expected. See your
dealer for details regarding winter tire
availability and proper tire selection. Also,
see Buying New Tires 0274.
With winter tires, there may be decreased
dry road traction, increased road noise, and
shorter tread life. After changing to winter
tires, be alert for changes in vehicle
handling and braking.
If using winter tires:
.Use tires of the same brand and tread
type on all four wheel positions.
.Use only radial ply tires of the same size,
load range, and speed rating as the
original equipment tires.
Winter tires with the same speed rating as
the original equipment tires may not be
available for H, V, W, Y, and ZR speed rated
tires. If winter tires with a lower speed
rating are chosen, never exceed the tire's
maximum speed capability.
Run-Flat Tires
This vehicle, when new, may have had
run-flat tires. There is no spare tire, no tire
changing equipment, and no place to store a
tire in the vehicle.
{Warning
While driving with run-flat tires at a
reduced inflation pressure, avoid making
sudden stops or severe maneuvers as the
handling capabilities of the tires will be
reduced. Driving too fast could cause loss
of control and you or others could be
injured. Do not drive over 80 km/h
(50 mph) with the tire operating at low
pressure. Drive cautiously and check the
tire pressure as soon as possible.