run flat CHEVROLET CORVETTE GRAND SPORT 2015 Owners Manual
[x] Cancel search | Manufacturer: CHEVROLET, Model Year: 2015, Model line: CORVETTE GRAND SPORT, Model: CHEVROLET CORVETTE GRAND SPORT 2015Pages: 391, PDF Size: 5.36 MB
Page 102 of 391
Black plate (3,1)Chevrolet Corvette Owner Manual (GMNA-Localizing-U.S./Canada/Mexico-
7576293) - 2015 - crc - 6/17/14
Storage 4-3
convertible top. The trunk partition
must be in place for the convertible
top to move. If the trunk partition is
not properly in place, a message will
display and a noise will be heard.
SeeConvertible Top Messages on
page 5-35.
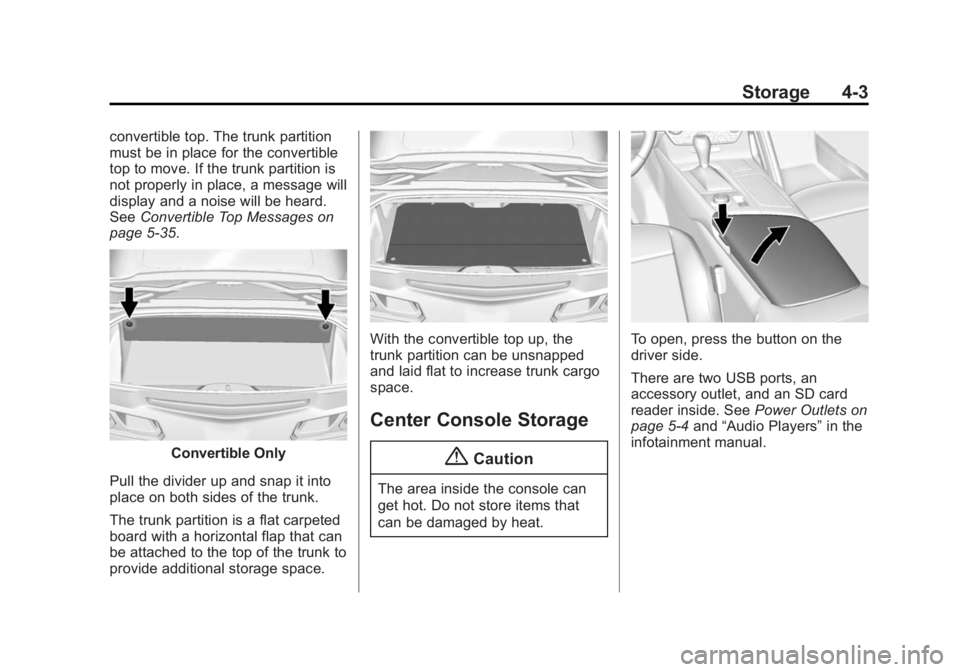
Convertible Only
Pull the divider up and snap it into
place on both sides of the trunk.
The trunk partition is a flat carpeted
board with a horizontal flap that can
be attached to the top of the trunk to
provide additional storage space.
With the convertible top up, the
trunk partition can be unsnapped
and laid flat to increase trunk cargo
space.
Center Console Storage
{Caution
The area inside the console can
get hot. Do not store items that
can be damaged by heat.
To open, press the button on the
driver side.
There are two USB ports, an
accessory outlet, and an SD card
reader inside. See Power Outlets on
page 5-4 and“Audio Players” in the
infotainment manual.
Page 240 of 391
Black plate (1,1)Chevrolet Corvette Owner Manual (GMNA-Localizing-U.S./Canada/Mexico-
7576293) - 2015 - crc - 6/17/14
Vehicle Care 10-1
Vehicle Care
General Information
General Information . . . . . . . . . . 10-2
California Proposition65 Warning . . . . . . . . . . . . . . . . . 10-2
California Perchlorate Materials Requirements . . . . 10-2
Accessories and Modifications . . . . . . . . . . . . . . . 10-2
Lifting the Vehicle . . . . . . . . . . . . 10-3
Vehicle Checks
Doing Your Own Service Work . . . . . . . . . . . . . . . 10-5
Hood . . . . . . . . . . . . . . . . . . . . . . . . 10-6
Engine Compartment Overview . . . . . . . . . . . . . . . . . . . 10-7
Engine Oil . . . . . . . . . . . . . . . . . . 10-12
Engine Oil Life System . . . . . 10-18
Automatic Transmission Fluid . . . . . . . . . . . . . . . . . . . . . . 10-19
Manual Transmission Fluid . . . . . . . . . . . . . . . . . . . . . . 10-19
Hydraulic Clutch . . . . . . . . . . . . 10-19
Engine Air Cleaner/Filter . . . . 10-20
Cooling System (Engine) . . . 10-22 Cooling System (Aero
Panel) . . . . . . . . . . . . . . . . . . . . . 10-23
Engine Coolant . . . . . . . . . . . . . 10-24
Engine Overheating . . . . . . . . 10-27
Washer Fluid . . . . . . . . . . . . . . . 10-28
Brakes . . . . . . . . . . . . . . . . . . . . . 10-29
Brake Fluid . . . . . . . . . . . . . . . . . 10-32
Battery . . . . . . . . . . . . . . . . . . . . . 10-33
Rear Axle . . . . . . . . . . . . . . . . . . 10-34
Starter Switch Check . . . . . . . 10-35
Automatic Transmission Shift Lock Control Function
Check . . . . . . . . . . . . . . . . . . . . . 10-35
Park Brake and P (Park) Mechanism Check . . . . . . . . 10-36
Wiper Blade Replacement . . . . . . . . . . . . . . 10-36
Windshield Replacement . . . 10-37
Headlamp Aiming
Headlamp Aiming . . . . . . . . . . 10-37
Bulb Replacement
Bulb Replacement . . . . . . . . . . 10-37
High Intensity Discharge (HID) Lighting . . . . . . . . . . . . . 10-37
LED Lighting . . . . . . . . . . . . . . . 10-38
License Plate Lamp . . . . . . . . 10-38
Replacement Bulbs . . . . . . . . . 10-38
Electrical System
Electrical System Overload . . . . . . . . . . . . . . . . . . 10-39
Fuses . . . . . . . . . . . . . . . . . . . . . . 10-39
Engine Compartment Fuse Block . . . . . . . . . . . . . . . . . . . . . 10-39
Rear Compartment Fuse Block . . . . . . . . . . . . . . . . . . . . . 10-43
Wheels and Tires
Tires . . . . . . . . . . . . . . . . . . . . . . . . 10-46
Winter Tires . . . . . . . . . . . . . . . . 10-47
Run-Flat Tires . . . . . . . . . . . . . . 10-48
Low-Profile Tires . . . . . . . . . . . 10-49
Competition OrientedTires . . . . . . . . . . . . . . . . . . . . . . 10-49
Summer Tires . . . . . . . . . . . . . . 10-50
Tire Sidewall Labeling . . . . . . 10-51
Tire Designations . . . . . . . . . . . 10-52
Tire Terminology and Definitions . . . . . . . . . . . . . . . . 10-53
Tire Pressure . . . . . . . . . . . . . . . 10-55
Tire Pressure for High-Speed Operation . . . . . . . . . . . . . . . . . 10-57
Tire Pressure Monitor System . . . . . . . . . . . . . . . . . . . 10-57
Tire Pressure Monitor Operation . . . . . . . . . . . . . . . . . 10-58
Tire Inspection . . . . . . . . . . . . . . 10-61
Page 287 of 391
Black plate (48,1)Chevrolet Corvette Owner Manual (GMNA-Localizing-U.S./Canada/Mexico-
7576293) - 2015 - crc - 6/17/14
10-48 Vehicle Care
If using winter tires:
.Use tires of the same brand and
tread type on all four wheel
positions.
.Use only radial ply tires of the
same size, load range, and
speed rating as the original
equipment tires.
Winter tires with the same speed
rating as the original equipment tires
may not be available for H, V, W, Y,
and ZR speed rated tires. If winter
tires with a lower speed rating are
chosen, never exceed the tire's
maximum speed capability.
Run-Flat Tires
This vehicle, when new, had run-flat
tires. There is no spare tire, no tire
changing equipment, and no place
to store a tire in the vehicle.
The vehicle also has a Tire
Pressure Monitor System (TPMS)
that indicates a loss of tire pressure
in any of the tires.
{Warning
If the low tire warning light
displays on the instrument cluster,
the handling capabilities will be
reduced during severe
maneuvers. Driving too fast could
cause loss of control and you or
others could be injured. Do not
drive over 80 km/h (50 mph) when
the low tire warning light is
displayed. Drive cautiously and
check the tire pressures as soon
as possible.
Run-flat tires can be driven on with
no air pressure. There is no need to
stop on the side of the road to
change the tire. Continue driving;
however, do not drive too far or too
fast. Driving on the tire may not be
possible if there is permanent
damage. To prevent permanent
damage, the tire can be driven with
no air pressure for up to 80 km
(50 mi) at speeds slower than
80 km/h (50 mph). As soon as possible, contact the nearest
authorized GM or run-flat servicing
facility for inspection and repair or
replacement.
When driving on a deflated run-flat
tire, avoid potholes and other road
hazards that could damage the tire
and/or wheel beyond repair. When a
tire has been damaged, or if driven
any distance while deflated, check
with an authorized run-flat tire
service center to determine whether
the tire can be repaired or should be
replaced. To maintain the run-flat
feature, all replacement tires must
be run-flat tires.
To locate the nearest GM or run-flat
servicing facility, call Customer
Assistance.
The valve stems on run-flat tires
have sensors that are part of the
TPMS. See
Tire Pressure Monitor
System on page 10-57. These
sensors contain batteries that are
designed to last for 10 years under
Page 288 of 391
Black plate (49,1)Chevrolet Corvette Owner Manual (GMNA-Localizing-U.S./Canada/Mexico-
7576293) - 2015 - crc - 6/17/14
Vehicle Care 10-49
normal driving conditions. See your
dealer for wheel or sensor
replacement.
{Caution
Using liquid sealants can damage
the tire valves and tire pressure
monitor sensors in the run-flat
tires. This damage is not covered
by the vehicle warranty. Do not
use liquid sealants in run-flat
tires.
Low-Profile Tires
Low-Profile Performance Tire
The original equipment tires on
this vehicle are classified as
low-profile performance tires.
These tires are designed for
very responsive driving on wet
or dry pavement, however, may
produce more road noise and
tend to wear faster.
{Caution
Low-profile tires are more
susceptible to damage from road
hazards or curb impact than
standard profile tires. Tire and/or
wheel assembly damage can
occur when coming into contact
with road hazards like potholes,
or sharp edged objects, or when
sliding into a curb. The warranty
does not cover this type of
damage. Keep tires set to the
correct inflation pressure and
when possible, avoid contact with
curbs, potholes, and other road
hazards.
Competition Oriented
Tires
This vehicle may come with P285/
30ZR19 and P335/25ZR20 Michelin
PS CUP2 competition oriented tires
that are DOT approved for street
use. Competition oriented tires use
a special tread pattern andcompound that provide more grip
than normal road tires. The
minimum tread depth will be
reached earlier than typical tires,
resulting in reduced tire life. This
special tread pattern and compound
will have decreased performance in
cold climates, heavy rain, and
standing water. We recommend
installing winter tires on the vehicle
when driving at temperatures below
approximately 10°C (50°F) or on ice
or snow covered roads. See
Winter
Tires on page 10-47.
{Warning
Driving on wet roads, in heavy
rain, or through standing water
with competition oriented tires
may cause hydroplaning and loss
of control. Use extreme caution
and drive slowly on wet roads.
Page 308 of 391
Black plate (69,1)Chevrolet Corvette Owner Manual (GMNA-Localizing-U.S./Canada/Mexico-
7576293) - 2015 - crc - 6/17/14
Vehicle Care 10-69
Warning (Continued)
suspension, or other vehicle
parts. The area damaged by the
tire chains could cause loss of
control and a crash. Use another
type of traction device only if its
manufacturer recommends it for
the vehicle's tire size combination
and road conditions. Follow that
manufacturer's instructions. To
avoid vehicle damage, drive
slowly and readjust or remove the
traction device if it contacts the
vehicle. Do not spin the wheels.
If traction devices are used, install
them on the rear tires.
If a Tire Goes Flat
It is unusual for a tire to blow out
while driving, especially if the tires
are maintained properly. If air goes
out of a tire, it is much more likely to
leak out slowly. SeeTires on
page 10-46 for additional
information. But if there ever is a
blowout, here are a few tips about
what to expect and what to do:
If a front tire fails, the flat tire
creates a drag that pulls the vehicle
toward that side. Take your foot off
the accelerator pedal and grip the
steering wheel firmly. Steer to
maintain lane position, and then
gently brake to a stop, well off the
road, if possible.
A rear blowout, particularly on a
curve, acts much like a skid and
may require the same correction as
used in a skid. Stop pressing the
accelerator pedal and steer to
straighten the vehicle. It may be
very bumpy and noisy. Gently brake
to a stop, well off the road,
if possible. The vehicle has no spare tire, no
tire changing equipment, and no
place to store a tire.
If the vehicle has run-flat tires, there
is no need to stop on the side of the
road to change a flat tire. See
Run-Flat Tires on page 10-48.
{Warning
Special tools and procedures are
required to service a run-flat tire.
If these special tools and
procedures are not used, injury or
vehicle damage may occur.
Always be sure the proper tools
and procedures, as described in
the service manual, are used.
If this vehicle does not have run-flat
tires and a tire goes flat, avoid
further tire and wheel damage by
driving slowly to a level place, well
off the road, if possible. Turn on the
hazard warning flashers. See
Hazard Warning Flashers on
page 6-4.
Page 309 of 391
Black plate (70,1)Chevrolet Corvette Owner Manual (GMNA-Localizing-U.S./Canada/Mexico-
7576293) - 2015 - crc - 6/17/14
10-70 Vehicle Care
1. Turn on the hazard warningflashers.
2. Set the parking brake firmly.
3. Put an automatic transmission in P (Park) or a manual
transmission in 1 (First) or
R (Reverse).
4. Turn off the ignition.
5. Inspect the flat tire.
{Warning
Driving on a flat tire will cause
permanent damage to the tire.
Re-inflating a tire after it has been
driven on while severely
underinflated or flat may cause a
blowout and a serious crash.
Never attempt to re-inflate a tire
that has been driven on while
severely underinflated or flat.
Have your dealer or an authorized
tire service center repair or
replace the flat tire as soon as
possible. If this vehicle has a tire sealant kit
and the tire has been separated
from the wheel, has damaged
sidewalls, or has a puncture larger
than 6 mm (0.25 in), the tire is too
severely damaged for the tire
sealant and compressor kit to be
effective. If the tire has a puncture
less than 6 mm (0.25 in) in the tread
area of the tire, see
Tire Sealant
and Compressor Kit on page 10-70.
Tire Sealant and
Compressor Kit
{Warning
Idling a vehicle in an enclosed
area with poor ventilation is
dangerous. Engine exhaust may
enter the vehicle. Engine exhaust
contains carbon monoxide (CO)
which cannot be seen or smelled.
It can cause unconsciousness
and even death. Never run the
engine in an enclosed area that
(Continued)
Warning (Continued)
has no fresh air ventilation. For
more information, seeEngine
Exhaust on page 9-26.
{Warning
Overinflating a tire could cause
the tire to rupture and you or
others could be injured. Be sure
to read and follow the tire sealant
and compressor kit instructions
and inflate the tire to its
recommended pressure. Do not
exceed the recommended
pressure.
Page 312 of 391
Black plate (73,1)Chevrolet Corvette Owner Manual (GMNA-Localizing-U.S./Canada/Mexico-
7576293) - 2015 - crc - 6/17/14
Vehicle Care 10-73
3. Pressure Gauge
4. Pressure Deflation Button
5. Tire Sealant Canister
6. Sealant/Air Hose (Clear)
7. Air Only Hose (Black)
8. Power Plug
9. Canister Release Button(Under Sealant/Air Hose)
When using the tire sealant and
compressor kit during cold
temperatures, warm the kit in a
heated environment for five minutes.
This will help to inflate the tire
faster.
If a tire goes flat, avoid further tire
and wheel damage by driving slowly
to a level place. Turn on the hazard
warning flashers. See Hazard
Warning Flashers on page 6-4.
See If a Tire Goes Flat on
page 10-69 for other important
safety warnings.
Do not remove any objects that
have penetrated the tire. 1. Remove the tire sealant and
compressor kit from its storage
location. See Storing the Tire
Sealant and Compressor Kit on
page 10-78.
2. Unwrap the sealant/air hose (6) and the power plug (8).
3. Place the kit on the ground. Make sure the tire valve stem is
positioned close to the ground
so the hose will reach it.
4. Remove the valve stem cap from the flat tire by turning it
counterclockwise.
5. Attach the sealant/air hose (6) onto the tire valve stem. Turn it
clockwise until it is tight. 6. Plug the power plug (8) into the
accessory power outlet in the
vehicle. Unplug all items from
other accessory power outlets.
See Power Outlets on page 5-4.
If the vehicle has an accessory
power outlet, do not use the
cigarette lighter.
If the vehicle only has a cigarette
lighter, use the cigarette lighter.
Do not pinch the power plug
cord in the door or window.
7. Start the vehicle. The vehicle must be running while using the
air compressor.
8. Press and turn the selector switch (1) counterclockwise to
the Sealant + Air position.
Page 316 of 391
Black plate (77,1)Chevrolet Corvette Owner Manual (GMNA-Localizing-U.S./Canada/Mexico-
7576293) - 2015 - crc - 6/17/14
Vehicle Care 10-77
3. Place the kit on the ground.Make sure the tire valve stem is
positioned close to the ground
so the hose will reach it.
4. Remove the tire valve stem cap from the flat tire by turning it
counterclockwise.
5. Attach the air only hose (7) onto the tire valve stem by turning it
clockwise until it is tight.
6. Plug the power plug (8) into the accessory power outlet in the
vehicle. Unplug all items from
other accessory power outlets.
See Power Outlets on page 5-4.
If the vehicle has an accessory
power outlet, do not use the
cigarette lighter.
If the vehicle only has a cigarette
lighter, use the cigarette lighter.
Do not pinch the power plug
cord in the door or window.
7. Start the vehicle. The vehicle must be running while using the
air compressor. 8. Press and turn the selector
switch (1) clockwise to the Air
Only position.
9. Press the on/off button (2) to turn the compressor on.
The compressor will inflate the
tire with air only.
10. Inflate the tire to the recommended inflation
pressure using the pressure
gauge (3). The recommended
inflation pressure can be found
on the Tire and Loading
Information label. See Tire
Pressure on page 10-55.
The pressure gauge (3) may
read higher than the actual tire
pressure while the compressor
is on. Turn the compressor off
to get an accurate reading. The
compressor may be turned on/
off until the correct pressure is
reached.
If you inflate the tire higher
than the recommended
pressure you can adjust the excess pressure by pressing
the pressure deflation
button (4) until the proper
pressure reading is reached.
This option is only functional
when using the air only
hose (7).
11. Press the on/off button (2) to turn the tire sealant and
compressor kit off.
Be careful while handling the
tire sealant and compressor kit
as it could be warm after
usage.
12. Unplug the power plug (8) from the accessory power outlet in
the vehicle.
13. Disconnect the air only hose (7) from the tire valve stem, by
turning it counterclockwise, and
replace the tire valve stem cap.
14. Replace the air only hose (7) and the power plug (8) and
cord back in its original
location.
Page 317 of 391
Black plate (78,1)Chevrolet Corvette Owner Manual (GMNA-Localizing-U.S./Canada/Mexico-
7576293) - 2015 - crc - 6/17/14
10-78 Vehicle Care
15. Place the equipment in theoriginal storage location in the
vehicle.
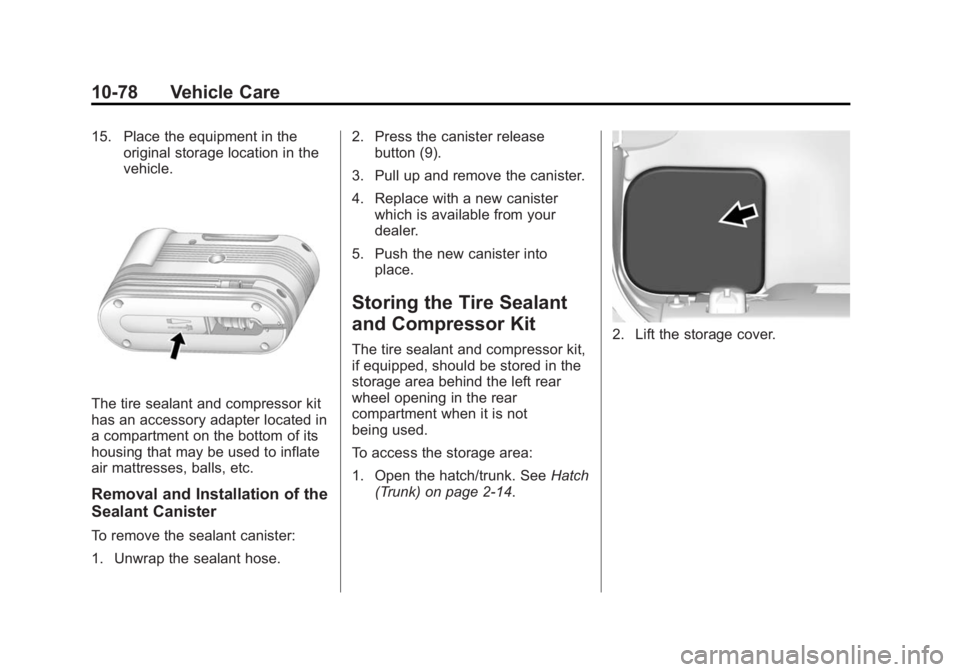
The tire sealant and compressor kit
has an accessory adapter located in
a compartment on the bottom of its
housing that may be used to inflate
air mattresses, balls, etc.
Removal and Installation of the
Sealant Canister
To remove the sealant canister:
1. Unwrap the sealant hose. 2. Press the canister release
button (9).
3. Pull up and remove the canister.
4. Replace with a new canister which is available from your
dealer.
5. Push the new canister into place.
Storing the Tire Sealant
and Compressor Kit
The tire sealant and compressor kit,
if equipped, should be stored in the
storage area behind the left rear
wheel opening in the rear
compartment when it is not
being used.
To access the storage area:
1. Open the hatch/trunk. See Hatch
(Trunk) on page 2-14.2. Lift the storage cover.
Page 383 of 391
Black plate (4,1)Chevrolet Corvette Owner Manual (GMNA-Localizing-U.S./Canada/Mexico-
7576293) - 2015 - crc - 6/17/14
i-4 INDEX
Electrical SystemEngine Compartment
Fuse Block . . . . . . . . . . . . . . . . 10-39
Fuses . . . . . . . . . . . . . . . . . . . . . . 10-39
Overload . . . . . . . . . . . . . . . . . . . 10-39
Rear Compartment Fuse Block . . . . . . . . . . . . . . . . . . . . . . 10-43
Emergency OnStar
®. . . . . . . . . . . . . . . . . . . . . . 14-3
Engine Air Cleaner/Filter . . . . . . . . . . . 10-20
Check and Service Engine
Soon Light . . . . . . . . . . . . . . . . . . 5-18
Compartment Overview . . . . . . . 10-7
Coolant . . . . . . . . . . . . . . . . . . . . . 10-24
Coolant Temperature Gauge . . . . . . . . . . . . . . . . . . . . . . 5-15
Coolant Temperature Warning Light . . . . . . . . . . . . . . . 5-23
Cooling System . . . . . . 10-22, 10-23
Cooling System Messages . . . 5-37
Drive Belt Routing . . . . . . . . . . . . 12-4
Exhaust . . . . . . . . . . . . . . . . . . . . . . 9-26
Oil Life System . . . . . . . . . . . . . 10-18
Oil Messages . . . . . . . . . . . . . . . . . 5-37
Overheating . . . . . . . . . . . . . . . . 10-27 Engine (cont'd)
Power Messages . . . . . . . . . . . . . 5-38
Pressure Light . . . . . . . . . . . . . . . . 5-24
Running While Parked . . . . . . . . 9-26
Starting . . . . . . . . . . . . . . . . . . . . . . . 9-21
Entry Lighting . . . . . . . . . . . . . . . . . . . 6-6
Event Data Recorders . . . . . . . . 13-14
Exit Lighting . . . . . . . . . . . . . . . . . . . . 6-6
Extender, Safety Belt . . . . . . . . . . 3-13
Exterior Lamp Controls . . . . . . . . . 6-1
Exterior Lamps Off Reminder . . . 6-2
Exterior Lighting Battery Saver . . . . . . . . . . . . . . . . . . . . . . . . . 6-7
F
FeaturesMemory . . . . . . . . . . . . . . . . . . . . . . . . 1-9
Filter, Engine Air Cleaner . . . . . . . . . 10-20
Flash-to-Pass . . . . . . . . . . . . . . . . . . . 6-2
Flashers, Hazard Warning . . . . . . 6-4
Flat Tire . . . . . . . . . . . . . . . . . . . . . . 10-69
Floor Mats . . . . . . . . . . . . . . . . . . . . 10-91 Fluid
Automatic Transmission . . . . 10-19
Brakes . . . . . . . . . . . . . . . . . . . . . . 10-32
Washer . . . . . . . . . . . . . . . . . . . . . 10-28
Folding Mirrors . . . . . . . . . . . . . . . . 2-20
Frequency Statement Radio . . . . . . . . . . . . . . . . . . . . . . . 13-12
Front Air Dam . . . . . . . . . . . . . . . . . 9-19
Front Seats Heated and Ventilated . . . . . . . . . 3-7
Fuel . . . . . . . . . . . . . . . . . . . . . . . . . . . 9-53
Additives . . . . . . . . . . . . . . . . . . . . . 9-54
Economy Driving . . . . . . . . . . . . . 1-21
Filling a Portable FuelContainer . . . . . . . . . . . . . . . . . . . 9-56
Filling the Tank . . . . . . . . . . . . . . . 9-55
Foreign Countries . . . . . . . . . . . . 9-54
Gauge . . . . . . . . . . . . . . . . . . . . . . . . 5-13
Low Fuel Warning Light . . . . . . . 5-25
Management, Active . . . . . . . . . . 9-25
Requirements, California . . . . . 9-54
System Messages . . . . . . . . . . . . 5-38