light CHEVROLET DYNASTY 1993 Service Manual
[x] Cancel search | Manufacturer: CHEVROLET, Model Year: 1993, Model line: DYNASTY, Model: CHEVROLET DYNASTY 1993Pages: 2438, PDF Size: 74.98 MB
Page 1647 of 2438
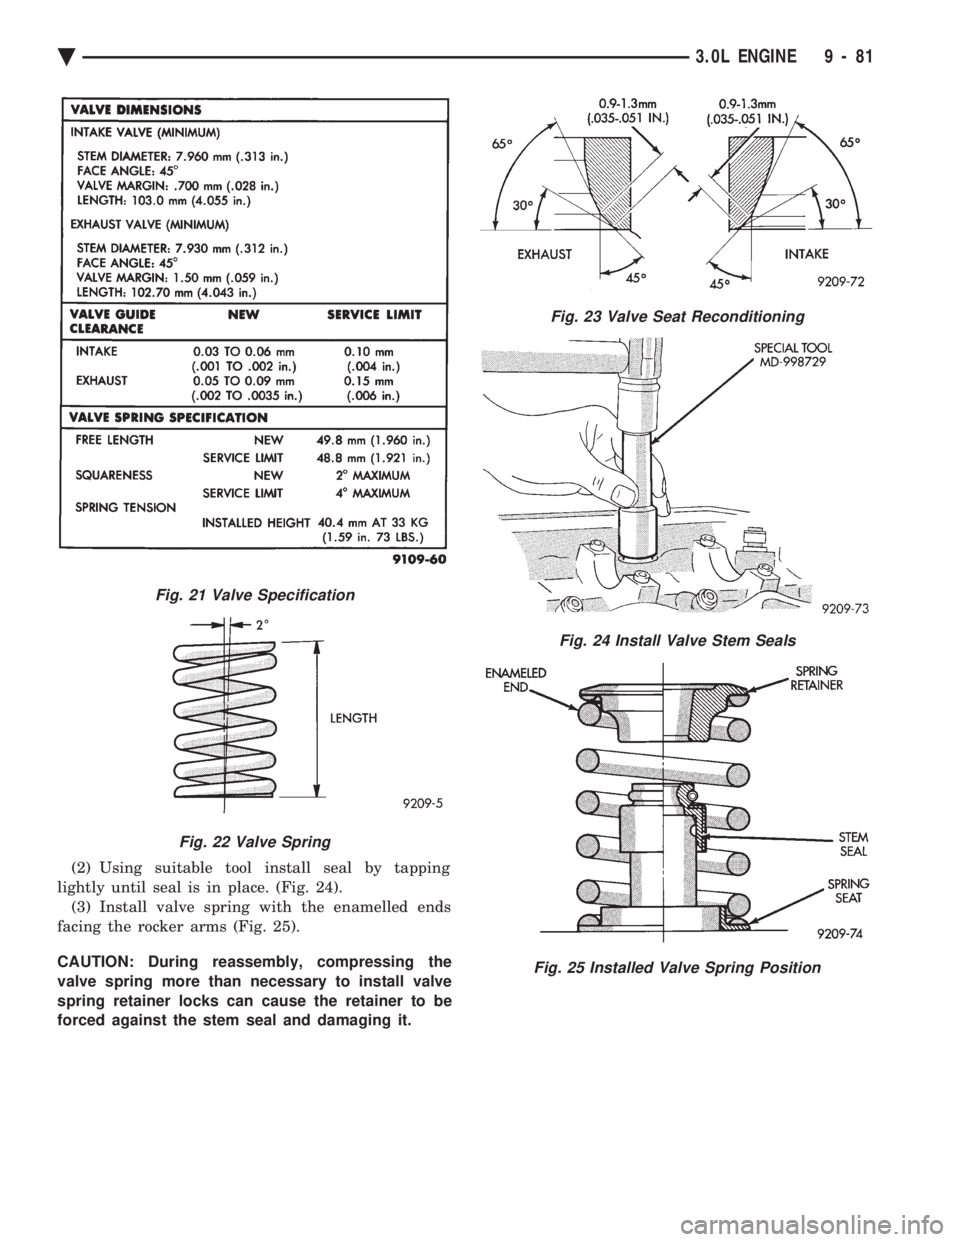
(2) Using suitable tool install seal by tapping
lightly until seal is in place. (Fig. 24). (3) Install valve spring with the enamelled ends
facing the rocker arms (Fig. 25).
CAUTION: During reassembly, compressing the
valve spring more than necessary to install valve
spring retainer locks can cause the retainer to be
forced against the stem seal and damaging it.
Fig. 21 Valve Specification
Fig. 22 Valve Spring
Fig. 23 Valve Seat Reconditioning
Fig. 24 Install Valve Stem Seals
Fig. 25 Installed Valve Spring Position
Ä 3.0L ENGINE 9 - 81
Page 1655 of 2438

(3) Apply light coating of engine oil to the entire
circumference of oil seal lip. (4) Install seal assembly on cylinder block and
tighten bolts to 12 N Im (104 in. lbs.)
FRONT CRANKSHAFT OIL PUMP AND OIL
SEAL
(1) Install oil pump gasket and oil pump case
(Figs. 1 and 14). CAUTION: Install bolts, depending on length in lo-
cations shown in (Fig. 14).
(2) Using front crankshaft oil seal installer Special
Tool MB998306 install oil seal in oil pump (Fig. 15).
CYLINDER BLOCK
Inspect cylinder block for scratches, cracks and rust
or corrosion, and repair or replace as required.
Fig. 10 Crankshaft Main Bearing Cap
Fig. 11 Checking Crankshaft End PlayFig. 12 Install Crankshaft Rear Oil Seal
Ä 3.0L ENGINE 9 - 89
Page 1665 of 2438
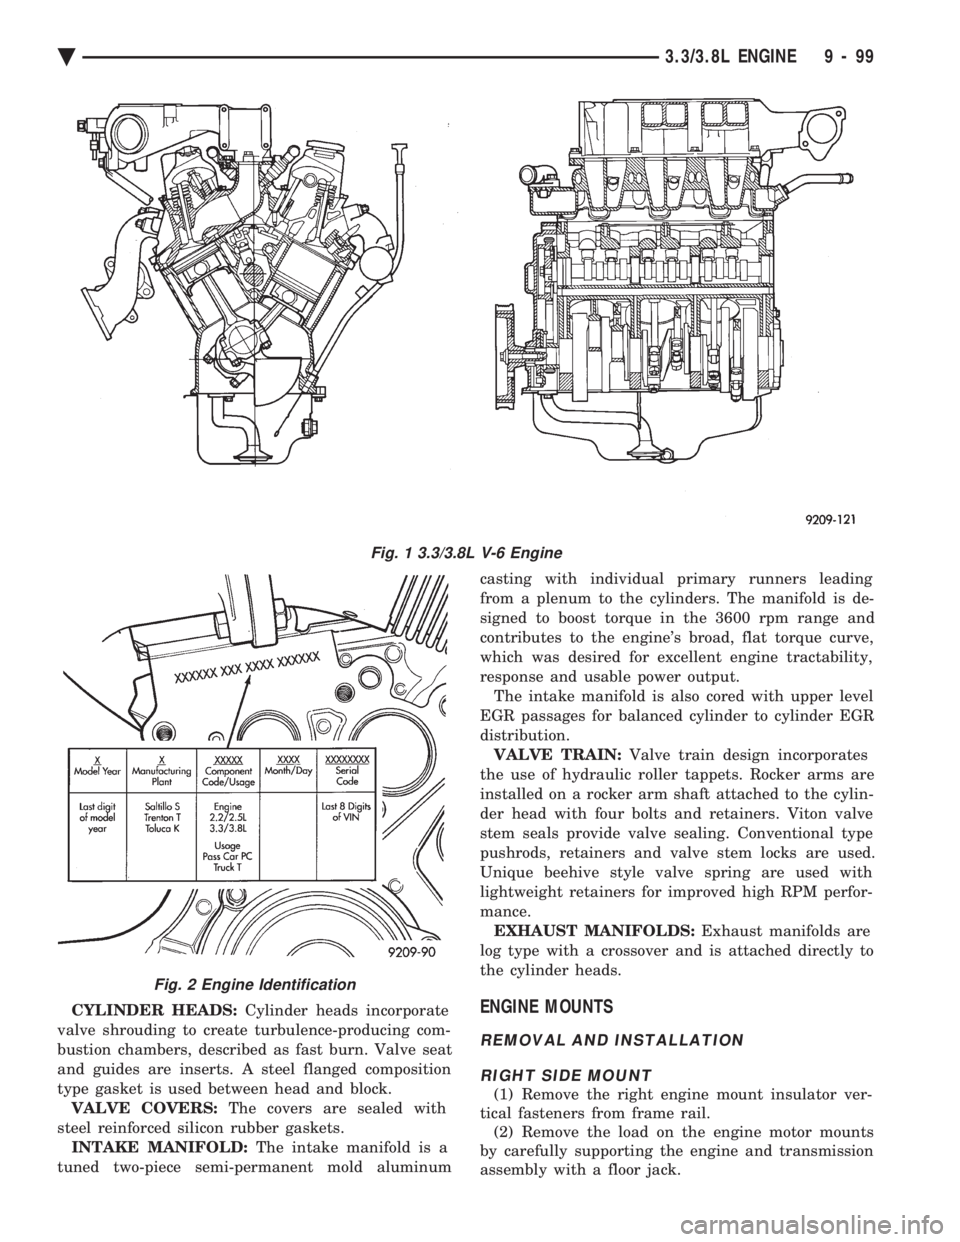
CYLINDER HEADS: Cylinder heads incorporate
valve shrouding to create turbulence-producing com-
bustion chambers, described as fast burn. Valve seat
and guides are inserts. A steel flanged composition
type gasket is used between head and block. VALVE COVERS: The covers are sealed with
steel reinforced silicon rubber gaskets. INTAKE MANIFOLD: The intake manifold is a
tuned two-piece semi-permanent mold aluminum casting with individual primary runners leading
from a plenum to the cylinders. The manifold is de-
signed to boost torque in the 3600 rpm range and
contributes to the engine's broad, flat torque curve,
which was desired for excellent engine tractability,
response and usable power output. The intake manifold is also cored with upper level
EGR passages for balanced cylinder to cylinder EGR
distribution. VALVE TRAIN: Valve train design incorporates
the use of hydraulic roller tappets. Rocker arms are
installed on a rocker arm shaft attached to the cylin-
der head with four bolts and retainers. Viton valve
stem seals provide valve sealing. Conventional type
pushrods, retainers and valve stem locks are used.
Unique beehive style valve spring are used with
lightweight retainers for improved high RPM perfor-
mance. EXHAUST MANIFOLDS: Exhaust manifolds are
log type with a crossover and is attached directly to
the cylinder heads.ENGINE MOUNTS
REMOVAL AND INSTALLATION
RIGHT SIDE MOUNT
(1) Remove the right engine mount insulator ver-
tical fasteners from frame rail. (2) Remove the load on the engine motor mounts
by carefully supporting the engine and transmission
assembly with a floor jack.
Fig. 1 3.3/3.8L V-6 Engine
Fig. 2 Engine Identification
Ä 3.3/3.8L ENGINE 9 - 99
Page 1669 of 2438
INSPECTION
(1) Before cleaning, check for leaks, damage and
cracks. (2) Clean cylinder head and oil passages.
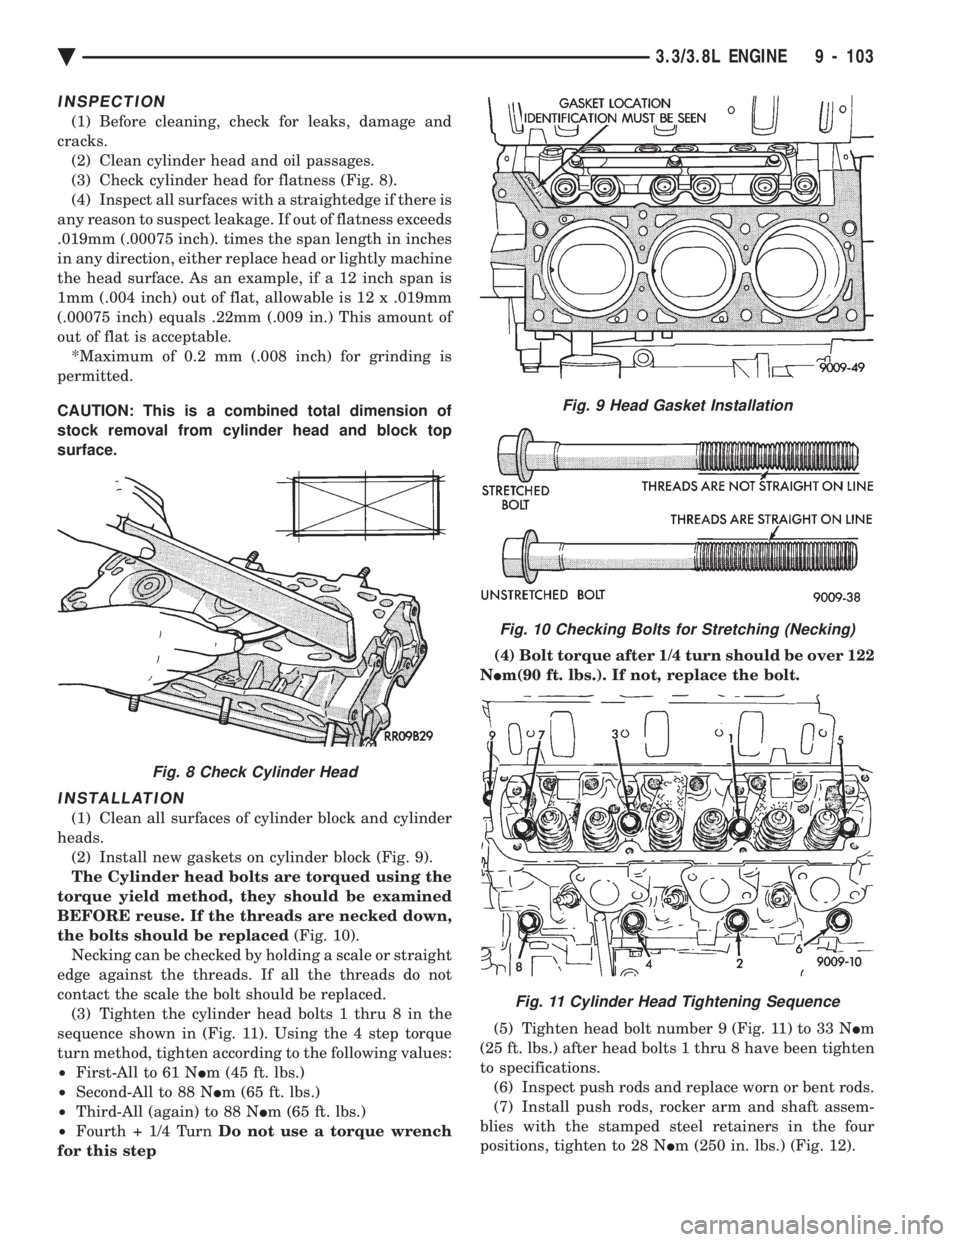
(3) Check cylinder head for flatness (Fig. 8).
(4) Inspect all surfaces with a straightedge if there is
any reason to suspect leakage. If out of flatness exceeds
.019mm (.00075 inch). times the span length in inches
in any direction, either replace head or lightly machine
the head surface. As an example, if a 12 inch span is
1mm (.004 inch) out of flat, allowable is 12 x .019mm
(.00075 inch) equals .22mm (.009 in.) This amount of
out of flat is acceptable. *Maximum of 0.2 mm (.008 inch) for grinding is
permitted.
CAUTION: This is a combined total dimension of
stock removal from cylinder head and block top
surface.
INSTALLATION
(1) Clean all surfaces of cylinder block and cylinder
heads. (2) Install new gaskets on cylinder block (Fig. 9).
The Cylinder head bolts are torqued using the
torque yield method, they should be examined
BEFORE reuse. If the threads are necked down,
the bolts should be replaced (Fig. 10).
Necking can be checked by holding a scale or straight
edge against the threads. If all the threads do not
contact the scale the bolt should be replaced. (3) Tighten the cylinder head bolts 1 thru 8 in the
sequence shown in (Fig. 11). Using the 4 step torque
turn method, tighten according to the following values:
² First-All to 61 N Im (45 ft. lbs.)
² Second-All to 88 N Im (65 ft. lbs.)
² Third-All (again) to 88 N Im (65 ft. lbs.)
² Fourth + 1/4 Turn Do not use a torque wrench
for this step (4) Bolt torque after 1/4 turn should be over 122
N Im(90 ft. lbs.). If not, replace the bolt.
(5) Tighten head bolt number 9 (Fig. 11) to 33 N Im
(25 ft. lbs.) after head bolts 1 thru 8 have been tighten
to specifications. (6) Inspect push rods and replace worn or bent rods.
(7) Install push rods, rocker arm and shaft assem-
blies with the stamped steel retainers in the four
positions, tighten to 28 N Im (250 in. lbs.) (Fig. 12).
Fig. 8 Check Cylinder Head
Fig. 9 Head Gasket Installation
Fig. 10 Checking Bolts for Stretching (Necking)
Fig. 11 Cylinder Head Tightening Sequence
Ä 3.3/3.8L ENGINE 9 - 103
Page 1672 of 2438
REFACING VALVES AND VALVE SEATS
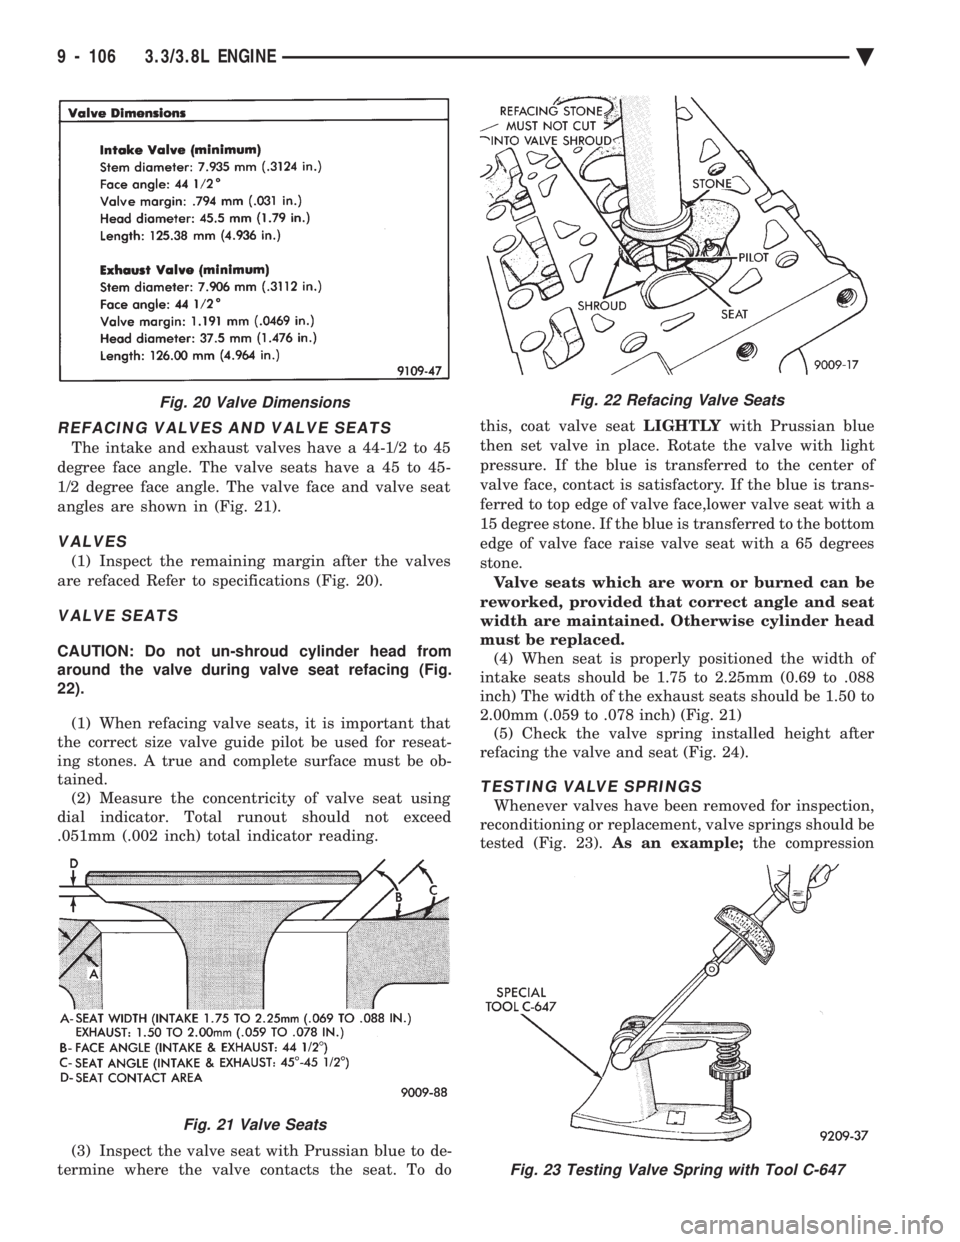
The intake and exhaust valves have a 44-1/2 to 45
degree face angle. The valve seats have a 45 to 45-
1/2 degree face angle. The valve face and valve seat
angles are shown in (Fig. 21).
VALVES
(1) Inspect the remaining margin after the valves
are refaced Refer to specifications (Fig. 20).
VALVE SEATS
CAUTION: Do not un-shroud cylinder head from
around the valve during valve seat refacing (Fig.
22).
(1) When refacing valve seats, it is important that
the correct size valve guide pilot be used for reseat-
ing stones. A true and complete surface must be ob-
tained. (2) Measure the concentricity of valve seat using
dial indicator. Total runout should not exceed
.051mm (.002 inch) total indicator reading.
(3) Inspect the valve seat with Prussian blue to de-
termine where the valve contacts the seat. To do this, coat valve seat
LIGHTLYwith Prussian blue
then set valve in place. Rotate the valve with light
pressure. If the blue is transferred to the center of
valve face, contact is satisfactory. If the blue is trans-
ferred to top edge of valve face,lower valve seat with a
15 degree stone. If the blue is transferred to the bottom
edge of valve face raise valve seat with a 65 degrees
stone. Valve seats which are worn or burned can be
reworked, provided that correct angle and seat
width are maintained. Otherwise cylinder head
must be replaced. (4) When seat is properly positioned the width of
intake seats should be 1.75 to 2.25mm (0.69 to .088
inch) The width of the exhaust seats should be 1.50 to
2.00mm (.059 to .078 inch) (Fig. 21) (5) Check the valve spring installed height after
refacing the valve and seat (Fig. 24).
TESTING VALVE SPRINGS
Whenever valves have been removed for inspection,
reconditioning or replacement, valve springs should be
tested (Fig. 23). As an example; the compression
Fig. 23 Testing Valve Spring with Tool C-647
Fig. 20 Valve Dimensions
Fig. 21 Valve Seats
Fig. 22 Refacing Valve Seats
9 - 106 3.3/3.8L ENGINE Ä
Page 1674 of 2438
(15) Install rocker arm covers tighten screws to 14
N Im (120 in. lbs.) and connector to ignition coils.
(16) Install Intake Manifold; Refer to Intake Mani-
fold Installation 3.3/3.8L Engine, Group 11 Exhaust
System and Intake Manifold.
HYDRAULIC TAPPETS
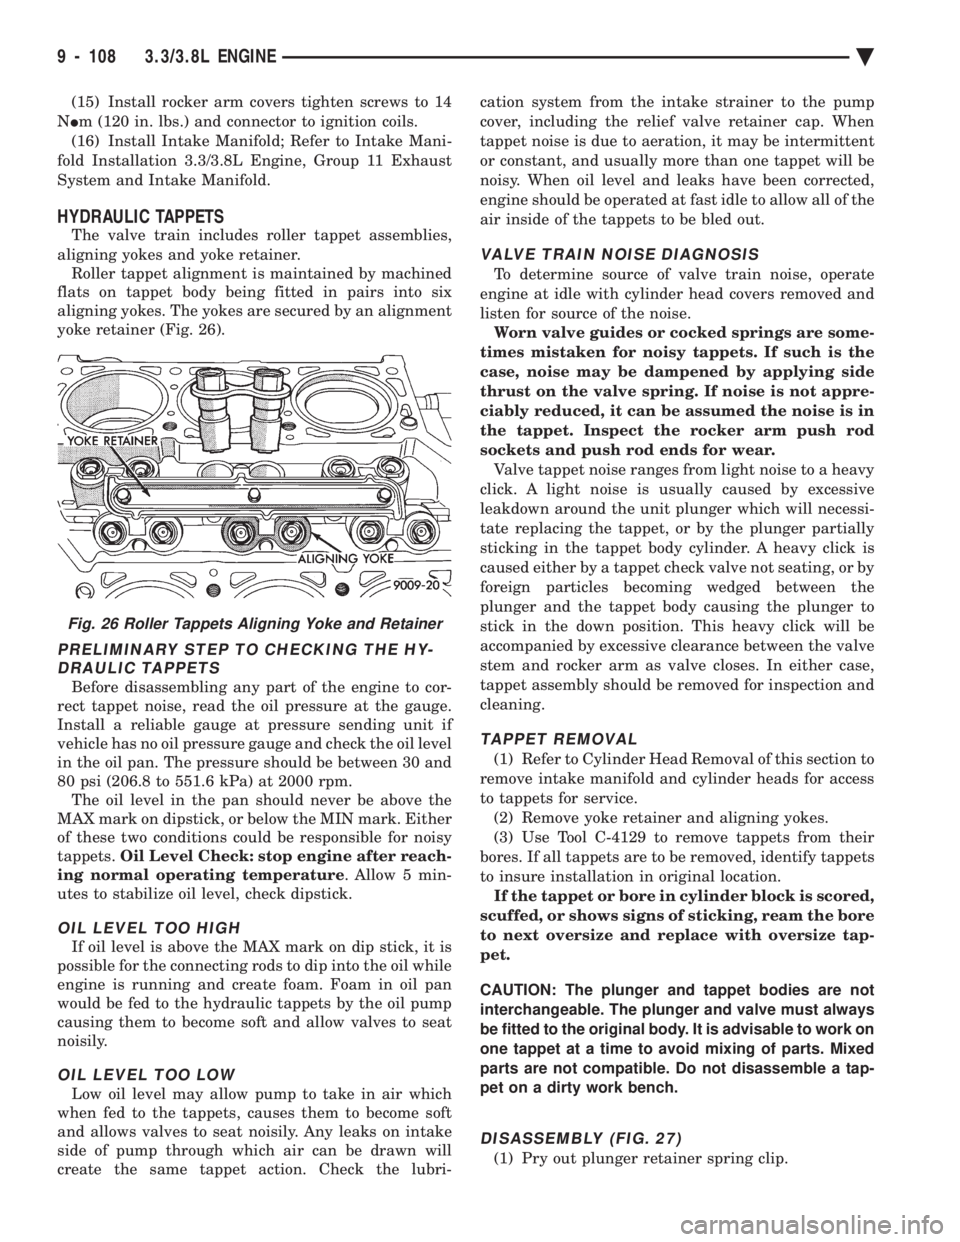
The valve train includes roller tappet assemblies,
aligning yokes and yoke retainer. Roller tappet alignment is maintained by machined
flats on tappet body being fitted in pairs into six
aligning yokes. The yokes are secured by an alignment
yoke retainer (Fig. 26).
PRELIMINARY STEP TO CHECKING THE HY- DRAULIC TAPPETS
Before disassembling any part of the engine to cor-
rect tappet noise, read the oil pressure at the gauge.
Install a reliable gauge at pressure sending unit if
vehicle has no oil pressure gauge and check the oil level
in the oil pan. The pressure should be between 30 and
80 psi (206.8 to 551.6 kPa) at 2000 rpm. The oil level in the pan should never be above the
MAX mark on dipstick, or below the MIN mark. Either
of these two conditions could be responsible for noisy
tappets. Oil Level Check: stop engine after reach-
ing normal operating temperature . Allow 5 min-
utes to stabilize oil level, check dipstick.
OIL LEVEL TOO HIGH
If oil level is above the MAX mark on dip stick, it is
possible for the connecting rods to dip into the oil while
engine is running and create foam. Foam in oil pan
would be fed to the hydraulic tappets by the oil pump
causing them to become soft and allow valves to seat
noisily.
OIL LEVEL TOO LOW
Low oil level may allow pump to take in air which
when fed to the tappets, causes them to become soft
and allows valves to seat noisily. Any leaks on intake
side of pump through which air can be drawn will
create the same tappet action. Check the lubri- cation system from the intake strainer to the pump
cover, including the relief valve retainer cap. When
tappet noise is due to aeration, it may be intermittent
or constant, and usually more than one tappet will be
noisy. When oil level and leaks have been corrected,
engine should be operated at fast idle to allow all of the
air inside of the tappets to be bled out.
VALVE TRAIN NOISE DIAGNOSIS
To determine source of valve train noise, operate
engine at idle with cylinder head covers removed and
listen for source of the noise. Worn valve guides or cocked springs are some-
times mistaken for noisy tappets. If such is the
case, noise may be dampened by applying side
thrust on the valve spring. If noise is not appre-
ciably reduced, it can be assumed the noise is in
the tappet. Inspect the rocker arm push rod
sockets and push rod ends for wear. Valve tappet noise ranges from light noise to a heavy
click. A light noise is usually caused by excessive
leakdown around the unit plunger which will necessi-
tate replacing the tappet, or by the plunger partially
sticking in the tappet body cylinder. A heavy click is
caused either by a tappet check valve not seating, or by
foreign particles becoming wedged between the
plunger and the tappet body causing the plunger to
stick in the down position. This heavy click will be
accompanied by excessive clearance between the valve
stem and rocker arm as valve closes. In either case,
tappet assembly should be removed for inspection and
cleaning.
TAPPET REMOVAL
(1) Refer to Cylinder Head Removal of this section to
remove intake manifold and cylinder heads for access
to tappets for service. (2) Remove yoke retainer and aligning yokes.
(3) Use Tool C-4129 to remove tappets from their
bores. If all tappets are to be removed, identify tappets
to insure installation in original location. If the tappet or bore in cylinder block is scored,
scuffed, or shows signs of sticking, ream the bore
to next oversize and replace with oversize tap-
pet.
CAUTION: The plunger and tappet bodies are not
interchangeable. The plunger and valve must always
be fitted to the original body. It is advisable to work on
one tappet at a time to avoid mixing of parts. Mixed
parts are not compatible. Do not disassemble a tap-
pet on a dirty work bench.
DISASSEMBLY (FIG. 27)
(1) Pry out plunger retainer spring clip.
Fig. 26 Roller Tappets Aligning Yoke and Retainer
9 - 108 3.3/3.8L ENGINE Ä
Page 1679 of 2438
(9) Measure camshaft end play. End Play should
measure .0127 to .304 mm (.005 to .012 inches.) .310
mm (.012 inch. Max.). If not within limits install a new
thrust plate. (10) Each tappet reused must be installed in the
same position from which it was removed. When
camshaft is replaced, all of the tappets must be
replaced .
CAMSHAFT BEARINGSÐENGINE REMOVED FROM
VEHICLE
REMOVAL
(1) With engine completely disassembled, drive out
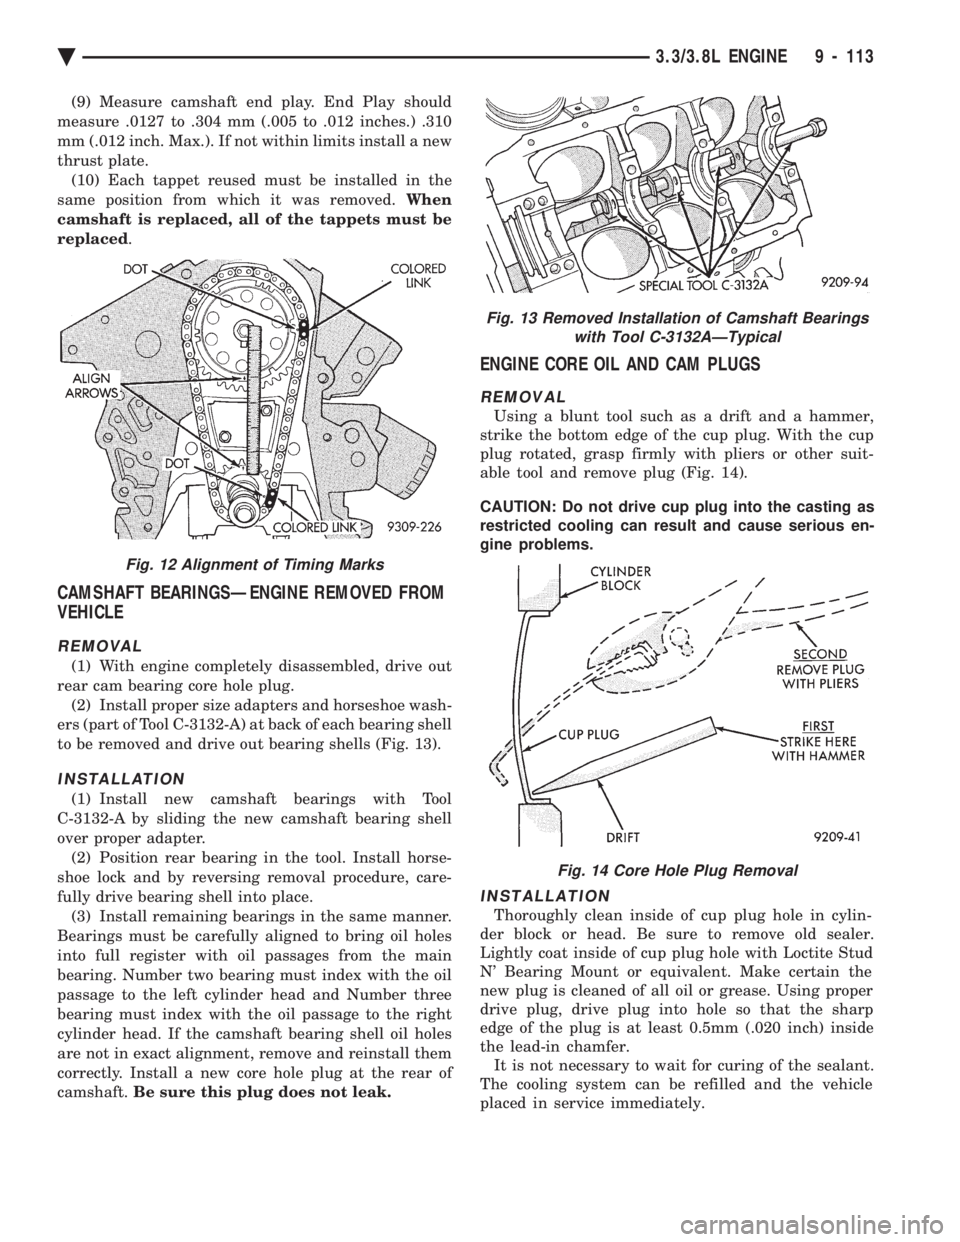
rear cam bearing core hole plug. (2) Install proper size adapters and horseshoe wash-
ers (part of Tool C-3132-A) at back of each bearing shell
to be removed and drive out bearing shells (Fig. 13).
INSTALLATION
(1) Install new camshaft bearings with Tool
C-3132-A by sliding the new camshaft bearing shell
over proper adapter. (2) Position rear bearing in the tool. Install horse-
shoe lock and by reversing removal procedure, care-
fully drive bearing shell into place. (3) Install remaining bearings in the same manner.
Bearings must be carefully aligned to bring oil holes
into full register with oil passages from the main
bearing. Number two bearing must index with the oil
passage to the left cylinder head and Number three
bearing must index with the oil passage to the right
cylinder head. If the camshaft bearing shell oil holes
are not in exact alignment, remove and reinstall them
correctly. Install a new core hole plug at the rear of
camshaft. Be sure this plug does not leak.
ENGINE CORE OIL AND CAM PLUGS
REMOVAL
Using a blunt tool such as a drift and a hammer,
strike the bottom edge of the cup plug. With the cup
plug rotated, grasp firmly with pliers or other suit-
able tool and remove plug (Fig. 14).
CAUTION: Do not drive cup plug into the casting as
restricted cooling can result and cause serious en-
gine problems.
INSTALLATION
Thoroughly clean inside of cup plug hole in cylin-
der block or head. Be sure to remove old sealer.
Lightly coat inside of cup plug hole with Loctite Stud
N' Bearing Mount or equivalent. Make certain the
new plug is cleaned of all oil or grease. Using proper
drive plug, drive plug into hole so that the sharp
edge of the plug is at least 0.5mm (.020 inch) inside
the lead-in chamfer. It is not necessary to wait for curing of the sealant.
The cooling system can be refilled and the vehicle
placed in service immediately.
Fig. 13 Removed Installation of Camshaft Bearings with Tool C-3132AÐTypical
Fig. 14 Core Hole Plug Removal
Fig. 12 Alignment of Timing Marks
Ä 3.3/3.8L ENGINE 9 - 113
Page 1685 of 2438
before installation. Bearing shells are available in
standard and the following undersizes: 0.025mm (.001
inch), .051mm (.002 inch), .076mm (.003 inch), .254mm
(.010 inch), and .305mm (.012 inch). Never install an
undersize bearing that will reduce clearance below
specifications.
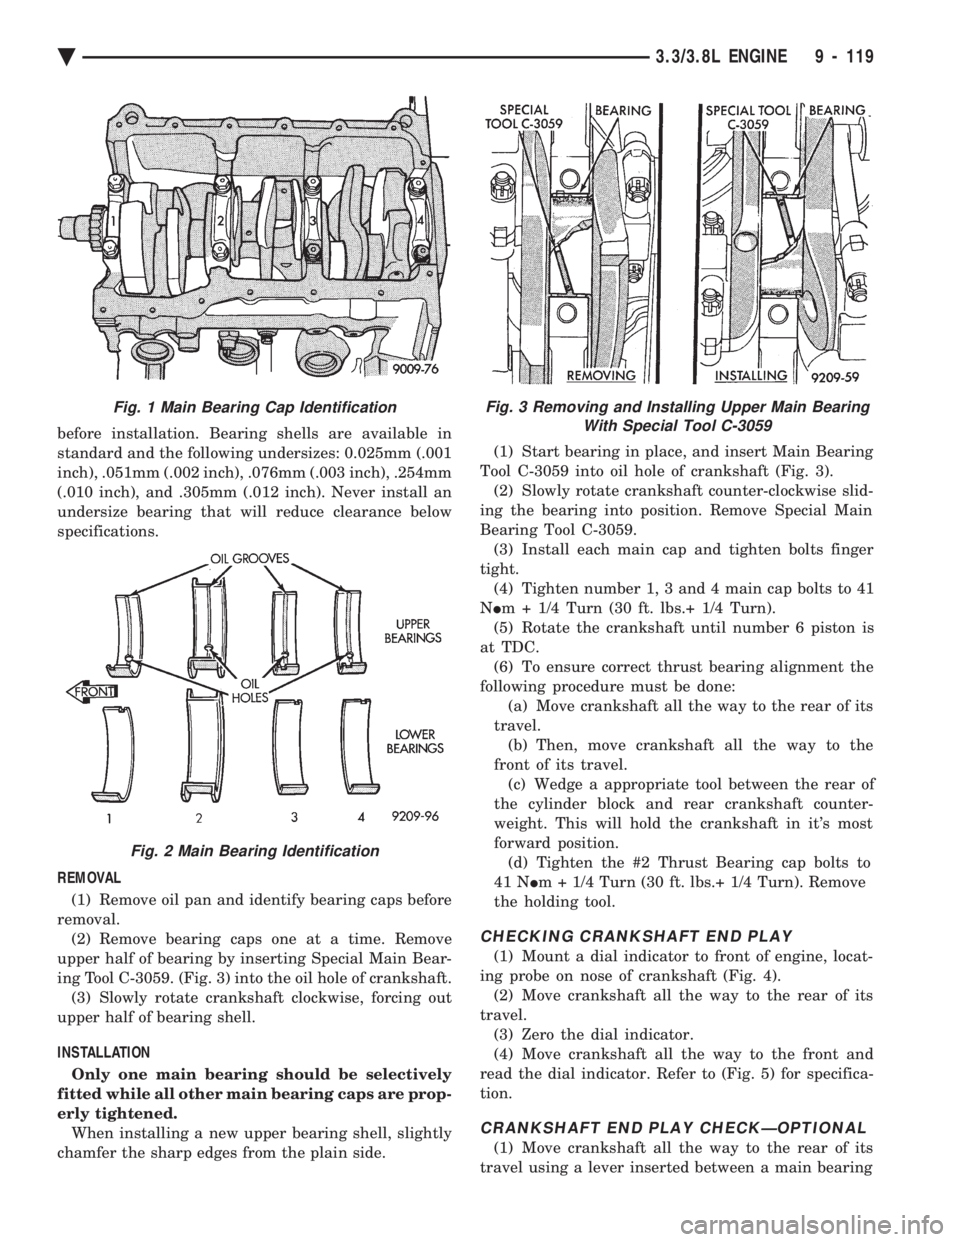
REMOVAL (1) Remove oil pan and identify bearing caps before
removal. (2) Remove bearing caps one at a time. Remove
upper half of bearing by inserting Special Main Bear-
ing Tool C-3059. (Fig. 3) into the oil hole of crankshaft. (3) Slowly rotate crankshaft clockwise, forcing out
upper half of bearing shell.
INSTALLATION Only one main bearing should be selectively
fitted while all other main bearing caps are prop-
erly tightened. When installing a new upper bearing shell, slightly
chamfer the sharp edges from the plain side. (1) Start bearing in place, and insert Main Bearing
Tool C-3059 into oil hole of crankshaft (Fig. 3). (2) Slowly rotate crankshaft counter-clockwise slid-
ing the bearing into position. Remove Special Main
Bearing Tool C-3059. (3) Install each main cap and tighten bolts finger
tight. (4) Tighten number 1, 3 and 4 main cap bolts to 41
N Im + 1/4 Turn (30 ft. lbs.+ 1/4 Turn).
(5) Rotate the crankshaft until number 6 piston is
at TDC. (6) To ensure correct thrust bearing alignment the
following procedure must be done: (a) Move crankshaft all the way to the rear of its
travel. (b) Then, move crankshaft all the way to the
front of its travel. (c) Wedge a appropriate tool between the rear of
the cylinder block and rear crankshaft counter-
weight. This will hold the crankshaft in it's most
forward position. (d) Tighten the #2 Thrust Bearing cap bolts to
41 N Im + 1/4 Turn (30 ft. lbs.+ 1/4 Turn). Remove
the holding tool.
CHECKING CRANKSHAFT END PLAY
(1) Mount a dial indicator to front of engine, locat-
ing probe on nose of crankshaft (Fig. 4). (2) Move crankshaft all the way to the rear of its
travel. (3) Zero the dial indicator.
(4) Move crankshaft all the way to the front and
read the dial indicator. Refer to (Fig. 5) for specifica-
tion.
CRANKSHAFT END PLAY CHECKÐOPTIONAL
(1) Move crankshaft all the way to the rear of its
travel using a lever inserted between a main bearing
Fig. 3 Removing and Installing Upper Main Bearing With Special Tool C-3059Fig. 1 Main Bearing Cap Identification
Fig. 2 Main Bearing Identification
Ä 3.3/3.8L ENGINE 9 - 119
Page 1687 of 2438
CRANKSHAFT OIL SEALS SERVICE
REMOVAL
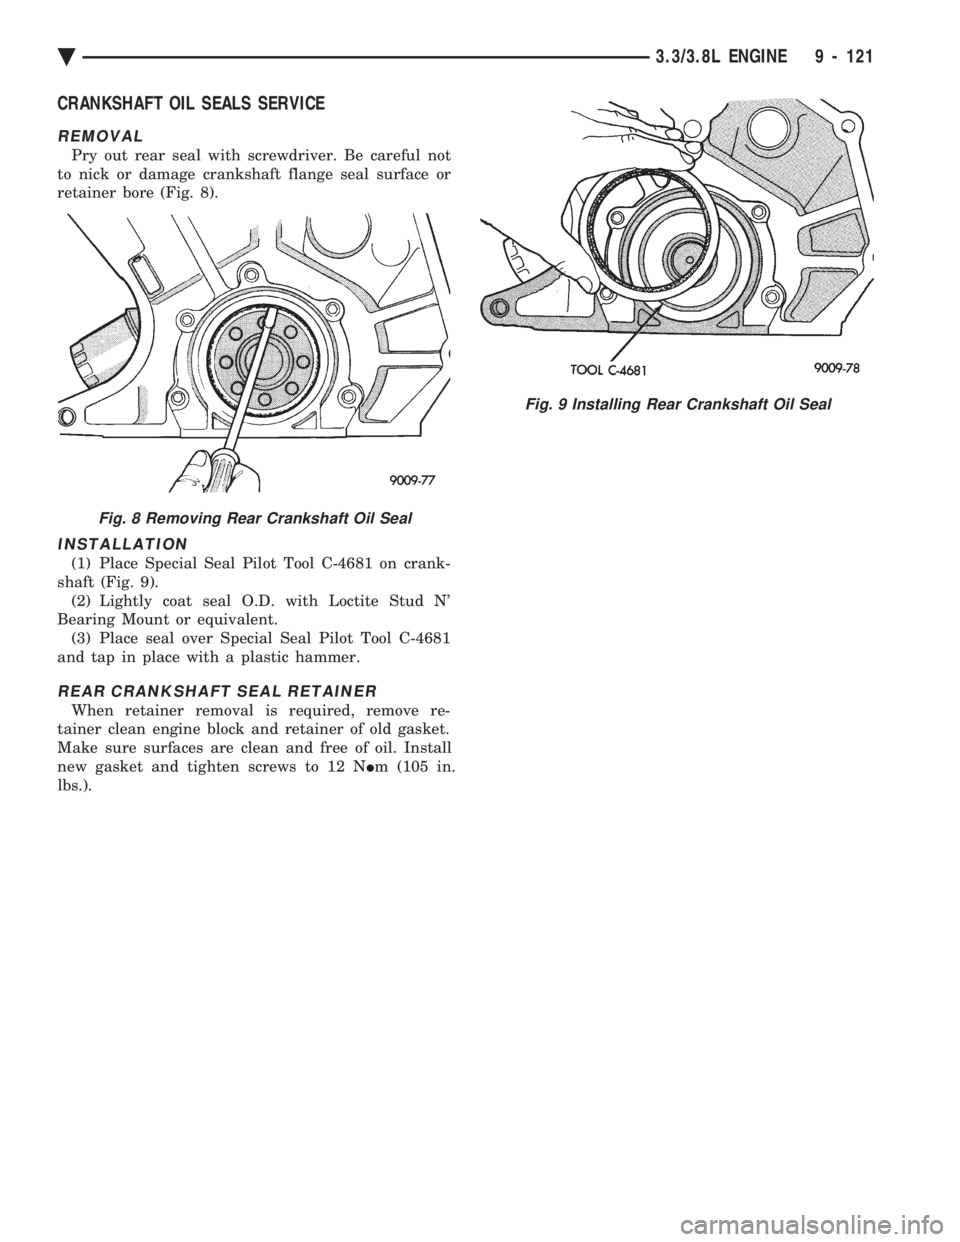
Pry out rear seal with screwdriver. Be careful not
to nick or damage crankshaft flange seal surface or
retainer bore (Fig. 8).
INSTALLATION
(1) Place Special Seal Pilot Tool C-4681 on crank-
shaft (Fig. 9). (2) Lightly coat seal O.D. with Loctite Stud N'
Bearing Mount or equivalent. (3) Place seal over Special Seal Pilot Tool C-4681
and tap in place with a plastic hammer.
REAR CRANKSHAFT SEAL RETAINER
When retainer removal is required, remove re-
tainer clean engine block and retainer of old gasket.
Make sure surfaces are clean and free of oil. Install
new gasket and tighten screws to 12 N Im (105 in.
lbs.).
Fig. 9 Installing Rear Crankshaft Oil Seal
Fig. 8 Removing Rear Crankshaft Oil Seal
Ä 3.3/3.8L ENGINE 9 - 121
Page 1699 of 2438
CAUTION: Avoid application of rust prevention
compounds or undercoating materials to exhaust
system floor pan heat shields on cars if equipped.
Light overspray near the edges is permitted. Appli-
cation of coating will greatly reduce the efficiency
of the heat shields resulting in excessive floor pan
temperatures and objectionable fumes.
The combustion reaction caused by the catalyst re-
leases additional heat in the exhaust system. Caus-
ing temperature increases in the area of the reactor
under severe operating conditions. Such conditions
can exist when the engine misfires or otherwise does
not operate at peak efficiency. Do notremove spark
plug wires from plugs or by any other means short
out cylinders if exhaust system is equipped with cat-
alytic converter. Failure of the catalytic converter
can occur due to temperature increases caused by un-
burned fuel passing through the converter. The use of the catalysts also involves some non-au-
tomotive problems. Unleaded gasoline must be used
to avoid poisoning the catalyst core. Do not allow en- gine to operate above 1200 RPM in neutral for ex-
tended periods over 5 minutes. This condition may
result in excessive exhaust system/floor pan temper-
atures because of no air movement under the vehicle.
EXHAUST GAS RECIRCULATION (EGR) SYSTEM
To assist in the control of oxides of nitrogen (NOx)
in engine exhaust, some engines are equipped with
an exhaust gas recirculation system. The use of ex-
haust gas to dilute incoming air/fuel mixtures lowers
peak flame temperatures during combustion, thus
limiting the formation of NOx. Exhaust gases are taken from openings in the ex-
haust gas crossover passage in the intake manifold.
REFER TO SECTION 25 EMISSION SYSTEMS
FOR A COMPLETE DESCRIPTION, DIAGNOSIS
AND SERVICE PROCEDURES ON THE EXHAUST
GAS RECIRCULATION SYSTEM AND COMPO-
NENTS.
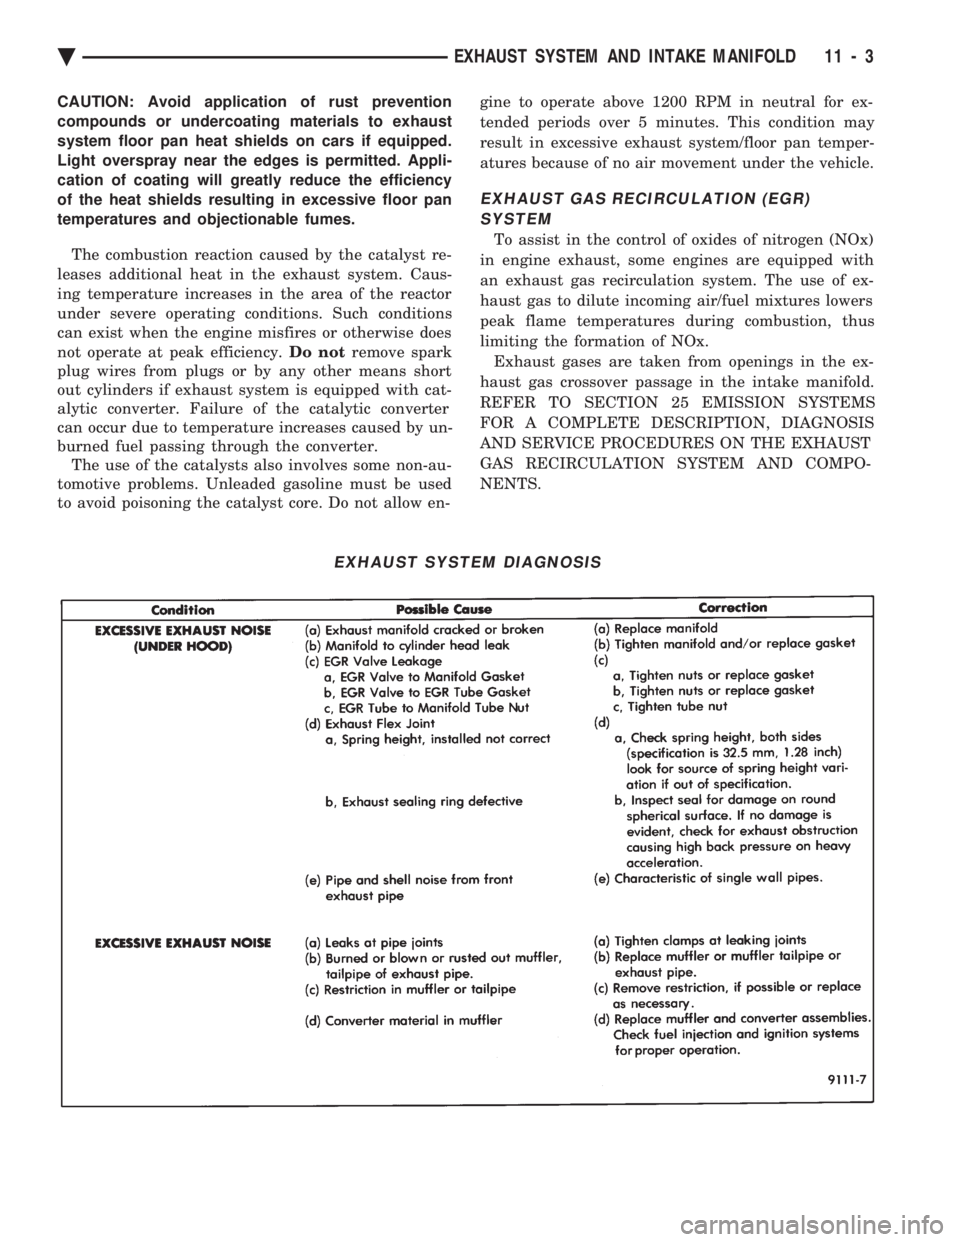
EXHAUST SYSTEM DIAGNOSIS
Ä EXHAUST SYSTEM AND INTAKE MANIFOLD 11 - 3