cooling CHEVROLET EPICA 2006 1.G Owners Manual
[x] Cancel search | Manufacturer: CHEVROLET, Model Year: 2006, Model line: EPICA, Model: CHEVROLET EPICA 2006 1.GPages: 368, PDF Size: 2.24 MB
Page 80 of 368
Opening a Rear Door When the
Security Lock is On
1. Unlock the door from the inside.
2. Open the door from the outside.
If you do not cancel the security lock, adults or older
children who ride in the rear will not be able to open the
rear door from the inside. You should let adults and
older children know how to cancel the locks.
Canceling the Rear Door Security Lock
1. Unlock the door from the inside and open the
door from the outside.
2. Move the lever downward to unlock.
3. Do the same for the other rear door.
The rear door locks will now work normally.
Lockout Protection
This feature helps prevent locking your key in the car.
The driver’s door can only be locked with the door
closed. From the outside of the vehicle, close the
driver’s door and lock it using the key or the remote
keyless entry transmitter.
This feature cannot guarantee that you will never be
locked out of your vehicle. Always remember to
take your key with you.
Trunk
To unlock the trunk from the outside, use the key or the
remote keyless entry transmitter.
When closing the trunk, close from the center to ensure
it fully latches.
{CAUTION:
It can be dangerous to drive with the trunk
lid open because carbon monoxide (CO) gas
can come into your vehicle. You cannot see or
smell CO. It can cause unconsciousness and
even death. If you must drive with the trunk
lid open or if electrical wiring or other cable
connections must pass through the seal
between the body and the trunk lid:
Make sure all other windows are shut.
Turn the fan on your heating or cooling
system to its highest speed and select
the control setting that will force outside
air into your vehicle. See Climate Control
System.
If you have air outlets on or under the
instrument panel, open them all the way.
SeeEngine Exhaust on page 2-29.
2-10
Page 125 of 368
Climate Controls
Climate Control System
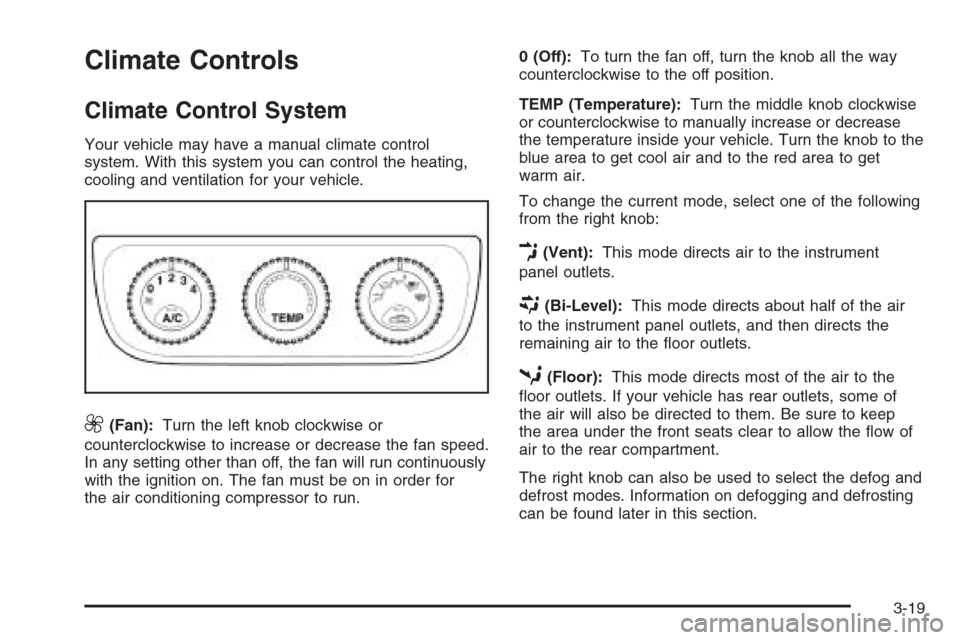
Your vehicle may have a manual climate control
system. With this system you can control the heating,
cooling and ventilation for your vehicle.
9(Fan):Turn the left knob clockwise or
counterclockwise to increase or decrease the fan speed.
In any setting other than off, the fan will run continuously
with the ignition on. The fan must be on in order for
the air conditioning compressor to run.0 (Off):To turn the fan off, turn the knob all the way
counterclockwise to the off position.
TEMP (Temperature):Turn the middle knob clockwise
or counterclockwise to manually increase or decrease
the temperature inside your vehicle. Turn the knob to the
blue area to get cool air and to the red area to get
warm air.
To change the current mode, select one of the following
from the right knob:
E(Vent):This mode directs air to the instrument
panel outlets.
((Bi-Level):This mode directs about half of the air
to the instrument panel outlets, and then directs the
remaining air to the floor outlets.
5(Floor):This mode directs most of the air to the
floor outlets. If your vehicle has rear outlets, some of
the air will also be directed to them. Be sure to keep
the area under the front seats clear to allow the flow of
air to the rear compartment.
The right knob can also be used to select the defog and
defrost modes. Information on defogging and defrosting
can be found later in this section.
3-19
Page 128 of 368
Automatic Climate Control System
Your vehicle may have an automatic climate control
system. With this system you can control the heating,
cooling and ventilation for your vehicle.
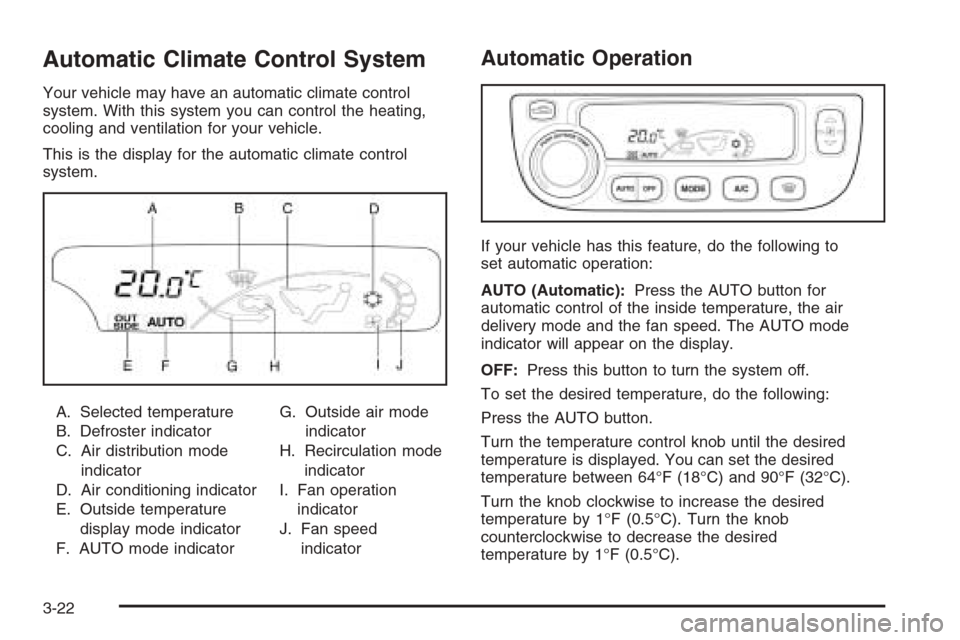
This is the display for the automatic climate control
system.
A. Selected temperature
B. Defroster indicator
C. Air distribution mode
indicator
D. Air conditioning indicator
E. Outside temperature
display mode indicator
F. AUTO mode indicatorG. Outside air mode
indicator
H. Recirculation mode
indicator
I. Fan operation
indicator
J. Fan speed
indicator
Automatic Operation
If your vehicle has this feature, do the following to
set automatic operation:
AUTO (Automatic):Press the AUTO button for
automatic control of the inside temperature, the air
delivery mode and the fan speed. The AUTO mode
indicator will appear on the display.
OFF:Press this button to turn the system off.
To set the desired temperature, do the following:
Press the AUTO button.
Turn the temperature control knob until the desired
temperature is displayed. You can set the desired
temperature between 64°F (18°C) and 90°F (32°C).
Turn the knob clockwise to increase the desired
temperature by 1°F (0.5°C). Turn the knob
counterclockwise to decrease the desired
temperature by 1°F (0.5°C).
3-22
Page 130 of 368
For quick cool down on hot days, press the AUTO
button and the system will automatically enter
recirculation mode and the temperature will be at
the full cold position for maximum cooling.
Using these settings together for long periods of time
may cause the air inside of your vehicle to become too
dry. To prevent this from happening, after the air in
your vehicle has cooled, turn the recirculation mode off.
The air conditioning system removes moisture from
the air, so you may sometimes notice a small amount
of water dripping underneath your vehicle while idling
or after turning off the engine. This is normal.
Outside Temperature:To display the outside
temperature, press the temperature control knob.
Pressing this knob again will cancel the outside
temperature display, otherwise the display will return
to the temperature inside of the vehicle after about
five seconds.
The outside temperature sensor is located near the
front bumper, so the displayed temperature may
be affected by road or engine heat while the vehicle is
idling or traveling at slow speeds. For this reason,
the displayed temperature will be most accurate at
speeds over 25 mph (40 km/h).Sensors
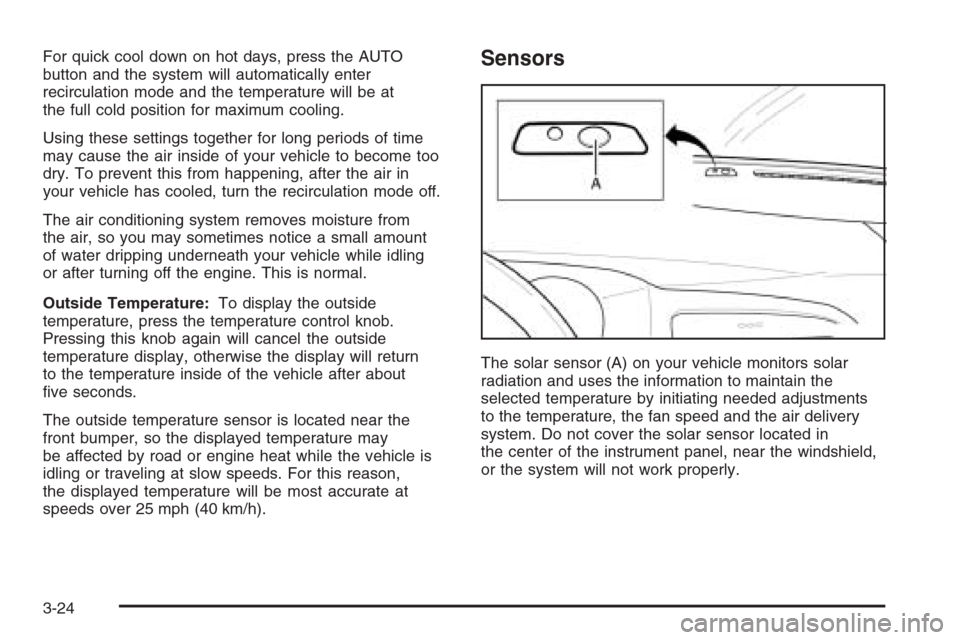
The solar sensor (A) on your vehicle monitors solar
radiation and uses the information to maintain the
selected temperature by initiating needed adjustments
to the temperature, the fan speed and the air delivery
system. Do not cover the solar sensor located in
the center of the instrument panel, near the windshield,
or the system will not work properly.
3-24
Page 210 of 368
Highway Hypnosis
Is there actually such a condition as highway hypnosis?
Or is it just plain falling asleep at the wheel? Call it
highway hypnosis, lack of awareness, or whatever.
There is something about an easy stretch of road with
the same scenery, along with the hum of the tires on
the road, the drone of the engine, and the rush of
the wind against the vehicle that can make you sleepy.
Do not let it happen to you! If it does, your vehicle
can leave the road in less than a second, and you
could crash and be injured.
What can you do about highway hypnosis? First, be
aware that it can happen.
Then here are some tips:
•Make sure your vehicle is well ventilated, with a
comfortably cool interior.
•Keep your eyes moving. Scan the road ahead and
to the sides. Check your rearview mirrors and your
instruments frequently.
•If you get sleepy, pull off the road into a rest,
service, or parking area and take a nap, get some
exercise, or both. For safety, treat drowsiness
on the highway as an emergency.
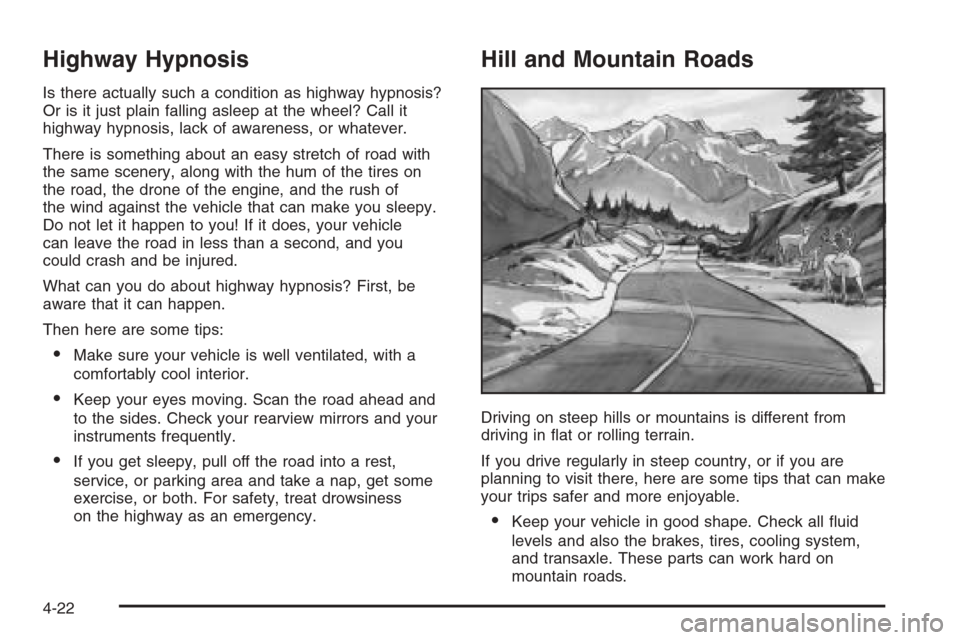
Hill and Mountain Roads
Driving on steep hills or mountains is different from
driving in flat or rolling terrain.
If you drive regularly in steep country, or if you are
planning to visit there, here are some tips that can make
your trips safer and more enjoyable.
•Keep your vehicle in good shape. Check all fluid
levels and also the brakes, tires, cooling system,
and transaxle. These parts can work hard on
mountain roads.
4-22
Page 225 of 368
Service............................................................5-3
Accessories and Modifications..........................5-3
California Proposition 65 Warning.....................5-4
Doing Your Own Service Work.........................5-4
Adding Equipment to the Outside
of Your Vehicle...........................................5-5
Fuel................................................................5-5
Gasoline Octane............................................5-5
Gasoline Specifications....................................5-5
California Fuel...............................................5-6
Additives.......................................................5-6
Fuels in Foreign Countries...............................5-7
Filling the Tank..............................................5-8
Filling a Portable Fuel Container.....................5-10
Checking Things Under the Hood....................5-11
Hood Release..............................................5-11
Engine Compartment Overview.......................5-12
Engine Oil...................................................5-13
Engine Air Cleaner/Filter................................5-17
Automatic Transaxle Fluid..............................5-19
Engine Coolant.............................................5-19
Coolant Surge Tank Pressure Cap..................5-22
Engine Overheating.......................................5-22
Cooling System............................................5-24
Power Steering Fluid.....................................5-29Windshield Washer Fluid................................5-30
Brakes........................................................5-31
Battery........................................................5-34
Jump Starting...............................................5-35
Headlamp Aiming...........................................5-38
Bulb Replacement..........................................5-39
Halogen Bulbs..............................................5-39
Headlamps..................................................5-39
Front Turn Signal Lamps...............................5-41
Center High-Mounted Stoplamp (CHMSL).........5-42
Parking Lamps.............................................5-43
Taillamps, Turn Signal, Stoplamps and
Back-up Lamps.........................................5-44
Replacement Bulbs.......................................5-44
Windshield Wiper Blade Replacement..............5-45
Tires..............................................................5-46
Tire Sidewall Labeling...................................5-47
Tire Terminology and Definitions.....................5-49
Inflation - Tire Pressure.................................5-52
Tire Inspection and Rotation...........................5-53
When It Is Time for New Tires.......................5-54
Buying New Tires.........................................5-55
Different Size Tires and Wheels......................5-56
Uniform Tire Quality Grading..........................5-56
Section 5 Service and Appearance Care
5-1
Page 237 of 368
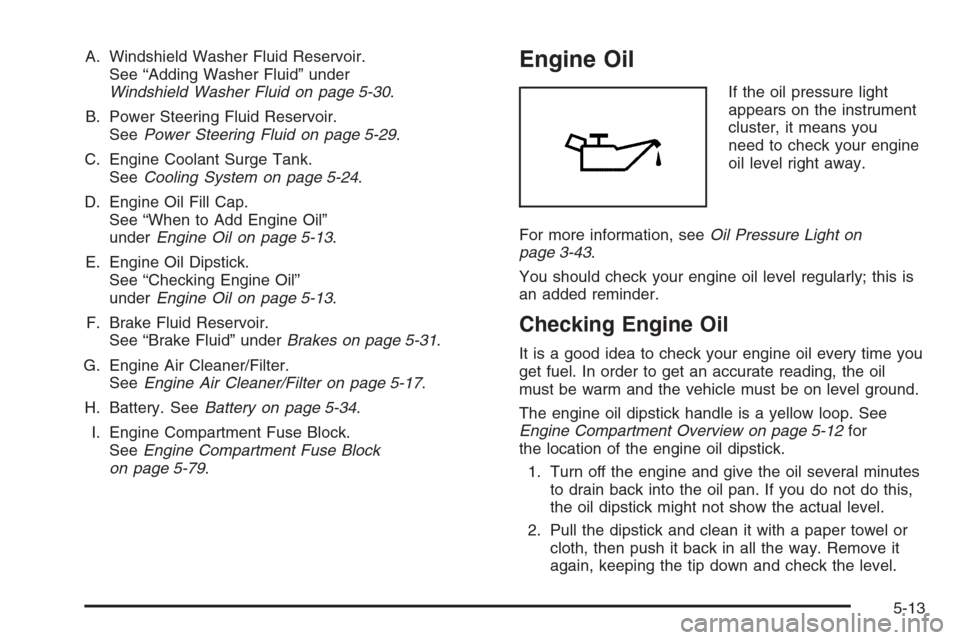
A. Windshield Washer Fluid Reservoir.
See “Adding Washer Fluid” under
Windshield Washer Fluid on page 5-30.
B. Power Steering Fluid Reservoir.
SeePower Steering Fluid on page 5-29.
C. Engine Coolant Surge Tank.
SeeCooling System on page 5-24.
D. Engine Oil Fill Cap.
See “When to Add Engine Oil”
underEngine Oil on page 5-13.
E. Engine Oil Dipstick.
See “Checking Engine Oil”
underEngine Oil on page 5-13.
F. Brake Fluid Reservoir.
See “Brake Fluid” underBrakes on page 5-31.
G. Engine Air Cleaner/Filter.
SeeEngine Air Cleaner/Filter on page 5-17.
H. Battery. SeeBattery on page 5-34.
I. Engine Compartment Fuse Block.
SeeEngine Compartment Fuse Block
on page 5-79.Engine Oil
If the oil pressure light
appears on the instrument
cluster, it means you
need to check your engine
oil level right away.
For more information, seeOil Pressure Light on
page 3-43.
You should check your engine oil level regularly; this is
an added reminder.
Checking Engine Oil
It is a good idea to check your engine oil every time you
get fuel. In order to get an accurate reading, the oil
must be warm and the vehicle must be on level ground.
The engine oil dipstick handle is a yellow loop. See
Engine Compartment Overview on page 5-12for
the location of the engine oil dipstick.
1. Turn off the engine and give the oil several minutes
to drain back into the oil pan. If you do not do this,
the oil dipstick might not show the actual level.
2. Pull the dipstick and clean it with a paper towel or
cloth, then push it back in all the way. Remove it
again, keeping the tip down and check the level.
5-13
Page 243 of 368
Automatic Transaxle Fluid
It is not necessary to check the transaxle fluid level. If a
leak occurs, take the vehicle to the dealership service
department and have it repaired as soon as possible.
Have your dealer or service center change both the fluid
and filter every 50,000 miles (83 000 km) if the vehicle
is mainly driven under one or more of these conditions:
•In heavy city traffic where the outside temperature
regularly reaches 90°F (32°C) or higher.
•In hilly or mountainous terrain.
•Uses such as found in taxi, police or delivery
service.
If you do not use your vehicle under any of these
conditions, the fluid and filter do not require changing.
Notice:Use of automatic transaxle �uid labeled
other than ESSO LT71141 or TOTAL ATF H50235
may damage your vehicle, and the damages may
not be covered by your warranty. Always use
ESSO LT71141 or TOTAL ATF H50235 labeled
automatic transaxle �uid.
Engine Coolant
The following explains your cooling system and how
to add coolant when it is low. If you have a problem
with engine overheating, seeEngine Overheating
on page 5-22.
A 50/50 mixture of clean, drinkable water and proper
coolant will:
•Give freezing protection down to−34°F (−37°C).
•Give boiling protection up to 265°F (129°C).
•Protect against rust and corrosion.
•Help keep the proper engine temperature.
•Let the warning lights and gages work as
they should.
5-19
Page 244 of 368
What to Use
Use a 50/50 mixture of clean, drinkable water and
coolant that meets GM specification 1825M, which will
not damage aluminum parts. You can also use a recycled
coolant conforming to GM specification 1825M with a
complete coolant flush and refill. If you use this coolant
mixture, you do not need to add anything else.
{CAUTION:
Adding only plain water to your cooling
system can be dangerous. Plain water, or
some other liquid such as alcohol, can boil
before the proper coolant mixture will. Your
vehicle’s coolant warning system is set for
the proper coolant mixture. With plain water
or the wrong mixture, your engine could get
too hot but you would not get the overheat
warning. Your engine could catch �re and you
or others could be burned. Use a 50/50 mixture
of clean, drinkable water and the proper
coolant.Notice:If you use an improper coolant mixture,
your engine could overheat and be badly damaged.
The repair cost would not be covered by your
warranty. Too much water in the mixture can freeze
and crack the engine, radiator, heater core and
other parts.
If you have to add coolant more than four times a year,
have your dealer check your cooling system.
Notice:If you use extra inhibitors and/or additives
in your vehicle’s cooling system, you could
damage your vehicle. Use only the proper mixture
of the engine coolant listed in this manual for
the cooling system. SeePart D: Recommended
Fluids and Lubricants on page 6-25for more
information.
5-20
Page 245 of 368
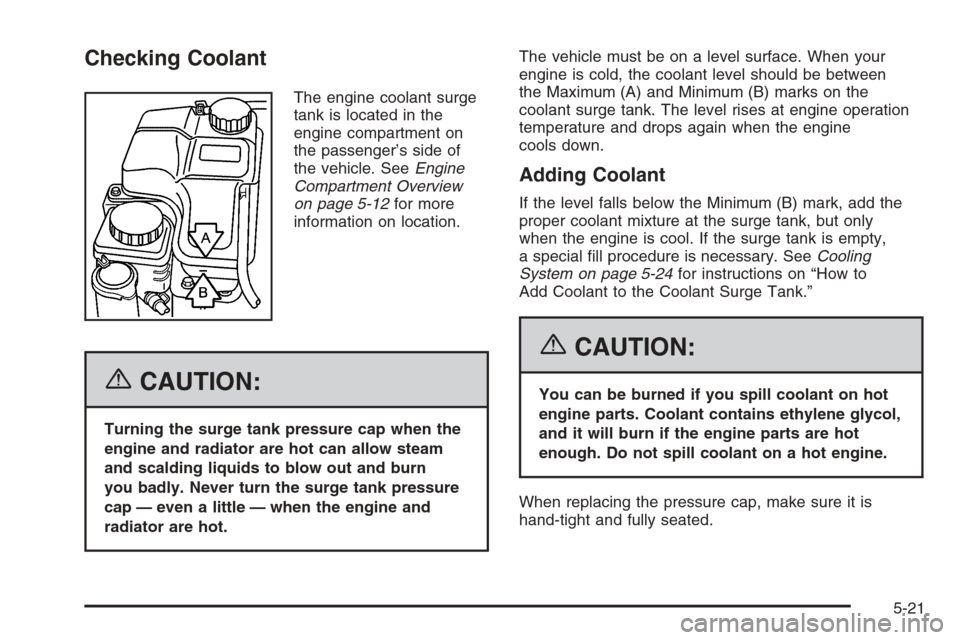
Checking Coolant
The engine coolant surge
tank is located in the
engine compartment on
the passenger’s side of
the vehicle. SeeEngine
Compartment Overview
on page 5-12for more
information on location.
{CAUTION:
Turning the surge tank pressure cap when the
engine and radiator are hot can allow steam
and scalding liquids to blow out and burn
you badly. Never turn the surge tank pressure
cap — even a little — when the engine and
radiator are hot.The vehicle must be on a level surface. When your
engine is cold, the coolant level should be between
the Maximum (A) and Minimum (B) marks on the
coolant surge tank. The level rises at engine operation
temperature and drops again when the engine
cools down.
Adding Coolant
If the level falls below the Minimum (B) mark, add the
proper coolant mixture at the surge tank, but only
when the engine is cool. If the surge tank is empty,
a special fill procedure is necessary. SeeCooling
System on page 5-24for instructions on “How to
Add Coolant to the Coolant Surge Tank.”
{CAUTION:
You can be burned if you spill coolant on hot
engine parts. Coolant contains ethylene glycol,
and it will burn if the engine parts are hot
enough. Do not spill coolant on a hot engine.
When replacing the pressure cap, make sure it is
hand-tight and fully seated.
5-21