remove CHEVROLET EXPRESS 2014 Owner's Manual
[x] Cancel search | Manufacturer: CHEVROLET, Model Year: 2014, Model line: EXPRESS, Model: CHEVROLET EXPRESS 2014Pages: 379, PDF Size: 5.15 MB
Page 237 of 379

Black plate (4,1)Chevrolet Express Owner Manual (GMNA-Localizing-U.S./Canada/Mexico-
7707481) - 2015 - CRC - 4/30/14
10-4 Vehicle Care
Hood
To open the hood:
1. Pull the handle with this symbolon it. It is in front of the driver
side door frame near the floor.
2. Go to the front of the vehicle andlift up the secondary hood
release, which is underneath the
middle of the hood.
3. Lift the hood, release the hood
prop from its retainer, and put
the hood prop into the slot in
the hood. If the vehicle has an underhood
lamp, it will automatically come on
and stay on until the hood is closed.
Before closing the hood, be sure all
of the filler caps are on properly.
Then lift the hood to relieve
pressure on the hood prop. Remove
the hood prop from the slot in the
hood and return the prop to its
retainer. Let the hood down and
close it firmly.
Page 240 of 379

Black plate (7,1)Chevrolet Express Owner Manual (GMNA-Localizing-U.S./Canada/Mexico-
7707481) - 2015 - CRC - 4/30/14
Vehicle Care 10-7
{Warning
The engine oil dipstick handle
may be hot; it could burn you.
Use a towel or glove to touch the
dipstick handle.
2. Pull out the dipstick and wipe it with a clean paper towel or cloth,
then push it back in all the way.
Remove it again, keeping the tip
down, and check the level.
When to Add Engine Oil
If the oil is below the cross-hatched
area at the tip of the dipstick, add
1 L (1 qt) of the recommended oil
and then recheck the level. See
“Selecting the Right Engine Oil” in
this section for an explanation of what kind of oil to use. For engine
oil crankcase capacity, see
Capacities and Specifications on
page 12-2.
{Caution
Do not add too much oil. Oil
levels above or below the
acceptable operating range
shown on the dipstick are harmful
to the engine. If you find that you
have an oil level above the
operating range, i.e., the engine
has so much oil that the oil level
gets above the cross-hatched
area that shows the proper
operating range, the engine could
be damaged. You should drain
out the excess oil or limit driving
of the vehicle and seek a service
professional to remove the
excess amount of oil.
See Engine Compartment Overview
on page 10-5 for the location of the
engine oil fill cap. Add enough oil to put the level
somewhere in the proper operating
range. Push the dipstick all the way
back in when through.
Selecting the Right Engine Oil
Selecting the right engine oil
depends on both the proper oil
specification and viscosity grade.
See
Recommended Fluids and
Lubricants on page 11-11.
Specification
Use and ask for licensed engine oils
with the dexos1
®approved
certification mark. Engine oils
meeting the requirements for the
vehicle should have the dexos1
approved certification mark. This
certification mark indicates that the
oil has been approved to the dexos1
specification. See
www.gmdexos.com.
Page 246 of 379

Black plate (13,1)Chevrolet Express Owner Manual (GMNA-Localizing-U.S./Canada/Mexico-
7707481) - 2015 - CRC - 4/30/14
Vehicle Care 10-13
When to Inspect the Engine Air
Cleaner/Filter
Inspect or replace the air cleaner/
filter at the scheduled maintenance
intervals. SeeMaintenance
Schedule on page 11-3. If driving in
dusty/dirty conditions, inspect the
filter at each engine oil change.
How to Inspect the Engine Air
Cleaner/Filter
To inspect the air cleaner/filter,
remove the filter from the vehicle
and lightly shake it to release loose
dust and dirt. If the filter remains
covered with dirt, a new filter is
required. Never use compressed air
to clean the filter. To inspect or replace the engine air
cleaner/filter:
1. Unhook the retainer clips and
remove the cover.
2. Lift the filter out of the engine air cleaner/filter housing. Care
should be taken to dislodge as
little dirt as possible.
3. Clean the engine air cleaner/ filter housing.
4. Inspect or replace the engine air cleaner/filter. Make sure that the
filter fits properly into the
housing.
5. Reinstall the cover and fasten the retaining clips.
{Warning
Operating the engine with the air
cleaner/filter off can cause you or
others to be burned. The air
cleaner not only cleans the air; it
helps to stop flames if the engine
backfires. Use caution when
working on the engine and do not
drive with the air cleaner/filter off.
{Caution
If the air cleaner/filter is off, dirt
can easily get into the engine,
which could damage it. Always
have the air cleaner/filter in place
when you are driving.
Page 250 of 379

Black plate (17,1)Chevrolet Express Owner Manual (GMNA-Localizing-U.S./Canada/Mexico-
7707481) - 2015 - CRC - 4/30/14
Vehicle Care 10-17
If coolant is needed, add the proper
mixture directly to the radiator, but
be sure the cooling system is cool
before this is done.
1. Remove the radiator pressurecap when the cooling system,
including the radiator pressure
cap and upper radiator hose, is
no longer hot. Turn the pressure
cap slowly counterclockwise
until it first stops. Do not press
down while turning the
pressure cap.
If a hiss is heard, wait for that to
stop. A hiss means there is still
some pressure left.
2. Keep turning the pressure cap, but now push down as you turn
it. Remove the pressure cap.
3. Fill the radiator with the properDEX-COOL coolant mixture, up
to the base of the filler neck.
See Recommended Fluids and
Lubricants on page 11-11 for
more information about the
proper coolant mixture.4. Fill the coolant recovery tank to
the COLD FILL mark.
5. Reinstall the cap back on the coolant recovery tank, but leave
the radiator pressure cap off.
Page 253 of 379

Black plate (20,1)Chevrolet Express Owner Manual (GMNA-Localizing-U.S./Canada/Mexico-
7707481) - 2015 - CRC - 4/30/14
10-20 Vehicle Care
If there is still no sign of steam,
push down the accelerator until the
engine speed is about twice as fast
as normal idle speed for at least
three minutes while parked. If the
warning is still on, turn off the
engine until it cools down.
If the decision is made not to lift the
hood, get service help right away.
Engine Fan
The vehicle has a clutched engine
cooling fan. When the clutch is
engaged, the fan spins faster to
provide more air to cool the engine.
In most everyday driving conditions,
the fan is spinning slower and the
clutch is not fully engaged. This
improves fuel economy and reduces
fan noise. Under heavy vehicle
loading, trailer towing, and/or high
outside temperatures, the fan speed
increases as the clutch more fully
engages, so an increase in fan
noise may be heard. This is normal
and should not be mistaken as the
transmission slipping or makingextra shifts. It is merely the cooling
system functioning properly. The fan
will slow down when additional
cooling is not required and the
clutch partially disengages.
This fan noise may be heard when
starting the engine. It will go away
as the fan clutch partially
disengages.
Power Steering Fluid
The power steering fluid reservoir is
in the engine compartment on the
driver side of the vehicle. See
Engine Compartment Overview on
page 10-5
for reservoir location.
When to Check Power Steering
Fluid
It is not necessary to regularly
check power steering fluid unless
there is a leak suspected in the
system or an unusual noise is
heard. A fluid loss in this system
could indicate a problem. Have the
system inspected and repaired.
How to Check Power Steering
Fluid
To check the power steering fluid:
1. Turn the key off and let the
engine compartment cool down.
2. Wipe the cap and the top of the reservoir clean.
3. Unscrew the cap and wipe the dipstick with a clean rag.
4. Replace the cap and completely tighten it.
5. Remove the cap again and look at the fluid level on the dipstick.
Page 256 of 379

Black plate (23,1)Chevrolet Express Owner Manual (GMNA-Localizing-U.S./Canada/Mexico-
7707481) - 2015 - CRC - 4/30/14
Vehicle Care 10-23
Brake Fluid
The brake master cylinder reservoir
is filled with DOT 3 brake fluid. See
Engine Compartment Overview on
page 10-5for the location of the
reservoir.
There are only two reasons why the
brake fluid level in the reservoir
might go down:
.The brake fluid level goes down
because of normal brake lining
wear. When new linings are
installed, the fluid level goes
back up.
.A fluid leak in the brake
hydraulic system can also cause
a low fluid level. Have the brake
hydraulic system fixed, since a
leak means that sooner or later
the brakes will not work well. Do not top off the brake fluid.
Adding fluid does not correct a leak.
If fluid is added when the linings are
worn, there will be too much fluid
when new brake linings are
installed. Add or remove brake fluid,
as necessary, only when work is
done on the brake hydraulic system.
{Warning
If too much brake fluid is added, it
can spill on the engine and/or fuel
operated heater parts,
if equipped. If the vehicle has a
diesel engine and a fuel operated
heater, see
“Fuel Operated
Heater (FOH)” in the diesel
engine supplement. The fluid will
burn if the engine is hot enough.
You or others could be burned,
and the vehicle could be
damaged. Add brake fluid only
when work is done on the brake
hydraulic system. See “Checking
Brake Fluid” in this section. Refer to the Maintenance Schedule
to determine when to check the
brake fluid. See
Maintenance
Schedule on page 11-3.
Checking Brake Fluid
Check brake fluid by looking at the
brake fluid reservoir. See Engine
Compartment Overview on
page 10-5.
The fluid level should be above
MIN. If it is not, have the brake
hydraulic system checked to see if
there is a leak.
Page 258 of 379

Black plate (25,1)Chevrolet Express Owner Manual (GMNA-Localizing-U.S./Canada/Mexico-
7707481) - 2015 - CRC - 4/30/14
Vehicle Care 10-25
Vehicle Storage
{Warning
Batteries have acid that can burn
you and gas that can explode.
You can be badly hurt if you are
not careful. SeeJump Starting on
page 10-74 for tips on working
around a battery without
getting hurt.
Infrequent Usage: Remove the
black, negative (−) cable from the
battery to keep the battery from
running down.
Extended Storage: Remove the
black, negative (−) cable from the
battery or use a battery trickle
charger.
Rear Axle
When to Check Lubricant
Refer to the Maintenance Schedule
on page 11-3 to determine how
often to check the lubricant.
How to Check Lubricant
To get an accurate reading, the
vehicle should be on a level
surface.
The proper level for the 2500 and
3500 Series is from 0 to 6 mm
(1/4 in) below the bottom of the fill
plug hole. Add only enough fluid to
reach the proper level.
What to Use
Refer to Recommended Fluids and
Lubricants on page 11-11 to
determine what kind of lubricant
to use.
Noise Control System
The following information relates to
compliance with federal noise
emission standards for vehicles with
a Gross Vehicle Weight Rating
(GVWR) of more than 4 536 kg
(10,000 lbs). The Maintenance
Schedule provides information on
maintaining the noise control system
to minimize degradation of the noise
emission control system during the
life of the vehicle. The noise control
system warranty is given in the
vehicle warranty booklet.
These standards apply only to
vehicles sold in the United States.
Page 259 of 379
Black plate (26,1)Chevrolet Express Owner Manual (GMNA-Localizing-U.S./Canada/Mexico-
7707481) - 2015 - CRC - 4/30/14
10-26 Vehicle Care
Federal law prohibits the following
acts or the causing thereof:
1. The removal or renderinginoperative by any person, other
than for purposes of
maintenance, repair or
replacement, of any device or
element of design incorporated
into any new vehicle for the
purpose of noise control, prior to
its sale or delivery to the ultimate
purchaser or while it is in use; or
2. The use of the vehicle after such device or element of design has
been removed or rendered
inoperative by any person.
Among those acts presumed to
constitute tampering are the acts
listed below.
Insulation:
.Removal of the noise shields or
any underhood insulation. Engine:
.Removal or rendering engine
speed governor, if the vehicle
has one, inoperative so as to
allow engine speed to exceed
manufacturer specifications.
Fan and Drive:
.Removal of fan clutch, if the
vehicle has one, or rendering
clutch inoperative.
.Removal of the fan shroud, if the
vehicle has one.
Air Intake:
.Removal of the air cleaner
silencer.
.Modification of the air cleaner.
Exhaust:
.Removal of the muffler and/or
resonator.
.Removal of the exhaust pipes
and exhaust pipe clamps. Fuel Operated Heater (FOH)
—
Diesel Engine:
.Removal of the muffler.
Starter Switch Check
{Warning
When you are doing this
inspection, the vehicle could
move suddenly. If the vehicle
moves, you or others could be
injured.
1. Before starting this check, be sure there is enough room
around the vehicle.
2. Apply both the parking brake and the regular brake.
Do not use the accelerator
pedal, and be ready to turn off
the engine immediately if it
starts.
3. Try to start the engine in each gear. The vehicle should start
only in P (Park) or N (Neutral).
Page 260 of 379
Black plate (27,1)Chevrolet Express Owner Manual (GMNA-Localizing-U.S./Canada/Mexico-
7707481) - 2015 - CRC - 4/30/14
Vehicle Care 10-27
If the vehicle starts in any other
position, contact your dealer for
service.
Automatic Transmission
Shift Lock Control
Function Check
{Warning
When you are doing this
inspection, the vehicle could
move suddenly. If the vehicle
moves, you or others could be
injured.
1. Before starting this check, be sure there is enough room
around the vehicle. It should be
parked on a level surface.
2. Apply the parking brake. Be ready to apply the regular brake
immediately if the vehicle begins
to move. 3. With the engine off, turn the
ignition on, but do not start the
engine. Without applying the
regular brake, try to move the
shift lever out of P (Park) with
normal effort. If the shift lever
moves out of P (Park), contact
your dealer for service.
Ignition Transmission
Lock Check
While parked and with the parking
brake set, try to turn the ignition to
LOCK/OFF in each shift lever
position.
.The ignition should turn to
LOCK/OFF only when the shift
lever is in P (Park).
.The ignition key should come
out only in LOCK/OFF.
Contact your dealer if service is
required.
Park Brake and P (Park)
Mechanism Check
{Warning
When you are doing this check,
the vehicle could begin to move.
You or others could be injured
and property could be damaged.
Make sure there is room in front
of the vehicle in case it begins to
roll. Be ready to apply the regular
brake at once should the vehicle
begin to move.
Park on a fairly steep hill, with the
vehicle facing downhill. Keeping
your foot on the regular brake, set
the parking brake.
.To check the parking brake's
holding ability: With the engine
running and the transmission in
N (Neutral), slowly remove foot
pressure from the regular brake
pedal. Do this until the vehicle is
held by the parking brake only.
Page 261 of 379
Black plate (28,1)Chevrolet Express Owner Manual (GMNA-Localizing-U.S./Canada/Mexico-
7707481) - 2015 - CRC - 4/30/14
10-28 Vehicle Care
.To check the P (Park)
mechanism's holding ability:
With the engine running, shift to
P (Park). Then release the
parking brake followed by the
regular brake.
Contact your dealer if service is
required.
Wiper Blade Replacement
Windshield wiper blades should be
inspected for wear and cracking.
See Maintenance Schedule on
page 11-3.
Replacement blades come in
different types and are removed in
different ways. For proper type and
length, see Maintenance
Replacement Parts on page 11-13.
{Caution
Allowing the wiper arm to touch
the windshield when no wiper
blade is installed could damage
(Continued)
Caution (Continued)
the windshield. Any damage that
occurs would not be covered by
your warranty. Do not allow the
wiper arm to touch the windshield.
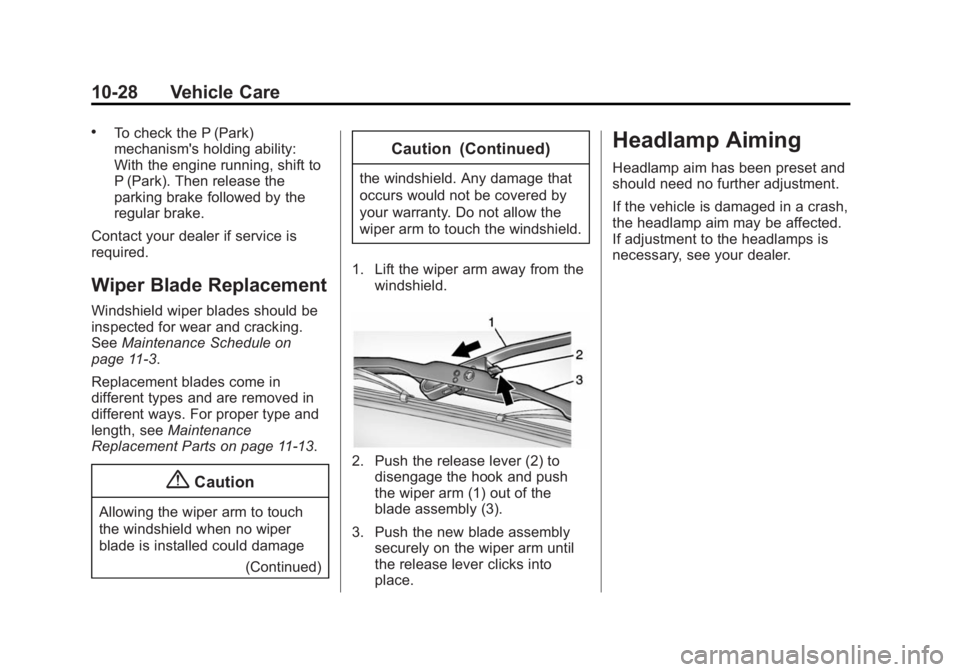
1. Lift the wiper arm away from the windshield.
2. Push the release lever (2) todisengage the hook and push
the wiper arm (1) out of the
blade assembly (3).
3. Push the new blade assembly securely on the wiper arm until
the release lever clicks into
place.
Headlamp Aiming
Headlamp aim has been preset and
should need no further adjustment.
If the vehicle is damaged in a crash,
the headlamp aim may be affected.
If adjustment to the headlamps is
necessary, see your dealer.