remove CHEVROLET EXPRESS 2014 Owner's Guide
[x] Cancel search | Manufacturer: CHEVROLET, Model Year: 2014, Model line: EXPRESS, Model: CHEVROLET EXPRESS 2014Pages: 379, PDF Size: 5.15 MB
Page 262 of 379
Black plate (29,1)Chevrolet Express Owner Manual (GMNA-Localizing-U.S./Canada/Mexico-
7707481) - 2015 - CRC - 4/30/14
Vehicle Care 10-29
Bulb Replacement
For the proper type of replacement
bulbs, seeReplacement Bulbs on
page 10-33.
For any bulb‐changing procedure
not listed in this section, contact
your dealer.
Halogen Bulbs
{Warning
Halogen bulbs have pressurized
gas inside and can burst if you
drop or scratch the bulb. You or
others could be injured. Be sure
to read and follow the instructions
on the bulb package.
Headlamps
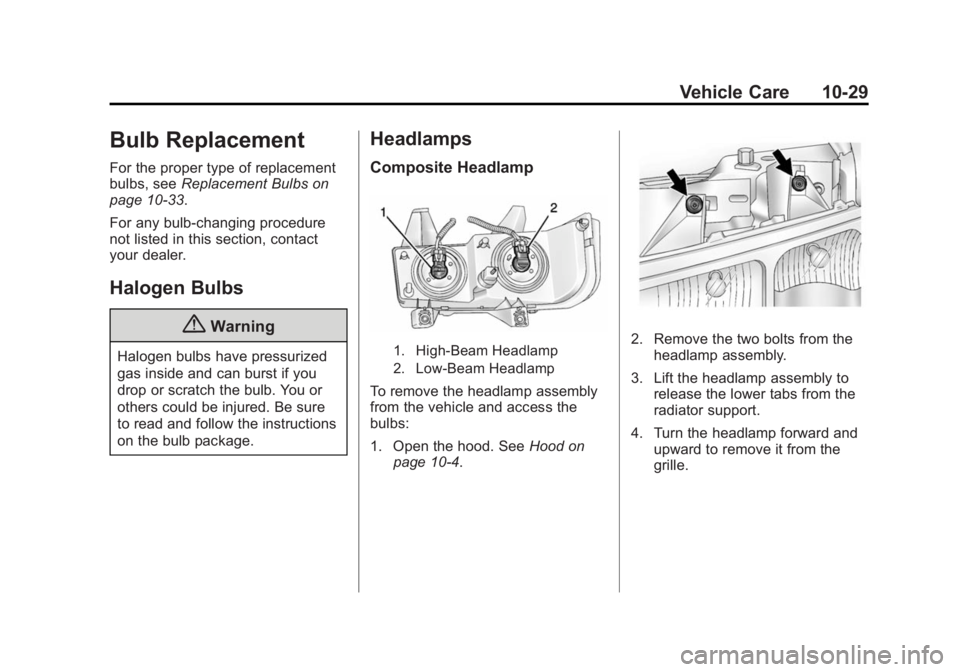
Composite Headlamp
1. High-Beam Headlamp
2. Low-Beam Headlamp
To remove the headlamp assembly
from the vehicle and access the
bulbs:
1. Open the hood. See Hood on
page 10-4.
2. Remove the two bolts from the
headlamp assembly.
3. Lift the headlamp assembly to release the lower tabs from the
radiator support.
4. Turn the headlamp forward and upward to remove it from the
grille.
Page 263 of 379
Black plate (30,1)Chevrolet Express Owner Manual (GMNA-Localizing-U.S./Canada/Mexico-
7707481) - 2015 - CRC - 4/30/14
10-30 Vehicle Care
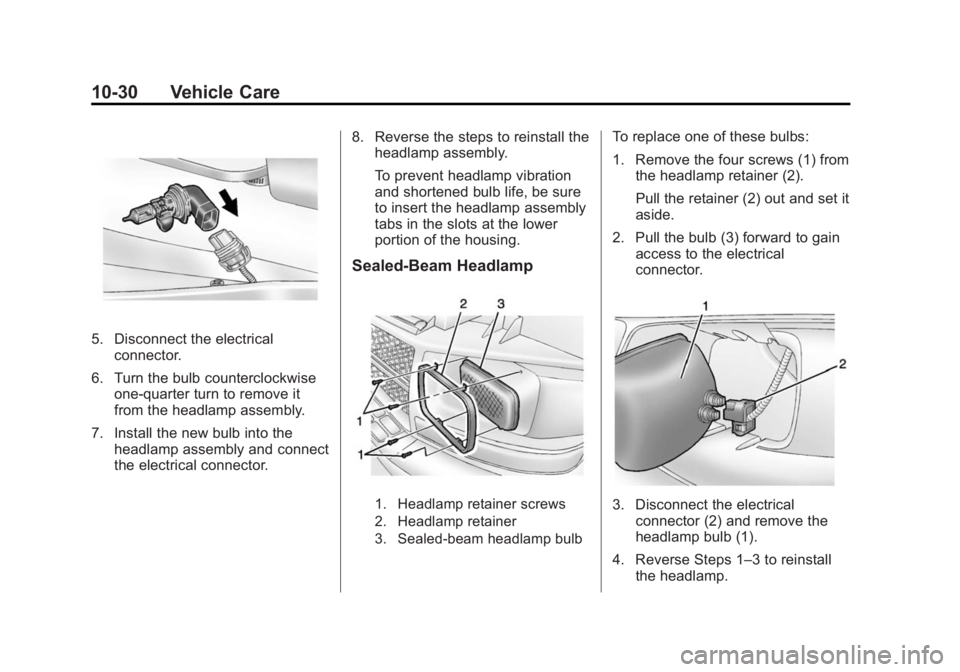
5. Disconnect the electricalconnector.
6. Turn the bulb counterclockwise one-quarter turn to remove it
from the headlamp assembly.
7. Install the new bulb into the headlamp assembly and connect
the electrical connector. 8. Reverse the steps to reinstall the
headlamp assembly.
To prevent headlamp vibration
and shortened bulb life, be sure
to insert the headlamp assembly
tabs in the slots at the lower
portion of the housing.
Sealed-Beam Headlamp
1. Headlamp retainer screws
2. Headlamp retainer
3. Sealed-beam headlamp bulb
To replace one of these bulbs:
1. Remove the four screws (1) from
the headlamp retainer (2).
Pull the retainer (2) out and set it
aside.
2. Pull the bulb (3) forward to gain access to the electrical
connector.
3. Disconnect the electricalconnector (2) and remove the
headlamp bulb (1).
4. Reverse Steps 1–3 to reinstall the headlamp.
Page 264 of 379
Black plate (31,1)Chevrolet Express Owner Manual (GMNA-Localizing-U.S./Canada/Mexico-
7707481) - 2015 - CRC - 4/30/14
Vehicle Care 10-31
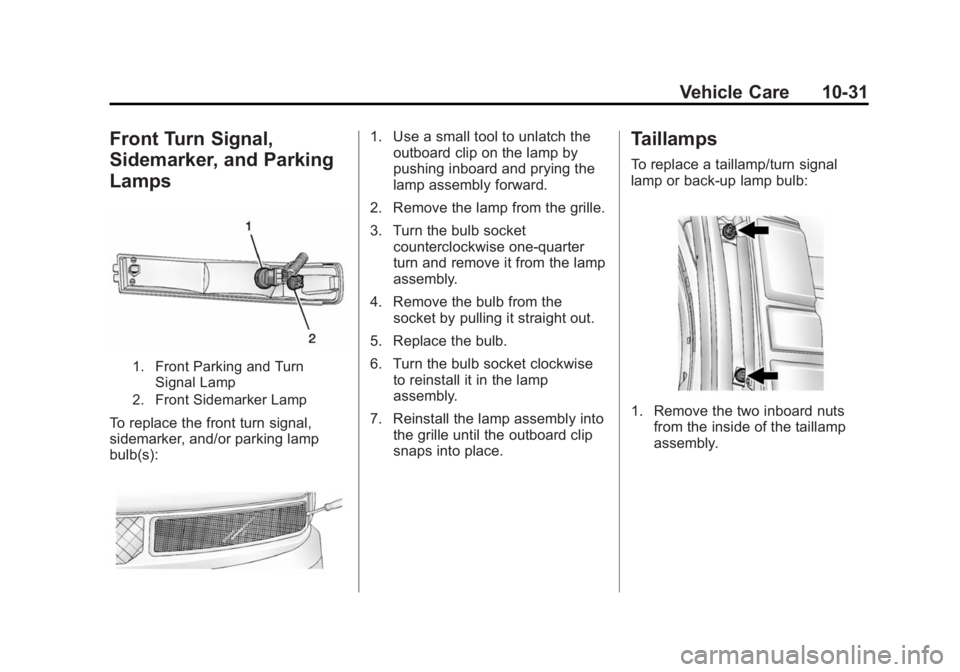
Front Turn Signal,
Sidemarker, and Parking
Lamps
1. Front Parking and TurnSignal Lamp
2. Front Sidemarker Lamp
To replace the front turn signal,
sidemarker, and/or parking lamp
bulb(s):
1. Use a small tool to unlatch the outboard clip on the lamp by
pushing inboard and prying the
lamp assembly forward.
2. Remove the lamp from the grille.
3. Turn the bulb socket counterclockwise one-quarter
turn and remove it from the lamp
assembly.
4. Remove the bulb from the socket by pulling it straight out.
5. Replace the bulb.
6. Turn the bulb socket clockwise to reinstall it in the lamp
assembly.
7. Reinstall the lamp assembly into the grille until the outboard clip
snaps into place.Taillamps
To replace a taillamp/turn signal
lamp or back-up lamp bulb:
1. Remove the two inboard nuts
from the inside of the taillamp
assembly.
Page 265 of 379
Black plate (32,1)Chevrolet Express Owner Manual (GMNA-Localizing-U.S./Canada/Mexico-
7707481) - 2015 - CRC - 4/30/14
10-32 Vehicle Care
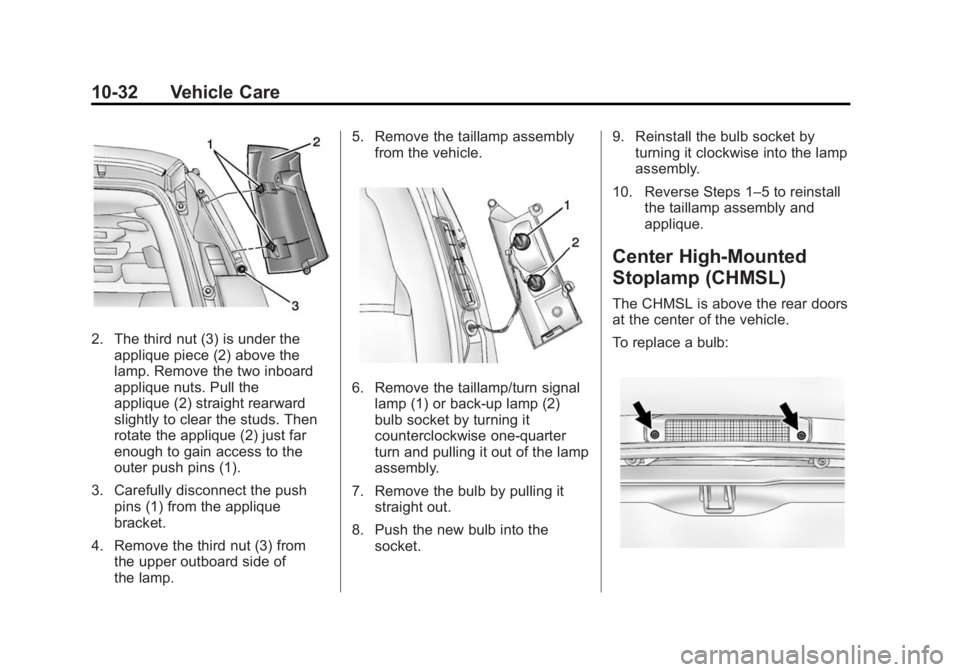
2. The third nut (3) is under theapplique piece (2) above the
lamp. Remove the two inboard
applique nuts. Pull the
applique (2) straight rearward
slightly to clear the studs. Then
rotate the applique (2) just far
enough to gain access to the
outer push pins (1).
3. Carefully disconnect the push pins (1) from the applique
bracket.
4. Remove the third nut (3) from the upper outboard side of
the lamp. 5. Remove the taillamp assembly
from the vehicle.
6. Remove the taillamp/turn signallamp (1) or back-up lamp (2)
bulb socket by turning it
counterclockwise one-quarter
turn and pulling it out of the lamp
assembly.
7. Remove the bulb by pulling it straight out.
8. Push the new bulb into the socket. 9. Reinstall the bulb socket by
turning it clockwise into the lamp
assembly.
10. Reverse Steps 1–5 to reinstall the taillamp assembly and
applique.
Center High-Mounted
Stoplamp (CHMSL)
The CHMSL is above the rear doors
at the center of the vehicle.
To replace a bulb:
Page 266 of 379
Black plate (33,1)Chevrolet Express Owner Manual (GMNA-Localizing-U.S./Canada/Mexico-
7707481) - 2015 - CRC - 4/30/14
Vehicle Care 10-33
1. Remove the two screws from theCHMSL assembly.
2. Remove the CHMSL assembly.
3. Turn the bulb socket counterclockwise one-quarter
turn to remove it from the lamp
assembly.
4. Pull the old bulb straight out of the socket and push the new
bulb into the socket.
5. Turn the bulb socket clockwise one-quarter turn to install it in
the lamp assembly.
6. Reinstall the CHMSL assembly and two screws.
Do not block or damage the CHMSL
when items are loaded on the roof
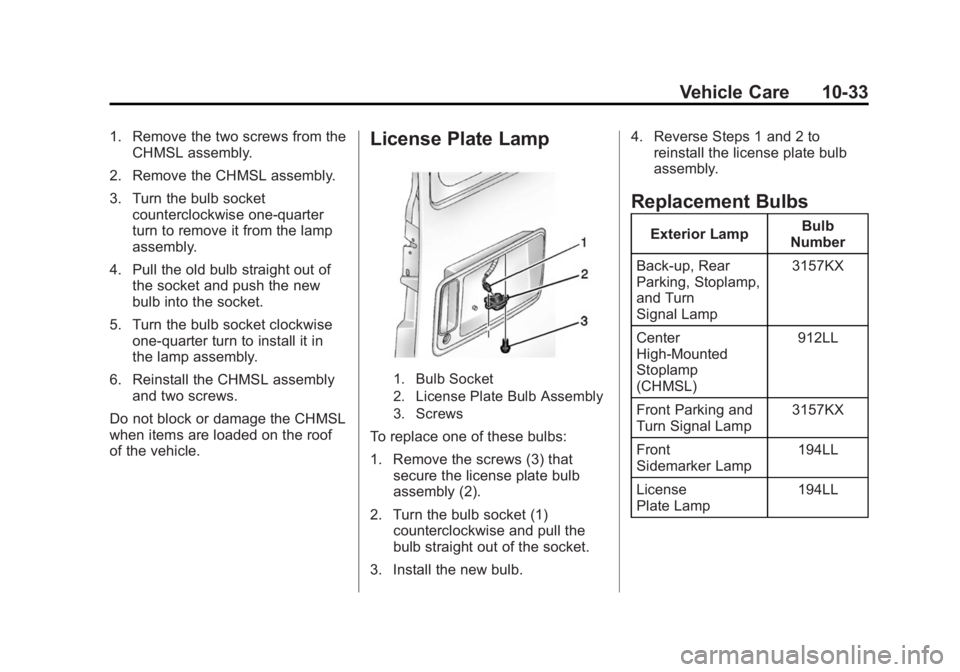
of the vehicle.License Plate Lamp
1. Bulb Socket
2. License Plate Bulb Assembly
3. Screws
To replace one of these bulbs:
1. Remove the screws (3) that secure the license plate bulb
assembly (2).
2. Turn the bulb socket (1) counterclockwise and pull the
bulb straight out of the socket.
3. Install the new bulb. 4. Reverse Steps 1 and 2 to
reinstall the license plate bulb
assembly.
Replacement Bulbs
Exterior Lamp Bulb
Number
Back-up, Rear
Parking, Stoplamp,
and Turn
Signal Lamp 3157KX
Center
High-Mounted
Stoplamp
(CHMSL) 912LL
Front Parking and
Turn Signal Lamp 3157KX
Front
Sidemarker Lamp 194LL
License
Plate Lamp 194LL
Page 284 of 379
Black plate (51,1)Chevrolet Express Owner Manual (GMNA-Localizing-U.S./Canada/Mexico-
7707481) - 2015 - CRC - 4/30/14
Vehicle Care 10-51
example of the Tire and Loading
Information label, seeVehicle
Load Limits on page 9-9. How
the vehicle is loaded affects
vehicle handling and ride
comfort. Never load the vehicle
with more weight than it was
designed to carry.
When to Check
Check the tires once a month
or more.
Do not forget the spare tire,
if the vehicle has one. See
Full-Size Spare Tire on
page 10-74 for additional
information.
How to Check
Use a good quality pocket-type
gauge to check tire pressure.
Proper tire inflation cannot be
determined by looking at the tire.
Check the tire inflation pressure
when the tires are cold, meaning the vehicle has not been driven
for at least three hours or no
more than 1.6 km (1 mi).
Remove the valve cap from the
tire valve stem. Press the tire
gauge firmly onto the valve to
get a pressure measurement.
If the cold tire inflation pressure
matches the recommended
pressure on the Tire and
Loading Information label, no
further adjustment is necessary.
If the inflation pressure is low,
add air until the recommended
pressure is reached. If the
inflation pressure is high, press
on the metal stem in the center
of the tire valve to release air.
Re-check the tire pressure with
the tire gauge.
Return the valve caps on the
valve stems to prevent leaks
and keep out dirt and moisture.Tire Pressure Monitor
System
The Tire Pressure Monitor System
(TPMS) uses radio and sensor
technology to check tire pressure
levels. The TPMS sensors monitor
the air pressure in your tires and
transmit tire pressure readings to a
receiver located in the vehicle.
Each tire, including the spare (if
provided), should be checked
monthly when cold and inflated to
the inflation pressure recommended
by the vehicle manufacturer on the
vehicle placard or tire inflation
pressure label. (If your vehicle has
tires of a different size than the size
indicated on the vehicle placard or
tire inflation pressure label, you
should determine the proper tire
inflation pressure for those tires.)
As an added safety feature, your
vehicle has been equipped with a
tire pressure monitoring system
(TPMS) that illuminates a low tire
Page 290 of 379
Black plate (57,1)Chevrolet Express Owner Manual (GMNA-Localizing-U.S./Canada/Mexico-
7707481) - 2015 - CRC - 4/30/14
Vehicle Care 10-57
Reset the Tire Pressure Monitor
System. SeeTire Pressure
Monitor Operation on
page 10-52.
Check that all wheel nuts are
properly tightened. See “Wheel
Nut Torque” underCapacities
and Specifications on
page 12-2.
{Warning
Rust or dirt on a wheel, or on the
parts to which it is fastened, can
make wheel nuts become loose
after time. The wheel could come
off and cause an accident. When
changing a wheel, remove any
rust or dirt from places where the
wheel attaches to the vehicle. In
an emergency, a cloth or a paper
towel can be used; however, use
a scraper or wire brush later to
remove all rust or dirt.
Lightly coat the center of the
wheel hub with wheel bearing
grease after a wheel change or
tire rotation to prevent corrosion
or rust build-up. Do not get
grease on the flat wheel
mounting surface or on the
wheel nuts or bolts.
Dual Tire Rotation
When the vehicle is new,
or whenever a wheel, wheel bolt,
or wheel nut is replaced, check
the wheel nut torque after
160, 1 600, and 10 000 km (100,
1,000, and 6,000 mi) of driving. For
proper wheel nut tightening
information, see “Removing the Flat
Tire and Installing the Spare Tire”
under Tire Changing on page 10-66.
Also see “Wheel Nut Torque” under
Capacities and Specifications on
page 12-2. The outer tire on a dual wheel setup
generally wears faster than the
inner tire. Tires last longer and wear
more evenly if they are rotated. See
Tire Inspection on page 10-56
and
Tire Rotation on page 10-56. Also
see Maintenance Schedule on
page 11-3.
{Warning
If the vehicle is operated with a
tire that is underinflated, the tire
can overheat. An overheated tire
can lose air suddenly or catch
fire. You or others could be
injured. Properly inflate all tires,
including the spare.
See Tires on page 10-41 andTire
Pressure on page 10-50 for more
information on proper tire inflation.
Page 291 of 379
Black plate (58,1)Chevrolet Express Owner Manual (GMNA-Localizing-U.S./Canada/Mexico-
7707481) - 2015 - CRC - 4/30/14
10-58 Vehicle Care
When It Is Time for New
Tires
Factors such as maintenance,
temperatures, driving speeds,
vehicle loading, and road conditions
affect the wear rate of the tires.
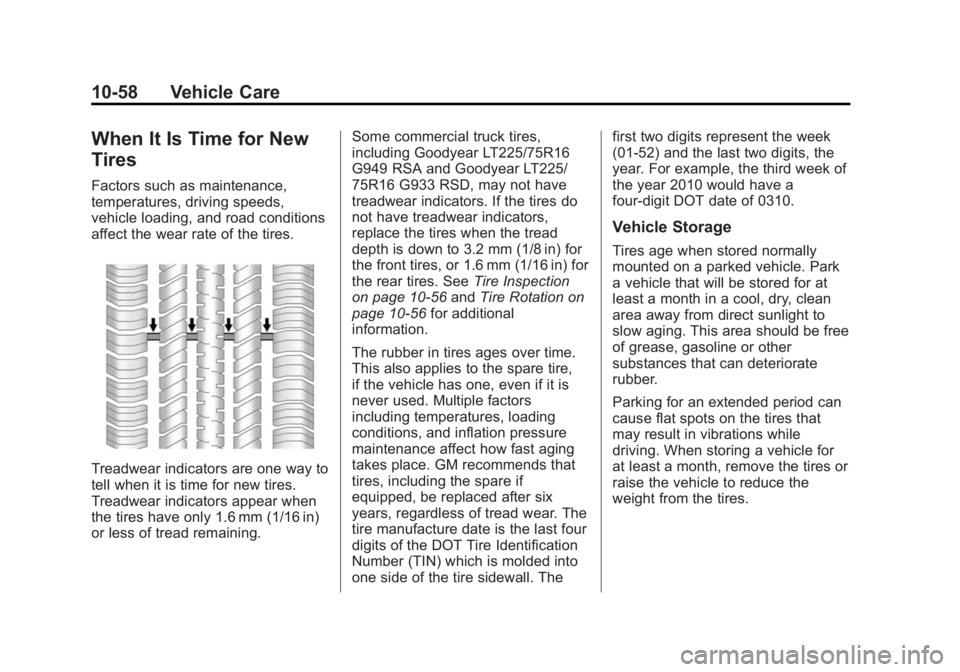
Treadwear indicators are one way to
tell when it is time for new tires.
Treadwear indicators appear when
the tires have only 1.6 mm (1/16 in)
or less of tread remaining.Some commercial truck tires,
including Goodyear LT225/75R16
G949 RSA and Goodyear LT225/
75R16 G933 RSD, may not have
treadwear indicators. If the tires do
not have treadwear indicators,
replace the tires when the tread
depth is down to 3.2 mm (1/8 in) for
the front tires, or 1.6 mm (1/16 in) for
the rear tires. See
Tire Inspection
on page 10-56 andTire Rotation on
page 10-56 for additional
information.
The rubber in tires ages over time.
This also applies to the spare tire,
if the vehicle has one, even if it is
never used. Multiple factors
including temperatures, loading
conditions, and inflation pressure
maintenance affect how fast aging
takes place. GM recommends that
tires, including the spare if
equipped, be replaced after six
years, regardless of tread wear. The
tire manufacture date is the last four
digits of the DOT Tire Identification
Number (TIN) which is molded into
one side of the tire sidewall. The first two digits represent the week
(01-52) and the last two digits, the
year. For example, the third week of
the year 2010 would have a
four-digit DOT date of 0310.
Vehicle Storage
Tires age when stored normally
mounted on a parked vehicle. Park
a vehicle that will be stored for at
least a month in a cool, dry, clean
area away from direct sunlight to
slow aging. This area should be free
of grease, gasoline or other
substances that can deteriorate
rubber.
Parking for an extended period can
cause flat spots on the tires that
may result in vibrations while
driving. When storing a vehicle for
at least a month, remove the tires or
raise the vehicle to reduce the
weight from the tires.
Page 297 of 379
Black plate (64,1)Chevrolet Express Owner Manual (GMNA-Localizing-U.S./Canada/Mexico-
7707481) - 2015 - CRC - 4/30/14
10-64 Vehicle Care
Warning (Continued)
crash. To help avoid damage to
the vehicle, drive slowly, readjust,
or remove the device if it is
contacting the vehicle. Do not
spin the vehicle's tires. Follow the
manufacturer's instructions.
{Caution
Use tire chains only where legal
and only when necessary. Use
chains that are the proper size for
the tires. Install them on the tires
of the rear axle. Do not use
chains on the tires of the front
axle. Tighten them as tightly as
possible with the ends securely
fastened. Drive slowly and follow
the chain manufacturer's
instructions. If the chains contact
the vehicle, stop and retighten
them. If the contact continues,(Continued)
Caution (Continued)
slow down until it stops. Driving
too fast or spinning the wheels
with chains on will damage the
vehicle.
For Cutaway models with LT245/
75R16, LT225/75R16 or LT215/
85R16 size single or dual rear tires,
use Low Profile Z-Chain or SAE
Class S cables.
For Cargo or Passenger models
with P245/70R17, LT225/75R16 or
LT245/75R16 size tires, use Low
Profile Z-Chain cables. SAE Class S
chains are not recommended.
If the vehicle has dual rear tires, do
not use individual tire chains. Use
tire chains that fit across both dual
tires.
If a Tire Goes Flat
It is unusual for a tire to blow out
while driving, especially if the tires
are maintained properly. See Tires
on page 10-41. If air goes out of a
tire, it is much more likely to leak
out slowly. But if there ever is a
blowout, here are a few tips about
what to expect and what to do:
If a front tire fails, the flat tire
creates a drag that pulls the vehicle
toward that side. Take your foot off
the accelerator pedal and grip the
steering wheel firmly. Steer to
maintain lane position, and then
gently brake to a stop, well off the
road, if possible.
A rear blowout, particularly on a
curve, acts much like a skid and
may require the same correction as
used in a skid. Stop pressing the
accelerator pedal and steer to
straighten the vehicle. It may be
very bumpy and noisy. Gently brake
to a stop, well off the road,
if possible.
Page 299 of 379
Black plate (66,1)Chevrolet Express Owner Manual (GMNA-Localizing-U.S./Canada/Mexico-
7707481) - 2015 - CRC - 4/30/14
10-66 Vehicle Care
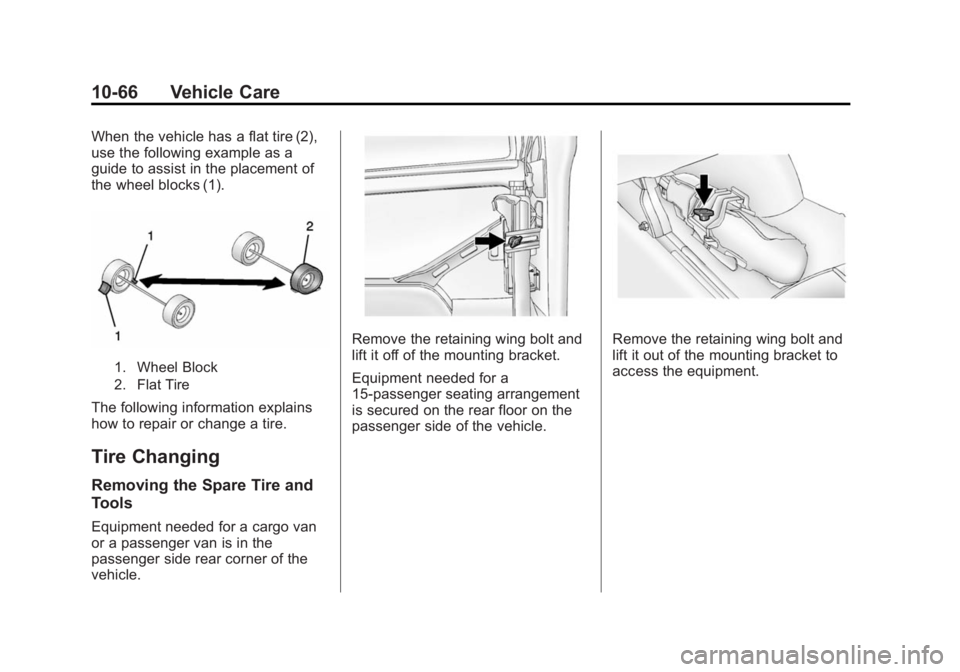
When the vehicle has a flat tire (2),
use the following example as a
guide to assist in the placement of
the wheel blocks (1).
1. Wheel Block
2. Flat Tire
The following information explains
how to repair or change a tire.
Tire Changing
Removing the Spare Tire and
Tools
Equipment needed for a cargo van
or a passenger van is in the
passenger side rear corner of the
vehicle.
Remove the retaining wing bolt and
lift it off of the mounting bracket.
Equipment needed for a
15-passenger seating arrangement
is secured on the rear floor on the
passenger side of the vehicle.Remove the retaining wing bolt and
lift it out of the mounting bracket to
access the equipment.