keyless CHEVROLET EXPRESS 2020 Get To Know Guide
[x] Cancel search | Manufacturer: CHEVROLET, Model Year: 2020, Model line: EXPRESS, Model: CHEVROLET EXPRESS 2020Pages: 356, PDF Size: 5.7 MB
Page 8 of 356
Chevrolet Express Owner Manual (GMNA-Localizing-U.S./Canada/Mexico-
13882570) - 2020 - CRC - 11/1/19
Keys, Doors, and Windows 7
Keys, Doors, and
Windows
Keys and Locks
Keys . . . . . . . . . . . . . . . . . . . . . . . . . . . . 7
Remote Keyless Entry (RKE)System . . . . . . . . . . . . . . . . . . . . . . . . 9
Remote Keyless Entry (RKE) System Operation . . . . . . . . . . . . . 9
Remote Vehicle Start . . . . . . . . . . 12
Door Locks . . . . . . . . . . . . . . . . . . . . 13
Power Door Locks . . . . . . . . . . . . . 14
Cargo Door Relocking . . . . . . . . . 14
Delayed Locking . . . . . . . . . . . . . . . 14
Automatic Door Locks . . . . . . . . . 14
Lockout Protection . . . . . . . . . . . . . 14
Safety Locks . . . . . . . . . . . . . . . . . . . 14
Safety Locks . . . . . . . . . . . . . . . . . . . 15
Doors
Side Door (60/40 Swing-Out) . . . . . . . . . . . . . . . . . . . 16
Sliding Door . . . . . . . . . . . . . . . . . . . 17
Rear Doors . . . . . . . . . . . . . . . . . . . . 18
Vehicle Security
Vehicle Security . . . . . . . . . . . . . . . . 19
Vehicle Alarm System . . . . . . . . . 19
Immobilizer . . . . . . . . . . . . . . . . . . . . 20 Immobilizer Operation . . . . . . . . . 20
Exterior Mirrors
Convex Mirrors . . . . . . . . . . . . . . . . 21
Manual Mirrors . . . . . . . . . . . . . . . . . 21
Trailer-Tow Mirrors . . . . . . . . . . . . . 21
Power Mirrors . . . . . . . . . . . . . . . . . . 22
Folding Mirrors . . . . . . . . . . . . . . . . . 22
Heated Mirrors . . . . . . . . . . . . . . . . . 22
Interior Mirrors
Interior Rearview Mirrors . . . . . . . 22
Manual Rearview Mirror . . . . . . . . 22
Windows
Windows . . . . . . . . . . . . . . . . . . . . . . . 23
Manual Windows . . . . . . . . . . . . . . 23
Power Windows . . . . . . . . . . . . . . . 23
Swing-Out Windows . . . . . . . . . . . 24
Enhanced Technology Glass . . . 24
Rear Windows . . . . . . . . . . . . . . . . . 25
Sun Visors . . . . . . . . . . . . . . . . . . . . . 25
Keys and Locks
Keys
{Warning
Leaving children in a vehicle with
the ignition key is dangerous and
children or others could be
seriously injured or killed. They
could operate the power windows
or other controls or make the
vehicle move. The windows will
function with the keys in the
ignition, and children or others
could be caught in the path of a
closing window. Do not leave
children in a vehicle with the
ignition key.
Page 9 of 356
Chevrolet Express Owner Manual (GMNA-Localizing-U.S./Canada/Mexico-
13882570) - 2020 - CRC - 11/1/19
8 Keys, Doors, and Windows
{Warning
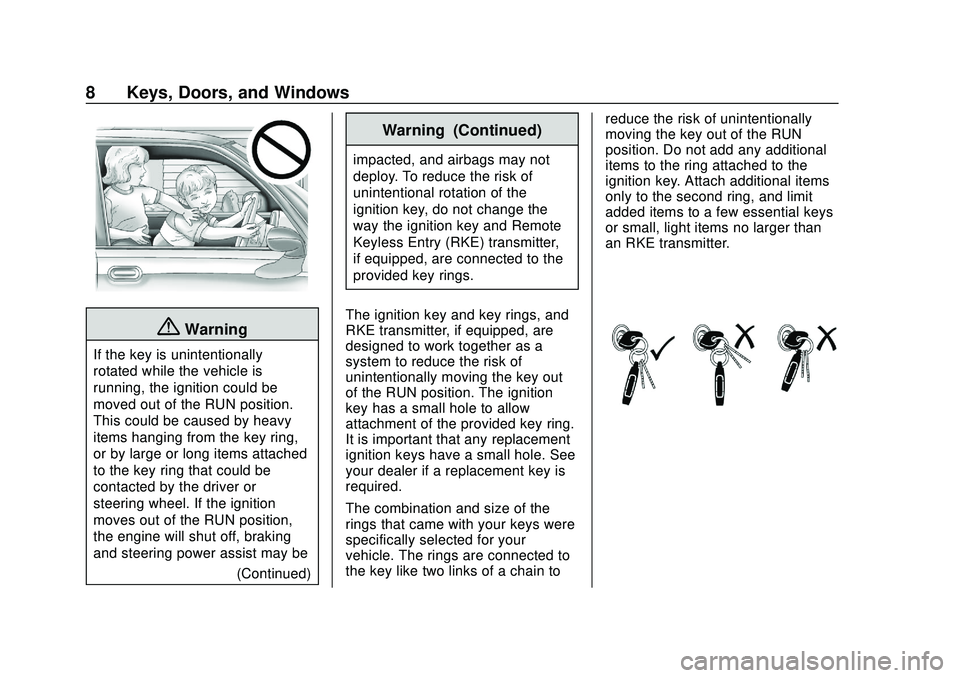
If the key is unintentionally
rotated while the vehicle is
running, the ignition could be
moved out of the RUN position.
This could be caused by heavy
items hanging from the key ring,
or by large or long items attached
to the key ring that could be
contacted by the driver or
steering wheel. If the ignition
moves out of the RUN position,
the engine will shut off, braking
and steering power assist may be(Continued)
Warning (Continued)
impacted, and airbags may not
deploy. To reduce the risk of
unintentional rotation of the
ignition key, do not change the
way the ignition key and Remote
Keyless Entry (RKE) transmitter,
if equipped, are connected to the
provided key rings.
The ignition key and key rings, and
RKE transmitter, if equipped, are
designed to work together as a
system to reduce the risk of
unintentionally moving the key out
of the RUN position. The ignition
key has a small hole to allow
attachment of the provided key ring.
It is important that any replacement
ignition keys have a small hole. See
your dealer if a replacement key is
required.
The combination and size of the
rings that came with your keys were
specifically selected for your
vehicle. The rings are connected to
the key like two links of a chain to reduce the risk of unintentionally
moving the key out of the RUN
position. Do not add any additional
items to the ring attached to the
ignition key. Attach additional items
only to the second ring, and limit
added items to a few essential keys
or small, light items no larger than
an RKE transmitter.
Page 10 of 356
Chevrolet Express Owner Manual (GMNA-Localizing-U.S./Canada/Mexico-
13882570) - 2020 - CRC - 11/1/19
Keys, Doors, and Windows 9
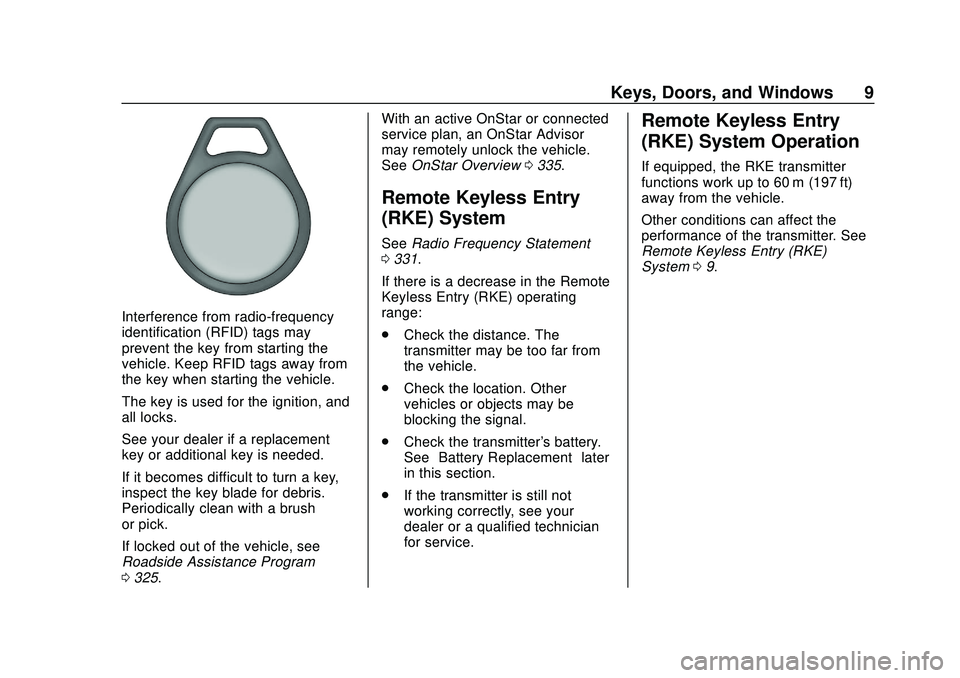
Interference from radio-frequency
identification (RFID) tags may
prevent the key from starting the
vehicle. Keep RFID tags away from
the key when starting the vehicle.
The key is used for the ignition, and
all locks.
See your dealer if a replacement
key or additional key is needed.
If it becomes difficult to turn a key,
inspect the key blade for debris.
Periodically clean with a brush
or pick.
If locked out of the vehicle, see
Roadside Assistance Program
0325. With an active OnStar or connected
service plan, an OnStar Advisor
may remotely unlock the vehicle.
See
OnStar Overview 0335.
Remote Keyless Entry
(RKE) System
See Radio Frequency Statement
0 331.
If there is a decrease in the Remote
Keyless Entry (RKE) operating
range:
. Check the distance. The
transmitter may be too far from
the vehicle.
. Check the location. Other
vehicles or objects may be
blocking the signal.
. Check the transmitter's battery.
See “Battery Replacement” later
in this section.
. If the transmitter is still not
working correctly, see your
dealer or a qualified technician
for service.
Remote Keyless Entry
(RKE) System Operation
If equipped, the RKE transmitter
functions work up to 60 m (197 ft)
away from the vehicle.
Other conditions can affect the
performance of the transmitter. See
Remote Keyless Entry (RKE)
System 09.
Page 13 of 356
Chevrolet Express Owner Manual (GMNA-Localizing-U.S./Canada/Mexico-
13882570) - 2020 - CRC - 11/1/19
12 Keys, Doors, and Windows
3. Insert the new battery, positiveside facing down. Replace with
a CR2032 or equivalent
battery.
4. Snap the transmitter back together.
Remote Vehicle Start
This vehicle may have a remote
start feature. This feature allows you
to start the engine from outside the
vehicle. It may also start the
vehicle's heating or air conditioning
systems. See Climate Control
Systems 0144.
Laws in some local communities
may restrict the use of remote
starters. For example, some laws
may require a person using remote
start to have the vehicle in view
when doing so. Check local
regulations for any requirements on
remote starting of vehicles.
Do not use the remote start feature
if the vehicle is low on fuel. The
vehicle may run out of fuel.
The RKE transmitter range may be
less while the vehicle is running. Other conditions can affect the
performance of the transmitter. See
Remote Keyless Entry (RKE)
System
09.
/:This button will be on the RKE
transmitter if the vehicle has remote
start.
To start the engine using the remote
start feature:
1. Press and release
Qon the
transmitter.
2. Immediately press and hold
/
until the turn signal lamps
flash. If you cannot see the
lamps, press and hold
/for at
least four seconds.
When the engine starts, the
parking lamps will turn on and
remain on while the engine is
running. The doors will be
locked.
The engine will continue to run
for 10 minutes. After
30 seconds, repeat the steps if
a 10-minute extension is
desired. Remote start can be
extended only once. After entering the vehicle during a
remote start, turn the ignition on to
drive the vehicle.
A maximum of two remote starts or
a start with an extension are
allowed between ignition cycles.
If the remote start procedure is used
again before the first 10-minute time
frame has ended, the first
10 minutes will immediately expire
and the second 10-minute time
frame will start.
After the engine has been remote
started two times or a start with an
extension, the ignition must be
turned on and then off before the
remote start procedure can be used
again.
To cancel a remote start do any of
the following:
.
Press and hold
/until the
parking lamps turn off.
. Turn on the hazard warning
flashers.
. Turn the ignition on and then off.
The remote vehicle start feature will
not operate if:
Page 14 of 356
Chevrolet Express Owner Manual (GMNA-Localizing-U.S./Canada/Mexico-
13882570) - 2020 - CRC - 11/1/19
Keys, Doors, and Windows 13
.The key is in the ignition.
. The hood is open.
. The hazard warning flashers
are on.
. There is an emission control
system malfunction. See
Malfunction Indicator Lamp
(Check Engine Light) 093.
. The engine coolant temperature
is too high.
. The oil pressure is low.
. The vehicle is not in park.
. Two remote starts or a start with
an extension have already been
provided.
To turn on or off, see Vehicle
Personalization 0105.
Door Locks
{Warning
.
Passengers, especially
children, can easily open
the doors and fall out of a
(Continued)
Warning (Continued)
moving vehicle. When a
door is locked, the handle
will not open it. The chance
of being thrown out of the
vehicle in a crash is
increased if the doors are
not locked. So, all
passengers should wear
seat belts properly and the
doors should be locked
whenever the vehicle is
driven.
. Young children who get into
unlocked vehicles may be
unable to get out. A child
can be overcome by
extreme heat and can suffer
permanent injuries or even
death from heat stroke.
Always lock the vehicle
whenever leaving it.
. Outsiders can easily enter
through an unlocked door
when you slow down or stop
(Continued)
Warning (Continued)
the vehicle. Locking the
doors can help prevent this
from happening.
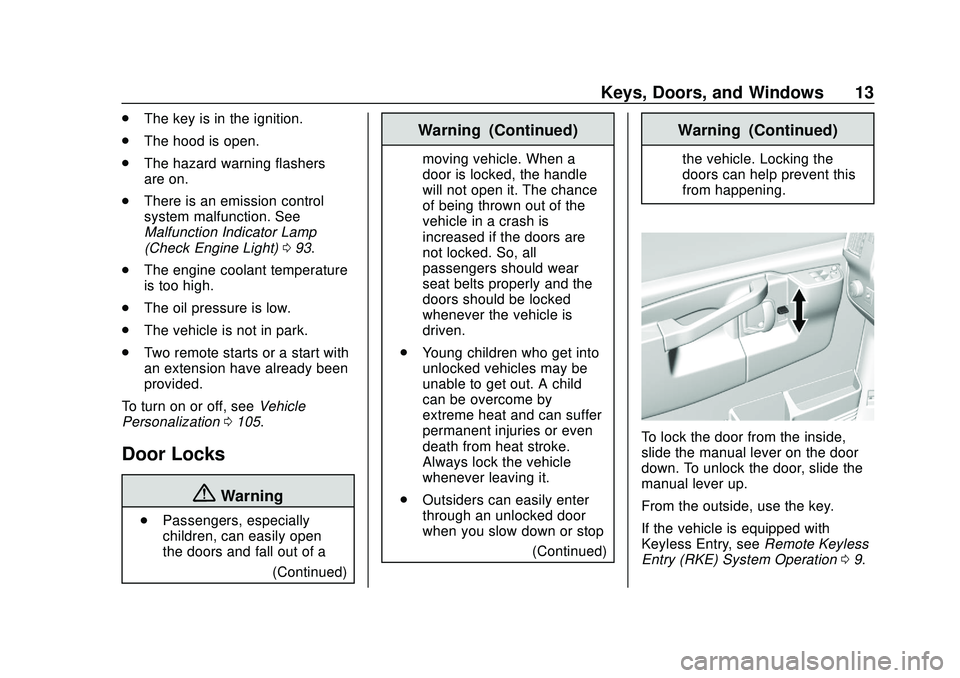
To lock the door from the inside,
slide the manual lever on the door
down. To unlock the door, slide the
manual lever up.
From the outside, use the key.
If the vehicle is equipped with
Keyless Entry, see Remote Keyless
Entry (RKE) System Operation 09.
Page 101 of 356
Chevrolet Express Owner Manual (GMNA-Localizing-U.S./Canada/Mexico-
13882570) - 2020 - CRC - 11/1/19
100 Instruments and Controls
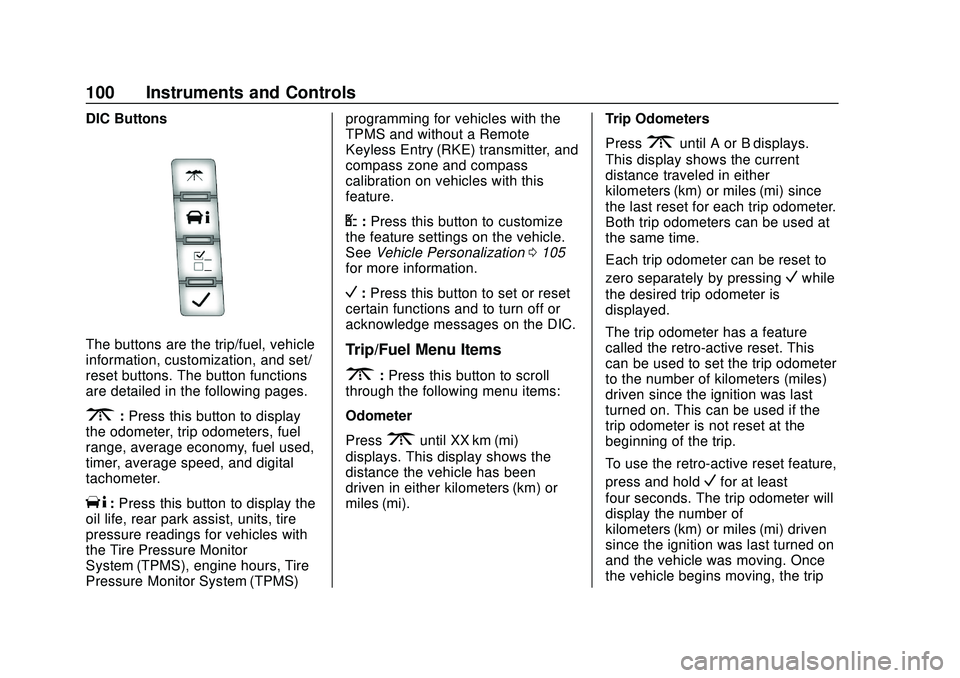
DIC Buttons
The buttons are the trip/fuel, vehicle
information, customization, and set/
reset buttons. The button functions
are detailed in the following pages.
3:Press this button to display
the odometer, trip odometers, fuel
range, average economy, fuel used,
timer, average speed, and digital
tachometer.
T: Press this button to display the
oil life, rear park assist, units, tire
pressure readings for vehicles with
the Tire Pressure Monitor
System (TPMS), engine hours, Tire
Pressure Monitor System (TPMS) programming for vehicles with the
TPMS and without a Remote
Keyless Entry (RKE) transmitter, and
compass zone and compass
calibration on vehicles with this
feature.
U:
Press this button to customize
the feature settings on the vehicle.
See Vehicle Personalization 0105
for more information.
V: Press this button to set or reset
certain functions and to turn off or
acknowledge messages on the DIC.
Trip/Fuel Menu Items
3: Press this button to scroll
through the following menu items:
Odometer
Press
3until XX km (mi)
displays. This display shows the
distance the vehicle has been
driven in either kilometers (km) or
miles (mi). Trip Odometers
Press
3until A or B displays.
This display shows the current
distance traveled in either
kilometers (km) or miles (mi) since
the last reset for each trip odometer.
Both trip odometers can be used at
the same time.
Each trip odometer can be reset to
zero separately by pressing
Vwhile
the desired trip odometer is
displayed.
The trip odometer has a feature
called the retro-active reset. This
can be used to set the trip odometer
to the number of kilometers (miles)
driven since the ignition was last
turned on. This can be used if the
trip odometer is not reset at the
beginning of the trip.
To use the retro-active reset feature,
press and hold
Vfor at least
four seconds. The trip odometer will
display the number of
kilometers (km) or miles (mi) driven
since the ignition was last turned on
and the vehicle was moving. Once
the vehicle begins moving, the trip
Page 107 of 356
Chevrolet Express Owner Manual (GMNA-Localizing-U.S./Canada/Mexico-
13882570) - 2020 - CRC - 11/1/19
106 Instruments and Controls
To select a setting, pressVwhile
the desired setting is displayed on
the DIC. A beep will sound once a
language has been selected.
AUTO DOOR LOCK
This feature allows you to select
when the doors will
automatically lock.
Press
Uuntil AUTO DOOR LOCK
appears on the DIC display. Press
Vonce to access the settings for
this feature. Then press
Uto scroll
through the following settings:
SHIFT OUT OF PARK (default) :
The doors will automatically lock
when the vehicle is shifted out of
P (Park).
AT VEHICLE SPEED : The doors
will automatically lock when the
vehicle speed is above 13 km/h
(8 mph) for three seconds.
NO CHANGE : No change will be
made to this feature. The current
setting will remain. To select a setting, press
Vwhile
the desired setting is displayed on
the DIC.
AUTO DOOR UNLOCK
This feature allows you to select
whether or not to turn off the
automatic door unlocking feature.
It also allows you to select which
doors and when the doors will
automatically unlock.
Press
Uuntil AUTO DOOR
UNLOCK appears on the DIC
display. Press
Vonce to access the
settings for this feature. Then press
Uto scroll through the following
settings:
OFF : None of the doors will
automatically unlock.
DRIVER AT KEY OUT : Only the
driver door will unlock when the key
is taken out of the ignition.
DRIVER IN PARK : Only the driver
door will unlock when the vehicle is
shifted into P (Park). ALL AT KEY OUT :
All of the doors
will unlock when the key is taken
out of the ignition.
ALL IN PARK (default) : All of the
doors will unlock when the vehicle is
shifted into P (Park).
NO CHANGE : No change will be
made to this feature. The current
setting will remain.
To select a setting, press
Vwhile
the desired setting is displayed on
the DIC.
REMOTE DOOR LOCK
This feature allows you to select the
type of feedback you will receive
when locking the vehicle with the
Remote Keyless Entry (RKE)
transmitter. You will not receive
feedback when locking the vehicle
with the RKE transmitter if the doors
are open. See Remote Keyless
Entry (RKE) System Operation 09.
Press
Uuntil REMOTE DOOR
LOCK appears on the DIC display.
Press
Vonce to access the settings
for this feature. Then press
Uto
scroll through the following settings:
Page 108 of 356

Chevrolet Express Owner Manual (GMNA-Localizing-U.S./Canada/Mexico-
13882570) - 2020 - CRC - 11/1/19
Instruments and Controls 107
OFF :There will be no feedback
when you press
Qon the RKE
transmitter.
LIGHTS ONLY : The exterior lamps
will flash when you press
Qon the
RKE transmitter.
HORN ONLY : The horn will sound
on the second press of
Qon the
RKE transmitter.
HORN & LIGHTS (default) : The
exterior lamps will flash when you
press
Qon the RKE transmitter, and
the horn will sound when
Qis
pressed again within five seconds of
the previous command.
NO CHANGE : No change will be
made to this feature. The current
setting will remain.
To select a setting, press
Vwhile
the desired setting is displayed on
the DIC.
REMOTE DOOR UNLOCK
This feature allows you to select the
type of feedback you will receive
when unlocking the vehicle with the
Remote Keyless Entry (RKE) transmitter. You will not receive
feedback when unlocking the
vehicle with the RKE transmitter if
the doors are open. See
Remote
Keyless Entry (RKE) System
Operation 09.
Press
Uuntil REMOTE DOOR
UNLOCK appears on the DIC
display. Press
Vonce to access the
settings for this feature. Then press
Uto scroll through the following
settings:
LIGHTS OFF : The exterior lamps
will not flash when you press
Kon
the RKE transmitter.
LIGHTS ON (default) : The exterior
lamps will flash when you press
K
on the RKE transmitter.
NO CHANGE : No change will be
made to this feature. The current
setting will remain.
To select a setting, press
Vwhile
the desired setting is displayed on
the DIC. DELAY DOOR LOCK
This feature allows you to select
whether or not the locking of the
doors will be delayed. When locking
the doors with the power door lock
switch and a door is open, this
feature will delay locking the doors
until five seconds after the last door
is closed. You will hear three chimes
to signal that the delayed locking
feature is in use. The key must be
out of the ignition for this feature to
work. You can temporarily override
delayed locking by pressing the
power door lock switch twice or
Q
on the RKE transmitter twice. See
Delayed Locking
014.
Press
Uuntil DELAY DOOR LOCK
appears on the DIC display. Press
Vonce to access the settings for
this feature. Then press
Uto scroll
through the following settings:
OFF : There will be no delayed
locking of the vehicle's doors.
ON (default) : The doors will not
lock until five seconds after the last
door is closed.
Page 268 of 356

Chevrolet Express Owner Manual (GMNA-Localizing-U.S./Canada/Mexico-
13882570) - 2020 - CRC - 11/1/19
Vehicle Care 267
.One or more TPMS sensors are
missing or damaged. The
malfunction light and the DIC
message should go off when the
TPMS sensors are installed and
the sensor matching process is
performed successfully. See
your dealer for service.
. Replacement tires or wheels do
not match the original equipment
tires or wheels. Tires and wheels
other than those recommended
could prevent the TPMS from
functioning properly. See Buying
New Tires 0271.
. Operating electronic devices or
being near facilities using radio
wave frequencies similar to the
TPMS could cause the TPMS
sensors to malfunction.
If the TPMS is not functioning
properly, it cannot detect or signal a
low tire pressure condition. See
your dealer for service if the TPMS
malfunction light and DIC message
come on and stay on.TPMS Sensor Matching
Process
Each TPMS sensor has a unique
identification code. The identification
code needs to be matched to a new
tire/wheel position after rotating the
vehicle’s tires or replacing one or
more of the TPMS sensors. Also,
the TPMS sensor matching process
should be performed after replacing
a spare tire with a road tire
containing the TPMS sensor. The
malfunction light and the DIC
message should go off at the next
ignition cycle. The sensors are
matched to the tire/wheel positions,
using a TPMS relearn tool, in the
following order: driver side front tire,
passenger side front tire, passenger
side rear tire, and driver side rear.
See your dealer for service or to
purchase a relearn tool. A TPMS
relearn tool can also be purchased.
See Tire Pressure Monitor Sensor
Activation Tool at
www.gmtoolsandequipment.com or
call 1-800-GM TOOLS
(1-800-468-6657). There are two minutes to match the
first tire/wheel position, and
five minutes overall to match all four
tire/wheel positions. If it takes
longer, the matching process stops
and must be restarted.
The TPMS sensor matching
process is:
1. Set the parking brake.
2. Turn the ignition on without starting the vehicle. See
Ignition Positions 0163.
3. Press the Remote Keyless Entry (RKE) transmitter's
Q
andKbuttons at the same
time for approximately
five seconds. The horn sounds
twice to signal the receiver is in
relearn mode and TIRE
LEARNING ACTIVE message
displays on the DIC screen.
If the vehicle does not have
RKE, press the Driver
Information Center (DIC)
vehicle information button until
the PRESS VTO RELEARN
TIRE POSITIONS message
displays. The horn sounds
Page 350 of 356

Chevrolet Express Owner Manual (GMNA-Localizing-U.S./Canada/Mexico-
13882570) - 2020 - CRC - 11/1/19
Index 349
K
Keyless EntryRemote (RKE) System . . . . . . . . . . 9
Keys . . . . . . . . . . . . . . . . . . . . . . . . . . . . . . 7
L
Labeling, Tire Sidewall . . . . . . . . . . 257
Lamps Daytime Running (DRL) . . . . . . .112
Dome . . . . . . . . . . . . . . . . . . . . . . . . . .114
Exterior Controls . . . . . . . . . . . . . . .110
Exterior Lamps OffReminder . . . . . . . . . . . . . . . . . . . . 111
Exterior Lighting Battery Saver . . . . . . . . . . . . . . . . . . . . . . . .116
License Plate . . . . . . . . . . . . . . . . . 247
Malfunction Indicator (Check Engine) . . . . . . . . . . . . . . . . . . . . . . . 93
Reading . . . . . . . . . . . . . . . . . . . . . . .115
Taillamps . . . . . . . . . . . . . . . . . . . . . 246
Lamps, Bulb Replacement . . . . . . 245
Lane Departure Warning (LDW) . . . . . . . . . . . . . . . . 190
Lane Departure Warning Light . . . 96
Lap-Shoulder Belt . . . . . . . . . . . . . . . 36
LATCH System
Replacing Parts after aCrash . . . . . . . . . . . . . . . . . . . . . . . . . 70 LATCH, Lower Anchors and
Tethers for Children . . . . . . . . . . . . 62
Lighter, Cigarette . . . . . . . . . . . . . . . . 84
Lighting Entry . . . . . . . . . . . . . . . . . . . . . . . . . .115
Entry/Exit . . . . . . . . . . . . . . . . . . . . . .115
Exit . . . . . . . . . . . . . . . . . . . . . . . . . . . .115
Illumination Control . . . . . . . . . . . .114
Lights Airbag On-Off . . . . . . . . . . . . . . . . . . . 91
Airbag Readiness . . . . . . . . . . . . . . . 90
Antilock Brake System(ABS) Warning . . . . . . . . . . . . . . . . 95
Brake System Warning . . . . . . . . . 94
Charging System . . . . . . . . . . . . . . . 92
Check Engine (Malfunction Indicator) . . . . . . . . . . . . . . . . . . . . . . 93
Cruise Control . . . . . . . . . . . . . . . . . . 99
Engine Oil Pressure . . . . . . . . . . . . 97
Flash-to-Pass . . . . . . . . . . . . . . . . . . 111
High-Beam On . . . . . . . . . . . . . . . . . . 98
High/Low Beam Changer . . . . . . 111
Lane Departure Warning . . . . . . . . 96
Low Fuel Warning . . . . . . . . . . . . . . 98
Seat Belt Reminders . . . . . . . . . . . . 90
Security . . . . . . . . . . . . . . . . . . . . . . . . 98
StabiliTrak OFF . . . . . . . . . . . . . . . . . 96
Tire Pressure . . . . . . . . . . . . . . . . . . . 97 Lights (cont'd)
Tow/Haul Mode . . . . . . . . . . . . . . . . . 96
Traction Control System
(TCS)/StabiliTrak . . . . . . . . . . . . . . 97
Locking Rear Axle . . . . . . . . . . . . . . 180
Locks Automatic Door . . . . . . . . . . . . . . . . . 14
Cargo Door Relocking . . . . . . . . . . 14
Delayed Locking . . . . . . . . . . . . . . . . 14
Door . . . . . . . . . . . . . . . . . . . . . . . . . . . . 13
Lockout Protection . . . . . . . . . . . . . . 14
Power Door . . . . . . . . . . . . . . . . . . . . . 14
Safety . . . . . . . . . . . . . . . . . . . . . . 14, 15
Loss of Control . . . . . . . . . . . . . . . . . 154
Low Fuel Warning Light . . . . . . . . . . 98
Lower Anchors and Tethers for Children (LATCH
System) . . . . . . . . . . . . . . . . . . . . . . . . 62
M
MaintenanceRecords . . . . . . . . . . . . . . . . . . . . . . 316
Maintenance and Care Additional . . . . . . . . . . . . . . . . . . . . . 310
Maintenance Schedule . . . . . . . . . 305 Recommended Fluids and
Lubricants . . . . . . . . . . . . . . . . . . . 313
Malfunction Indicator Lamp . . . . . . 93