seats CHEVROLET EXPRESS 2020 Get To Know Guide
[x] Cancel search | Manufacturer: CHEVROLET, Model Year: 2020, Model line: EXPRESS, Model: CHEVROLET EXPRESS 2020Pages: 356, PDF Size: 5.7 MB
Page 75 of 356

Chevrolet Express Owner Manual (GMNA-Localizing-U.S./Canada/Mexico-
13882570) - 2020 - CRC - 11/1/19
74 Seats and Restraints
When the airbag off switch has
turned off the front outboard
passenger frontal airbag, the
off indicator in the airbag off
light should light and stay lit
when you start the vehicle. See
Airbag On-Off Light091.
2. Put the child restraint on the seat.
3. Pick up the latch plate, and run the lap and shoulder portions
of the vehicle seat belt through
or around the child restraint.
The child restraint instructions
will show you how.4. Push the latch plate into thebuckle until it clicks.
Position the release button on
the buckle, away from the child
restraint, so that the seat belt
could be quickly unbuckled
if necessary.
5. Pull the shoulder belt all theway out of the retractor to set
the lock. When the retractor
lock is set, the belt can be
tightened but not pulled out of
the retractor.
6. To tighten the belt, push downon the child restraint, pull the
shoulder portion of the belt to
tighten the lap portion of the
belt, and feed the shoulder belt
back into the retractor. When
installing a forward-facing child
restraint, it may be helpful to
use your knee to push down on
the child restraint as you
tighten the belt.
Try to pull the belt out of the
retractor to make sure the
retractor is locked. If the
retractor is not locked, repeat
Steps 5 and 6.
Page 76 of 356

Chevrolet Express Owner Manual (GMNA-Localizing-U.S./Canada/Mexico-
13882570) - 2020 - CRC - 11/1/19
Seats and Restraints 75
7. If the vehicle does not have arear seat and the child restraint
manufacturer recommends
using a top tether anchor,
attach the top tether to the top
tether anchor. Refer to the
instructions that came with the
child restraint and to Lower
Anchors and Tethers for
Children (LATCH System) 062.
8. Before placing a child in the child restraint, make sure it is
securely held in place. To
check, grasp the child restraint
at the seat belt path and
attempt to move it side to side
and back and forth. When the
child restraint is properly
installed, there should be no
more than 2.5 cm (1 in) of
movement.
To remove the child restraint,
unbuckle the vehicle seat belt and
let it return to the stowed position.
If the top tether is attached to a top
tether anchor, disconnect it.
If you turned the airbag off with the
switch, turn on the front outboard
passenger airbag when you remove the child restraint from the vehicle
unless the person who will be sitting
there is a member of a passenger
airbag risk group. See
Airbag
On-Off Switch 050 for more
information, including important
safety information.
Page 78 of 356

Chevrolet Express Owner Manual (GMNA-Localizing-U.S./Canada/Mexico-
13882570) - 2020 - CRC - 11/1/19
Storage 77
Additional Storage
Features
Cargo Tie-Downs
If equipped, there are six cargo
tie-downs in the cargo area that can
be used to secure cargo.
Do not apply a total load of more
than 5 000 N (1,124 lbs of force) to
a single cargo tie-down when
securing cargo.
SeeVehicle Load Limits 0158.
{Warning
The child restraint top tether strap
may be damaged by contact with
items in the cargo area. Your child
could be seriously injured or killed
in a collision if the top tether strap
is damaged. Properly secure all
cargo.
{Warning
Properly secure all cargo with
ropes or straps to help prevent it
from sliding or shifting. Do not
place cargo higher than the
seatbacks. In a sudden stop or
collision, unsecured cargo could
cause personal injury. Use
suitable ropes or straps to secure
cargo.
{Warning
Never allow anyone to ride in the
cargo area. It is extremely
dangerous to ride in the cargo
area of a vehicle. In a collision,
people riding in these areas are
more likely to be seriously injured
or killed.
Do not allow people to ride in any
area of the vehicle that is not
equipped with seats and seat
belts. Be sure everyone in the
vehicle is in a seat and using a
seat belt properly.
Page 83 of 356

Chevrolet Express Owner Manual (GMNA-Localizing-U.S./Canada/Mexico-
13882570) - 2020 - CRC - 11/1/19
82 Instruments and Controls
2. Find the vehicle's currentlocation and variance zone
number on the map.
Zones 1 through 15 are
available.
3. Press
Vto scroll through and
select the appropriate
variance zone.
4. Press
3until the vehicle
heading, for example, N for
North, is displayed in the DIC.
5. If calibration is necessary, calibrate the compass. See
“Compass Calibration
Procedure” following. Compass Calibration
The compass can be manually
calibrated. Only calibrate the
compass in a magnetically clean
and safe location, such as an open
parking lot, where driving the
vehicle in circles is not a danger.
It is suggested to calibrate away
from tall buildings, utility wires,
manhole covers, or other industrial
structures, if possible.
If CAL should ever appear in the
DIC display, the compass should be
calibrated.
If the DIC display does not show a
heading, for example, N for North,
or the heading does not change
after making turns, there may be a
strong magnetic field interfering with
the compass. Such interference
may be caused by a magnetic CB or
cell phone antenna mount, a
magnetic emergency light, magnetic
note pad holder, or any other
magnetic item. Turn off the vehicle,
move the magnetic item, then turn
on the vehicle and calibrate the
compass.
To calibrate the compass, use the
following procedure:
Compass Calibration Procedure
1. Before calibrating the compass, make sure the compass zone
is set to the variance zone in
which the vehicle is located.
See “Compass Variance (Zone)
Procedure” earlier in this
section.
Do not operate any switches
such as window, climate
controls, seats, etc. during the
calibration procedure.
2. Press
Tuntil PRESSVTO
CALIBRATE COMPASS
displays.
3. Press
Vto start the compass
calibration.
4. The DIC will display CALIBRATING: DRIVE IN
CIRCLES. Drive the vehicle in
tight circles at less than 8 km/h
(5 mph) to complete the
calibration. The DIC will display
CALIBRATION COMPLETE for
a few seconds when the
Page 117 of 356
Chevrolet Express Owner Manual (GMNA-Localizing-U.S./Canada/Mexico-
13882570) - 2020 - CRC - 11/1/19
116 Lighting
A high electrical load occurs when
several of the following are on, such
as: headlamps, high beams, fog
lamps, rear window defogger,
climate control fan at high speed,
heated seats, engine cooling fans,
trailer loads, and loads plugged into
accessory power outlets.
EPM works to prevent excessive
discharge of the battery. It does this
by balancing the generator's output
and the vehicle's electrical needs.
It can increase engine idle speed to
generate more power, whenever
needed. It can temporarily reduce
the power demands of some
accessories.
Normally, these actions occur in
steps or levels, without being
noticeable. In rare cases at the
highest levels of corrective action,
this action may be noticeable to the
driver. If so, a Driver Information
Center (DIC) message might be
displayed, such as SERVICE
BATTERY CHARGING SYSTEM.
If this messages displays, it isrecommended that the driver reduce
the electrical loads as much as
possible.
Battery Power Protection
This feature shuts off the dome
lamps if they are left on for more
than 10 minutes when the ignition is
off. This helps to prevent the battery
from running down.
Exterior Lighting Battery
Saver
The exterior lamps turn off about
10 minutes after the ignition is
turned off, if the parking lamps or
headlamps have been manually left
on. This protects against draining
the battery. To restart the 10-minute
timer, turn the exterior lamp control
to the
Oposition and then back to
the
;or2position.
To keep the lamps on for more than
10 minutes, the ignition must be on
or in ACC/ACCESSORY.
Page 149 of 356
Chevrolet Express Owner Manual (GMNA-Localizing-U.S./Canada/Mexico-
13882570) - 2020 - CRC - 11/1/19
148 Climate Controls
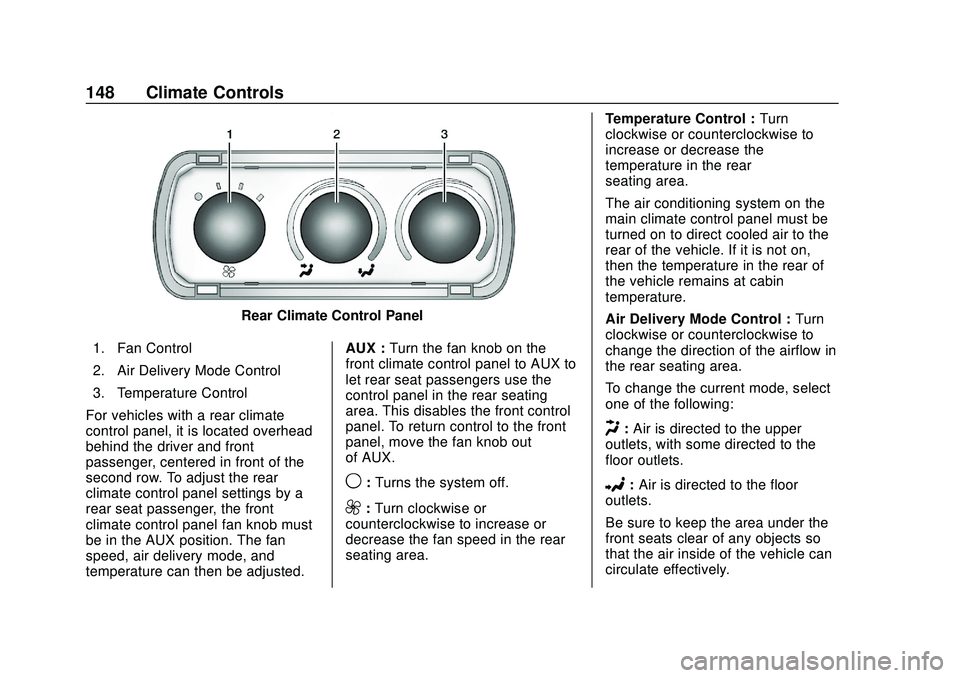
Rear Climate Control Panel
1. Fan Control
2. Air Delivery Mode Control
3. Temperature Control
For vehicles with a rear climate
control panel, it is located overhead
behind the driver and front
passenger, centered in front of the
second row. To adjust the rear
climate control panel settings by a
rear seat passenger, the front
climate control panel fan knob must
be in the AUX position. The fan
speed, air delivery mode, and
temperature can then be adjusted. AUX :
Turn the fan knob on the
front climate control panel to AUX to
let rear seat passengers use the
control panel in the rear seating
area. This disables the front control
panel. To return control to the front
panel, move the fan knob out
of AUX.
9: Turns the system off.
9:Turn clockwise or
counterclockwise to increase or
decrease the fan speed in the rear
seating area. Temperature Control :
Turn
clockwise or counterclockwise to
increase or decrease the
temperature in the rear
seating area.
The air conditioning system on the
main climate control panel must be
turned on to direct cooled air to the
rear of the vehicle. If it is not on,
then the temperature in the rear of
the vehicle remains at cabin
temperature.
Air Delivery Mode Control : Turn
clockwise or counterclockwise to
change the direction of the airflow in
the rear seating area.
To change the current mode, select
one of the following:
H: Air is directed to the upper
outlets, with some directed to the
floor outlets.
2: Air is directed to the floor
outlets.
Be sure to keep the area under the
front seats clear of any objects so
that the air inside of the vehicle can
circulate effectively.
Page 150 of 356
Chevrolet Express Owner Manual (GMNA-Localizing-U.S./Canada/Mexico-
13882570) - 2020 - CRC - 11/1/19
Climate Controls 149
For information on how to use the
main climate control system, see
Climate Control Systems0144. For
information on ventilation, see Air
Vents 0149.Air Vents
Use the outlets located near the
center and on the sides of the
instrument panel to change the
direction of airflow.
Operation Tips
.
Clear away any ice, snow or
leaves from the air inlets at the
base of the windshield that may
block the flow of air into the
vehicle.
. Use of non-GM approved hood
deflectors may adversely affect
the performance of the system.
. Clear snow off the hood to
improve visibility and help
decrease moisture drawn into
the vehicle.
. Keep the path under the front
seats clear of objects to help
circulate the air inside of the
vehicle more effectively.
Maintenance
Service
All vehicles have a label underhood
that identifies the refrigerant used in
the vehicle. The refrigerant system
should only be serviced by trained
and certified technicians. The air
conditioning evaporator should
never be repaired or replaced by
one from a salvage vehicle.
It should only be replaced by a new
evaporator to ensure proper and
safe operation.
During service, all refrigerants
should be reclaimed with proper
equipment. Venting refrigerants
directly to the atmosphere is harmful
to the environment and may also
create unsafe conditions based on
inhalation, combustion, frostbite,
or other health-based concerns.
The air conditioning system requires
periodic maintenance. See
Maintenance Schedule 0305.
Page 163 of 356
Chevrolet Express Owner Manual (GMNA-Localizing-U.S./Canada/Mexico-
13882570) - 2020 - CRC - 11/1/19
162 Driving and Operating
Warning (Continued)
.Never stack heavier
things, like suitcases,
inside the vehicle so that
some of them are above
the tops of the seats.
.Do not leave an
unsecured child restraint
in the vehicle.
.When you carry
something inside the
vehicle, secure it
whenever you can.
.Do not leave a seat
folded down unless you
need to.
Add-On Equipment
When carrying removable items,
a limit on how many people
carried inside the vehicle may
be necessary. Be sure to weigh
the vehicle before buying and
installing the new equipment.
Starting and
Operating
New Vehicle Break-In
Caution
The vehicle does not need an
elaborate break-in. But it will
perform better in the long run if
you follow these guidelines: . Keep the vehicle speed at
88 km/h (55 mph) or less for
the first 805 km (500 mi).
. Do not drive at any one
constant speed, fast or slow,
for the first 805 km (500 mi).
Do not make full-throttle
starts. Avoid downshifting to
brake or slow the vehicle.
. Avoid making hard stops for
the first 322 km (200 mi) or
so. During this time the new
brake linings are not yet
broken in. Hard stops with
new linings can mean
(Continued)
Caution (Continued)
premature wear and earlier
replacement. Follow this
breaking-in guideline every
time you get new brake
linings.
. Do not tow a trailer during
break-in. See Trailer Towing
0 201 for the trailer towing
capabilities of the vehicle
and more information.
Following break-in, engine speed
and load can be gradually
increased.
Page 256 of 356

Chevrolet Express Owner Manual (GMNA-Localizing-U.S./Canada/Mexico-
13882570) - 2020 - CRC - 11/1/19
Vehicle Care 255
Mini-Fuses UsageF37 –
F38 –
Relays Usage K1 Run
K2 –
K3 Parking lamps
K4 Upfitter 2
K5 Rear window defogger
K6 Retained accessory power
Circuit
Breakers Usage
CB1 Power seats
CB2 Power windowsWheels and Tires
Tires
Every new GM vehicle has
high-quality tires made by a
leading tire manufacturer. See
the warranty manual for
information regarding the tire
warranty and where to get
service. For additional
information refer to the tire
manufacturer.
{Warning
.Poorly maintained and
improperly used tires are
dangerous.
.Overloading the tires can
cause overheating as a
result of too much
flexing. There could be a
blowout and a serious
crash. See Vehicle Load
Limits 0158.
(Continued)
Warning (Continued)
.Underinflated tires pose
the same danger as
overloaded tires. The
resulting crash could
cause serious injury.
Check all tires frequently
to maintain the
recommended pressure.
Tire pressure should be
checked when the tires
are cold.
.Overinflated tires are
more likely to be cut,
punctured, or broken by
a sudden impact —such
as when hitting a pothole.
Keep tires at the
recommended pressure.
.Worn or old tires can
cause a crash. If the
tread is badly worn,
replace them.
(Continued)
Page 261 of 356
Chevrolet Express Owner Manual (GMNA-Localizing-U.S./Canada/Mexico-
13882570) - 2020 - CRC - 11/1/19
260 Vehicle Care
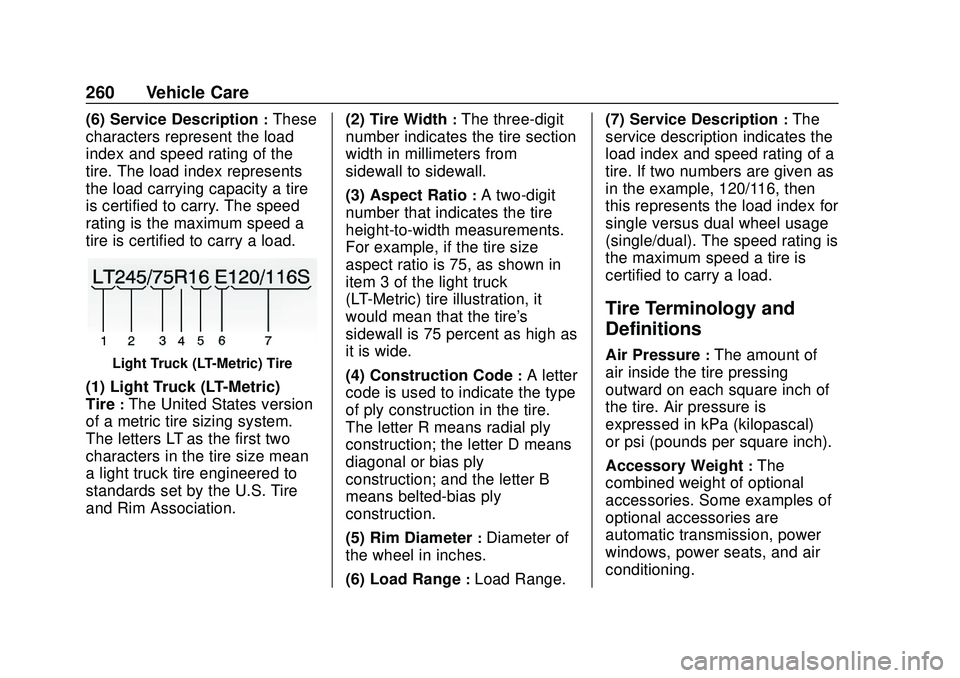
(6) Service Description:These
characters represent the load
index and speed rating of the
tire. The load index represents
the load carrying capacity a tire
is certified to carry. The speed
rating is the maximum speed a
tire is certified to carry a load.
Light Truck (LT-Metric) Tire
(1) Light Truck (LT-Metric)
Tire
:The United States version
of a metric tire sizing system.
The letters LT as the first two
characters in the tire size mean
a light truck tire engineered to
standards set by the U.S. Tire
and Rim Association. (2) Tire Width
:The three-digit
number indicates the tire section
width in millimeters from
sidewall to sidewall.
(3) Aspect Ratio
:A two-digit
number that indicates the tire
height-to-width measurements.
For example, if the tire size
aspect ratio is 75, as shown in
item 3 of the light truck
(LT-Metric) tire illustration, it
would mean that the tire's
sidewall is 75 percent as high as
it is wide.
(4) Construction Code
:A letter
code is used to indicate the type
of ply construction in the tire.
The letter R means radial ply
construction; the letter D means
diagonal or bias ply
construction; and the letter B
means belted-bias ply
construction.
(5) Rim Diameter
:Diameter of
the wheel in inches.
(6) Load Range
:Load Range. (7) Service Description
:The
service description indicates the
load index and speed rating of a
tire. If two numbers are given as
in the example, 120/116, then
this represents the load index for
single versus dual wheel usage
(single/dual). The speed rating is
the maximum speed a tire is
certified to carry a load.
Tire Terminology and
Definitions
Air Pressure:The amount of
air inside the tire pressing
outward on each square inch of
the tire. Air pressure is
expressed in kPa (kilopascal)
or psi (pounds per square inch).
Accessory Weight
:The
combined weight of optional
accessories. Some examples of
optional accessories are
automatic transmission, power
windows, power seats, and air
conditioning.