spare tire CHEVROLET EXPRESS CARGO VAN 2017 1.G User Guide
[x] Cancel search | Manufacturer: CHEVROLET, Model Year: 2017, Model line: EXPRESS CARGO VAN, Model: CHEVROLET EXPRESS CARGO VAN 2017 1.GPages: 346, PDF Size: 6.54 MB
Page 275 of 346
Chevrolet Express Owner Manual (GMNA-Localizing-U.S./Canada/Mexico-9967827) - 2017 - crc - 5/2/16
274 Vehicle Care
Warning (Continued)
training. If a jack is provided with
the vehicle, it is designed only for
changing a flat tire. If it is used for
anything else, you or others could
be badly injured or killed if the
vehicle slips off the jack. If a jack
is provided with the vehicle, only
use it for changing a flat tire.
If a tire goes flat, avoid further tireand wheel damage by driving slowlyto a level place, well off the road,if possible. Turn on the hazardwarning flashers. SeeHazardWarning Flashers0128.
{Warning
Changing a tire can be
dangerous. The vehicle can slip
off the jack and roll over or fall
causing injury or death. Find a
level place to change the tire. To
help prevent the vehicle from
moving:
(Continued)
Warning (Continued)
1. Set the parking brake firmly.
2. Put an automatictransmission in P (Park) or amanual transmission in1(First) or R(Reverse).
3. Turn off the engine and donot restart while the vehicleis raised.
4. Do not allow passengers toremain in the vehicle.
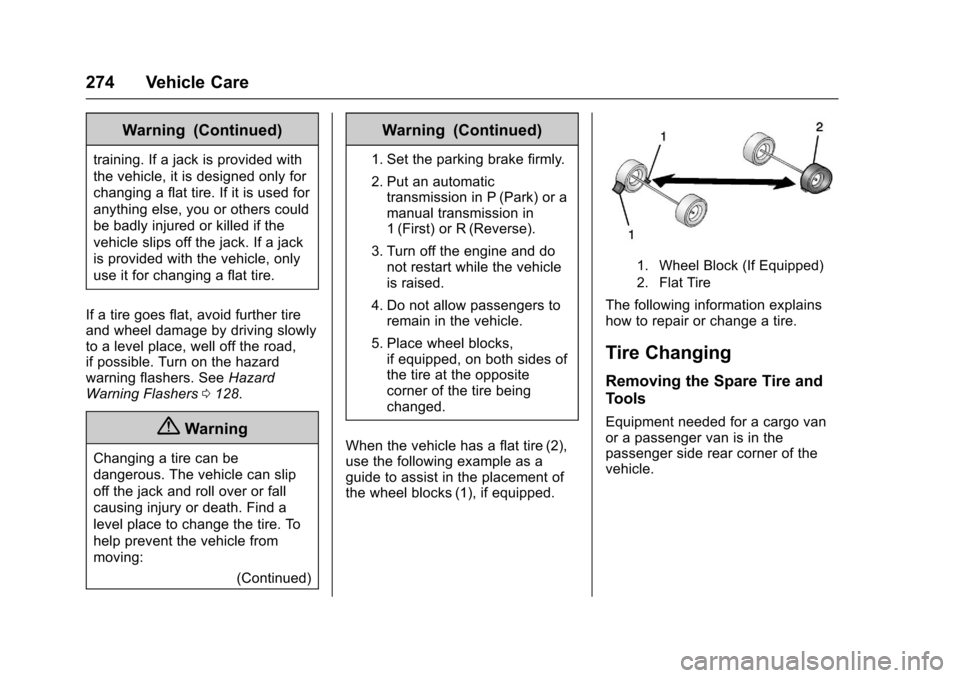
5. Place wheel blocks,if equipped, on both sides ofthe tire at the oppositecorner of the tire beingchanged.
When the vehicle has a flat tire (2),use the following example as aguide to assist in the placement ofthe wheel blocks (1), if equipped.
1. Wheel Block (If Equipped)
2. Flat Tire
The following information explainshow to repair or change a tire.
Tire Changing
Removing the Spare Tire and
Tools
Equipment needed for a cargo vanor a passenger van is in thepassenger side rear corner of thevehicle.
Page 276 of 346

Chevrolet Express Owner Manual (GMNA-Localizing-U.S./Canada/Mexico-9967827) - 2017 - crc - 5/2/16
Vehicle Care 275
Remove the retaining wing bolt andlift it off of the mounting bracket.
Equipment needed for a15-passenger seating arrangementis secured on the rear floor on thepassenger side of the vehicle.
Remove the retaining wing bolt andlift it out of the mounting bracket toaccess the equipment.
The tools you will be using include:
1. Jack
2. Hoist Handle
3. Extension(s)
4. Wheel Wrench
5. Jack Handle
The spare tire is mounted in the rearunderbody of the vehicle.
Use the hoist handle, extension(s),and the wheel wrench to remove theunderbody-mounted spare tire.
To l o w e r t h e s p a r e t i r e f r o m t h evehicle:
1. Spare Tire
2. Tire/Wheel Retainer
3. Hoist Cable
Page 277 of 346
Chevrolet Express Owner Manual (GMNA-Localizing-U.S./Canada/Mexico-9967827) - 2017 - crc - 5/2/16
276 Vehicle Care
4. Hoist Assembly
5. Hoist Shaft
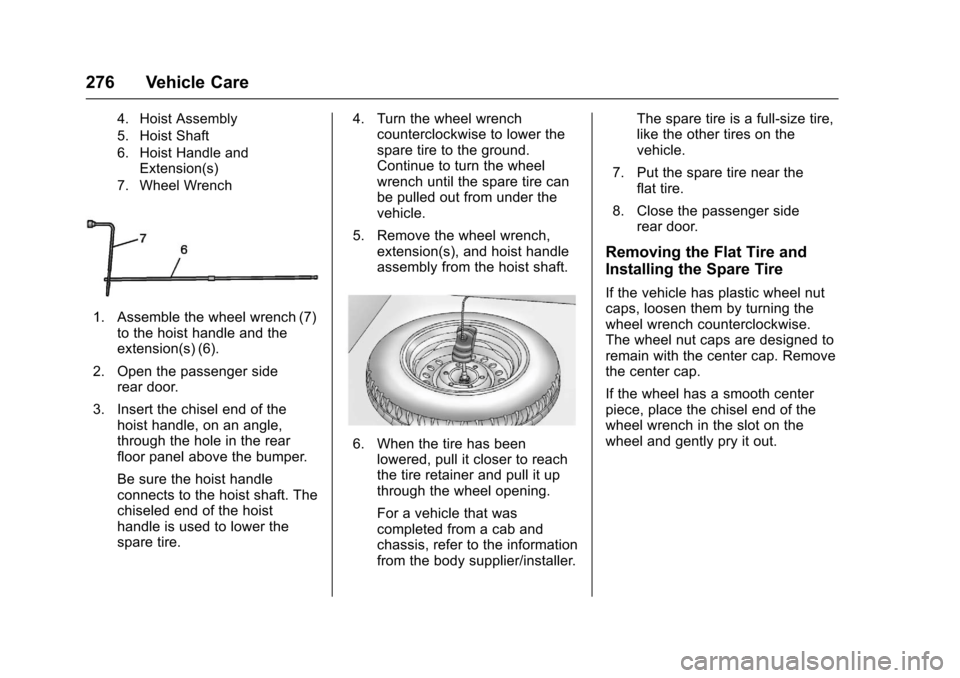
6. Hoist Handle andExtension(s)
7. Wheel Wrench
1. Assemble the wheel wrench (7)to the hoist handle and theextension(s) (6).
2. Open the passenger siderear door.
3. Insert the chisel end of thehoist handle, on an angle,through the hole in the rearfloor panel above the bumper.
Be sure the hoist handleconnects to the hoist shaft. Thechiseled end of the hoisthandle is used to lower thespare tire.
4. Turn the wheel wrenchcounterclockwise to lower thespare tire to the ground.Continue to turn the wheelwrench until the spare tire canbe pulled out from under thevehicle.
5. Remove the wheel wrench,extension(s), and hoist handleassembly from the hoist shaft.
6. When the tire has beenlowered, pull it closer to reachthe tire retainer and pull it upthrough the wheel opening.
For a vehicle that wascompleted from a cab andchassis, refer to the informationfrom the body supplier/installer.
The spare tire is a full-size tire,like the other tires on thevehicle.
7. Put the spare tire near theflat tire.
8. Close the passenger siderear door.
Removing the Flat Tire and
Installing the Spare Tire
If the vehicle has plastic wheel nutcaps, loosen them by turning thewheel wrench counterclockwise.The wheel nut caps are designed toremain with the center cap. Removethe center cap.
If the wheel has a smooth centerpiece, place the chisel end of thewheel wrench in the slot on thewheel and gently pry it out.
Page 279 of 346
Chevrolet Express Owner Manual (GMNA-Localizing-U.S./Canada/Mexico-9967827) - 2017 - crc - 5/2/16
278 Vehicle Care
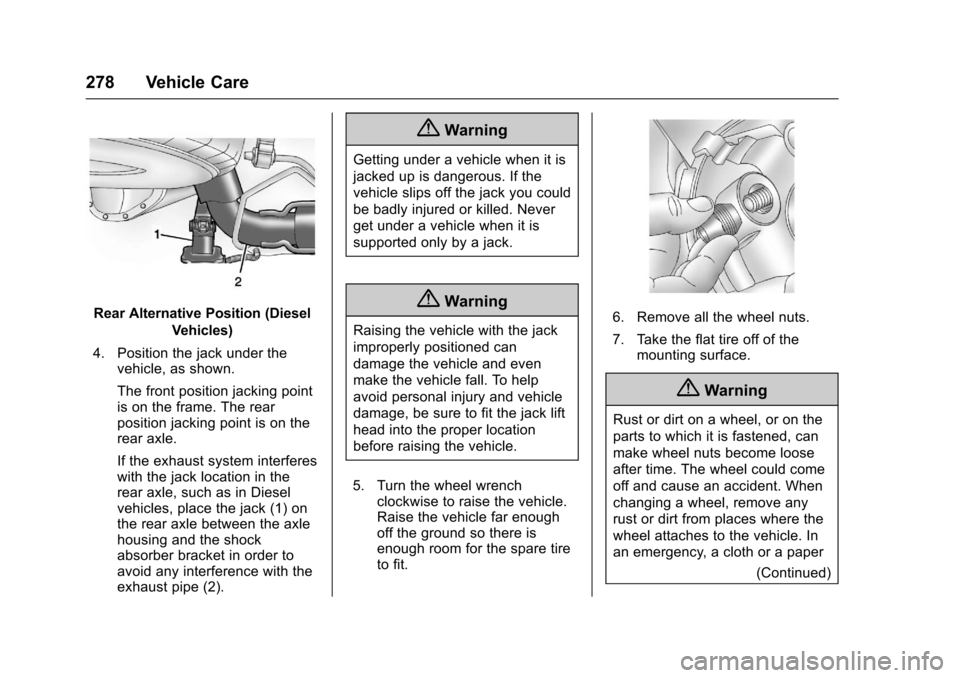
Rear Alternative Position (Diesel
Vehicles)
4. Position the jack under thevehicle, as shown.
The front position jacking pointis on the frame. The rearposition jacking point is on therear axle.
If the exhaust system interfereswith the jack location in therear axle, such as in Dieselvehicles, place the jack (1) onthe rear axle between the axlehousing and the shockabsorber bracket in order toavoid any interference with theexhaust pipe (2).
{Warning
Getting under a vehicle when it is
jacked up is dangerous. If the
vehicle slips off the jack you could
be badly injured or killed. Never
get under a vehicle when it is
supported only by a jack.
{Warning
Raising the vehicle with the jack
improperly positioned can
damage the vehicle and even
make the vehicle fall. To help
avoid personal injury and vehicle
damage, be sure to fit the jack lift
head into the proper location
before raising the vehicle.
5. Turn the wheel wrenchclockwise to raise the vehicle.Raise the vehicle far enoughoff the ground so there isenough room for the spare tireto fit.
6. Remove all the wheel nuts.
7. Take the flat tire off of themounting surface.
{Warning
Rust or dirt on a wheel, or on the
parts to which it is fastened, can
make wheel nuts become loose
after time. The wheel could come
off and cause an accident. When
changing a wheel, remove any
rust or dirt from places where the
wheel attaches to the vehicle. In
an emergency, a cloth or a paper
(Continued)
Page 282 of 346
Chevrolet Express Owner Manual (GMNA-Localizing-U.S./Canada/Mexico-9967827) - 2017 - crc - 5/2/16
Vehicle Care 281
serviced. SeeCapacities andSpecifications0309for moreinformation.
Storing a Flat or Spare Tire
and Tools
{Warning
Storing a jack, a tire, or other
equipment in the passenger
compartment of the vehicle could
cause injury. In a sudden stop or
collision, loose equipment could
strike someone. Store all these in
the proper place.
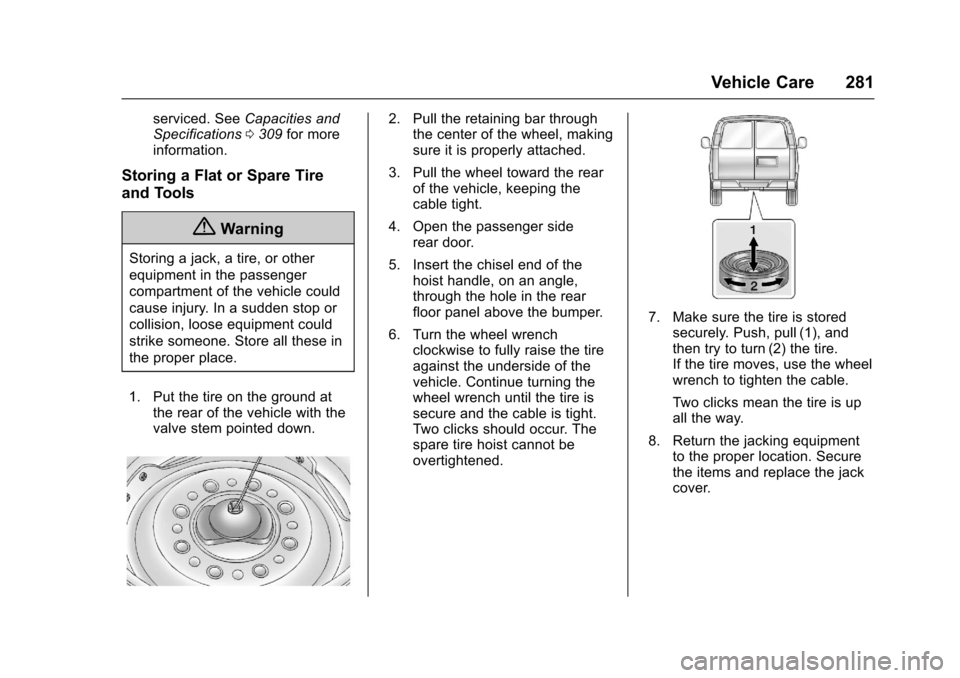
1. Put the tire on the ground atthe rear of the vehicle with thevalve stem pointed down.
2. Pull the retaining bar throughthe center of the wheel, makingsure it is properly attached.
3. Pull the wheel toward the rearof the vehicle, keeping thecable tight.
4. Open the passenger siderear door.
5. Insert the chisel end of thehoist handle, on an angle,through the hole in the rearfloor panel above the bumper.
6. Turn the wheel wrenchclockwise to fully raise the tireagainst the underside of thevehicle. Continue turning thewheel wrench until the tire issecure and the cable is tight.Tw o c l i c k s s h o u l d o c c u r. T h espare tire hoist cannot beovertightened.
7. Make sure the tire is storedsecurely. Push, pull (1), andthen try to turn (2) the tire.If the tire moves, use the wheelwrench to tighten the cable.
Tw o c l i c k s m e a n t h e t i r e i s u pall the way.
8. Return the jacking equipmentto the proper location. Securethe items and replace the jackcover.
Page 283 of 346
Chevrolet Express Owner Manual (GMNA-Localizing-U.S./Canada/Mexico-9967827) - 2017 - crc - 5/2/16
282 Vehicle Care
Full-Size Spare Tire
If this vehicle came with a full-sizespare tire, it was fully inflated whennew, however, it can lose air overtime. Check the inflation pressureregularly. SeeTire Pressure0260andVehicle Load Limits0171.Forinstructions on how to remove,install, or store a spare tire, seeTireChanging0274.
After installing the spare tire on thevehicle, stop as soon as possibleand check that the spare is correctlyinflated. The spare tire is made toperform well at speeds up to11 2 k m / h ( 7 0 m p h ) a t t h erecommended inflation pressure, soyou can finish your trip.
Have the damaged or flat road tirerepaired or replaced back onto thevehicle, as soon as possible, so thespare tire will be available in case itis needed again.
Do not mix tires and wheels ofdifferent sizes, because they will notfit. Keep the spare tire and its wheeltogether.
Jump Starting
Jump Starting - North
America
For more information about thevehicle battery, seeBattery - NorthAmerica0236.
If the vehicle battery has run down,you may want to use anothervehicle and some jumper cables tostart your vehicle. Be sure to usethe following steps to do it safely.
{Warning
WA R N I N G :Battery posts,
terminals, and related
accessories contain lead and lead
compounds, chemicals known to
the State of California to cause
cancer and birth defects or other
reproductive harm. Batteries also
contain other chemicals known to
the State of California to cause
cancer.WASH HANDS AFTER
HANDLING.
(Continued)
Warning (Continued)
SeeCalifornia Proposition
65 Warning0215.
{Warning
Batteries can hurt you. They can
be dangerous because:
.They contain acid that canburn you.
.They contain gas that canexplode or ignite.
.They contain enoughelectricity to burn you.
If you do not follow these steps
exactly, some or all of these
things can hurt you.
Page 318 of 346
Chevrolet Express Owner Manual (GMNA-Localizing-U.S./Canada/Mexico-9967827) - 2017 - crc - 5/2/16
Customer Information 317
Services Provided
.Emergency Fuel Delivery:Delivery of enough fuel for thevehicle to get to the nearestservice station.
.Lock-Out Service:Service tounlock the vehicle if you arelocked out. A remote unlock maybe available if you have OnStar.For security reasons, the drivermust present identificationbefore this service is given.
.Emergency Tow from a PublicRoad or Highway:To w t o t h enearest Chevrolet dealer forwarranty service, or if the vehiclewas in a crash and cannot bedriven. Assistance is not givenwhen the vehicle is stuck in thesand, mud, or snow.
.Flat Tire Change:Service tochange a flat tire with the sparetire. The spare tire, if equipped,must be in good condition andproperly inflated. It is the owner'sresponsibility for the repair orreplacement of the tire if it is notcovered by the warranty.
.Battery Jump Start:Service tojump start a dead battery.
.Tr i p I n t e r r u p t i o n B e n e f i t s a n dAssistance:If your trip isinterrupted due to a warrantyevent, incidental expenses maybe reimbursed within thePowertrain warranty period.Items considered are reasonableand customary hotel, meals,rental car, or a vehicle beingdelivered back to the customer,up to 805 km (500 mi).
Services Not Included in
Roadside Assistance
.Impound towing caused byviolation of any laws.
.Legal fines.
.Mounting, dismounting,or changing of snow tires,chains, or other traction devices.
Service is not provided if a vehicleis in an area that is not accessibleto the service vehicle or is not aregularly traveled or maintainedpublic road, which includes ice andwinter roads. Off-road use is notcovered.
Services Specific to
Canadian-Purchased Vehicles
.Fuel Delivery:Reimbursementis up to 7 liters. If available,diesel fuel delivery may berestricted. Propane and otherfuels are not provided throughthis service.
.Lock-Out Service:Vehicleregistration is required.
.Tr i p I n t e r r u p t i o n B e n e f i t s a n dAssistance:Must be over150 km from where your trip wasstarted to qualify.Pre-authorization, originaldetailed receipts, and a copy ofthe repair orders are required.Once authorization has beenreceived, the RoadsideAssistance advisor will help tomake arrangements and explainhow to receive payment.
.Alternative Service:Ifassistance cannot be providedright away, the RoadsideAssistance advisor may givepermission to get localemergency road service. You willreceive payment, up to $100,
Page 340 of 346
Chevrolet Express Owner Manual (GMNA-Localizing-U.S./Canada/Mexico-9967827) - 2017 - crc - 5/2/16
Index 339
E
E85 or FlexFuel . . . . . . . . . . . . . . . . 199
Electrical Equipment,
Add-On . . . . . . . . . . . . . . . . . . . . . . . 212
Electrical System
Engine Compartment Fuse
Block . . . . . . . . . . . . . . . . . . . . . . . . 246
Floor Console Fuse Block . . . . 249
Fuses and Circuit Breakers . . . 246
Overload . . . . . . . . . . . . . . . . . . . . . 245
Emergency
OnStar®...................... 327
Engine
Air Cleaner/Filter . . . . . . . . . . . . . 225
Check and Service Engine
Soon Light . . . . . . . . . . . . . . . . . . 102
Compartment Overview . . . . . . . 218
Coolant . . . . . . . . . . . . . . . . . . . . . . . 227
Coolant Temperature Gauge . . . . 98
Cooling System . . . . . . . . . . . . . . . 226
Cooling System Messages . . . .113
Drive Belt Routing . . . . . . . . . . . . .311
Exhaust . . . . . . . . . . . . . . . . . . . . . . 182
Fan . . . . . . . . . . . . . . . . . . . . . . . . . . . 231
Heater . . . . . . . . . . . . . . . . . . . . . . . . 179
Oil Life System . . . . . . . . . . . . . . . 221
Oil Messages . . . . . . . . . . . . . . . . . .114
Oil Pressure Gauge . . . . . . . . . . . . 97
Engine (cont'd)
Oil Pressure Light . . . . . . . . . . . . 106
Overheating . . . . . . . . . . . . . . . . . . 230
Power Messages . . . . . . . . . . . . . .114
Running While Parked . . . . . . . . 183
Starting . . . . . . . . . . . . . . . . . . . . . . . 177
Enhanced Technology Glass . . . . 38
Entry/Exit Lighting . . . . . . . . . . . . . . 130
Equipment, Towing . . . . . . . . . . . . . 210
Event Data Recorders . . . . . . . . . . 324
Extender, Safety Belt . . . . . . . . . . . . 53
Exterior Lamp Controls . . . . . . . . . 125
Exterior Lamps Off Reminder . . . 126
F
Fan
Engine . . . . . . . . . . . . . . . . . . . . . . . . 231
Fast Idle System . . . . . . . . . . . . . . . . 178
Filter,
Engine Air Cleaner . . . . . . . . . . . 225
Flash-to-Pass . . . . . . . . . . . . . . . . . . . 126
Flashers, Hazard Warning . . . . . . 128
Flat Tire . . . . . . . . . . . . . . . . . . . . . . . . 273
Changing . . . . . . . . . . . . . . . . . . . . . 274
FlexFuel
E85 . . . . . . . . . . . . . . . . . . . . . . . . . . . 199
Floor Mats . . . . . . . . . . . . . . . . . . . . . . 295
Fluid
Automatic Transmission . . . . . . 222
Fluid (cont'd)
Brakes . . . . . . . . . . . . . . . . . . . . . . . . 234
Power Steering . . . . . . . . . . . . . . . 232
Washer . . . . . . . . . . . . . . . . . . . . . . . 233
Frequency Statement
Radio . . . . . . . . . . . . . . . . . . . . . . . . . 322
Front Seats
Adjustment . . . . . . . . . . . . . . . . . . . . . 41
Front Storage . . . . . . . . . . . . . . . . . . . . 85
Front Turn Signal
Bulb Replacement . . . . . . . . . . . . 242
Fuel . . . . . . . . . . . . . . . . . . . . . . . . . . . . 198
Additives . . . . . . . . . . . . . . . . . . . . . 199
Economy Driving . . . . . . . . . . . . . . . 22
Filling a Portable Fuel
Container . . . . . . . . . . . . . . . . . . . 202
Filling the Tank . . . . . . . . . . . . . . . 200
Foreign Countries . . . . . . . . . . . . 199
Gauge . . . . . . . . . . . . . . . . . . . . . . . . . . 96
Low Fuel Warning Light . . . . . . . 107
Requirements, California . . . . . 199
System Messages . . . . . . . . . . . . .115
Full-Size Spare Tire . . . . . . . . . . . . 282
Fuses
Engine Compartment Fuse
Block . . . . . . . . . . . . . . . . . . . . . . . . 246
Floor Console Fuse Block . . . . 249
Fuses and Circuit Breakers . . . 246
Page 345 of 346
Chevrolet Express Owner Manual (GMNA-Localizing-U.S./Canada/Mexico-9967827) - 2017 - crc - 5/2/16
344 Index
Service (cont'd)
Maintenance, General
Information . . . . . . . . . . . . . . . . . . 296
Parts Identification Label . . . . . 308
Publications Ordering
Information . . . . . . . . . . . . . . . . . . 321
Scheduling Appointments . . . . . 318
Vehicle Messages . . . . . . . . . . . . . 117
Services
Special Application . . . . . . . . . . . 302
Servicing the Airbag . . . . . . . . . . . . . 65
Shift Lock Control Function
Check, Automatic
Transmission . . . . . . . . . . . . . . . . . . 238
Shifting
Into Park . . . . . . . . . . . . . . . . . . . . . . 180
Out of Park . . . . . . . . . . . . . . . . . . . 181
Side Door . . . . . . . . . . . . . . . . . . . . . . . 31
Sidemarker
Bulb Replacement . . . . . . . . . . . . 242
Signals, Turn and
Lane-Change . . . . . . . . . . . . . . . . . 128
Sliding Door . . . . . . . . . . . . . . . . . . . . . 32
Special Application Services . . . . 302
Specifications and
Capacities . . . . . . . . . . . . . . . . . . . . . 309
Speedometer . . . . . . . . . . . . . . . . . . . . 96
StabiliTrak
OFF Light . . . . . . . . . . . . . . . . . . . . . 105
Start Vehicle, Remote . . . . . . . . . . . 27
Starter Switch Check . . . . . . . . . . . 238
Starting the Engine . . . . . . . . . . . . . 177
Steering . . . . . . . . . . . . . . . . . . . . . . . . 166
Fluid, Power . . . . . . . . . . . . . . . . . . 232
Wheel Adjustment . . . . . . . . . . . . . . 88
Wheel Controls . . . . . . . . . . . . . . . . . 88
Storage Areas
Front . . . . . . . . . . . . . . . . . . . . . . . . . . . 85
Storage Compartments . . . . . . . . . . 85
Stuck Vehicle . . . . . . . . . . . . . . . . . . . 171
Sun Visors . . . . . . . . . . . . . . . . . . . . . . . 39
Swing-out Windows . . . . . . . . . . . . . . 37
Switches
Airbag On-Off . . . . . . . . . . . . . . . . . . . 62
Symbols . . . . . . . . . . . . . . . . . . . . . . . . . . 3
System
Infotainment . . . . . . . . . . . . . 132, 325
Noise Control . . . . . . . . . . . . . . . . . 237
T
Ta i l l a m p s . . . . . . . . . . . . . . . . . . . . . . . 2 4 3
Te x t Te l e p h o n e ( T T Y ) U s e r s . . . . 3 1 5
Theft-Deterrent Systems . . . . . . . . . 33
Immobilizer . . . . . . . . . . . . . . . . . . . . . 33
Time . . . . . . . . . . . . . . . . . . . . . . . . . . . . . 92
Tires . . . . . . . . . . . . . . . . . . . . . . . . . . . . 252
Tires (cont'd)
All-Season . . . . . . . . . . . . . . . . . . . . 253
All-Terrain . . . . . . . . . . . . . . . . . . . . 253
Buying New Tires . . . . . . . . . . . . . 268
Chains . . . . . . . . . . . . . . . . . . . . . . . . 272
Changing . . . . . . . . . . . . . . . . . . . . . 274
Designations . . . . . . . . . . . . . . . . . 256
Different Size . . . . . . . . . . . . . . . . . 269
Dual Rotation . . . . . . . . . . . . . . . . . 266
Full-Size Spare . . . . . . . . . . . . . . . 282
If a Tire Goes Flat . . . . . . . . . . . . 273
Inspection . . . . . . . . . . . . . . . . . . . . 265
Messages . . . . . . . . . . . . . . . . . . . . .118
Pressure Light . . . . . . . . . . . . . . . . 106
Pressure Monitor Operation . . 262
Pressure Monitor System . . . . . 261
Rotation . . . . . . . . . . . . . . . . . . . . . . 265
Sidewall Labeling . . . . . . . . . . . . . 254
Te r m i n o l o g y a n d D e f i n i t i o n s . . 2 5 7
Uniform Tire Quality
Grading . . . . . . . . . . . . . . . . . . . . . 270
Wheel Alignment and Tire
Balance . . . . . . . . . . . . . . . . . . . . . 271
Wheel Replacement . . . . . . . . . . 271
When It Is Time for New
Tires . . . . . . . . . . . . . . . . . . . . . . . . 267
Winter . . . . . . . . . . . . . . . . . . . . . . . . 253
To w / H a u l M o d e . . . . . . . . . . . . . . . . . 1 8 7