CHEVROLET EXPRESS CARGO VAN 2017 1.G Owners Manual
Manufacturer: CHEVROLET, Model Year: 2017, Model line: EXPRESS CARGO VAN, Model: CHEVROLET EXPRESS CARGO VAN 2017 1.GPages: 346, PDF Size: 6.54 MB
Page 211 of 346
Chevrolet Express Owner Manual (GMNA-Localizing-U.S./Canada/Mexico-9967827) - 2017 - crc - 5/6/16
210 Driving and Operating
the driver door, or seeVehicle LoadLimits0171.Makesurenottogoover the GVW limit for the vehicle,or the GAWR, including the weightof the trailer tongue. If using aweight distributing hitch, make surenot to go over the rear axle limitbefore applying the weightdistribution spring bars.
Towing Equipment
Hitches
The correct hitch equipment helpsmaintain combination control. Manytrailers can be towed with aweight-carrying hitch which simplyfeatures a coupler latched to thehitch ball, or a tow eye latched to apintle hook. Other trailers mayrequire a weight-distributing hitchthat uses spring bars to distributethe trailer tongue weight among thetwo vehicle and trailer axles. See“Weight of the Trailer Tongue”underTr a i l e r To w i n g0205for rating limitswith various hitch types.
Consider using sway controls withany trailer. Ask a traileringprofessional about sway controls orrefer to the trailer manufacturer'srecommendations and instructions.
Weight-Distributing Hitches
and Weight Carrying Hitches
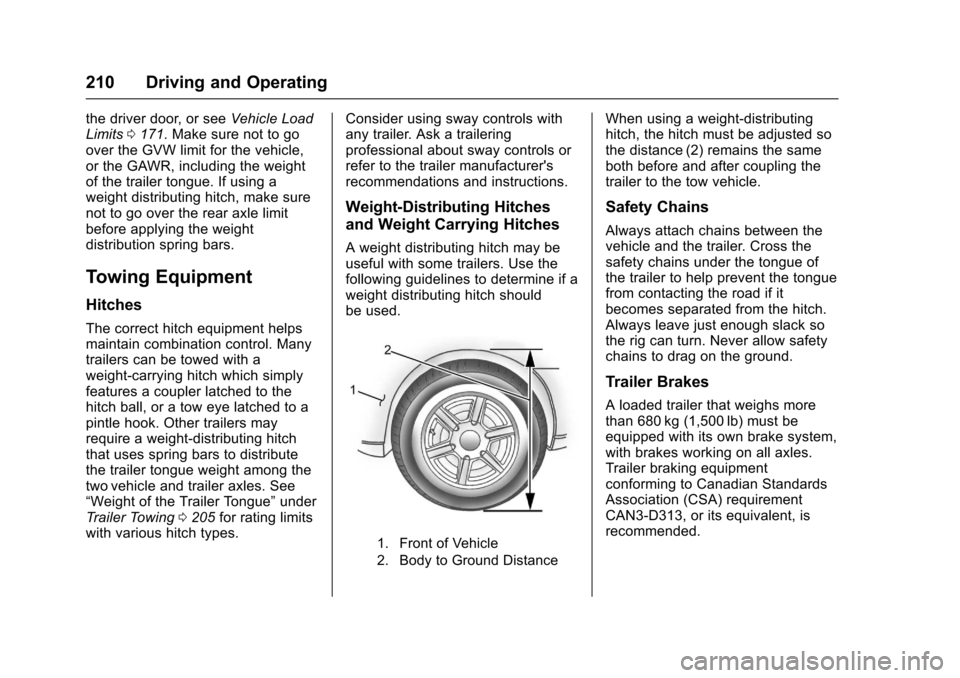
Aweightdistributinghitchmaybeuseful with some trailers. Use thefollowing guidelines to determine if aweight distributing hitch shouldbe used.
1. Front of Vehicle
2. Body to Ground Distance
When using a weight-distributinghitch, the hitch must be adjusted sothe distance (2) remains the sameboth before and after coupling thetrailer to the tow vehicle.
Safety Chains
Always attach chains between thevehicle and the trailer. Cross thesafety chains under the tongue ofthe trailer to help prevent the tonguefrom contacting the road if itbecomes separated from the hitch.Always leave just enough slack sothe rig can turn. Never allow safetychains to drag on the ground.
Trailer Brakes
Aloadedtrailerthatweighsmorethan 680 kg (1,500 lb) must beequipped with its own brake system,with brakes working on all axles.Trailer braking equipmentconforming to Canadian StandardsAssociation (CSA) requirementCAN3-D313, or its equivalent, isrecommended.
Page 212 of 346
Chevrolet Express Owner Manual (GMNA-Localizing-U.S./Canada/Mexico-9967827) - 2017 - crc - 5/6/16
Driving and Operating 211
State and local regulations may alsorequire the trailer to have its ownbraking system if loaded above acertain threshold.
Be sure to read and follow theinstructions for the trailer brakes sothey are installed, adjusted, andmaintained properly.
Do not tap into the vehicle'shydraulic brake system.
Trailer Wiring Harness
The optional heavy-duty trailerwiring package includes a wiringharness, with a seven-pin connectorat the rear of the vehicle and afour-wire harness assembly underthe driver side of the instrumentpanel. The four-wire harnessassembly comes without aconnector.
If the vehicle does not have a trailerhitch, the seven-wire harnessassembly with connector is tapedtogether and located in a framepocket at the driver side rear leftcorner of the frame.
If the vehicle has a trailer hitch, theseven-wire harness assembly withconnector is attached to a bracketon the hitch platform. In both cases,the seven-wire harness has aconnector and includes a 30-ampfeed wire.
Use only a round, seven-wireconnector with flat blade terminalsmeeting SAE J2863 specificationsfor proper electrical connectivity.
The seven-wire harness connectorcontains the following trailer circuits:
.Light Green: Back-up Lamps(10A fuse)**
.White: Ground
.Dark Blue: Trailer Brake Signal
.Dark Green: Right Rear Stopand Turn Signal*
.Red/Black Stripe: Battery Feed(30A Fuse)
.Brown: Trailer Park LampSupply Voltage (15A fuse)**
.Ye l l o w : L e f t R e a r S t o p a n d Tu r nSignal *
The four-wire harness (withoutconnector) contains the followingcircuits:
.Black: Ground
.Red/White: Battery Feed
.Dark Blue: Trailer Brake Signal
.Light Blue: CHMSL/StoplampSupply Voltage
*Ifthevehicleisacutawaywithtrailer provisions, a 15 amp fuse willbe shared for both left/stop trailerturn and right/stop trailer turnsignals. However, the cutawaylighting connector will have a10 amp fuse for each signal.
** If the vehicle is a cutaway withtrailer provisions, a 15 amp fuse willbe shared for trailer park lamps andcutaway rear lighting connector parklamps. Also, a 10 amp fuse will beshared for trailer back-up lamps andcutaway rear lighting connectorback-up lamps.
Tow/Haul Mode
This button is on the instrumentpanel, to the right of the steeringwheel.
Page 213 of 346
Chevrolet Express Owner Manual (GMNA-Localizing-U.S./Canada/Mexico-9967827) - 2017 - crc - 5/6/16
212 Driving and Operating
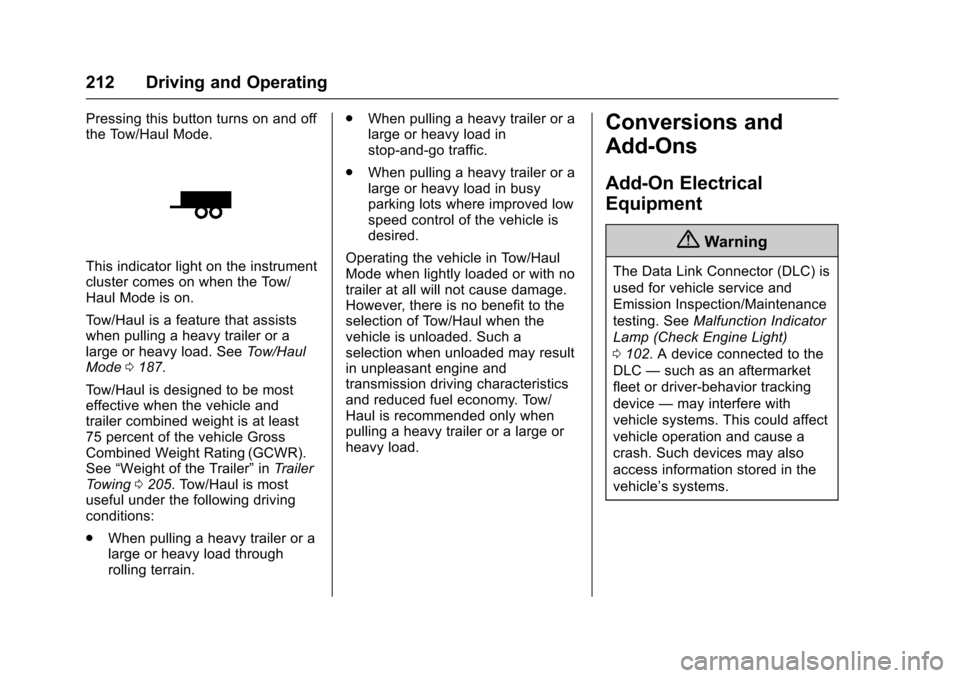
Pressing this button turns on and offthe Tow/Haul Mode.
This indicator light on the instrumentcluster comes on when the Tow/Haul Mode is on.
To w / H a u l i s a f e a t u r e t h a t a s s i s t swhen pulling a heavy trailer or alarge or heavy load. SeeTo w / H a u lMode0187.
To w / H a u l i s d e s i g n e d t o b e m o s teffective when the vehicle andtrailer combined weight is at least75 percent of the vehicle GrossCombined Weight Rating (GCWR).See“Weight of the Trailer”inTr a i l e rTo w i n g0205.Tow/Haulismostuseful under the following drivingconditions:
.When pulling a heavy trailer or alarge or heavy load throughrolling terrain.
.When pulling a heavy trailer or alarge or heavy load instop-and-go traffic.
.When pulling a heavy trailer or alarge or heavy load in busyparking lots where improved lowspeed control of the vehicle isdesired.
Operating the vehicle in Tow/HaulMode when lightly loaded or with notrailer at all will not cause damage.However, there is no benefit to theselection of Tow/Haul when thevehicle is unloaded. Such aselection when unloaded may resultin unpleasant engine andtransmission driving characteristicsand reduced fuel economy. Tow/Haul is recommended only whenpulling a heavy trailer or a large orheavy load.
Conversions and
Add-Ons
Add-On Electrical
Equipment
{Warning
The Data Link Connector (DLC) is
used for vehicle service and
Emission Inspection/Maintenance
testing. SeeMalfunction Indicator
Lamp (Check Engine Light)
0102.Adeviceconnectedtothe
DLC—such as an aftermarket
fleet or driver-behavior tracking
device—may interfere with
vehicle systems. This could affect
vehicle operation and cause a
crash. Such devices may also
access information stored in the
vehicle’ssystems.
Page 214 of 346
Chevrolet Express Owner Manual (GMNA-Localizing-U.S./Canada/Mexico-9967827) - 2017 - crc - 5/6/16
Driving and Operating 213
Caution
Some electrical equipment can
damage the vehicle or cause
components to not work and
would not be covered by the
vehicle warranty. Always check
with your dealer before adding
electrical equipment.
Add-on equipment can drain thevehicle's 12-volt battery, even if thevehicle is not operating.
The vehicle has an airbag system.Before attempting to add anythingelectrical to the vehicle, seeServicing the Airbag-EquippedVehicle065andAdding Equipmentto the Airbag-EquippedVehicle065.
Page 215 of 346
Chevrolet Express Owner Manual (GMNA-Localizing-U.S./Canada/Mexico-9967827) - 2017 - crc - 5/2/16
214 Vehicle Care
Vehicle Care
General Information
General Information . . . . . . . . . . 215California Proposition65 Warning . . . . . . . . . . . . . . . . . 215California PerchlorateMaterials Requirements . . . . . 215Accessories andModifications . . . . . . . . . . . . . . . . 216
Vehicle Checks
Doing Your OwnService Work . . . . . . . . . . . . . . . 216Hood . . . . . . . . . . . . . . . . . . . . . . . . . 217Engine CompartmentOverview . . . . . . . . . . . . . . . . . . . . 218Engine Oil . . . . . . . . . . . . . . . . . . . . 219Engine Oil Life System . . . . . . . 221Automatic TransmissionFluid . . . . . . . . . . . . . . . . . . . . . . . . 222Engine Air Cleaner/Filter . . . . . . 225Cooling System . . . . . . . . . . . . . . 226Engine Coolant . . . . . . . . . . . . . . . 227Engine Overheating . . . . . . . . . . 230Engine Fan . . . . . . . . . . . . . . . . . . . 231Power Steering Fluid . . . . . . . . . 232Washer Fluid . . . . . . . . . . . . . . . . . 233Brakes . . . . . . . . . . . . . . . . . . . . . . . 233Brake Fluid . . . . . . . . . . . . . . . . . . . 234
Battery - North America . . . . . . 236Rear Axle . . . . . . . . . . . . . . . . . . . . 236Noise Control System . . . . . . . . 237Starter Switch Check . . . . . . . . . 238Automatic Transmission ShiftLock Control FunctionCheck . . . . . . . . . . . . . . . . . . . . . . . 238Ignition Transmission LockCheck . . . . . . . . . . . . . . . . . . . . . . . 239Park Brake and P (Park)Mechanism Check . . . . . . . . . . 239Wiper Blade Replacement . . . . 239
Headlamp Aiming
Headlamp Aiming . . . . . . . . . . . . 240
Bulb Replacement
Bulb Replacement . . . . . . . . . . . . 240Halogen Bulbs . . . . . . . . . . . . . . . . 240Headlamps . . . . . . . . . . . . . . . . . . . 241Front Turn Signal, Sidemarker,and Parking Lamps . . . . . . . . . 242Ta i l l a m p s . . . . . . . . . . . . . . . . . . . . . 2 4 3Center High-MountedStoplamp (CHMSL) . . . . . . . . . 244License Plate Lamp . . . . . . . . . . 244Replacement Bulbs . . . . . . . . . . . 245
Electrical System
Electrical System Overload . . . 245Fuses and Circuit Breakers . . . 246
Engine Compartment FuseBlock . . . . . . . . . . . . . . . . . . . . . . . . 246Floor Console Fuse Block . . . . 249
Wheels and Tires
Tires . . . . . . . . . . . . . . . . . . . . . . . . . . 252All-Season Tires . . . . . . . . . . . . . . 253Winter Tires . . . . . . . . . . . . . . . . . . 253All-Terrain Tires . . . . . . . . . . . . . . . 253Tire Sidewall Labeling . . . . . . . . 254Tire Designations . . . . . . . . . . . . . 256Tire Terminology andDefinitions . . . . . . . . . . . . . . . . . . 257Tire Pressure . . . . . . . . . . . . . . . . . 260Tire Pressure MonitorSystem . . . . . . . . . . . . . . . . . . . . . . 261Tire Pressure MonitorOperation . . . . . . . . . . . . . . . . . . . 262Tire Inspection . . . . . . . . . . . . . . . . 265Tire Rotation . . . . . . . . . . . . . . . . . 265Dual Tire Rotation . . . . . . . . . . . . 266When It Is Time for NewTires . . . . . . . . . . . . . . . . . . . . . . . . 267Buying New Tires . . . . . . . . . . . . . 268Different Size Tires andWheels . . . . . . . . . . . . . . . . . . . . . . 269Uniform Tire QualityGrading . . . . . . . . . . . . . . . . . . . . . 270Wheel Alignment and TireBalance . . . . . . . . . . . . . . . . . . . . . 271Wheel Replacement . . . . . . . . . . 271
Page 216 of 346
Chevrolet Express Owner Manual (GMNA-Localizing-U.S./Canada/Mexico-9967827) - 2017 - crc - 5/2/16
Vehicle Care 215
Tire Chains . . . . . . . . . . . . . . . . . . . 272If a Tire Goes Flat . . . . . . . . . . . . 273Tire Changing . . . . . . . . . . . . . . . . 274Full-Size Spare Tire . . . . . . . . . . 282
Jump Starting
Jump Starting - NorthAmerica . . . . . . . . . . . . . . . . . . . . . 282
Towing the Vehicle
To w i n g t h e V e h i c l e . . . . . . . . . . . 2 8 6Recreational VehicleTo w i n g . . . . . . . . . . . . . . . . . . . . . . 2 8 6
Appearance Care
Exterior Care . . . . . . . . . . . . . . . . . 288Interior Care . . . . . . . . . . . . . . . . . . 292Floor Mats . . . . . . . . . . . . . . . . . . . . 295
General Information
For service and parts needs, visityour dealer. You will receivegenuine GM parts and GM-trainedand supported service people.
Genuine GM parts have one ofthese marks:
California Proposition
65 Warning
WARNING:Most motor vehicles,including this one, as well as manyof its service parts and fluids,contain and/or emit chemicalsknown to the State of California to
cause cancer and birth defects orother reproductive harm. Engineexhaust, many parts and systems,many fluids, and some componentwear by-products contain and/oremit these chemicals.
SeeBattery - North America0236andJump Starting - NorthAmerica0282.
California Perchlorate
Materials Requirements
Certain types of automotiveapplications, such as airbaginitiators, safety belt pretensioners,and lithium batteries contained inRemote Keyless Entry transmitters,may contain perchlorate materials.Special handling may be necessary.For additional information, seewww.dtsc.ca.gov/hazardouswaste/perchlorate.
Page 217 of 346
Chevrolet Express Owner Manual (GMNA-Localizing-U.S./Canada/Mexico-9967827) - 2017 - crc - 5/2/16
216 Vehicle Care
Accessories and
Modifications
Adding non-dealer accessories ormaking modifications to the vehiclecan affect vehicle performance andsafety, including such things asairbags, braking, stability, ride andhandling, emissions systems,aerodynamics, durability, andelectronic systems like antilockbrakes, traction control, and stabilitycontrol. These accessories ormodifications could even causemalfunction or damage not coveredby the vehicle warranty.
Damage to suspension componentscaused by modifying vehicle heightoutside of factory settings will not becovered by the vehicle warranty.
Damage to vehicle componentsresulting from modifications or theinstallation or use of non-GMcertified parts, including controlmodule or software modifications, isnot covered under the terms of thevehicle warranty and may affectremaining warranty coverage foraffected parts.
GM Accessories are designed tocomplement and function with othersystems on the vehicle. See yourdealer to accessorize the vehicleusing genuine GM Accessoriesinstalled by a dealer technician.
Also, seeAdding Equipment to theAirbag-Equipped Vehicle065.
Vehicle Checks
Doing Your Own
Service Work
{Warning
It can be dangerous to work on
your vehicle if you do not have
the proper knowledge, service
manual, tools, or parts. Always
follow owner manual procedures
and consult the service manual
for your vehicle before doing any
service work.
If doing some of your own servicework, use the proper servicemanual. It tells you much moreabout how to service the vehiclethan this manual can. To order theproper service manual, seeServicePublications OrderingInformation0321.
This vehicle has an airbag system.Before attempting to do your ownservice work, seeServicing theAirbag-Equipped Vehicle065.
Page 218 of 346
Chevrolet Express Owner Manual (GMNA-Localizing-U.S./Canada/Mexico-9967827) - 2017 - crc - 5/2/16
Vehicle Care 217
Keep a record with all parts receiptsand list the mileage and the date ofany service work performed. SeeMaintenance Records0307.
Caution
Even small amounts of
contamination can cause damage
to vehicle systems. Do not allow
contaminants to contact the fluids,
reservoir caps, or dipsticks.
Hood
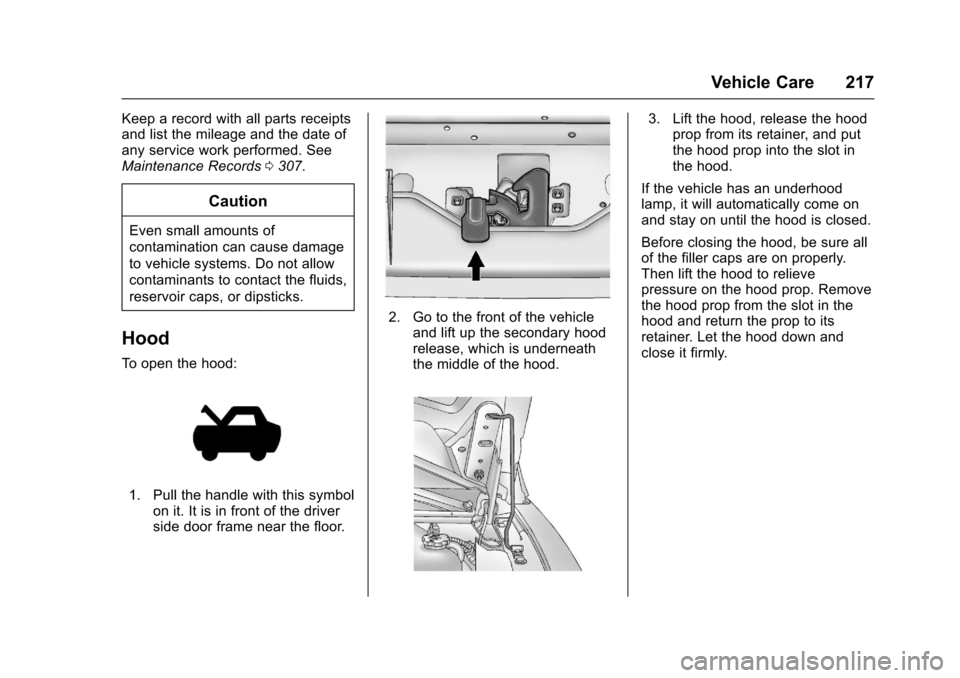
To o p e n t h e h o o d :
1. Pull the handle with this symbolon it. It is in front of the driverside door frame near the floor.
2. Go to the front of the vehicleand lift up the secondary hoodrelease, which is underneaththe middle of the hood.
3. Lift the hood, release the hoodprop from its retainer, and putthe hood prop into the slot inthe hood.
If the vehicle has an underhoodlamp, it will automatically come onand stay on until the hood is closed.
Before closing the hood, be sure allof the filler caps are on properly.Then lift the hood to relievepressure on the hood prop. Removethe hood prop from the slot in thehood and return the prop to itsretainer. Let the hood down andclose it firmly.
Page 219 of 346
Chevrolet Express Owner Manual (GMNA-Localizing-U.S./Canada/Mexico-9967827) - 2017 - crc - 5/2/16
218 Vehicle Care
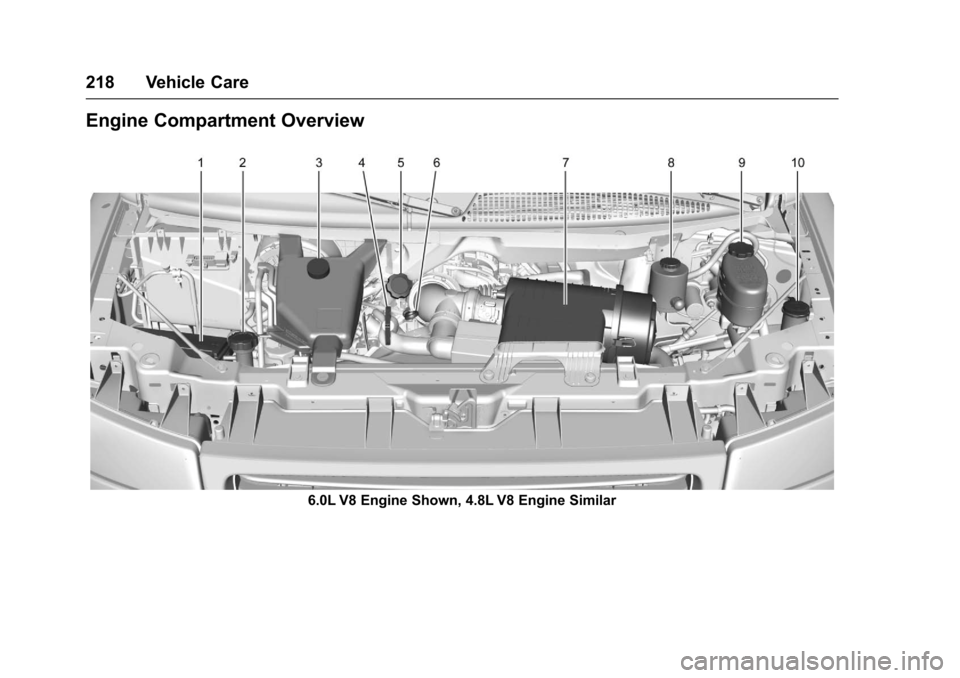
Engine Compartment Overview
6.0L V8 Engine Shown, 4.8L V8 Engine Similar
Page 220 of 346
Chevrolet Express Owner Manual (GMNA-Localizing-U.S./Canada/Mexico-9967827) - 2017 - crc - 5/2/16
Vehicle Care 219
1.Battery - North America0236.
2. Radiator Pressure Cap. SeeCooling System0226.
3. Coolant Recovery Tank. SeeCooling System0226.
4. Automatic Transmission FluidDipstick. See“Checking theFluid Level”underAutomaticTr a n s m i s s i o n F l u i d0222.
5. Engine Oil Fill Cap. See“Whento Add Engine Oil”underEngine Oil0219.
6. Engine Oil Dipstick. See“Checking Engine Oil”underEngine Oil0219.
7.Engine Air Cleaner/Filter0225.
8. Power Steering FluidReservoir. SeePower SteeringFluid0232.
9. Brake Master CylinderReservoir. SeeBrakeFluid0234.
10. Windshield Washer FluidReservoir. See“Adding WasherFluid”underWasherFluid0233.
Engine Oil
For diesel engine vehicles, see“Engine Oil”in the Duramax dieselsupplement.
To e n s u r e p r o p e r e n g i n eperformance and long life, carefulattention must be paid to engine oil.Following these simple, butimportant steps will help protectyour investment:
.Use engine oil approved to theproper specification and of theproper viscosity grade. See“Selecting the Right Engine Oil”in this section.
.Check the engine oil levelregularly and maintain theproper oil level. See“CheckingEngine Oil”and“When to AddEngine Oil”in this section.
.Change the engine oil at theappropriate time. SeeEngine OilLife System0221.
.Always dispose of engine oilproperly. See“What to Do withUsed Oil”in this section.
Checking Engine Oil
Check the engine oil level regularly(every 650 km (400 mi), especiallyprior to a long trip. The engine oildipstick handle is a loop. SeeEngine Compartment Overview0218for the location.
{Warning
The engine oil dipstick handle
may be hot; it could burn you.
Use a towel or glove to touch the
dipstick handle.
If a low oil Driver Information Center(DIC) message displays, check theoil level.
Follow these guidelines:
.To g e t a n a c c u r a t e r e a d i n g , p a r kthe vehicle on level ground.Check the engine oil level afterthe engine has been off for atleast two hours. Checking theengine oil level on steep gradesor too soon after engine shutoffcan result in incorrect readings.Accuracy improves when